How to assign the owner of a lead?
Lead distribution includes the assignment of the lead owner, need clarification and the decision to nurture further or proceed to handoff.
This step is optional and may be performed at any lead stage, except the final stages (“Awaiting sale” and “Satisfied”).
As the owner assignment is not a mandatory action, after the qualification stage is complete the lead is transferred to the “Handoff to sales” stage. To assign an owner, you need to return to lead distribution by clicking the lead distribution stage on the workflow bar (located at the top of the lead page), or go to the History tab and specify the owner on the Lead distribution detail.
What is the purpose of “Continue nurturing”?
The decision to hand off a lead to sales or to continue the nurturing is made based on whether there is sufficient information to start the sale and whether the customer is ready for a deal. If the customer is not interested at the moment, but communication is still available and the possibility to close the opportunity exists, select the “Back to nurturing” task completion result.
During the nurturing, you can determine the further strategy of working with the lead: to clarify the customer need or to specify missing data.
As a result, the lead remains at the distribution stage, and you can continue working on it later. Otherwise, you'd have to select the "Not interested" stage and such a lead would become unavailable for further work.
What is the difference between the lead source and lead channel?
Lead channels are resources involved to attract leads, for example, search engines, email, social networks, media resources, etc. A lead source is a specific resource from which a lead is transferred into Creatio, for example, the Google search engine, email, Facebook, etc.
What is the difference between the [Account] and [Account name] fields on the lead page?
The account information can be found in two places:
-
On the Registration info detail of the Lead info tab. The fields on the details are populated automatically when you add a new lead to Creatio and only with the data that the user provided during registration on the landing page. If a user has not entered the company name on the landing page, then the Account field on the Registration information detail will be blank.
-
The account profile is located on the left side of the lead page. This interface enables you to register a new company or to associate an existing account with the lead based on registration data from the Initial data tab. If a user has specified the company name registered in the Accounts section, Creatio will pull in the profile information for the account and enable you to associate it with the lead.
What is the logic of automatic contact creation?
A contact is added automatically when creating a new lead via landing page if the Create contact checkbox is enabled.
When adding a new lead manually:
-
If the lead is added for an existing contact, this contact will be specified in the corresponding profile on the lead page and you can connect the lead and contact records via the Select from similar option.
-
If the contact specified in the lead mini page does not exist, it will be added automatically after clicking the Qualify button.
What data from the lead page are passed to the contact page?
When a contact is created automatically, all basic information about the contact (name, communication options) is passed to the contact page from the lead page.
How does the contact and account search work when qualifying a lead?
The Name and Company fields are standard fields in the web form on the landing page. Information from these fields will be used to populate the Contact name and Account name fields on the Lead info tab.
Contact and account profiles are located in the left part of the lead page. These blocks contain general information about contact and account connected with the lead. If a contact or account are similar to the existing ones, the existing contact or account can be connected with the lead page via the Select from similar option. (Fig. 1):
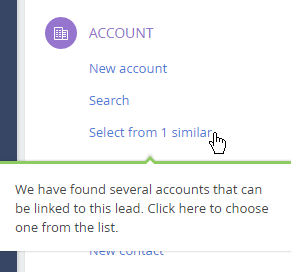
Conditions that enable selecting from similar contacts and accounts are described below.
Similar contact:
-
Values of the Contact name and Email fields on the lead page are equal to the Contact name and Email fields on the contact page.
-
Values of the Contact name and Mobile phone fields on the lead page are equal to the Contact name and Mobile phone fields on the contact page.
Similar account:
-
Value of the Account name field on the lead page is equal to the Account name field on the account page.
-
Values of the Account name and Country fields on the lead page are equal to the Account name and Country fields on the account page.
How to start the lead management process?
By qualifying the lead, you begin to work on the process. The lead management business process starts automatically after clicking the Qualify button and continues running as you work with a lead.
You can also customize the lead management business process according to your needs. To do this, create a new business process or copy an existing one and change it accordingly. Specify the name of the new process in the “Lead management business process” system setting. The details of the business process features are described process setup documentation.
How to disable a base sub-process?
To disable a base sub-process, copy an existing business process and give it a new name. Disable the required sub-process and specify the name of the new process in the “Lead management business process” system setting More ways of configuring and working with business processes are described in the process setup documentation.
How to change the standard lead management process? How do I add or modify process stages?
You can delete, change or add process stages, and change the list of activities in accordance with your needs.
To change the set of stages and transitions between them use the Lead stage and Available transitions between lead stages lookups.
To change the list of basic activities, which are created during the process execution, you need to replace the default process with a custom copy.
To do this:
-
Open the Process library section.
-
Find the default process that you want to change. The lead management process consists of several sub-processes, each referring to a particular stage. When searching for a subprocess, mind the name and the prefix. For example, if you need to change the “Qualification” stage of the lead management process in Financial Services Creatio, sales edition, look for a process called “Lead qualification v7.8.0(lead finance).”
-
Create a copy of the base lead management process by clicking the Copy button record in the process record.
-
Make the required changes in the copy. You can change the elements, remove elements or add new ones.
-
Save the edited copy and publish.
-
Specify the name of modified copy in the Value by default field of the “Lead management business process” system setting.
-
Go to the original version of the corporate sales process and disable it by clicking the Actions → Disable.
Detailed descriptions of business process management are available in the Creatio business process documentation.
After performing the settings, the system will use the custom lead management process.
How to search for duplicates?
The lead duplicate search helps to obtain information about customers with similar needs. You can delete duplicate leads manually, if needed. Leads that look like duplicates will be displayed on the Similar leads detail. Learn more in a separate article: Lead duplicate search.
How is the [Extended lead information] detail populated?
Creatio populates the detail automatically when LinkedIn integration is set up. The detail is populated using data of ad campaign, ad banner, and lead generation form that are connected to the lead.