This chapter covers a step-by-step procedure of setting up a typical approval case: a leave request in the Documents section.
- Each record with the “Approval” type is submitted for approval automatically, right after a new record is saved.
-
First, an HR employee must approve the request.
-
Once approved by the HR, the request is submitted for approval by the corresponding department manager.
-
Approvers will receive email notifications that a new record awaits their approval. The employees who submit requests for approval will receive email notifications about approval results.
-
If the approval has been denied by HR, the case transitions to the Preparation stage, at which the employee must revise the request. If the approval has been denied by the department manager, the case transitions to the Canceled stage.
-
If the request is approved by the department manager, the case transitions to the Completed stage.
-
The Completed and Canceled stages are final.
Set up the approval case as shown in Fig. 1.Fig. 1 – Case for leave request approval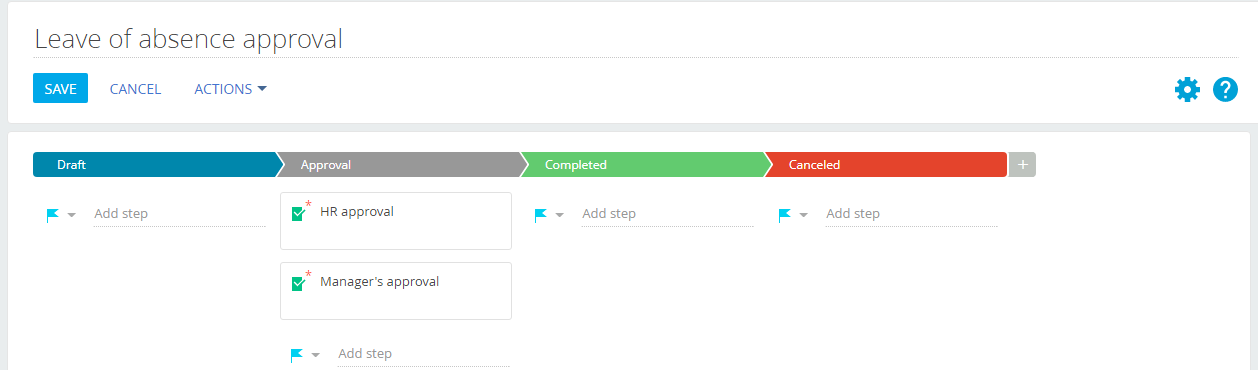
Set up the leave request approval case
-
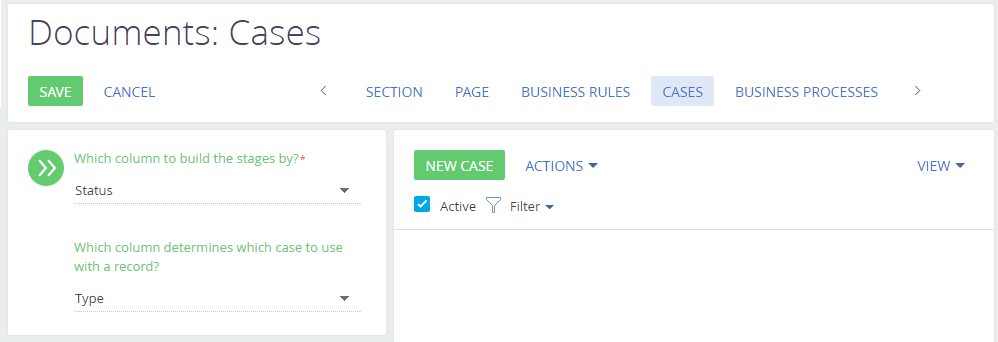
Click Click View → Set up section cases in the Documents section. The Case Designer will open (Fig. 2).
-
In the case list, select “Status” in the Which column to build the stages by? field. As a result, the case stages will be defined by the document status.
-
Select “Type” in the Which column determines which case to use with a record? field. As a result, the case will apply only to documents of a specific type (i.e., “Request”).
- Click the New case button to open the Case Designer. Here you will need to set up:
- Case parameters.
- Case sequence.
- Activities on each case stage.
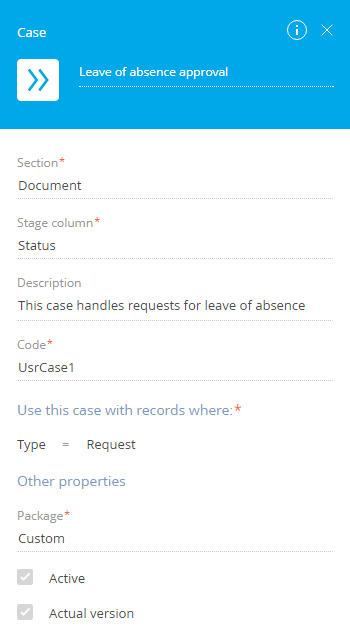
Set up case parameters.
The case parameters are set up in the case setup area (Fig. 3).
-
Click
 to open case properties.
 -
Specify the case title (i.e., “Request processing”).
-
Optionally, populate the Description field with additional information for anyone who may edit this case.
-
In the Use this case with records where: area, click
 and select “Request.” As a result, the case will apply to all documents of the “Request” type.
 -
The Section, Stage column, Code, Package, Active, and Actual version fields will be populated automatically.
Set up case stages
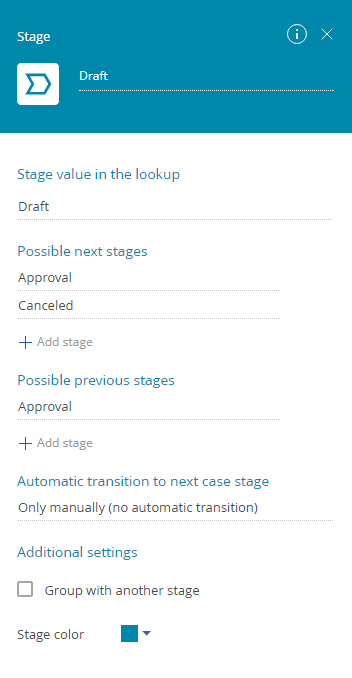
Use the stages panel to set up the case workflow. The leave request approval case will have 5 stages that correspond to the values in the Status field in the Documents section. Use the  button to add case stages: Draft, Approval, Completed, Canceled, and Archive. Set up stage properties and steps to complete at each stage. We will use the first stage as an example.
-
Click the first stage to open its setup area (Fig. 4).
-
Enter the name of the stage.
-
Select the corresponding document stage in the Stage value in the lookup
 field. You can add document stages directly from the Case Designer by typing in the new stage name. Make sure to save the case each time you add a new lookup value this way.
 -
All other case stages will be automatically added to the Possible next stages area. Remove all stages from the list, except for the Approval and Canceled stages.
-
All other case stages will be automatically added to the Possible previous stages area. Remove all stages, except for Approval from the list. If the approval is denied, the case will transition back to the Draft stage.
-
In the Automatic transition to the next case stage field, select “If required steps are completed.”
-
In the Additional settings area, select a color for this stage.
-
Leave the Group with another stage checkbox cleared. Grouped stages will display as one for the case user. Clicking a grouped stage will open a menu with all stages in the group. Note that this checkbox must be selected for the Canceled stage, which must be grouped with the Completed stage.
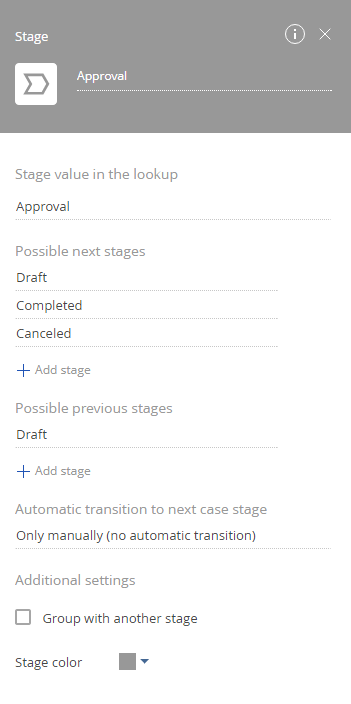
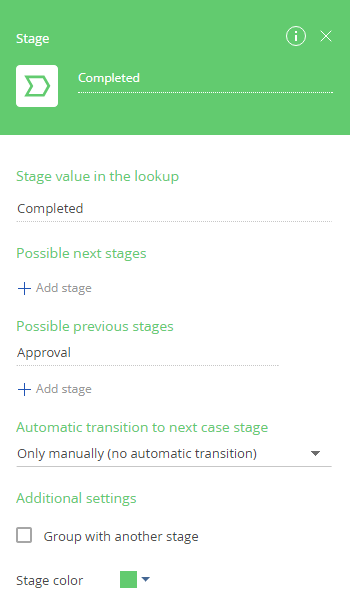
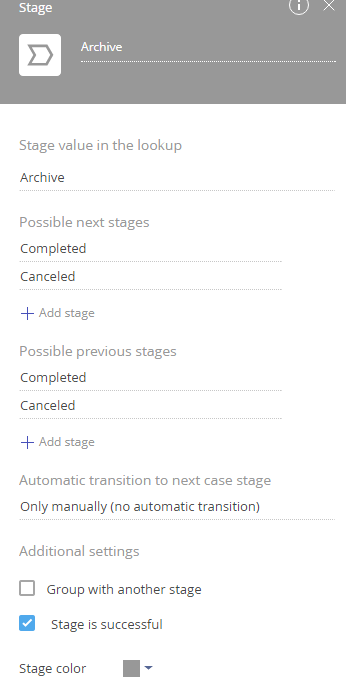
Set up other stage properties in a similar way: “Approval” (Fig. 5), “Completed” (Fig. 6), “Canceled” (Fig. 7), and “Archive” (Fig. 8).
 icon is displayed next to the
Set up case stage steps
Set up the steps of the Draft stage. To do this:
-
Click
 below the Draft stage in the Case Designer working area. Select the Open edit page element. As a result, the document page will open on the Draft stage.
 -
Enter the name of the new case element and press Enter. Click the added element to view its setup area.
-
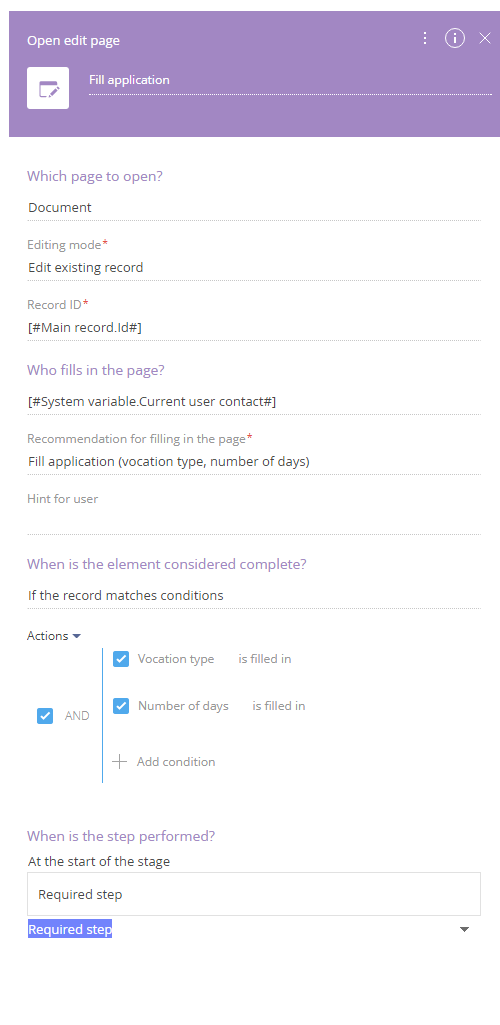
In the Which page to open?
 field, select “Document.“
 -
In the Editing mode field, select “Edit existing record.“ Record Id field will display below.
-
In the Record Id field, click
 and select “Main record column.” Choose the Id column. As a result, the case will open the document record for which the case instance is run.
 -
In the Who fills in the page? field, the current user contact is specified by default. Click
 to change this value, if needed.
 -
In the Recommendation for filling in the page field, list the actions that the user must perform on the opened document page, such as “Specify type of leave and exact dates.” This text will be displayed on the new document page.
-
In the Hint for user field, enter additional information for the user. For example, you can use this field to specify the maximum number of available vacation days or add a reminder to adjust the vacation with the head of the department before filling in the request.
-
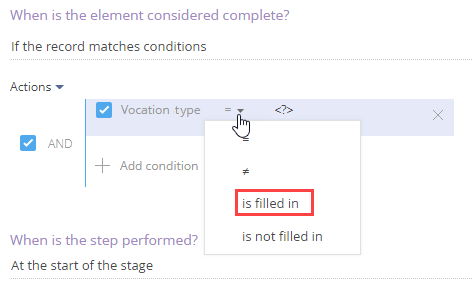
When is the element considered complete? – you can optionally select “If the record matches conditions” to consider the case element complete when the record matches required conditions (certain fields are filled, etc.).
-
Otherwise, leave “Immediately after saving the record” in the When is the element considered complete? field (Fig. 9). To do this:
-
Click the Add condition button and select the Vocation type column as required.
-
Select the Number of vacation days column as required.
-
-
The “At the start of the stage” value will be displayed by default in the When is the step performed? field. After the case transition to the Draft stage, the task for filling the application will be created. The task will be displayed on the application page which is processed by the case.
-
In the Step type field, specify the step as required.
As a result, the settings for the case element will look like this (Fig. 10):
Set up the sequence of stages
Set up the steps of the Approval stage.
-
Add a new Approval case element on the Case Designer working area. Enter the name of the new case element (i.e., “HR approval”) and press Enter. Populate the case element parameters.
-
In the When is the step performed? field the “At the start of the stage” value will be displayed by default.
-
In the Step type field, specify the step as required.
-
The “Approval required” value will automatically display In the Approval purpose field. If needed, modify the value in the Approval purpose field.
-
The value in the Approval section field should be “Documents” (the section, for which the case is being set up). This will be set by default if approvals are enabled in the Documents section.
-
The Record Id field will be set to the record for which the case is run.
-
In the Approver field, select “Role.”
-
In the Role field, select the “Lookup value” option and choose the value that corresponds to the HR department from the “Roles (view)” lookup. All employees in the selected role will be able to process this approval.
-
In the Send email notification area, configure automatic email notifications for the approvers and the document owner.
-
Select the Notify that approval is required checkbox.
-
In the Email template field, click
 and select an email template from the Email message template lookup.
 -
Select the Notify about the approval result checkbox.
-
In the Recipient field, click the
 button and select the “Main record column” option. In the opened Select column window, click + and select the Owner column. In the appeared Column field, select the Email column of the document owner’s contact record and click Select. The value in the Recipient field should now be “#Main record.Owner.Email#.”
 -
In the Email template field, click
 and select an email template from the Email message template lookup.
-
-
Select the Ignore errors on sending checkbox.
-
In the Change stage after element is completed area, set the following condition: If result – “Negative”; Set stage to – “Draft.”
As a result, the settings for the case element will look like this (Fig. 11):
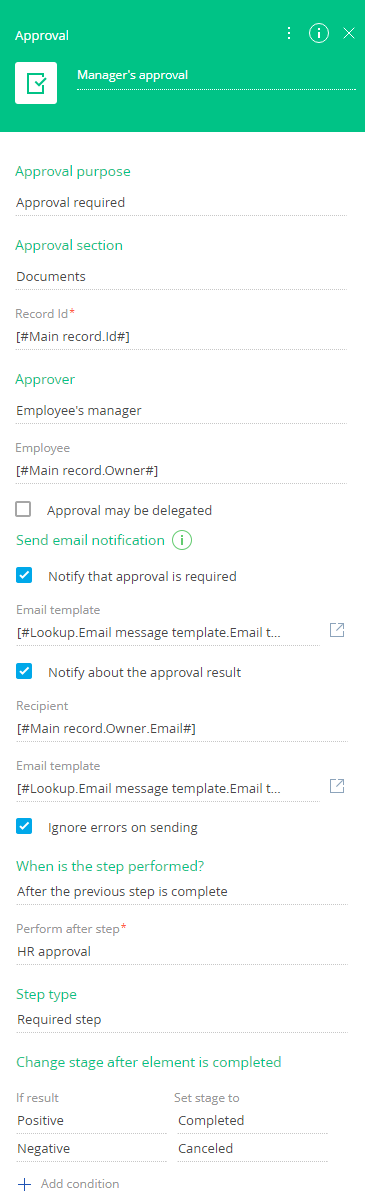
- Add another Approval element to the Approval stage. Enter the name of the new case element (i.e., “Manager’s approval”) and press Enter. The properties of this case element will be the same as the ones of the “HR approval” element, except for the values in the When is the step performed?, Approver and Change stage after element is completed properties.
-
In the When is the step performed? field, select “After the previous step is complete.”
-
In the Perform after step field, select “HR approval” (if the “HR approval” is the only preceding element, it will be selected by default).
-
In the Approver field, select “Employee's manager.”
-
In the Employee field, click
 and select “Main record column.” In the opened window, select the needed column of the Creatio object, specified in the Macro source field. As a result, whoever is specified as the manager of the employee submitting a leave request, will have to approve it.
 -
In the Change stage after element is completed area, set up the following stage transitions:
-
If result – “Positive”; Set stage to – “Completed.” As a result, if the request is denied by the employee’s manager, the case transitions to the Canceled stage.
-
Click
 and add another condition: If result – “Positive”; Set stage to – “Completed.” As a result, if the request is approved by the employee’s manager, the case transitions to the Completed stage.
The remaining properties of the “Manager’s approval” case element match those of the “HR approval” element. As a result, the settings for the case element will look like this (Fig. 12):
-
-
 button in the
  in the right part of the field to add a new email template. Learn more about creating an email template in the “
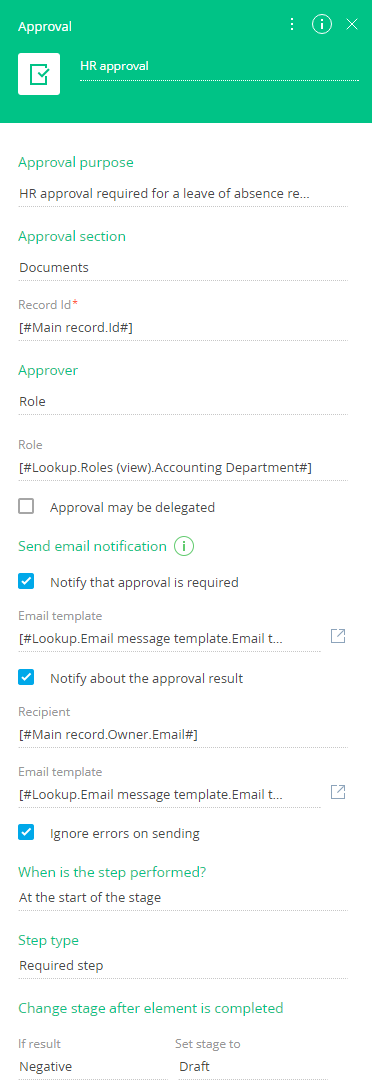
Fig. 12 – “Manager’s approval” case element setup area
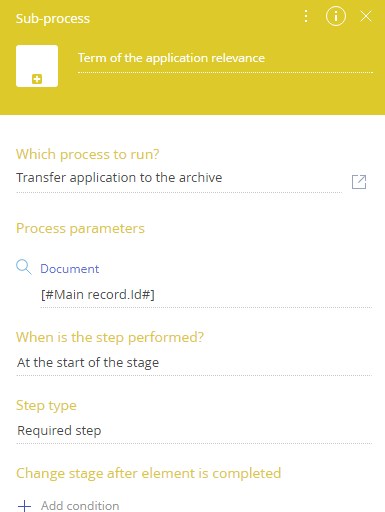
At the Completed case stage, set up a timer before the document status is changed to “Archive.”
-
Add a new Subprocess case element on the Case Designer working area on the Completed stage. Enter the name as “Term of the application relevance” (Fig. 13).
-
In the Which process to run? field, click and select the application activation business process. If the business process is disabled in the list, click the
 button to add it.
A Diagram of the business process of transfer application to the archive is provided in Fig. 14.
The Simple start event and Wait for timer process elements – the process will start after 15 seconds after transitioning the case to the Completed stage.
The Modify data element will change the status of the completed to “Archive.”
Fig. 13 – Business process diagram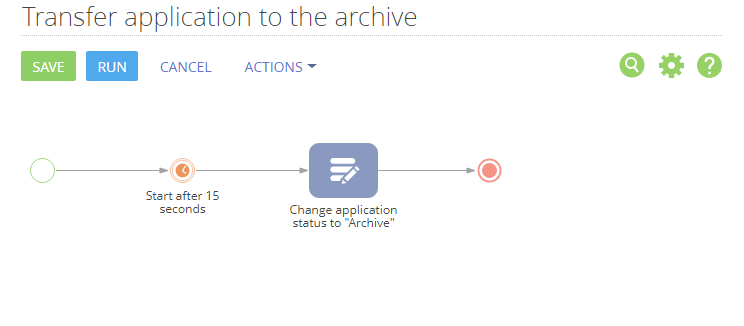
To transfer the application by which the case is running, you should set up the transfer of the main record parameter from the case to the process. In our case, the main record is a document and the parameter which getting is to be configured is the document ID. Perform configuration in the Process Designer if the pass of the parameter is not set up. To do this:
- Open the designer of the process of transfer the application to the archive by clicking the
 button at the Which process to run field.
 - Double click on the designer workspace to display the edit page of the process parameters.
- Click the Add parameter button on the Parameters tab.
- Select the “Lookup” in the list of the parameter types and specify the “Document” value in the Lookup field.
- Save the changes.
- Open the designer of the process of transfer the application to the archive by clicking the
-
Return to the Case Designer to the configuration of the “The term of the application relevance” element properties. After you specify the process in the Which process to run field the parameter described above will be displayed in the Process parameters area.
-
The “At the start of the stage” value will be displayed by default in the When is the step performed? field.
-
The “Optional step” will be displayed in the Step type field. You can make it required, if necessary.
-
Save all changes made in the Case Designer.
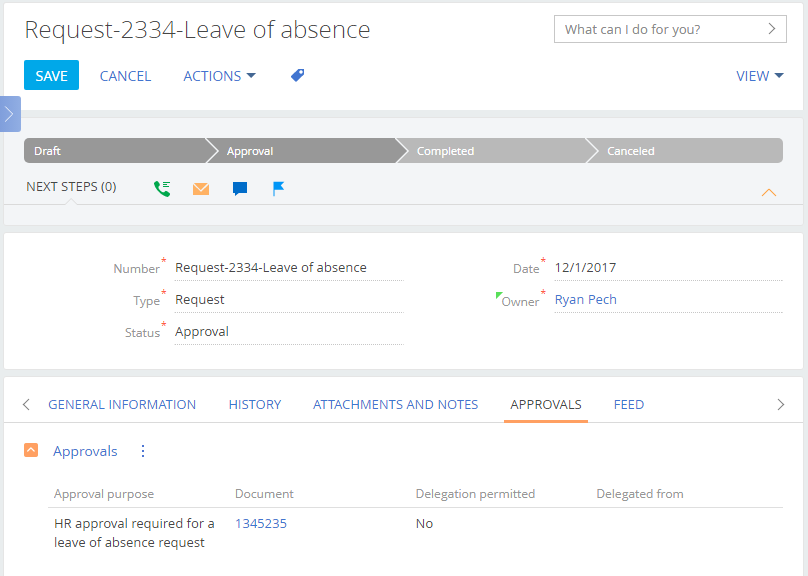
Configuration results
As a result, all documents of the “Request” type will be processed according to the “Leave of absence approval” case (Fig. 15). As soon as an employee who created a request clicks the Approval stage, the document is submitted for approval to HR. If HR denies the approval, the document status is set back to “Draft.” If HR approves the document, it is submitted for the employee's manager's approval. If the manager denies the approval, the document status is set to “Canceled.” If the manager approves the request, the document status is set to “Completed.”