
The package file content comprises files (*.js, *.css, images, etc.) added to custom Creatio packages. Since the file content is static, the webserver does not process it. This helps to improve Creatio performance.
The types of file content:
- Client content generated in real time.
- Pre-generated client content.
Special aspects of client content generated in real time:
- The pre-generation of client content is not needed.
- The calculation of package and schema hierarchy, as well as the generation of content, put a load on the CPU.
- The retrieval of package and schema hierarchy, as well as the generation of content, put a load on the database.
- The caching of client content takes up memory.
Special aspects of pre-generated client content:
- The load on the CPU is minimal.
- The pre-generation of client content is required.
- The database queries are not needed.
- The IIS tools cache the client content.
Storage structure of package file content
File content is an integral part of the package. You can pre-generate the file content in the dedicated ...\Terrasoft.WebApp\Terrasoft.Configuration\Pkg\<PackageName>\Files Creatio directory to improve Creatio performance and reduce the load on the database. If the IIS server receives a request, it will search for requested content in this directory and send the content to Creatio immediately. You can add any files to the package, however, Creatio will use only the files required for its client part.
We recommend structuring the Files directory as below.
js – the directory with JavaScript *.js source code files
css – the directory with *.css style files
less – the directory with *.less style files
Img – the directory with images
res – the directory with resource files
descriptor.json – the file content descriptor that stores the information about package bootstrap files
View the descriptor.json file structure below.
To add file content to a package, place the file in the corresponding subdirectory of the Files package directory.
Package bootstrap files
Package bootstrap files are *.js files that handle the loading of client configuration logic. The file structure may vary.
Creatio loads bootstrap files asynchronously after loading the core, but before loading the configuration. Creatio generates _FileContentBootstraps.js auxiliary file in the static content directory to ensure the bootstrap files are loaded correctly. The auxiliary file contains information about bootstrap files of all packages.
File content versioning
Creatio generates _FileContentDescriptors.js auxiliary file in the static file content directory to ensure the file content versioning works correctly. The auxiliary file contains information about files in the file content of all packages, displayed as a “key-value” collection. Each key (filename) corresponds to a unique hash code. This ensures the browser will receive the up-to-date file version.
Auxiliary file generation
To generate auxiliary files (_FileContentBootstraps.js and FileContentDescriptors.js), execute the BuildConfiguration operation using the WorkspaceConsole utility.
| Parameter | Description |
|---|---|
| The name of the operation. Set the value to BuildConfiguration – the operation that compiles the configuration. | |
| Enables the static content. Set the value to false. | |
| Enables the package file content. Set the value to true. |
As a result, Creatio will generate _FileContentBootstraps.js and _FileContentDescriptors.js auxiliary files in the ...\Terrasoft.WebApp\conf\content static content directory.
Learn more about the parameters of the utility: WorkspaceConsole parameters.
Static file content pre-generation
Creatio generates the file content in the .\Terrasoft.WebApp\conf special directory. The directory contains *.js files with schema source code, *.css style files, *.js resource files of all Creatio cultures, as well as images.
The following events trigger static file content generation or re-generation:
- Saving a schema in the Client Schema Designer and Client Objects Designer.
- Saving in the Section Wizard and Detail Wizard.
- Installing and deleting applications via Marketplace and *.zip archive.
- Applying translations.
- Running Compile and Compile all actions in the Configuration section.
Run these actions after you delete schemas or packages from the Configuration section.
Run the Compile all action after you install or update a package from SVN version control system.
File content generation
To generate the file content, execute the BuildConfiguration operation using the WorkspaceConsole utility.
| Parameter | Description |
|---|---|
| The workspace name. Set to Default by default. | |
| The directory to which to generate the static content. | |
|
Path to the web application from which to read the information about the connection to the database. Optional. If you do not specify a value, Creatio will establish a connection to the database specified in the connection string of the Terrasoft.Tools.WorkspaceConsole.config file. If you specify a value, Creatio will establish the connection to the database from the ConnectionStrings.config file of the web application. |
|
|
Optional. Set to false by default. If you leave the value as is, Creatio will generate the file contents only for modified schemas. If you set the value to true, Creatio will generate the content for all schemas. |
Client content generation when adding a new culture
After you add new cultures in the Creatio UI, run the Compile all action in the Configuration section.
Retrieve the image URL
The browser requests images in the client part of Creatio with the URL specified in the src attribute of the img HTML element. Creatio generates this URL using the Terrasoft.ImagesUrlBuilder (imagurlbuilder.js) module with the getUrl(config) public method for retrieving the image URL. This method expects the config JavaScript configuration object that contains the parameters object in the params property. Creatio generates the image URL to add to the page based on this property.
schemaName – the schema name (string)
resourceItemName – the image name in Creatio (string)
Hash – the image hash (string)
resourceItemExtension – the image file extension. For example, “.png.”
View the example that generates the parameters configuration object needed to retrieve the static image URL below
Compatibility with the file system development mode
It is not possible to retrieve client content from pre-generated files in the file system development mode. To ensure the correct operation of the file system development mode, disable the retrieval of static client content from the file system. To disable this feature, set the UseStaticFileContent flag in the Web.config file to false.
Transfer changes between environments
File content is an integral part of the package. The content is stored in the version control system repository along with other package content. You can transfer the file content to another environment:
- We recommend using the SVN version control system to transfer changes to the development environment.
- We recommend using the export and import mechanism in Creatio IDE to transfer changes to pre-production and production environments.
1. Create a module with localizable resources
If you want to translate resources to other languages, we recommend using a separate module with localizable resources. Create the module using the built-in Creatio tools in the Configuration section.
2. Import the module with localizable resources
To access the module with localizable resources from the client module, import the module with localizable resources to the client module as a dependency.
i18n is a plug-in for an AMD loader (for example, RequireJS). Use it to load the localizable string resources. Download the plug-in source code from the GitHub repository.
1. Add the plug-in
Place the plug-in in the ..\Terrasoft.
Where MyPackage1 is the development directory of the MyPackage1 package.
2. Create a directory with localizable resources
Create the ..\MyPackage1\content\nls directory and place the *.js files with localizable resources there.
You can add one or more resource files. File names can be arbitrary. The files contain AMD modules, which, in turn, contain objects.
The structure of AMD module objects:
-
Root field.
The “root” field contains the “key-value” collection, where the “key” is the name of a localizable string and the “value” is the localizable string in the default language. The value will be used if the requested language is not supported.
-
Culture fields.
The field names must match the standard codes of supported cultures. For example, en-US, de-DE. The field values must be boolean: true means the culture is toggled on, false means the culture is toggled off.
View the ..\MyPackage1\content\js\nls\ContactSectionV2Resources.js file example below.
3. Create the culture directories
Create the culture directories in the ..\MyPackage1\content\nls directory. Set the code of the culture as the name of the directory where the relevant localization will be stored. For example, en-US, de-DE).
View the structure of the MyPackage1 directory with German and English cultures below.
4. Add files with localizable resources
Place the same set of *.js files with localizable resources in each localization directory as the set of files you placed in the ..\MyPackage1\content\nls root directory. The files contain AMD modules whose objects are “key-value” collections, where the “key” is the name of a localizable string and the “value” is a string in the language that matches the directory name (the culture code).
For example, if you support only German and English cultures, create two ContactSectionV2Resources.js files.
Since the translation of the “FileContentActionDescr2” string is not specified for the German culture, the “File content second action (Default)” default value will be used.
5. Modify the bootstrap.js file
To modify the bootstrap.js file:
- Connect the i18n plug-in by specifying its name as the i18n alias in the RequireJS path configuration and specifying the corresponding path to the plug-in in the paths property.
- Specify the user's current culture for the plug-in. To do this, assign the object with the i18n property to the config property of the RequireJS library's configuration object. In turn, assign the object with the locale property and the value retrieved from the Terrasoft.currentUserCultureName global variable (the code of the current culture) to the object with the i18n property.
- Set the corresponding aliases and paths in the RequireJS path configuration for each file with the localization resources. The alias must be a URL path relative to the nls directory.
6. Use the resources in a client module
To use the resources in a client module, specify the resource module with the “i18n!” prefix in the dependency array.
View an example that uses the FileContentActionDescr localizable string as the heading for a new action in the Contacts section below.
You can use languages that can be compiled to JavaScript when developing the file contents of the custom functionality. For example, TypeScript. Learn more about TypeScript in documentation.
1. Install TypeScript
One way to install TypeScript is to use the NPM package manager for Node.js.
To install TypeScript:
- Make sure your OS has the Node.js runtime environment.
- Run the following command at the Windows console:
2. Switch to the file system development mode
To set up Creatio for file system development:
- Enable the file system development mode.
Set the value of the fileDesignMode element's enabled attribute to true in the Web.config file in Creatio root directory.
- Disable the retrieval of static file content from the file system.
Set the UseStaticFileContent flag to false in the Web.config file in Creatio root directory.
Web.config - Compile Creatio.
Run the Compile all action in the Configuration section.

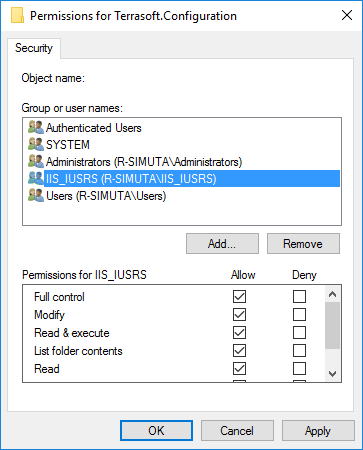
- Grant IIS access to the configuration directory.
To ensure Creatio works with the configuration project correctly, grant the OS user on whose behalf you run the IIS application pool full access to the [Path to Creatio]\Terrasoft.WebApp\Terrasoft.Configuration directory. Usually, this is a built-in IIS_IUSRS user.
Learn more about the file system development mode: External IDEs. Visual Studio.
3. Establish the structure of the file content storage
To establish the structure of the file content storage:
- Create the Files directory in the custom package downloaded to the file system.
- Create the src subdirectory in the Files directory.
- Create the js subdirectory in the src directory.
- Create the descriptor.json file in the Files directory.
- Create the bootstrap.js file in the Files\src\js directory.
4. Code the validation in TypeScript
To code the validation in TypeScript:
- Create the Validation.ts file in the Files\src\js directory and declare the StringValidator interface in the file.
- Create the LettersOnlyValidator.ts file in the Files\src\js directory. Declare the LettersOnlyValidator class that implements the StringValidator interface in the file.
5. Compile the TypeScript source code to JavaScript source code
To compile the TypeScript source code to JavaScript source code:
- Add the tsconfig.json configuration file to the Files\src\js directory to set up the compilation.
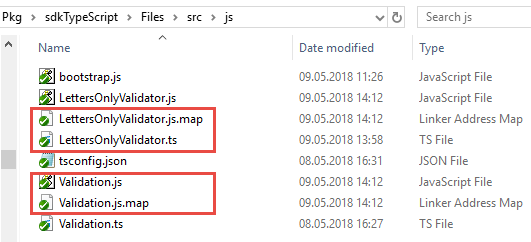
- Go to the Files\src\js directory via the Windows console and run the tsc command.
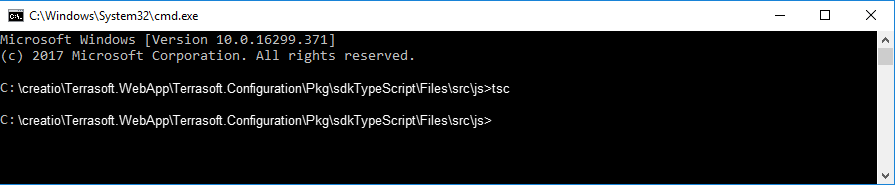
As a result, Windows will create the JavaScript version of the Validation.ts and LettersOnlyValidator.ts files, as well as the *.map files that streamline debugging in the browser, in the Files\src\js directory.
The contents of the automatically generated LettersOnlyValidator.js file to be used in Creatio.
6. Generate the auxiliary files
To generate the _FileContentBootstraps.js and FileContentDescriptors.js auxiliary files:
- Go to the Configuration section.
- Run the Update packages from file system action to upload packages from the file system.
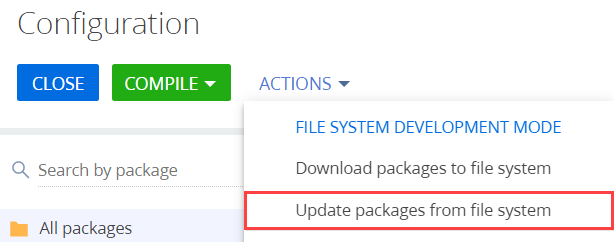
- Run the Compile all action to apply the changes to the bootstrap.js file.
7. Verify the example implementation results
To enable the validation:
- Go to the Configuration section.
- Run the Update packages from file system action to upload packages from the file system.
- Create the replacing view model schema for the account page.

- Run the Download packages to the file system action to download packages to the file system.
- Modify the ..\sdkTypeScript\Schemas\AccountPageV2\AccountPageV2.js file in the file system.
- Save the file with the schema source code and refresh the account page.
Creatio will validate the field and display the message with the validation results when you save the record.


Install Angular components in Creatio using the Angular Elements functionality. Angular Elements is an npm package that enables packing Angular components to Custom Elements and defining new HTML elements with standard behavior. Custom Elements is a part of the Web-Components standard.
Create a custom Angular component
1. Set up the Angular CLI development environment
To do this, install:
- Node.js® and npm package manager.
- Angular CLI.
To install Angular CLI, run the following command at the command prompt:
2. Create an Angular application
Run the ng new command at the command prompt and specify the application name. For example, angular-element-test.
3. Install the Angular Elements package
Go to the Creatio directory added on the previous step and run the following command at the command prompt.
4. Create an Angular component
To create a component, run the following command at the command prompt.
5. Register the component as a Custom Element
To transform the component into a custom HTML element, modify the app.module.ts file:
- Add the import of the createCustomElement module.
- Specify the component name in the entryComponents section of the module.
- Register the component under the HTML tag in the ngDoBootstrap method.
6. Build the application
-
Several *.js files will be generated as part of the project build. We recommend deploying the generated files as a single file to streamline the use of the web component. To do this, create the build.js script in the root of Angular project.
build.js exampleIf the web component uses the lodash library, merge main.js (as well as styles.js, if necessary) with the script that resolves lodash conflicts to ensure the library's compatibility with Creatio. To do this, create the tools directory and the lodash-fix.js file in the Angular project root.
lodash-fix.jsTo execute the build.js script, install the concat and fs-extra packages in the project as dev-dependency. To do this, run the following commands at the command prompt:
Install additional packagesBy default, you can set the settings of the browserslist file in the new application. These settings create several builds for browsers that support ES2015 and those that require ES5. For this example, build an Angular element for modern browsers.
browserslist example -
Add the element building commands to package.json. After the commands are executed, the business logic will be placed in a single angular-element-component.js file. Use this file going forward.
package.json
Connect the Custom Element to Creatio
Install the angular-element-component.js file you built in a Creatio package as file content.
1. Place the file in the package static content
To do this, copy the file to the Custom package name\Files\src\js directory. For example, MyPackage\Files\src\js.
2. Install the build in Creatio
To do this, configure the build path in the bootstrap.js file of the package to which to upload the component.
To upload bootstrap, specify the path to this file. To do this, create descriptor.json in Custom package name\Files.
Upload the file from the file system and compile Creatio.
3. Load the component to the required schema/module
Create a schema or module in the package to which to load the custom element. Load the schema or module to the dependency load block of the module.
4. Create an HTML element and add it to DOM
Work with data
The Angular component receives data using the public properties/fields marked with the @Input decorator.
Data retrieval is implemented via the event functionality. To do this, mark the public field of the EventEmiter<T> type with the @Output decorator. To initialize an event, call the emit(T) field method and pass the required data.
Add a button to angular-element.component.html.
Use Shadow DOM
Use Shadow DOM to block certain components created using Angular and installed in Creatio off the external environment.
The Shadow DOM mechanism encapsulates components within DOM. This mechanism adds a “shadow” DOM tree to the component, which cannot be addressed from the main document via the standard options. The tree may have isolated CSS rules, etc.
To toggle on Shadow DOM, add the encapsulation: ViewEncapsulation.ShadowDom property to the component decorator.
Create Acceptance Tests for Shadow DOM
Shadow DOM creates test problems for application components using cucumber acceptance tests. It is not possible to address the components within Shadow DOM from the root document via the standard selectors.
Instead, use shadow root as the root document and address the component elements through it.
Shadow root – the root component node within Shadow DOM.
Shadow host – the component node that contains Shadow DOM.
The BPMonline.BaseItem class implements the base Shadow DOM operation methods.
| clickShadowItem() | Click an element within the Shadow DOM component. |
| getShadowRootElement() | Returns the shadow root of the Angular component by the CSS selector. Use the shadow root to select other elements. |
| getShadowWebElement() | Returns the instance of the element within Shadow DOM by the CSS selector. Use the waitForVisible parameter to specify whether to wait for the instance to become visible. |
| getShadowWebElements() | Returns the instances of elements within Shadow DOM by the CSS selector. |
| mouseOverShadowItem() | Hover over the element within Shadow DOM. |
| waitForShadowItem() | Waits until the element within the Shadow DOM component becomes visible and returns its instance. |
| waitForShadowItemExist() | Waits until the element within the Shadow DOM component becomes visible. |
| waitForShadowItemHide() | Waits until the element within the Shadow DOM component becomes hidden. |