Creatio lets you use different version control systems. This article covers the use of the most popular of them, Subversion (SVN).
Subversion (SVN) is a free and open-source version control system.
The SVN base is a repository that stores data as a hierarchy of files and directories, i. e., a file tree.
You can perform the following actions with the SVN repository:
-
Read data of other Creatio users to which they granted access:
- Read files of other Creatio users and the directory tree.
- Read the directory tree.
- Review previous versions of files and the directory tree.
-
Modify data:
- Create new directories and files.
- Rename directories and files.
- Change file contents.
- Delete directories and files.
- Record data to grant access to other Creatio users.
We recommend using the SVN version control system in the following cases:
- Creatio .NET Framework.
- Apps where development is done mostly using low-code tools.
- Creatio in the cloud.
We recommend using Git for Creatio on-site. Learn more in a separate article: Version control in Git.
When using SVN on a pre-production or production environment, Creatio can be rendered inoperable by errors that occur when transferring changes or saving configuration elements. For example, if the package set as current is a package bound to SVN. You can restore the Creatio operability from a database backup. However, you might lose the changes made in Creatio since the last backup.
Also, if you use SVN on a pre-production or production environment, changes might be delivered without previous testing on the development environment, which is strictly forbidden.
Learn more about setting up and working with SVN in the SVN documentation.
Key concepts
Repository is a central database usually located on a file server. Stores versioned files. Can be accessed over various network protocols or from a local drive.
Working copy is a directory on the local machine. The working copy contains a copy of the files as they were in the repository before a user modified them. That way, you can view the exact changes.
Revision is the state of the file system tree. A revision saves the entire set of changes to files and directories as a single change.
Change commitment to the file system tree is an atomic operation that lets you commit the revision.
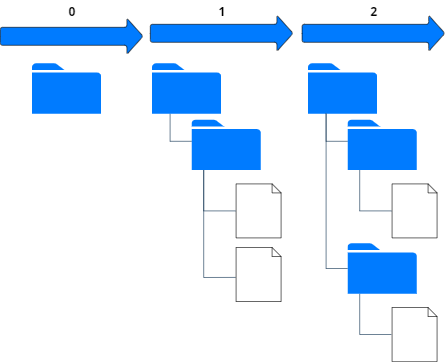
Revisions in the repository can be represented as a series of file system trees, i. e., an array of revision numbers that start from 0 and increase from left to right (see the image below). Each number contains a file system tree as a snapshot of the repository state after a commit.
The general procedure work with files in the working copy is as follows:
- Retrieve the latest file versions from the repository.
- Work with files on a local machine.
- Commit files to the repository.
Versioning models
Different developers might use SVN to develop the same functionality in the same file. If the first developer saves changes first and the second developer saves changes a few seconds later, the changes of the second developer overwrite those of the first developer. While these changes will be present in the repository, they will be absent from the latest file revision. To prevent that, use the following versioning models.
- the “Lock-Modify-Unlock” model
- the “Copy-Modify-Merge” model
“Lock-Modify-Unlock” model
The repository enables only one user at a time to modify a file. The first user must lock the file before they can modify it. The second user cannot commit the changes until the first user commits the changes to the repository and unlocks the file.
The model has the following special features:
-
Locking can cause administration issues.
If the first developer forgets to unlock the file, the second developer loses time.
-
Locking can add redundant steps.
If developers work with non-overlapping parts of the file, a more efficient alternative is working simultaneously and merging the changes.
-
Locking can create a false sense of security.
Developers might simultaneously work with different files that contain dependent functionality. In this case, each developer locks their file and thinks they begin a safely isolated task. As a result, the developers do not discuss changes in advance. Some of the changes made might be incompatible, which renders the developed solution inoperable.
Use this model if you work with files that cannot be merged. For example, if the repository contains images and users change them simultaneously, these changes cannot be merged.
“Copy-Modify-Merge” model
The client of each user downloads the project from the repository and creates a personal working copy, i. e., a local copy of the files and directories. After that, users modify their personal copies simultaneously. As a result, personal copies are merged into a new, final version. Generally, SVN merges the changes automatically, but the merge needs to be approved.
Overlapping changes made by two users cause a conflict.
To resolve the conflict, the user who committed the files later must take the following steps:
- Discuss the changes that caused the conflict with the user who committed the files earlier.
- Manually select the changes from the set of conflicting changes to commit.
- Commit the merged file to the repository.
The key factor in using this model is the interaction among users.
Manage files in SVN
SVN writes properties of every file to the .svn service directory of the working copy.
The file properties are as follows:
- Working file revision. The revision number on which the working copy file is based.
- Date and time of the last update of the local file copy from the repository.
The purpose of properties is to determine the status of the working copy file.
The statuses of the working copy file are as follows:
-
Not modified and not outdated.
File changes have not been committed to the repository since the working revision. When you try to update or commit a file, SVN takes no action.
-
Modified locally and not outdated.
File changes have not been committed to the repository since the base file revision. SVN does not update the file. The file is committed to the repository successfully.
-
Not modified and outdated.
The file in the working copy is unchanged, but it has been changed in the repository. Update the file so that it matches the current public revision. SVN does not commit the file. The file is updated successfully.
-
Modified locally and outdated.
The file has been changed both in the working copy and the repository. The commit fails. First, update the file by trying to merge the changes published by another developer with local changes. If SVN cannot merge the changes automatically, you must resolve the conflict manually.
Working copy used in Creatio
SVN mode is enabled in Creatio by default. When the file system development mode is disabled, Creatio uses its own working copies of custom packages that have versioning enabled. These working copies are placed in the directory specified in the defPackagesWorkingCopyPath element of the ConnectionStrings.config configuration file.
If the file system development mode is enabled, you can create a working copy manually in the [Path to Creatio]\Terrasoft.WebApp\Terrasoft.Configuration\Pkg\PackageName directory.
To configure SVN operation, change the sourceControlAuthPath setting of the ConnectionStrings.config configuration file. The setting contains the path to the local directory that stores the user authentication data (login and encrypted password) to connect to the SVN repository. The out-of-the-box Creatio SVN client saves the authentication data. We recommend specifying the path to a permanent directory in the sourceControlAuthPath setting. The operating system can clear the temporary directory specified by default.
SVN client
We recommend using the TortoiseSVN client version 1.9 and later to work with SVN in the file system. This client is a Windows shell extension built into the context menu of Windows Explorer. Learn more about using TortoiseSVN in the TortoiseSVN documentation.

The SVN integration mechanism is turned off when file system development mode is turned on. You can only install or update packages from the SVN repository using the out-of-the-box tools. We recommend creating a package using the out-of-the-box tools and binding it to the repository using third-party tools such as TortoiseSVN.
Before you bind a package to an SVN repository when the file system development mode is turned on, make sure Creatio is configured to access the SVN repository.
1. Create a package
To create a custom package:
- Click
 to open the System Designer.
 - Click Advanced settings in the Admin area block.
- Click
 in the package workspace.
 -
Fill out the package properties:
- Set Name to "sdkTestPackage."
-
Set Version control system repository to "SDKPackages."
If you fill out the Version control system repository field, the package will be bound to the repository. When file system development mode is turned on, manually add a directory whose name matches the package name to the repository.
If you leave the Version control system repository field empty, the package will not be bound to the repository. Connect the package from the file system manually to version the package.
- Set Version to "7.18.0."
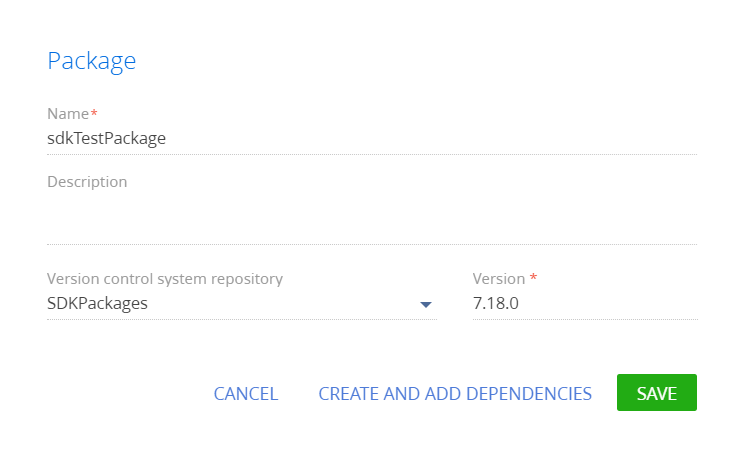
- Click Create and add dependencies and set the package dependencies.
2. Export the package to the file system
To export the package to the file system:
- Configure Creatio to work in the file system. Learn more in a separate article: External IDEs.
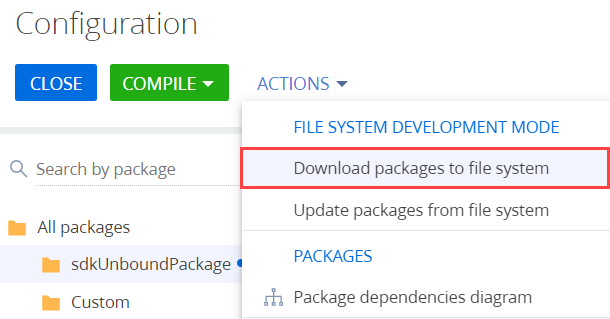
- Select Download packages to file system in the File system development mode group of the action menu.
/scr_download_to_fs.png)
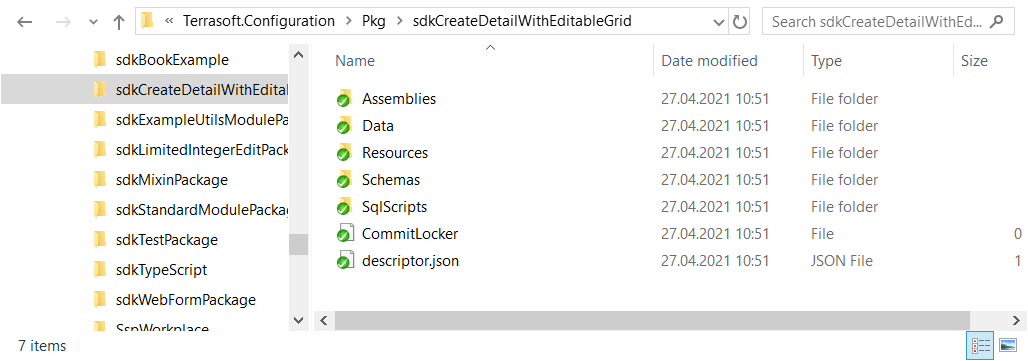
As a result, the packages will be downloaded along the ..\Terrasoft.WebApp\Terrasoft.Configuration\Pkg path to the directory whose name matches the package name.
3. Create directories for the package in the SVN repository
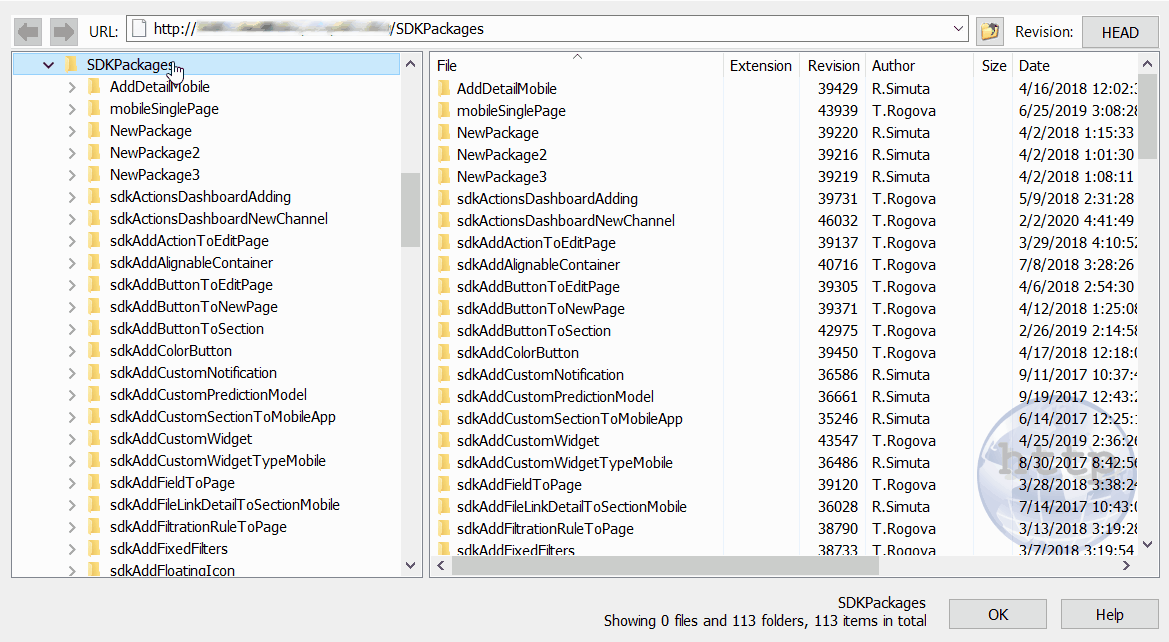
To create directories for the package in the SVN repository, use an SVN client, for example, TortoiseSvn.
To create directories for a package in the SVN repository:
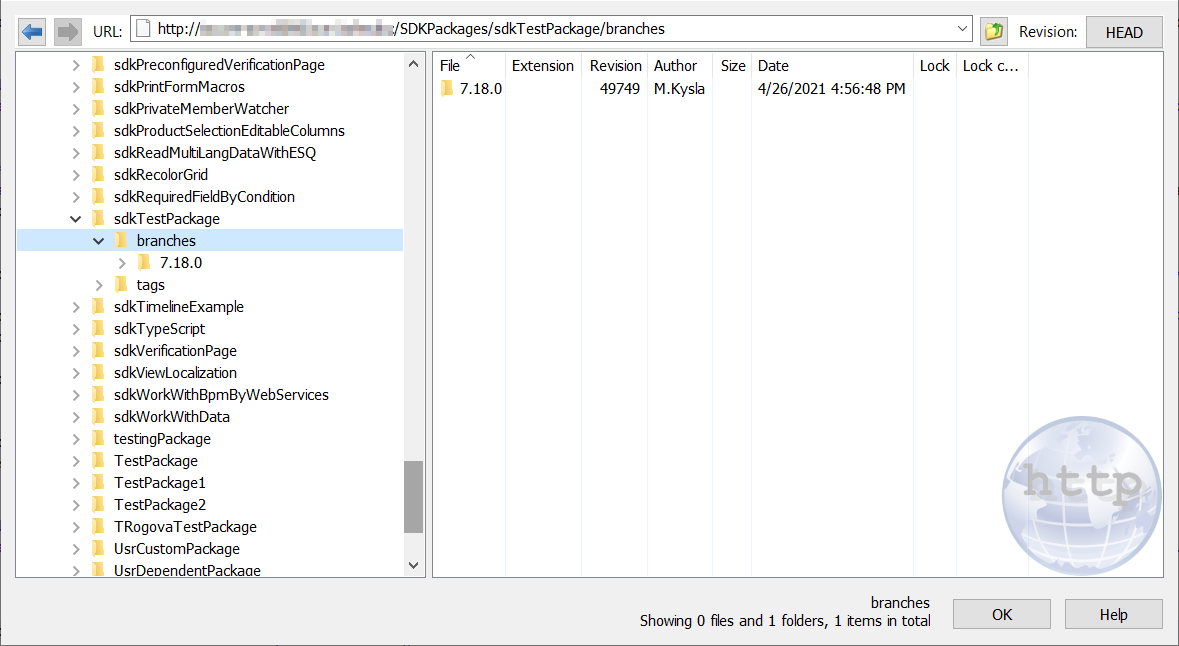
- Open the repository listed in the package properties.
- Create a directory whose name matches the Creatio package name in the repository. In this example, this is sdkTestPackage.
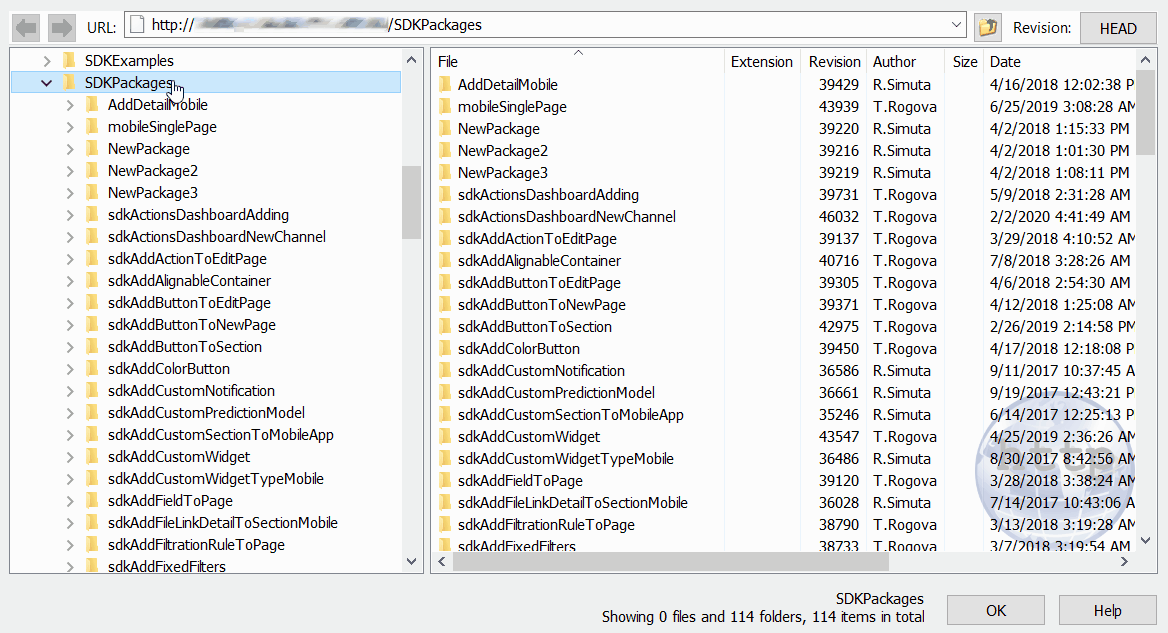
- Create branches and tags subdirectories in the directory.
- Create a directory whose name matches the 7.18.0 package version number in the branches directory.
4. Create a working copy of the versioned package branch
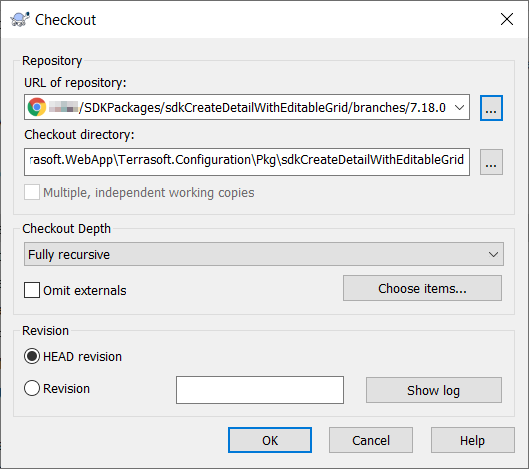
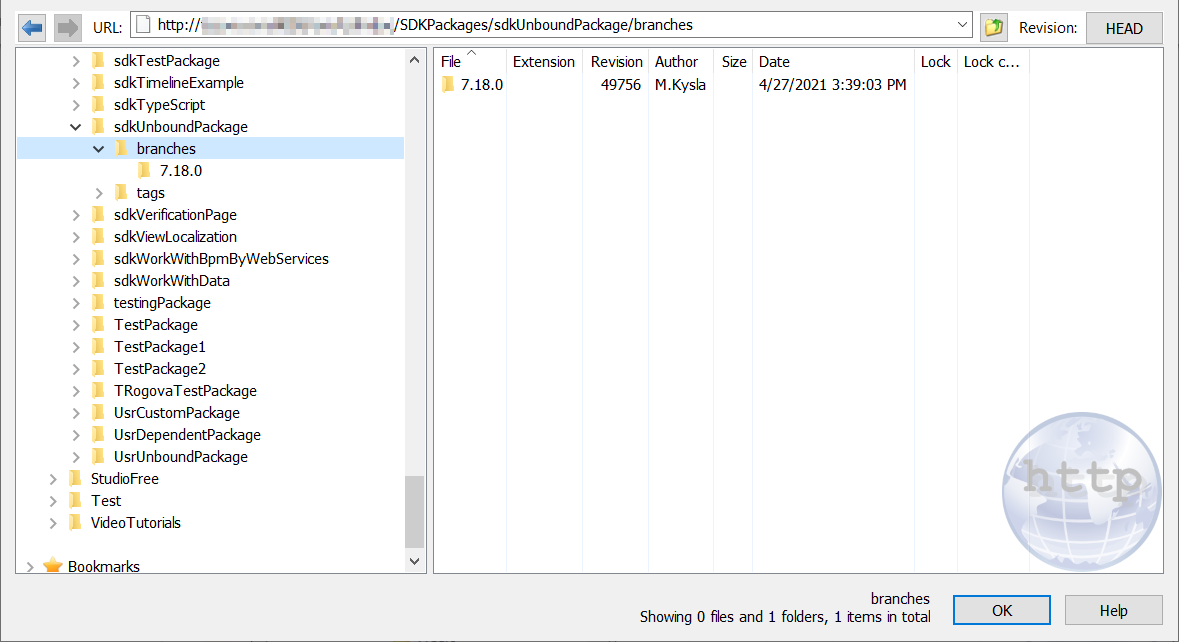
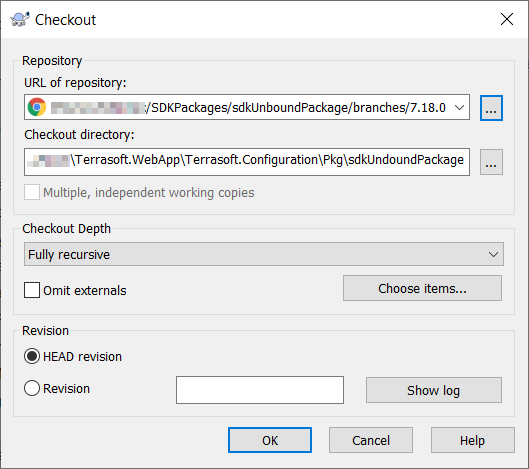
To create a working copy of the versioned package branch:
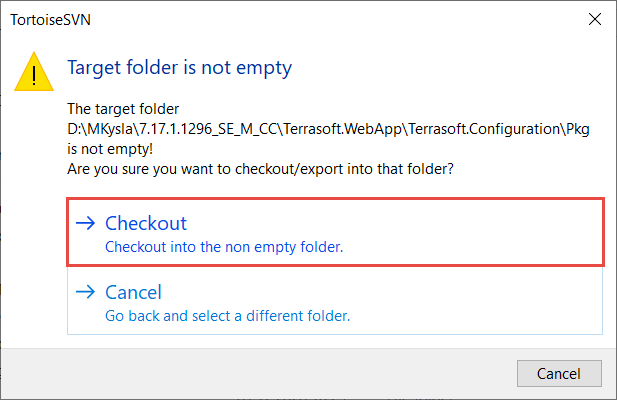
- Export (the SVN Checkout... command) the directory created on the previous step from the repository to the package directory in the file system. In this example, this is the 7.18.0 directory.
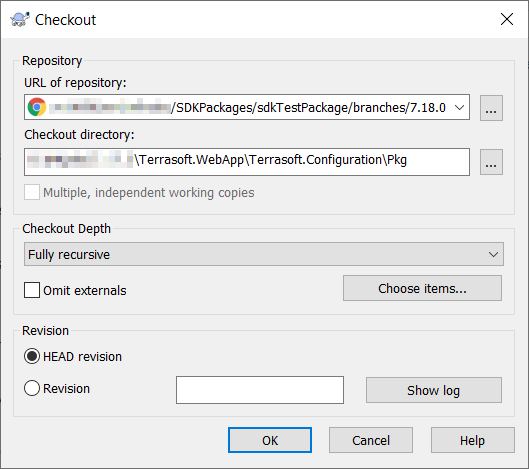
- Confirm the export to the existing directory.
As a result, the ...\Terrasoft.WebApp\Terrasoft.Configuration\Pkg\sdkTestPackage package director in the file system will be bound to the 7.18.0 version branch of the package in the repository.
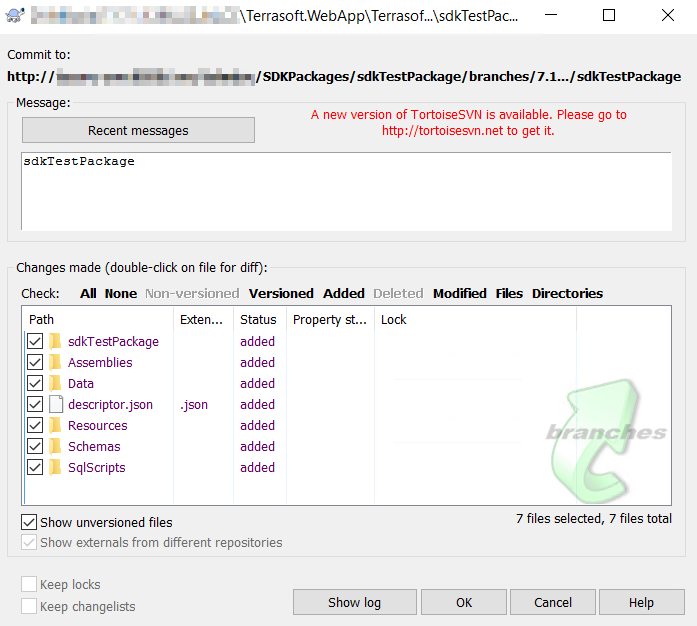
5. Commit the package to the repository
To commit the package to the repository:
- Add (the SVN Commit command) the contents of the ...\Terrasoft.WebApp\Terrasoft.Configuration\Pkg\sdkTestPackage directory to the repository.
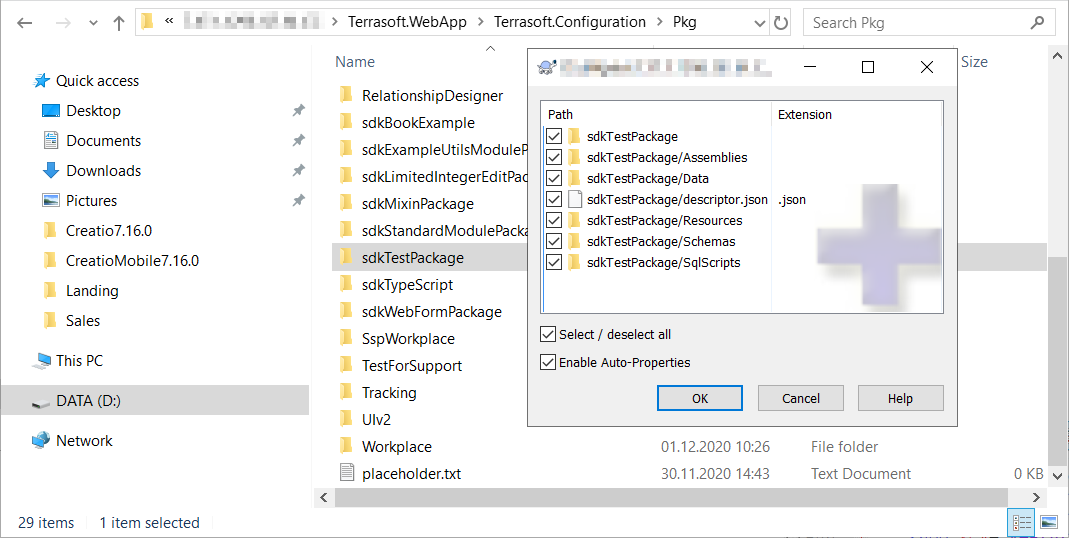
- Commit the directory to the repository.
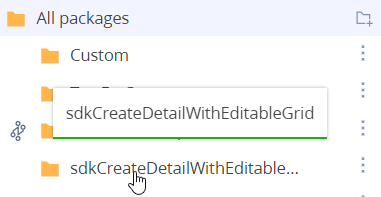
The package contains the functionality of an editable list detail.
Creatio lets you install an existing package from SVN in the file system development mode both automatically and manually.
To install the package manually:
- Install the package into the file system.
- Install the package into Creatio.
- Generate source codes.
- Compile the changes.
- Update the database structure.
- Install SQL scripts and bound data (optional).
To install the package automatically:
- Ensure Creatio applies changes automatically.
- Install the package into the file system.
- Install the package into Creatio.
Manually install the package from SVN in file system development mode
1. Install the package into the file system
To install the package into the file system:
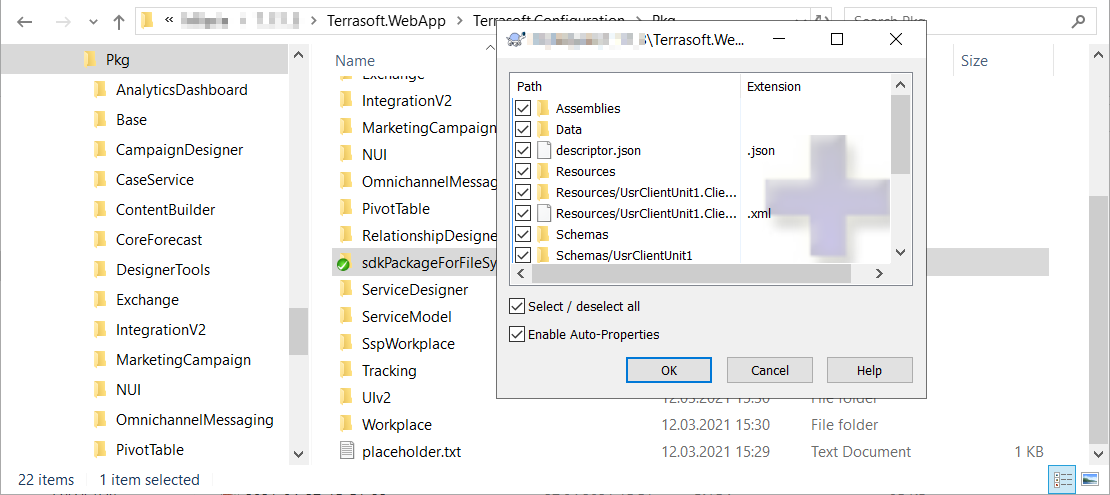
- In the ...\Terrasoft.WebApp\Terrasoft.Configuration\Pkg directory, create a directory with the same name as the package.
- Export (the SVN Checkout... command) the directory created on the previous step from the repository to the package directory in the file system.
- Specify the address of the repository that stores the package contents and the directory to export the package contents.
The directory name to export the package contents must match the package name.
After the export, the package working copy will be created in the ..\Terrasoft.WebApp\Terrasoft.Configuration\Pkg directory.
2. Install the package into Creatio
To install the package into Creatio:
- Click to open the System Designer.
- Click Advanced settings in the Admin area block.
- Select Update packages from file system in the File system development mode group of the action menu.
/scr_updating.png)
As a result, the package will be added to Creatio.
If the repository name is missing from the package name, you can commit the changes to the repository only from the file system.
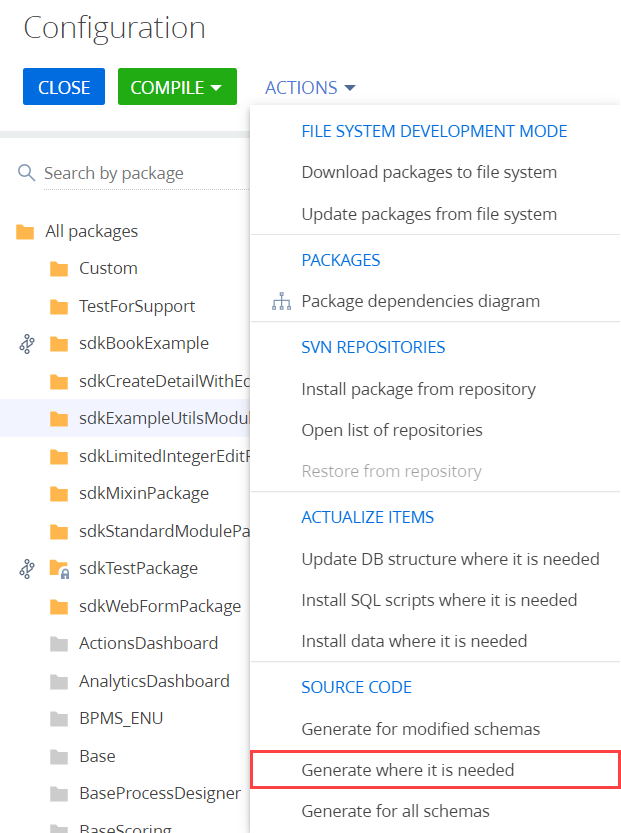
3. Generate source codes
To generate source codes:
- Select Generate where it is needed in the Source code group of the action menu.
4. Compile the changes
To compile the changes, click Compile on the toolbar.
You can check whether you need to update the database structure or install SQL scripts and bound data in the Status column of the Configuration section workspace.
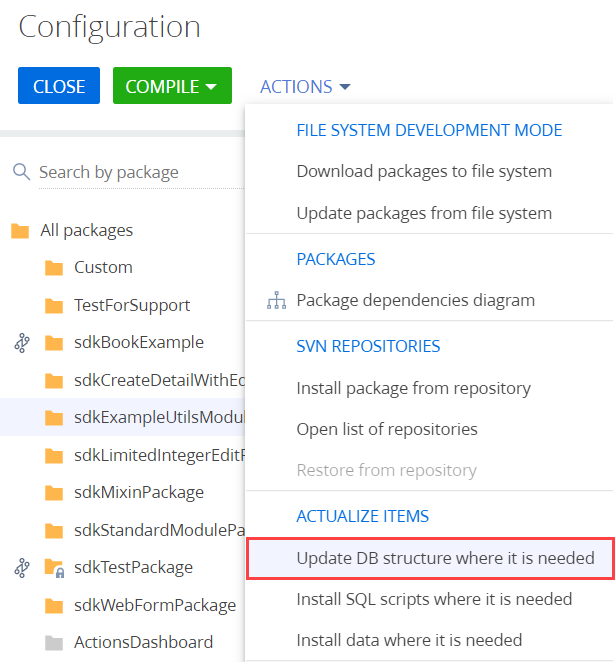
5. Update the database structure
To update the database structure, click Update DB structure where it is needed in the Actualize items group of the action menu.
6. Install SQL scripts and bound data (optional)
If the package contains bound SQL scripts or data, take the corresponding steps to execute them or install it.
After the installation, the implemented package functionality will be available in Creatio. In this example, this is the functionality of an editable list detail.

You might need to clear the browser cache and refresh the page to apply the changes.
Automatically install the package from SVN in file system development mode
1. Ensure Creatio applies changes automatically
To ensure Creatio applies changes automatically, check whether the <appSettings> element keys in the ..\Terrasoft.WebApp\Web.config file are set to true:
- AutoUpdateOnCommit key enables the package update from the SVN repository on package commitment. If you set the key to false and modify the package schemas, then try to commit the package to the repository, Creatio warns you that an update is required.
- AutoUpdateDBStructure key enables the database structure update.
- AutoInstallSqlScript key enables the SQL scenario installation.
- AutoInstallSqlScript key enables the installation of bound data.
Repeat steps 2–5 of the procedure to manually install the package from SVN in file system development mode.
Configure interaction with the SVN repository (optional)
Creatio lets you configure interaction with the SVN repository both from the Configuration section and file system.
To configure interaction with the SVN repository:
- Click to open the System Designer.
- Click Advanced settings in the Admin area block.
- Install the package from the SVN repository. Learn more in a separate article: Version control in Creatio IDE.
- Download the package to the file system. Learn more in a separate article: Set up Creatio to work with the file system.
Repeat steps 3–6 of the procedure to manually install the package from SVN in file system development mode.
You can bind a package from the file system to the repository only in Creatio on-site. After binding a package to SVN, you can install the package into the file system using the out-of-the-box Creatio tools.
1. Download the package to the file system
To download the package to the file system:
- Configure Creatio to work in the file system. Learn more in a separate article: External IDEs.
- Select Download packages to file system in the File system development mode group of the action menu.
As a result, all packages will be downloaded along the ..\Terrasoft.WebApp\Terrasoft.Configuration\Pkg path to the directory whose name matches the package name.
2. Create directories for the package in the SVN repository
To create directories for the package in the SVN repository, use an SVN client, for example, TortoiseSvn.
To create directories for the package in the SVN repository:
- Open the repository specified in the package properties.
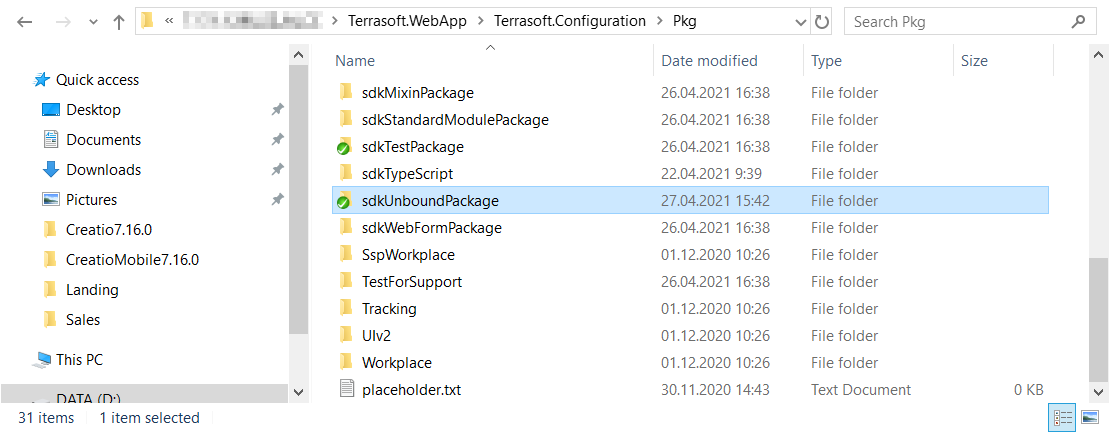
- Create a directory whose name matches the package name in Creatio in the repository. In this example, this is sdkUnboundPackage.
- Create branches and tags subdirectories in the created directory.
- Create a directory whose name matches the package version number (7.18.0) in the branches directory.
3. Create a working copy of the versioned package branch
To create a working copy of the versioned package branch:
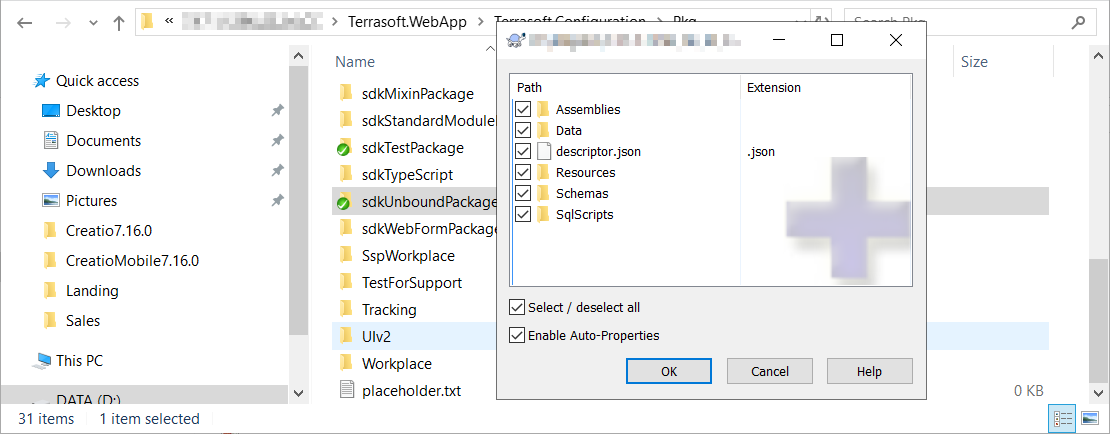
- Export (the SVN Checkout... command) the directory created on the previous step from the repository to the package directory in the file system. In this example, this is the 7.18.0 directory.
- Confirm the export to an existing directory.
As a result, the ...\Terrasoft.WebApp\Terrasoft.Configuration\Pkg\sdkUnboundPackage package directory in the file system will be bound to the branch of the 7.18.0 package version in the repository.
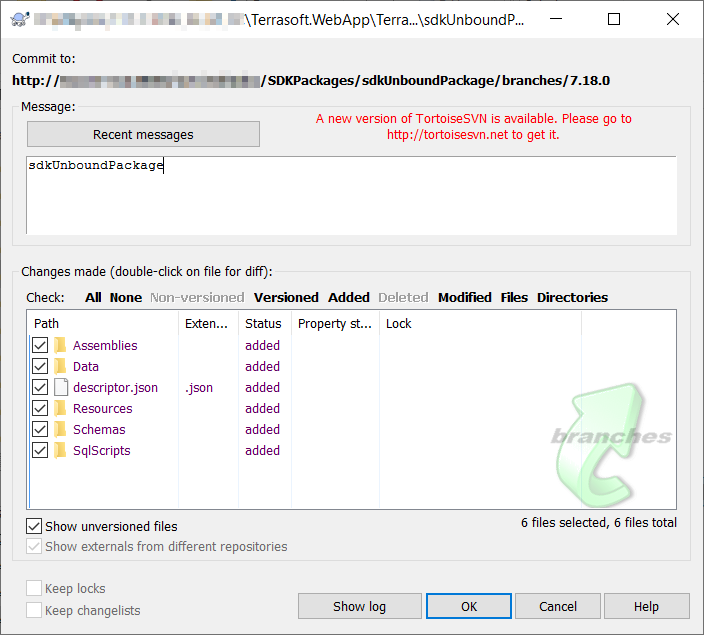
4. Commit the package directory to the repository
To commit the package directory to the repository:
- Add the contents of the ...\Terrasoft.WebApp\Terrasoft.Configuration\Pkg\sdkTestPackage directory to the repository.
- Commit the directory to the repository.
1. Connect the SVN repository to Creatio
If the SVN repository is connected to Creatio, proceed to the next step.
To connect the SVN repository to Creatio:
- Click to open the System Designer.
- Click Advanced settings in the Admin area block.
- Select Open list of repositories in the SVN repositories group of the action menu.
/scr_repos_list.png)
- Click Add and add a repository. In this example, the repository is .../SDKPackages.
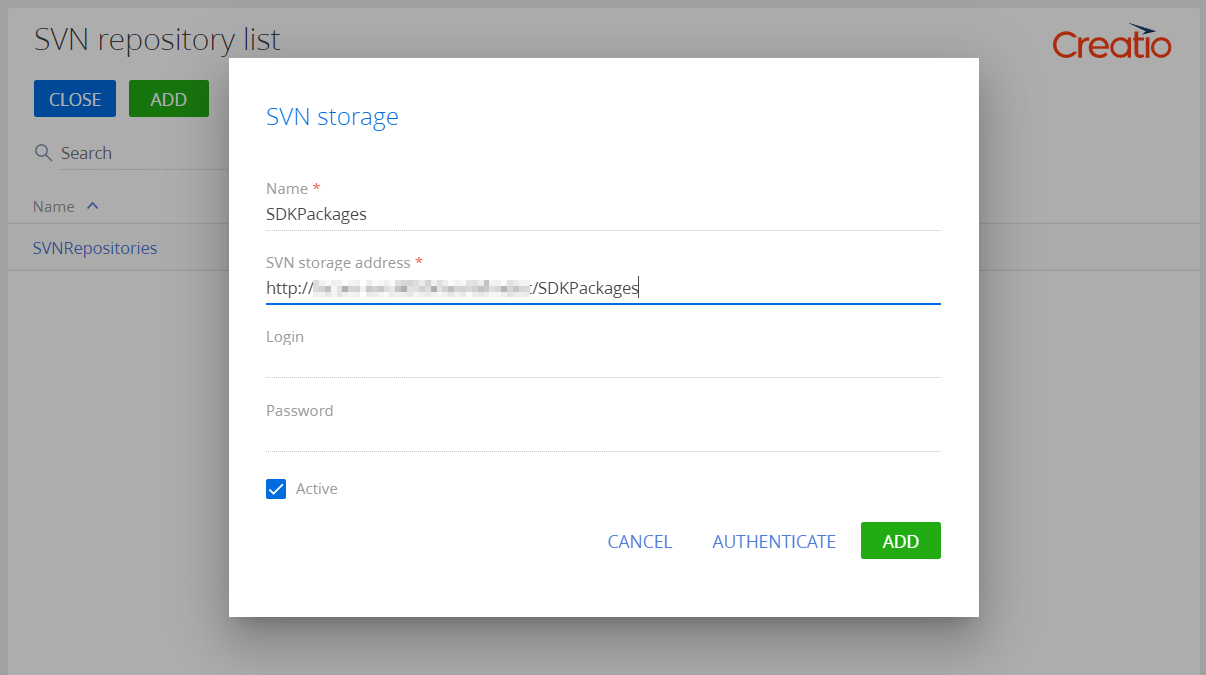
- Click Authenticate.
2. Bind the repository to the package
To bind the repository to the package:
- Open the Creatio database.
- Run an SQL query in the database.
This query executes the following actions:
- Gets the ID of the record that contains the SVN repository location from the [SysRepository] table.
- Adds the ID to the [SysPackage] database table’s record whose [SysRepositoryId] column contains the name of the package not bound to the SVN repository.
Log out from Creatio and log back in to apply the changes.
3. Download the package to the file system
To download the package to the file system:
- Configure Creatio to work in the file system. Learn more in a separate article: External IDEs.
- Select Download packages to file system in the File system development mode group of the action menu.
As a result, Creatio will download the packages along the ..\Terrasoft.WebApp\Terrasoft.Configuration\Pkg path to the directory that has the corresponding package name.
1. Update the package from the SVN repository
To get the latest package revision, use an SVN client, for example, TortoiseSvn.
To update the package from the SVN repository:
- Select the needed package in the ...\Terrasoft.WebApp\Terrasoft.Configuration\Pkg directory. In this example, this is sdkPackageInFileSystem.
- Update the package (the SVN Update command).
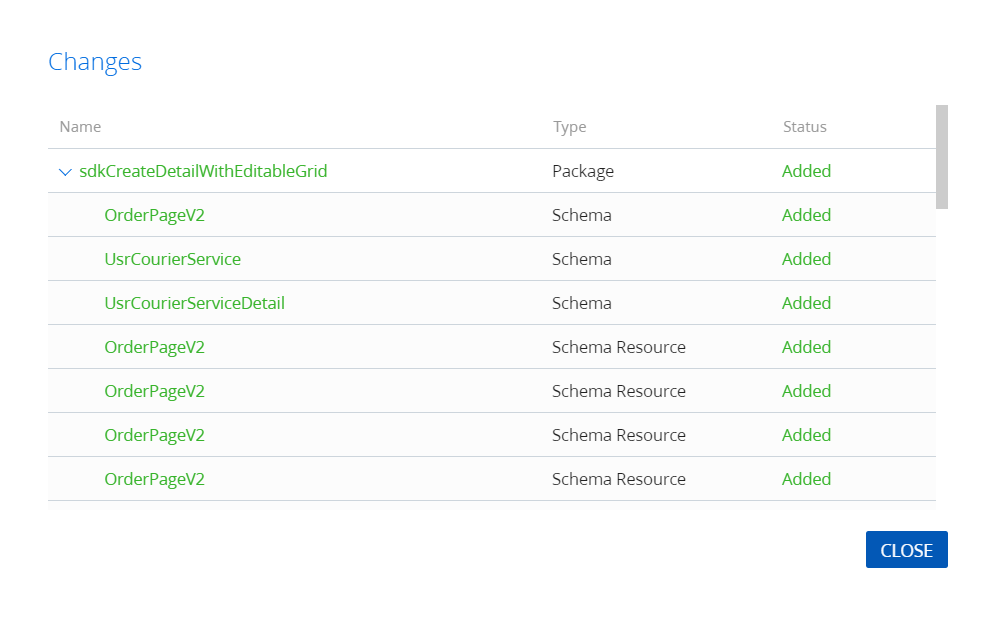
As a result, the package edit date in the descriptor.json package descriptor file and UsrGreetingService schema source code of the Source code type will be updated.
- Click to open the System Designer.
- Click Advanced settings in the Admin area block.
- Select Update packages from file system in the File system development mode group of the action menu.
- If object schemas or source code schemas were changed, take steps 3–6 in the Install an SVN package in the file system development mode article as well.
2. Modify the package contents
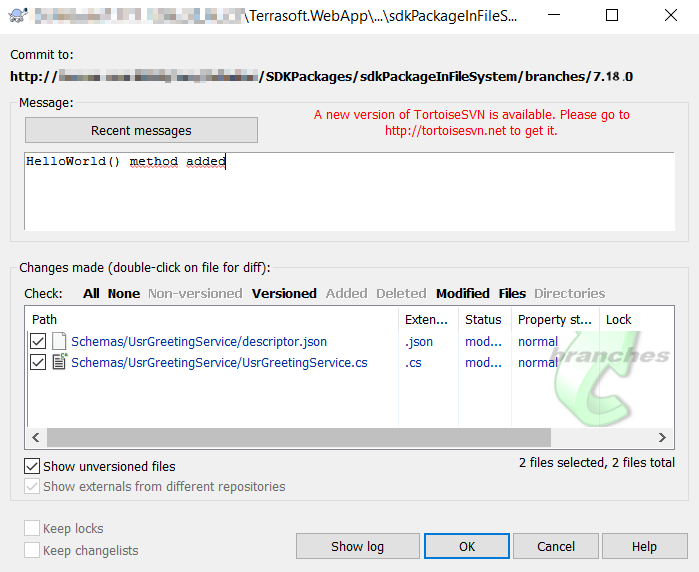
To modify the package contents, add the TestHelloWorld() method to the UsrGreetingService schema of the Source code type.
3. Commit the package to the repository
To commit the package to the repository:
- Select the needed package in the ..\Terrasoft.WebApp\Terrasoft.Configuration\Pkg directory. In this example, this is sdkPackageInFileSystem.
- Commit (the SVN Commit command) the directory to the repository.
The example requires understanding of the difference between development modes.
General recommendations:
- Work with the SVN repository only using the file system in the file system development mode.
- Work with the SVN repository only using the Configuration section tools in the development mode that uses out-of-the-box tools.
1. Add the directory path for working copies of packages
In the file system development mode, the Download packages to file system action downloads the custom packages to the ..\Terrasoft.WebApp\Terrasoft.Configuration\Pkg directory. However, the contents of the custom package downloaded to the file system are not bound to the SVN repository even if you bind the package to the repository in the Configuration section.
If you fill out the Version control system repository field using the out-of-the-box tools when creating a package, the package is bound to the SVN repository. This also creates a working copy of the package in the file system. Set the path to the directory where to create the working copies of packages in the defPackagesWorkingCopyPath attribute of the ConnectionStrings.config configuration file. If you set the path to the ..\Terrasoft.WebApp\Terrasoft.Configuration\Pkg directory in the defPackagesWorkingCopyPath attribute, the package is bound to the SVN repository automatically after you download the package to the file system.
To set the path to the directory for working copies of packages, set the full path to the ..\Terrasoft.WebApp\Terrasoft.Configuration\Pkg directory in the defPackagesWorkingCopyPath setting of the ConnectionStrings.config file.
This change lets you merge the directory that contains working copies of custom packages and directory where packages are downloaded in the file system development mode.
2. Create a package
To create a custom package:
- Click to open the System Designer.
- Click Advanced settings in the Admin area block.
- Click in the package workspace.
-
Fill out the package properties:
- Set Name to "sdkPackageForFileSystem."
- Set Version control system repository to "SDKPackages."
- Set Version to "7.18.0."
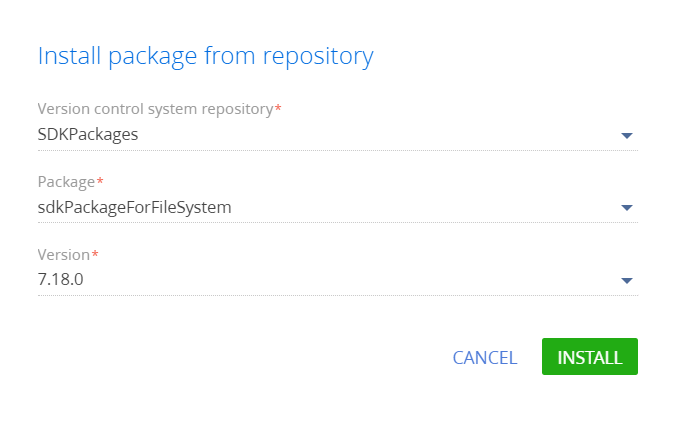
- Click Create and add dependencies and install the package dependencies.
As a result, the package will be committed to SVN automatically, and a working copy of the package will be created in the ..\Terrasoft.WebApp\Terrasoft.Configuration\Pkg directory.
3. Download the package to the file system
To download the package to the file system:
- Configure Creatio to work in the file system. Learn more in a separate article: External IDEs.
- Select Download packages to file system in the File system development mode group of the action menu.
As a result, the packages will be downloaded along the ..\Terrasoft.WebApp\Terrasoft.Configuration\Pkg path to the directory whose name matches the package name.
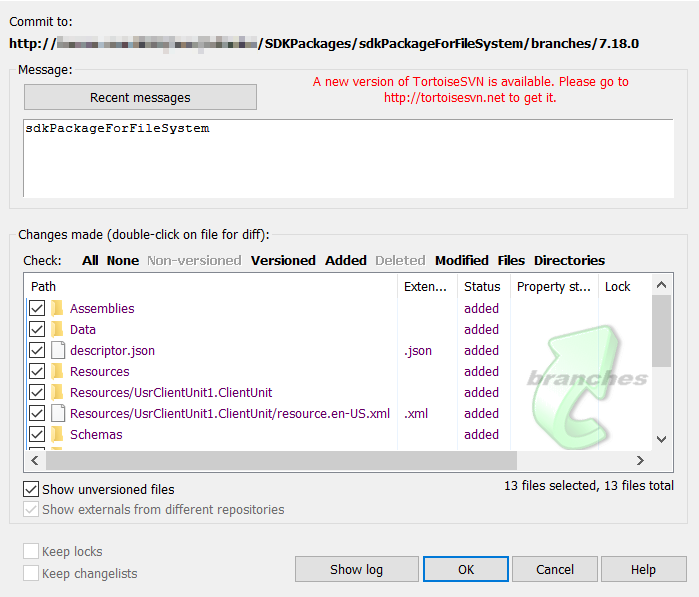
4. Commit the package to the repository
To commit the package to the repository:
- Add (the SVN Commit command) the contents of the ...\Terrasoft.WebApp\Terrasoft.Configuration\Pkg\sdkPackageForFileSystem directory to the repository.
- Commit the directory to the repository.