
The communication panel (Fig. 3) is located on the right side of the screen. It is used for viewing the system notifications for the current user and the message feeds from the channels that the user is subscribed to.
Fig. 3 The communication panel
The communicational panel consists of the following tabs:
•  – Call. This is a telephony tool in bpm’online. You can make and receive calls directly in the system. The button will be displayed once the telephony setup is completed.
•  – Feed. This detail displays the messages of the Feed section. Use the tab to view messages you follow, as well as to add new messages and comments. The functionality of the tab is identical to the functionality of the [Feed] section.
•  – Notifications. Shows notifications about activities, orders and invoices created by you and other users. It also displays system messages, for example, about completed actions in the system.
•  – Feed notifications. This tab displays the notifications related to your publications in the corporate social network, for example, when someone commented on or liked your post in the feed section, or mentioned your name in a message.
•  – Approvals. This tab displays the list of notifications about invoices, orders and contracts that must be approved.
You can create reminders about invoices, and activities for their owners by selecting the [Remind owner] checkbox on the record page and specifying the date/time of the reminder.
When working with notifications, you can either open a record for which the notification was created or put off the notification to a later point in time.
The number of unprocessed messages is displayed on the notifications panel tab.
Later in this chapter
See also
• The [Feed] section >The [Feed] view
To create a reminder for yourself or another user about an activity or an invoice, do the following:
1. Open the page of the record that you wish to create a reminder for. For example, to create a task reminder, open the corresponding task page.
2. Select the checkbox in the reminder field:
a. Select the [Remind Owner] checkbox to create a reminder for the user specified in the [Owner] field of the activity or invoice page.
b. Select the [Remind author] checkbox to create a reminder for the user specified in the [Author] field of the activity page.
3. Specify the date and time when the reminder should be displayed for the user.
4. Save the record.
As a result, at the specified time the reminder will appear on the notifications panel for the user indicated in the [Owner] or [Author] field of the corresponding record.
To view the list of pending notifications, click the  button on the communication panel. The communication panel will open in the right side of the screen.
Note
The  button displays the total number of active notifications for the current user.
Handling reminders
A notification will appear on the communication panel on the date/time when it is due.
The name of a reminder corresponds to the primary field of the record. For example, the “Call customer” reminder will be created for the “Call customer” task. The record type (for example, “Activity“) is also specified in notifications.
To view the page of the record for which the reminder was created, click its caption.
Use the actions menu (Fig. 4) to cancel or reschedule the reminder for later. Canceled and rescheduled reminders are no longer shown on the communication panel.
Fig. 4 Notification actions menu

Use the [Postpone all] menu or the [Cancel all] button to postpone or cancel all active reminders.
Handling approval notifications
Information about objects that require your approval is displayed on the [Approvals] tab. The name of the notification is corresponding to the number of a contract or invoice that must be approved. To view the record page, click the caption. Notifications also display the date of submitting for approval.
Use the approvals actions menu to (Fig. 5) to specify the result of approval or to change the approver.
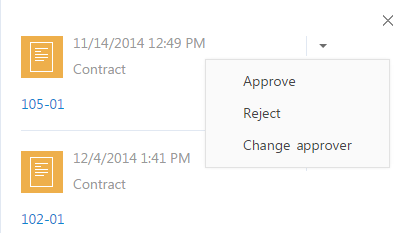
• [Approve] – sets positive result of approval.
• [Reject] – use this action if the contract, invoice or order needs to be improved.
Note
When approval or rejection is received, a pop-up window will open where you can enter your comments to the approval, for example, to specify the rejection reason. The comment will be displayed in the corresponding field of the approval page.
• [Change approver] – use this action to assign a different user as the approver. The action opens the window where you can choose the required user or user group. Changing approver is only available for those approvals that have the [Delegation permitted] checkbox selected on the approval information page.
Note
You can also process an approval using the [Approvals] tab on the page of the required contract, invoice or order. The approval procedure is described in a separate chapter.
Working with feed notifications
The Feed notifications  tab informs you when your name is mentioned and when there is a feedback from other users in relation to your message or comment in the feed section.
This tab displays the following notifications:
• Someone commented on your message in the feed section.
• Someone mentioned you in a message or in a comment.
• Someone liked your post or a comment by clicking the [Like] button.
The notification text displays the message that received feedback. Unread notifications are visually emphasized. Click a notification to mark it as read. As a result, the visual emphasis will be removed.