Run the “BPMonlineSetup.exe” file on the app server to start the setup. In the opened installer window, click the [Install] button. The installer will automatically run the bpm’online setup wizard.
Contents
• Specifying the destination folder
• Setting up connection by the WebSocket protocol
• Setting up the package repository parameters
• Restoring the bpm’online database
• Setting up Application Pools for bpm’online in IIS7
Specifying the destination folder
Specify the folder where the bpm’online files will be installed (Fig. 314) and click the [Next] button.
Fig. 314 Specifying the destination folder
Specify the website settings used in IIS (Fig. 315):
Fig. 315 Specifying the Internet information services
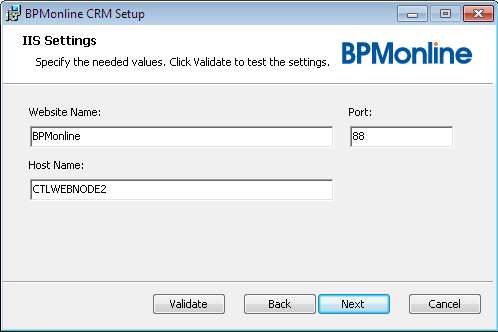
1. In the [Website Name] field, enter the name of the website that will be used to access bpm’online. As a result, the wizard will automatically create two applications in IIS. First application is the installer named as specified in the [Website Name] field. Second application is named “0” and is created inside the installer application to control the work of the default configuration named “Defaut”.
2. In the [Port] field, specify the port number for website binding. By default, port 80 is used.
Note
If the port 80 must be used for the bpm’online website, make sure that other websites do not use this port.
3. If the application should be accessible through the Internet, in the [Host Name] field, specify the corresponding site domain name. If the application should be accessible through the local area network only, enter the name of the application server (specified in the [Host Name] field by default).
Note
To verify the settings entered, click the [Validate] button.
4. Click the [Next] button.
Specify the database server connection settings (Fig. 316).
Fig. 316 Specifying the database server settings
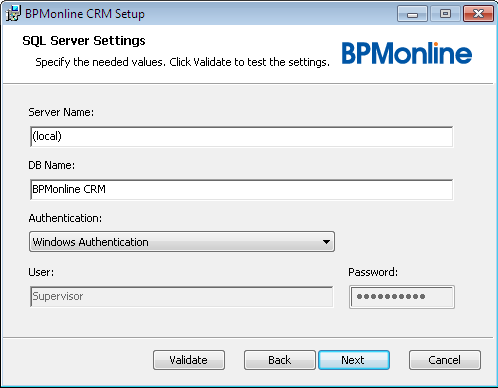
1. In the [Server Name] field, specify the name of your database server. For example, “DATABASE_SERVER_COMPUTER\SERVER_INSTANCE”.
2. In the [DB Name] field, enter the name of the database to be used by bpm’online. The setup will create a new database with the specified name.
3. In the [Authentication] field, select the preferred method of database server authentication. You can use SQL server authentication or Windows authentication options.
Attention!
In case you select the “Windows Authentication“ option, once the installation is completed, you will need to set up the Application Pools parameters in IIS7 for the bpm’online application. Indicate the domain user account that has access to MS SQL server (for example, the domain user account that has launched the installer) as an application pool.
4. In the [User] and [Password] fields, enter the login credentials for MS SQL user authentication. These fields will become editable if the “SQL Server Authentication” option is selected in the [Authentication] field. This user account will be used by the application to access the database.
5. Click the [Next] button.
Specify the connection settings for the Redis data storage server (Fig. 317):
Fig. 317 Specifying the Redis data storage server settings
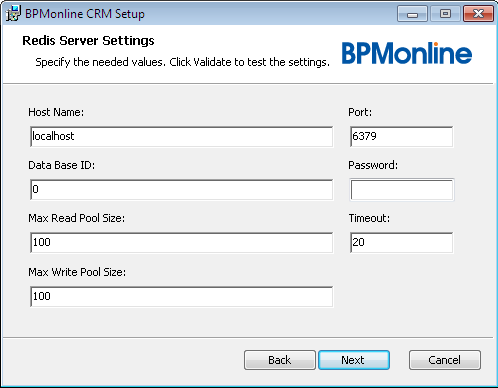
1. In the [Host Name] field, specify the name of the host used for the Redis server deployment.
2. In the [Data Base ID] field, enter the identification number of the database used to store the user sessions.
3. In the [Max Read Pool Size] and [Max Write Pool Size] fields, specify the maximum number of simultaneous read and write connections to the Redis server.
4. In the [Port] field, specify the number of the port used to connect to the Redis server.
5. In the [Password] field, enter the password if needed.
6. In the [Timeout] field, specify the connection timeout in minutes.
7. Click the [Next] button.
As a result, bpm’online will be installed in the specified folder. The application will be accessible on the specified website. A new database will be created on the database server.
Setting up connection by the WebSocket protocol
Specify the parameters for connecting to the application server using the WebSocket protocol (used for such features as business processes, notifications and integration with telephony) by selecting one of the available options (Fig. 318).
Fig. 318 Configuring the WebSocket parameters
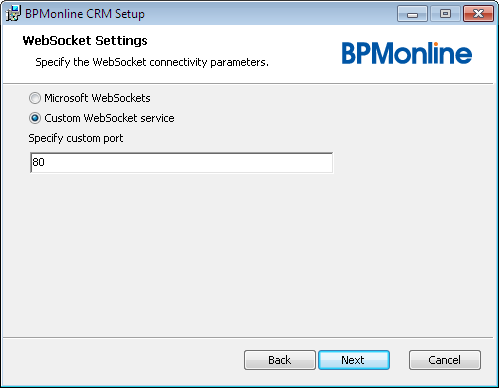
• Select the [Microsoft WebSockets] option if you do not want to use any additional port for WebSocket connection. This option can be selected if the application server is deployed on Windows 8 or Windows Server 2012.
• Select the [Custom WebSocket service] option to specify the port to be used for WebSocket connections.
If you select the [Custom WebSocket service] option, make sure that the corresponding ports are open on the application server. If different workspaces are used, a separate port must be opened for each workspace. The port number of each workspace is calculated according to the formula: “the number of the port entered in the installer”+“the number of the workspace”. Thus, the port of the “Default” workspace (number “0”) will correspond to the port that was specified in installer, for example, 2010. The port for the next configuration that was added (number “1”) will be 2011, etc.
If the [Custom WebSocket service] option is selected and Internet Explorer is used for working with the application, then in the Web.config file, change the value of the “httpOnlyCookies” to “false” (<httpCookies httpOnlyCookies="false" />).
Setting up the package repository parameters
Specify the path to the package repository folder (Fig. 319).
Fig. 319 Configuring the SVN repository parameters
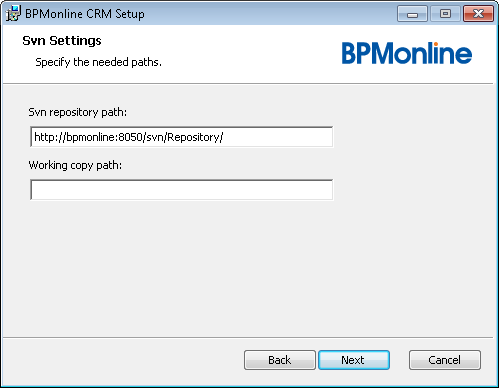
1. In the [Svn repository path] field, specify the URL of the SVN repository that has been created when deploying the SVN server. The repository will be used to store packages. The application server must have access to the repository using the specified path.
2. In the [Working copy path], if necessary, enter the path to the local copy of the repository.
Restoring the bpm’online database
If the database server is deployed on the same computer as the Web server, the setup will automatically restore the bpm’online database from the backup file.
If the database server is located on a different PC, restore the database from the backup file manually. The database backup file will be installed in the “\db\” subfolder of the bpm’online CRM installation folder.
The database must be restored into the database that was created during the installation. For example, if you have specified the “bpm’online“ name in the [DB Name] field, restore the backup file to that database.
Setting up Application Pools for bpm’online in IIS7
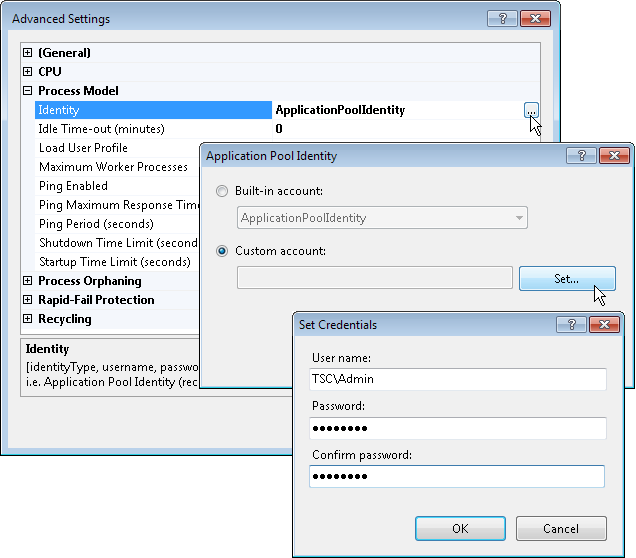
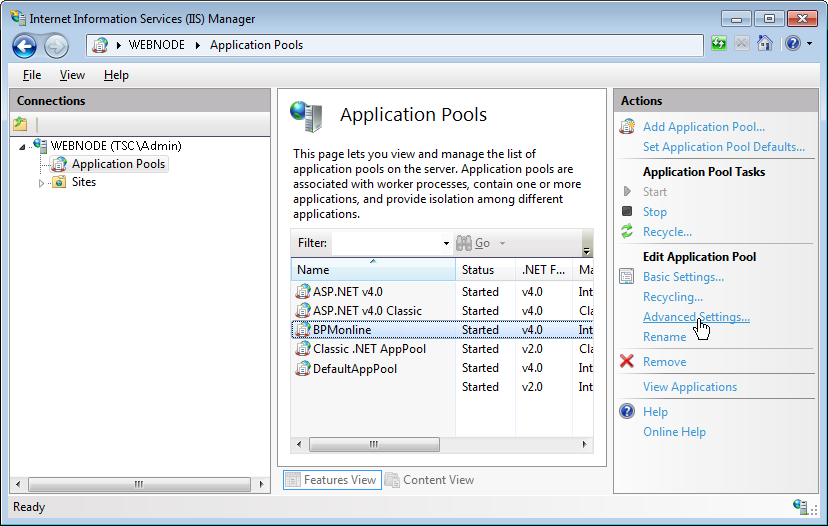
1. Run the Internet Information Services manager.
2. In the server tree, select “Application Pools”.
3. Select the bpm’online application in the applications list.
4. Click [Advanced Settings...]. (Fig. 320).
Fig. 320 Editing the Application Pools parameters
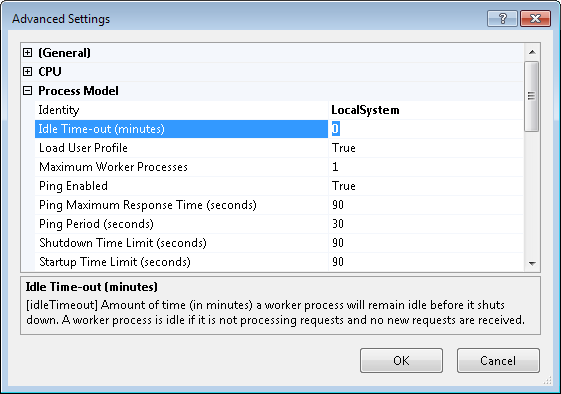
5. In the opened window, change the value in the [Idle Time-out (minutes)] field to “0” (Fig. 321).
Fig. 321 Setting up Idle Time-out
6. Enter the username and password of the user account that the application should use to access MS SQL Server. Click the [...] button in the [Identity] field to edit this property.
Attention!
This procedure must be performed if the Windows authentication was selected in the MS SQL Server settings during the installation.
7. In the opened window, select the [Custom account] and click the [Set] button.
8. Enter the username and password of the domain user account that is used by the application to access MS SQL Server. For example, it can be the domain user that has started the bpm’online installation (Fig. 322).
Fig. 322 Setting up Identity for Application Pool