 side panel (Fig. 121). The action opens a window, where you need to select the ”Corporate sale” process and either click [Run] or double-click the process. As a result, a new sale process will run, starting from the interest verification stage.
The corporate sales business process involves working with Opportunities, Activities and Accounts sections. The process includes verification of interest and several other consecutive stages, each consisting of certain steps. You can go through the process in sequential order, stage by stage. Also, you can skip any stage or return to a previously completed stage of opportunity, if such is required for a certain opportunity.
Described below are the ways you can use to start a process, and process execution general features:
Each process stage is described in detail below:
•The [Id. decision makers] stage
•The [Proposal submission] stage
Process completion options are as follows:
Note
Business process management details, including tools to add and edit processes, can be found in a separate book.
Corporate sales process can be run in a number of ways:
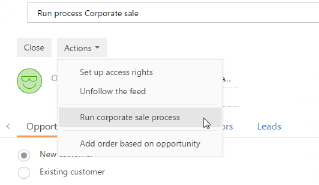
•By using the [Run process] action in the side panel (Fig. 121). The action opens a window, where you need to select the ”Corporate sale” process and either click [Run] or double-click the process. As a result, a new sale process will run, starting from the interest verification stage.
Fig. 121Running a process from the side panel

•By using the [Run process] command in the command line (Fig. 122). To start a process, type in the “Run process” command in the command line and then continue by typing in the name of the process – “Corporate sale”. As a result, a new sale process will run, starting from the interest verification stage.
Fig. 122Running a process from the command line

•By using the [Run corporate sale process] on the opportunity page (Fig. 123). The selected opportunity process will run, starting from the stage that the selected opportunity is currently at.
•Or it will begin automatically, when the lead status is changed to “Awaiting sale”.
Fig. 123Starting a process from the opportunity page
Note
If you start working with a new opportunity, we recommend that you run the process from the side panel or from the command line. In such a case, the opportunity will be created while running the process. If you manually created an opportunity before, and now wish to continue working with it in terms of a process, use the corresponding command on the opportunity page.
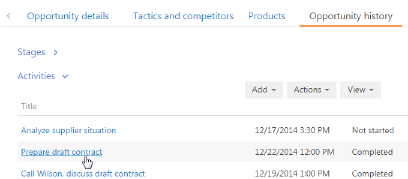
As a rule, working with a process involves creating activities that define the actions to be done at each stage. The list of such activities can be found either in the Activities section or on the [Opportunity history] tab of the opportunity page. You can complete a step right after you have activated it. Also, you can postpone completing a step and return to it later by opening the corresponding activity (Fig. 124).
Fig. 124Opening a process activity
To complete an activity created by the process, click one of the results available for the selected step (Fig. 125). As a rule, when an activity becomes completed, the next step of the process is activated. If an activity is canceled, the stage will end early.
Fig. 125Completing a process activity

Note
The system only displays the activity results that are relevant for the process. For example, “Issue invoice” result will not be displayed while verifying the customer interest at the needs analysis stage.
A process can also activate steps that do not include any activities. If such step is postponed, you can return to it by using the [Move down the process] on the opportunity page (Fig. 126).
Fig. 126Moving down the process

Note
You can also continue the process run in the [Process log] section. A detailed description of the functionality of this section can be found in the bpm’online business process documentation.
While going through some of the process steps, the system will give you hints to help you keep track of the vital information required to successfully manage the opportunity. For example, at the needs analysis stage, on the step that involves the activity of collecting the customer information, the system will recommend to you the information that you need to pay attention to. If you click  , the hint will be displayed in the pop-up window (Fig. 127).

To hide the hint, click [OK] (Fig. 128).

When all the process steps are completed within any stage of opportunity, a window will open to let you select the next action (Fig. 129).
Fig. 129Choosing an action when ending a stage

You might want to go to the next opportunity stage without completing the current stage steps. For example, you are preparing for a meeting with your customer, who called to inform you about new budget changes that require you to return to one of the previous stages. In such a case, select the needed stage in the [Stage] field of the opportunity page and save the opportunity. The process will automatically activate steps for the new stage, and all the incomplete activities from the previous stage will be canceled.
Note
Each stage can be performed as many times as required to manage the opportunity.
This is the first stage of the corporate sale process. This stage is performed if the process was run from the command line or from the side panel.
The goal of this stage is to make sure that the customer has allocated a budget, that the need is well defined and that there is a scheduled time to make the purchase-related decision.
When the process starts, the “Call” activity is added allowing you to schedule a call to the customer to further verify the interest. If the interest is verified and the customer is ready to meet or get more information about your services in a different way, specify what is requested in the next step by entering the preliminary date and time of the meeting. After you saved the information, a new opportunity window will open, where you need to specify the customer company, enter the opportunity information and select the next stage.
Note
If necessary, you can postpone a process step to a more convenient time and return to it later.
The rest of the process flow will depend on how the sales are organized in your company and which employee started the process.
•If the process was started by a manager and the rest of the opportunity routine will be done by the same employee, select the “Needs analysis” stage. As a result, the current user will become the opportunity owner.
•If the process was started by a manager, but the rest of the opportunity routine will be done by another employee (for example, it can be a contact center employee who registers opportunities and distributes them among the managers), select the “Needs analysis” stage. Specify the opportunity owner as well.
•If there are several sales divisions in your company and the decision on whether to work on the opportunity or not is made by the division head, select the “Qualification” stage. As a result, the selected division head will become the opportunity owner.
Note
You can form the organizational structure of your company in the [Users] section. The list of sales divisions and division heads can be specified in the [Divisions] lookup.
The goal of this stage is to decide whether to work on the opportunity or not, and if so, to assign a manager as the opportunity owner. This stage is required if there are several sales divisions in your company and the decision on whether to work on the opportunity or to reject it is made by the division head.
If the sales division and the division head were specified on the previous stage, then a task will be added for the division head to assign the opportunity owner. If any of the above conditions are not met, then the system will automatically assign the current user as the opportunity owner.
After being assigned, the opportunity owner has the rights to read and edit information about the account, who the customer is in the current opportunity, as well as to read all the opportunities connected to this account. Detailed information about record access rights can be found in the “Access Rights“ chapter.
The goal of this stage is to collect all the information about the customer so you can define the customer needs in detail to successfully manage the opportunity.
During the stage run, the system creates the activity for the owner to collect the customer information – for example, company development history and information about key contacts.
After all the required customer information is collected, the system will create the “Call” activity to call to the customer, to verbally verify the interest and agree on the presentation date and time.
To complete the activity, click one of the results available (Fig. 130).
Fig. 130Call results at the needs analysis stage
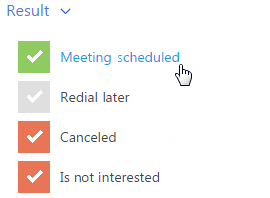
If you select the “Redial later” result, the “Call” activity will be added again. Otherwise, the process stage will end.
The goal of this stage is to present your company and products offered to the customer. At this stage, the manager will prepare the presentation with respect to the customer needs. After performing the presentation, the manager will enter the information about its results.
At this stage, the system creates the activity for the owner to prepare the presentation. Choose the most appropriate presentation for the particular customer found in your knowledge base library. Think about the questions you want to ask the customer, collect some examples for demonstration, define the list of contacts who will represent the customer and the list of existing competitors.
When you completed the activity of preparing the presentation, the process will switch to the standby mode and wait for the signal from the system to continue performing the process steps. Such signal is the completion of the “Conduct presentation” activity.
The “Conduct presentation” activity can be created at different process stages, depending on whether or not the opportunity was managed by the process. The activity due date can be preassigned manually or set automatically.
•If the opportunity was initially managed by the process, the “Conduct presentation” activity will be added at the interest verification stage, with the date and time that you specified for the activity.
•If the process was started from the manually added opportunity, the “Conduct presentation” activity will be automatically created at the presentation stage when the activity of preparing the presentation is completed. By default, the “Start” field of the added activity will be filled in with the record creation time.
You can edit the field by entering your actual presentation time.
When the presentation activity is completed, the process will display the opportunity page where you need to enter the information based on the presentation results: specify participants, opportunity management tactics, information about the products that the customer is interested in.
The rest of the process will depend on the presentation results.
•If the presentation revealed some new information about the customer's influential contacts, such as stakeholders and decision makers, switch to the [Id. decision makers] stage.
•If you did not get any new information about the customer's key contacts, switch to the [Proposal development] stage.
The [Id. decision makers] stage
The goal of this stage is to define the key contacts allowing you to better manage the opportunity based on the information about customer's influential contacts.
On the opportunity page, enter the information about the customer's decision makers and company stakeholders. You can manage the participants list, specify their level of influence, loyalty and main motivation factors.
The [Proposal submission] stage
The goal of this stage is to submit your proposal to the customer.
The stage run will depend on results of the activities added by the process.
1.At the beginning of the stage, the system creates the “Prepare materials for submitting the proposal” activity.
a.If the activity is completed, the opportunity page will open where you need to specify information about the opportunity tactics to be applied after further discussion with the appropriate manager.
b.If the activity is canceled, the stage will end.
2.After you entered all the required data on the opportunity page, the system will create the “Submit the proposal” activity.
a.If you postpone the activity, the process will return to a previous stage and create the “Prepare materials for submitting the proposal” activity again.
b.If the activity is completed or canceled, the stage will ends.
The rest of the process will depend on the proposal presentation results.
•If the customer requires more time to make a decision or wants to discuss the conditions further in hopes to achieve a new and better agreement, go to the [Negotiations] stage.
•If the customer is satisfied with your products and services and is ready to make a deal, go to the [Contracting] stage.
The goal of this stage is to discuss and mutually agree the sales conditions.
At the beginning of the stage, clarify the opportunity tactics and further negotiation steps. Enter the information on the opportunity page: enter new data obtained during negotiations, information about a competitor's strengths and weaknesses in order to flexibly manage the opportunity tactics. Then, specify if you need to discuss the negotiation tactics with the manager (Fig. 131).
Fig. 131Discussion of negotiation tactics with the manager

Further process steps will depend on your answer.
•If discussion is required, the opportunity page will open where you can enter the information about discussion results. After that, the system will create the “Negotiate a deal” activity.
•If discussion is not required, the system will go to the “Negotiate a deal” step.
When the “Negotiate a deal” activity is completed or canceled, the [Negotiations] stage will be completed.
An opportunity can be ended at any stage. To do that, select one of the terminal stages of the opportunity:
•Select ”Closed won” if the opportunity was completed successfully. For example, when you signed a contract with the customer. In such a case, check if the information on the opportunity page is up to date and schedule the activities related to the customer.
•Select ”Closed lost” if the opportunity was completed unsuccessfully. For example, when your customer gave preference to a competitor. In such a case, in the field [Reason won/lost], select [Lost], and specify the winning competitor on the [Tactics and competitors] tab.
•Select ”Closed rerouted”, if the customer needs changed or the opportunity was initially classified incorrectly. For example, if the needs analysis revealed that the customer is interested in a different class of goods, or that the customer belongs to a different target segment. In such a case, you should close the opportunity and add a new one specifying correct information for the new opportunity.
•Select ”Closed rejected” if you want to terminate the opportunity and do not want to continue cooperation with the customer. For example, if you found out that you cannot satisfy the customer needs at this time.
Note
Business process management details, including tools to add and edit processes, can be found in a separate book.