If you need to apply more complex filter that may contain several search parameters and conditions, use the advanced filter. For example, you can use it in the [Activities] section to display all meetings related to new customers.
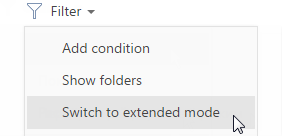
To apply the advanced filter, select the [Switch to extended mode] option from the [Filter] menu (Fig. 35).
Fig. 35 Switching to the extended filter mode
Contents
• Applying an advanced filter by object columns
• Applying an advanced filter by connected object column
• Applying the advanced filter with grouping filter conditions
• Applying an aggregate filter
• Applying filter by time period
Applying an advanced filter by object columns
You can apply filter by one of the current section columns (for example, you can filter activities by the [End date] column of the “Activity” section or contacts by the [Job Title] column of the “Contact” section).
For example, to filter uncompleted activities that were changed within the last two weeks in the [Activities] section:
1. Open the [Activities] section. From the [Filter] menu, select the [Switch to extended mode] option (Fig. 35).
2. In the filter setup area, click the <Add condition> link.
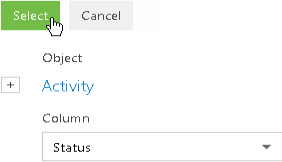
3. In the opened window, select the needed column from the [Column] drop-down list, for example, [Status], and click the [Select] button (Fig. 36).
Fig. 36 Selecting a column for the advanced filter
4. On the filter page, select the needed parameters:
a. Select the condition type by clicking its symbol, for example, “=”.
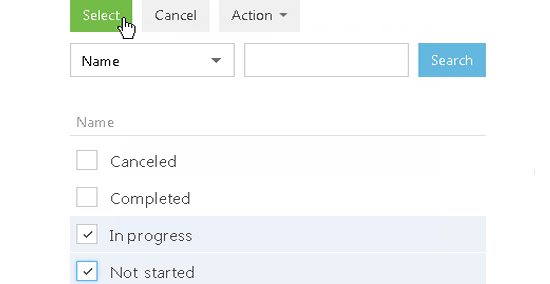
b. Click the <?> link. On the opened window, specify the values for the selected column, for example, “Not started” and “In progress”. Click the [Select] button (Fig. 37).
Fig. 37 Selecting a value for a column
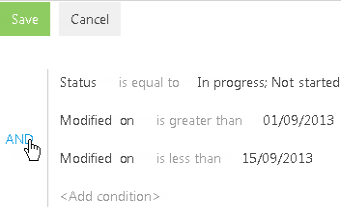
5. Similarly, add the remaining conditions. For example, specify the threshold dates for the records that were modified.
6. Specify the logical operator for the added conditions, for example, “AND”, by clicking it (Fig. 38).
Fig. 38 Selecting a logical operator
Note
The “AND” logical operator is applied if the record must match all conditions in the group. Apply the “OR” logical operator if the record must match at least one of the conditions in the group.
Note
By default, the filter area contains one empty root group with the logical operator “AND”.
7. Click the [Save] button.
As a result, only uncompleted activities that were changed within the specified period will be displayed in the [Activities] section.
Applying an advanced filter by connected object column
You can filter records by the columns of the current record and by the columns of the objects connected to it. Another example, activities can be filtered by the category of the connected account (the [Type] column of the [Accounts] section). For example, to filter activities in the [Activities] section by a certain type of company:
1. Open the [Activities] section. From the [Filter] menu, select the [Switch to extended mode] option (Fig. 35).
2. Click the <Add condition> link.
3. On the opened column selection page:
a. Click the  button next to the object name.
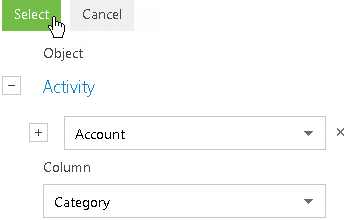
b. In the added field, select the connected object, for example, “Account”.
c. In the [Column] field, specify the column of the connected object, for example, “Category”.
d. Click the [Select] button (Fig. 39).
Fig. 39 Selecting a column of the connected object
4. On the filter setup area, select the needed parameters:
a. Click the symbol of filter condition to change its type. By default, the “=” condition is indicated.
b. Click the <?> link. In the opened window, select the needed value for the selected column, for example, “Category = VIP”. Click the [Select] button.
5. Click the [Save] button (Fig. 40).
Fig. 40 Applying filter conditions
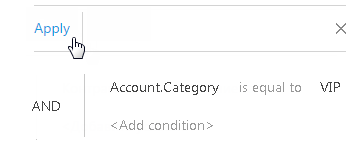
As a result, only activities that are connected to accounts of "VIP" category will be displayed in the section list.
Applying the advanced filter with grouping filter conditions
You can create advanced filters with several logical operators. For example, you can display all customer accounts who reside in New York, and those that have no city specified:
1. Open the Accounts section. From the [Filter] menu, select the [Switch to extended mode] option (Fig. 35).
2. To apply the “Type = Customer” condition:
a. Click the <Add condition> link.
b. In the opened window, select the account column, for example, “Type”. Click the [Select] button.
c. In the filter setup area, click the <?> link. In the opened window, select the needed value for the selected column, for example, “Category = VIP”. Click the [Select] button.
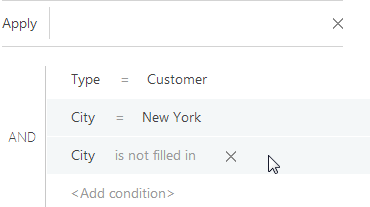
3. Add the “City = New York” condition in the same manner.
4. To apply the “City is not filled in” condition:
a. Click the <Add condition> link.
b. In the opened window, select the “City” column. Click the [Select] button.
c. In the filter setup area, click the condition type and select the “is not filled in” condition from the menu.
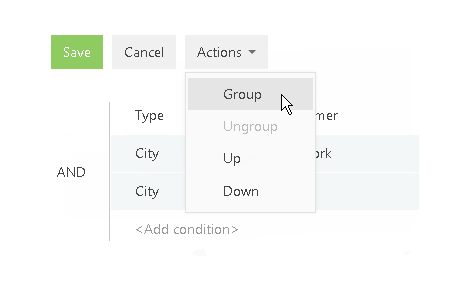
5. Group the needed conditions and set a different logical operator for them:
a. Holding down the Ctrl key, select those conditions that should be grouped (Fig. 41).
Fig. 41 Selecting filter conditions to be grouped
b. From the [Actions] menu, select the [Group] option (Fig. 42).
Fig. 42 Grouping filter conditions
As a result, the selected conditions will be combined in a separate group.
c. Set “AND” as the logical operator of the root group and “OR” as the logical operator for the newly created group by clicking the operator name (Fig. 43).
Fig. 43 Setting a logical operator for the group of filter conditions
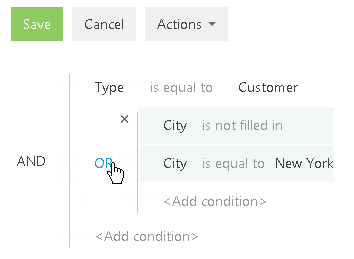
6. Click the [Apply] button.
As a result, only the accounts of the “Customer” type for which the “New York” value or no value is specified in the [City] field will be displayed in the section.
The aggregate filter allows to filter object records by the connected records in objects with the reverse connection. The following filter conditions can be applied in the aggregate filter:
• Count – a certain number of the connected records exists in the object with the reverse connection for the filtered records. For example, you can filter employees that are specified in the [Owner] field for five or more accounts.
Note
Information about your company employees is contained in the Contacts section.
• Maximum / minimum – for the filtered records, the object with the reverse connection contains records with a specific maximum (minimum) value in the numeric or the date column. For example, you can select employees whose last task was completed last week.
• Sum, average – for the filtered records, the object with the reverse connection contains the connected records with the particular sum of values or the average value in the numeric column. For example, you can filter employees whose average task duration is greater than two hours.
Applying the aggregate filter is identical to applying the filter by connected object columns. For example, you need to obtain a list of employees that are owners for the accounts of the “Customer” type. Applying the following aggregate filter will help you compile this list:
1. Open the section whose records must be filtered, for example, Contacts. From the [Filter] menu, select the [Switch to extended mode] option (Fig. 35).
2. Click the <Add condition> link.
3. In the opened column selection window (Fig. 44):
Fig. 44 Setting up a reverse connection object column in the aggregate filter
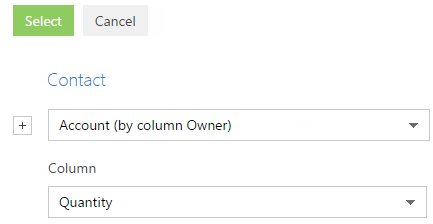
a. Click the button next to the object name.
b. In the added field, select the object with the reverse connection. For example, to apply an aggregate filter by the [Owner] column of the [Accounts] section, select “Account (by column Owner)”.
c. In the [Column] field, specify the column of the object with the reverse connection, for example, “Quantity“.
d. Click the [Select] button.
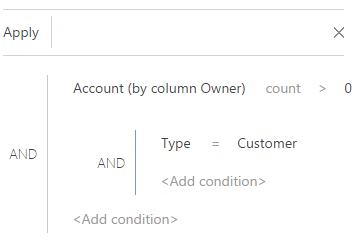
4. In the filter setup area (Fig. 45):
a. Select the filter conditions. In this case, the condition is “Quantity –› 0”.
b. Apply the necessary additional conditions: For example, if you need to display only those contacts that are owners for accounts of the “Customer” type, add this condition to the filter.
Fig. 45 Applying filter conditions for an aggregate filter
5. Click the [Apply] button.
As a result, the employee record will be displayed in the Contacts section, only if there is an account for which this contact is specified in the [Owner] field.
See also
Applying filter by time period
To display data related to a certain period of time, specify this period in the filter conditions. For example, you can view the activities that occurred during your business trip three weeks ago. To do this:
1. Open the needed section, for example, the [Activities] section.
2. From the [Filter] menu, select the [Switch to extended mode] option (Fig. 46).
Fig. 46 Switching to the extended filter mode
3. When the filter area opens, select the beginning of the period you want to display records for. To do this:
a. Click the <Add condition> link (Fig. 47). In the opened window, select the needed date column, for example, "Start", to sort activities by the start date.
Fig. 47 Adding column to filter condition

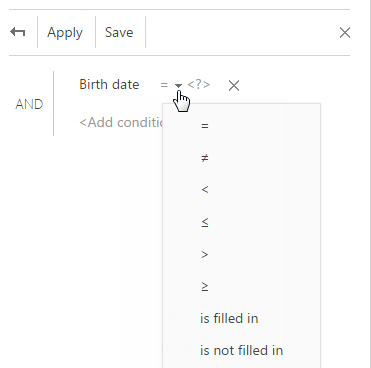
b. Select the logical operator next to the added column (Fig. 48), for example, “≥” (greater than or equal to), to set this period as the filter start date.
Fig. 48 Selecting filter condition type
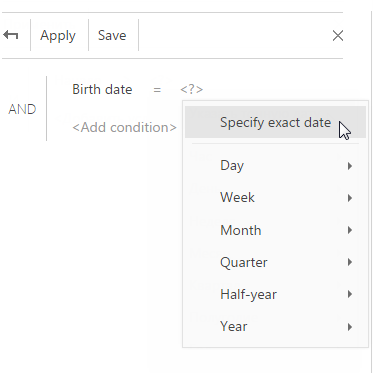
c. From the <?> link menu, select the [Specify exact date] option (Fig. 49).
Fig. 49 Specifying the exact date of filter period
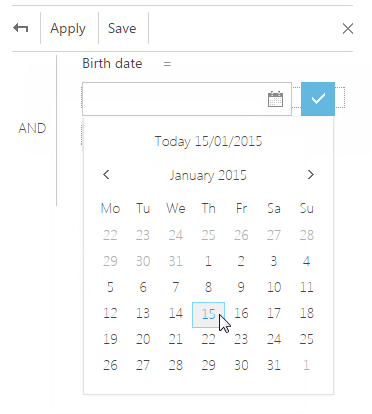
d. In the opened window, click the  button to open the built-in filter calendar, and select the needed date (Fig. 50).
Fig. 50 Built-in filter calendar
4. Similarly specify the filter end date.
a. Add the “Start” column to the filter condition to sort activities by the start date.
b. Then select the “≤” (less than or equal to) condition type.
c. Select the date from the built-in calendar.
5. Make sure that the “AND” logic operator is set for the added filter conditions.
6. Apply the filter by clicking the corresponding button.
Fig. 51 Applying filter
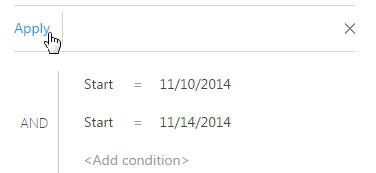
As a result, only activities that started within the specified period will be displayed in the [Activities] section.
Standard filter periods
To facilitate working with filters, use standard filter periods. For example, you can easily display records for the previous, current or next week.
Standard periods are available in the <?> link menu of the filter condition (Fig. 52).
Fig. 52 Selecting standard filter period

Hour
The menu includes options that allow you to display records for the previous, current or next hour. In addition, you can display records for a certain number of previous or next hours. Also you can set the exact time to the minute as a filter value.
To do that, select the [Exact time <?>] option and enter the needed time value in the following format – H:MM, for example, “2:43 PM”. Also, you can select a standard time value from the drop-down list.
To define the number of previous or next hours, select the [Previous hours <?>] or [Following hours <?>] option respectively. Enter the needed number in the appeared field. Only integer numbers are acceptable.
Please, note that the previous, current or following hour is not an hour from the current moment, but a full hour starting from the 1st till the 60th minute, for example, from 9:00 till 9:59 inclusive. So if the current time is 2:34, the following hour is the period from 3:00 till 3:59 inclusive, not from 2:34 till 3:33.
Day
The menu consists of options that allow you to display records for the previous, current or next day. In addition, you can display records for a certain number of previous or next days. You can also use a specific day of the month or week as a filter value.
To set a specific day of the month as a filter value, select the [Day of the month <?>] option and enter the needed date in the appeared string.
To set a specific day of the week as a filter value, click [Day] –> [Day of the week <?>] and select the needed day, for example, “Tu“ or “We“.
Week
The menu includes options that allow you to display records for the previous, current or next week.
Previous, current or next week is a calendar period from Monday till Sunday. It is not a 7-day period starting from the current day. For example, if today is Wednesday, the next week is the period from next Monday till Sunday, not the following 7 days from the current day.
Month
The menu includes options that allow you to display records for the previous, current or next month. You can also use a specific month as a filter value.
To set a specific month as a filter value, click [Month] –› [Month <?>] and select the value, for example, “December“.
Please, note that the previous, current or next month is a calendar period. For example, if the previous month was December, then when you select the “Previous month” period, the records for the period from December, 1st till December, 31st will be displayed.
Quarter
The menu includes options that allow you to display records for the previous, current or next quarter.
The previous, current or next quarter is a 3-month period: The 1st quarter includes the 1st, 2nd and 3rd months of the year (January, February, March), the 2nd quarter includes the next three months (April, May, June) and so on. For example, if it's August, the next quarter is the period that includes October, November and December (the 4th quarter).
Half-year
The menu includes options that allow you to display records for the previous, current or next half-year.
Previous, current or next half-year is a 6-month period: The period from January to June is considered the 1st half-year. The 2nd half-year is the period from the July to December. For example, if it's August (included in the 2nd half-year), then the next half-year is the time period from January to June of the next year.
Year
The menu includes options that allow you to display records for the previous, current or next year. You can also use a specific year as a filter value.
Previous, current and next year is a calendar period. For example, if it's August, 2014, the next year is the period from January to December of 2015 inclusive. It's not a 12-month period starting from August, 2014.
See also