Custom Freedom UI component implemented using remote module
The element library of the Freedom UI Designer includes a wide set of out-of-the-box components that cover most Freedom UI page customizations. For business scenarios that require something more specific — for example, a specialized input field, a custom data visualization, or a third-party widget — Creatio lets you build your own UI components and add them to the library.
Creatio lets you implement Freedom UI components of the following types:
- Custom Freedom UI component implemented using remote module.
- Custom Freedom UI component based on a Classic UI element. Learn more: Custom Freedom UI component based on a Classic UI element.
The development of a custom Freedom UI component using a remote module is based on the Module Federation plugin that divides the app into multiple smaller modules built independently. The plugin lets you develop custom Freedom UI components using various frameworks and library versions. Learn more: Module Federation (official vendor documentation).
When using the Module Federation plugin, you might experience difficulties with managing libraries that register themselves as global variables, for example, lodash.
For Creatio version 8.3.4 and later, the remote module template includes runtime and design default features. The runtime feature implements Freedom UI components and related business logic. The design feature implements Freedom UI Designer setup areas. If needed, you can add more features to split the remote module into smaller parts that Creatio loads separately.
The runtime feature definition publishes the feature discovery metadata in the discovery section, for example, public view element types and other information Creatio uses to resolve remote runtime contributions. The same definition loads designer metadata in the loadDesignerDefinitions() function and activates the runtime implementation when Creatio requests the feature. This approach is intended for advanced scenarios.
The remote module template contains a RemoteEntryDefinition object exported from the "src/main.ts" file. The RemoteEntryDefinition defines the RemoteFeatureDefinition objects provided by the package.
For Creatio version 8.3.3 and earlier
The project of a remote module has a modular structure. I.e., the business logic and view elements are aggregated into modules, which, in turn, can be aggregated into higher-level modules.
View an example of the CrtCdkModule root project module that contains the CrtInputModule and CrtButtonModule nested modules that have their own view elements in the diagram below.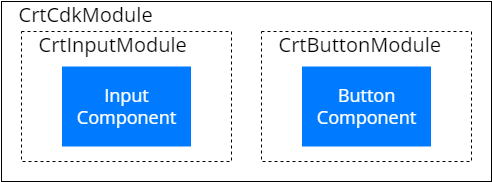
Example that creates a custom Freedom UI component using remote module: Implement a custom Freedom UI component using remote module.
To implement a custom Freedom UI component using a remote module, complete the following steps.
1. Create an Angular project
This procedure covers the custom Freedom UI component development in Microsoft Visual Studio Code. We recommend using components created using the Angular framework. The framework requires a globally installed @angular/cli command-line interface (Angular CLI). Run the npm i -g @angular/cli command in the Visual Studio Code terminal to set up the environment for component development using Angular CLI.
A custom Freedom UI component lets you include an external JS library. To do this, install the release version of the library using npm.
To create an Angular project via the Clio utility:
-
Run the
dotnet tool install clio -gcommand in the Visual Studio Code terminal to install the Clio utility (performed once). -
Run the
clio reg-web-app some_application_name -u https://mycreatio.com/ -l SomeLogin -p SomePasswordcommand in the Visual Studio Code terminal to register a new Creatio instance in Clio.Where:
some_application_nameis the Creatio instance name.https://mycreatio.com/is the Creatio instance URL.SomeLoginis the user login to the Creatio instance.SomePasswordis the user password to the Creatio instance.
-
Run the
clio install-gate some_application_namecommand in the Visual Studio Code terminal to install thecliogatesystem package into your development environment. -
Run the
clio restart some_application_namecommand in the Visual Studio Code terminal to restart your Creatio instance. -
Run the
clio createwcommand in the Visual Studio Code terminal to create a new workspace. -
Run the
clio ui some_application_name -v usr --package SomePackageName --empty truecommand in the Visual Studio Code terminal to create a project for the remote module, whereSomePackageNameis the name of the package to implement the remote module. If the workspace does not contain a package that has the specified name, Visual Studio Code creates a new package that has the specified name. -
Run the
cd some_directory/some_application_namecommand in the Visual Studio Code terminal to move to the project directory.
As a result, an Angular project to develop a custom UI component using a remote module will be added.
For Creatio version 8.3.4 and later, the project already contains:
- The remote entry exported from "src/main.ts."
- The runtime feature files.
- The optional design feature files that you extend when implementing a custom component.
2. Install npm packages
- Run the
npm icommand in the Visual Studio Code terminal to install thenpmpackages. - Run the
npm i @creatio-devkit/commoncommand in the Visual Studio Code terminal to update the@creatio-devkit/commonlibrary version. - For Creatio version 8.3.3 and later, run the
npm i @creatio/interface-designercommand in the Visual Studio Code terminal to install the@creatio/interface-designerlibrary. The project must include this library, which provides the API for interacting with the Freedom UI page schema from the setup area. - Run the
npm i class-transformercommand in the Visual Studio Code terminal to install theclass-transformerlibrary. - Run the
npm run buildcommand in the Visual Studio Code terminal to build the project.
As a result, required npm packages are installed.
3. Create a custom Freedom UI component
-
Add the "AGENTS.md" file to the project. For Creatio version 8.3.4 and later, the project must include the "AGENTS.md" file that contains instructions for coding agents like Copilot. It describes how the agent should behave in that project: coding rules, workflow expectations, tool usage, review standards, and any repo-specific constraints.
-
If you work with an existing remote module project, create the "AGENTS.md" file in the project root with the following content.
"AGENTS.md" file## Remote Module Reference Guides**MANDATORY**: Read and follow these guides before working on any task related to Creatio Freedom UI integrations with remote modules:Runtime components: node_modules\@creatio-devkit\common\AI_GUIDES_INDEX.mdDesign-time components (if relevant): node_modules\@creatio\interface-designer\AI_GUIDES_INDEX.md -
If you create a new project from the remote module template, the "AGENTS.md" file is already included.
-
-
For Creatio version 8.3.4 and later, run the
ng g c features/runtime/view-elements/some-component-name --view-encapsulation=ShadowDomcommand in the Visual Studio Code terminal to create an Angular component in the project.Where:
- "features/runtime/view-elements" specifies that the Angular component is added to the runtime feature.
some-component-nameis the custom component name.
This adds the component files to the "src/app/features/runtime/view-elements/some-component-name" directory.
For Creatio version 8.3.3 and earlier
Run the
ng g c view-elements/some-component-name --view-encapsulation=ShadowDomcommand in the Visual Studio Code terminal to create an Angular component in the project.Where:
- "view-elements" specifies that the Angular component is a view element.
some-component-nameis the custom component name.
This adds the component files to the "src/app/view-elements/some-component-name" directory.
-
For Creatio version 8.3.4 and later, define the component constants.
-
Go to the "app/features/runtime/view-elements/some-component-name" directory.
-
Create the "some-component-name.constants.ts" file.
-
Open the "some-component-name.constants.ts" file.
-
Export the following constants that define:
- the view element type
- the view element selector
- the component icon
-
Save the file.
"some-component-name.constants.ts" file/* The type of the view element.*/export const ELEMENT_TYPE = 'usr.SomeComponentName';/* The selector of the view element. */export const ELEMENT_SELECTOR = 'usr-some-component-name';/* Define the component icon as an inline SVG. */export const ELEMENT_ICON = `<svg ...>...</svg>`; -
-
For Creatio version 8.3.4 and later, define the runtime feature ID.
- Open the "src/app/features/runtime/runtime-feature.ids.ts" file.
- Export the constant that defines the runtime feature ID.
- Save the file.
"runtime-feature.ids.ts" file/* The ID of the runtime feature. */export const RUNTIME_FEATURE_ID = 'some-package-name-runtime'; -
Specify that the
SomeComponentNameComponentis a view element.- Open the "some-component-name.component.ts" file.
- Flag the component using the
@CrtViewElementdecorator. - Import the required functionality from the libraries into the file.
- Save the file.
"some-component-name.component.ts" file/* Import the required functionality from the libraries. */import { Component, OnInit, ViewEncapsulation } from '@angular/core';import { CrtViewElement } from '@creatio-devkit/common';import { ELEMENT_TYPE, ELEMENT_SELECTOR } from './some-component-name.constants';@Component({selector: 'usr-some-component-name',templateUrl: './some-component-name.component.html',styleUrls: ['./some-component-name.component.scss'],encapsulation: ViewEncapsulation.ShadowDom})/* Register the component as a Freedom UI view element. */@CrtViewElement({selector: ELEMENT_SELECTOR,type: ELEMENT_TYPE,})export class SomeComponentNameComponent implements OnInit {} -
For Creatio version 8.3.4 and later, register the
SomeComponentNameComponentview element in the runtime feature.The template already contains the runtime feature activation and
bootstrapCrtModule()call. Extend the existing files to register the custom component.-
Open the "runtime-feature.module.ts" file.
-
Add the
SomeComponentNameComponentview element to the@CrtModuledecorator and Angular module declarations."runtime-feature.module.ts" file/* Import the required functionality from the libraries. */import { NgModule } from '@angular/core';import { CommonModule } from '@angular/common';import { CrtModule } from '@creatio-devkit/common';import {SomeComponentNameComponent} from './view-elements/some-component-name/some-component-name.component';@CrtModule({/* Specify that SomeComponentNameComponent is a view element. */viewElements: [SomeComponentNameComponent]})@NgModule({declarations: [SomeComponentNameComponent],imports: [CommonModule],})export class RuntimeFeatureModule {} -
Open the "runtime.feature-definition.ts" file.
-
Add the public type of the
SomeComponentNameComponentview element to thediscovery.viewElementssection."runtime.feature-definition.ts" file/* Import the required functionality from the libraries. */import type {RemoteFeatureDefinition} from '@creatio-devkit/common';import { ELEMENT_TYPE } from './view-elements/some-component-name/some-component-name.constants';import { RUNTIME_FEATURE_ID } from './runtime-feature.ids';/*** Root definition for the runtime feature.** Describes the view elements this remote package contributes at runtime* and provides the entry points used to load designer metadata and* activate the feature.*/export const runtimeFeatureDefinition = {id: RUNTIME_FEATURE_ID,discovery: {viewElements: [{ type: ELEMENT_TYPE },],},loadDesignerDefinitions: (context) =>import('./runtime.designer-definitions').then((m) => m.loadRuntimeDesignerDefinitions(context)),activate: () =>import('./runtime.feature-activation').then((m) => m.activateRuntimeFeature()),} satisfies RemoteFeatureDefinition; -
Open the "runtime.feature-activation.ts" file.
-
Define the
SomeComponentNameComponentview element as an Angular Element. Learn more: Angular elements overview (official vendor documentation)."runtime.feature-activation.ts" file/* Import the required functionality from the libraries. */import { Injector, ProviderToken, Type } from '@angular/core';import { createCustomElement } from '@angular/elements';import { bootstrapCrtModule } from '@creatio-devkit/common';import { ensureFeatureModuleRef, ensureRemoteAppContext } from '../../remote-app-context';import { RuntimeFeatureModule } from './runtime-feature.module';import {SomeComponentNameComponent} from './view-elements/some-component-name/some-component-name.component';import { REMOTE_ENTRY_NAME } from '../../remote-entry.ids';import { ELEMENT_SELECTOR } from './view-elements/some-component-name/some-component-name.constants';function defineCustomElement(selector: string,component: Type<unknown>,injector: Injector): void {if (!customElements.get(selector)) {customElements.define(selector, createCustomElement(component, { injector }));}}/* Initialize the runtime feature module and boot the Creatio runtime integration. */export async function activateRuntimeFeature(): Promise<void> {await ensureRemoteAppContext();const moduleRef = await ensureFeatureModuleRef(RuntimeFeatureModule);const injector = moduleRef.injector;defineCustomElement(ELEMENT_SELECTOR, SomeComponentNameComponent, injector);bootstrapCrtModule(REMOTE_ENTRY_NAME, RuntimeFeatureModule, {resolveDependency: (token) =>injector.get(token as ProviderToken<unknown>),});}The remote module template includes the "remote-app-context.ts" file that exports
ensureFeatureModuleRef. The file bootstraps the remote application module and caches feature module references across calls."remote-app-context.ts" file/* Import the required functionality from the libraries. */import { Injector, NgModuleRef, Type, createNgModule } from '@angular/core';import { platformBrowser } from '@angular/platform-browser';import { RemoteAppModule } from './remote-app.module';export interface RemoteAppContext {injector: Injector;moduleRef: NgModuleRef<RemoteAppModule>;}let remoteAppContextPromise: Promise<RemoteAppContext> | undefined;const featureModuleRefs = new Map<Type<unknown>, NgModuleRef<unknown>>();async function bootstrapRemoteApp(): Promise<RemoteAppContext> {const moduleRef = await platformBrowser().bootstrapModule(RemoteAppModule);const injector = moduleRef.injector;return {injector,moduleRef,};}async function ensureRemoteAppContext(cultureName?: string): Promise<RemoteAppContext> {if (!remoteAppContextPromise) {remoteAppContextPromise = bootstrapRemoteApp().catch((error: unknown) => {remoteAppContextPromise = undefined;throw error;});}return remoteAppContextPromise;}export async function ensureFeatureModuleRef<T>(moduleType: Type<T>): Promise<NgModuleRef<T>> {const existingModuleRef = featureModuleRefs.get(moduleType) as NgModuleRef<T> | undefined;if (existingModuleRef) {return existingModuleRef;}const { injector } = await ensureRemoteAppContext();const moduleRef = createNgModule(moduleType, injector);featureModuleRefs.set(moduleType, moduleRef);return moduleRef;} -
Save the files.
For Creatio version 8.3.3 and earlier
Register the
SomeComponentNameComponentview element as a component.- Open the "app.module.ts" file.
- Add the
SomeComponentNameComponentview element to the@CrtModuledecorator. - Register the
SomeComponentNameComponentview element as a component, i.e., Angular Element, in thengDoBootstrap()method of theAppModuleroot module. Learn more: Angular elements overview (official vendor documentation). - Save the file.
"app.module.ts" file/* Import the required functionality from the libraries. */import { DoBootstrap, Injector, NgModule, ProviderToken } from '@angular/core';import { createCustomElement } from '@angular/elements';import { BrowserModule } from '@angular/platform-browser';import { bootstrapCrtModule, CrtModule } from '@creatio-devkit/common';import {SomeComponentNameComponent} from './view-elements/some-component-name/some-component-name.component';@CrtModule({/* Specify that SomeComponentNameComponent is a view element. */viewElements: [SomeComponentNameComponent]})@NgModule({declarations: [SomeComponentNameComponent],imports: [BrowserModule],providers: [],})export class AppModule implements DoBootstrap {constructor(private _injector: Injector) {}ngDoBootstrap(): void {/* Register SomeComponentNameComponent as an Angular Element. */const element = createCustomElement(SomeComponentNameComponent, {injector: this._injector,});customElements.define('usr-some-component-name', element);/* Bootstrap CrtModule definitions. */bootstrapCrtModule('some-package-name', AppModule, {resolveDependency: (token) =>this._injector.get(<ProviderToken<unknown>>token)});}} -
-
Run the
npm run buildcommand in the Visual Studio Code terminal to build the project.
As a result, the build will be added to the "dist" directory of the Angular project.
4. Implement the business logic of the custom Freedom UI component
-
Implement the business logic of the component.
-
For Creatio version 8.3.4 and later, open the "src/app/features/runtime/view-elements/some-component-name/some-component-name.component.ts" file.
For Creatio version 8.3.3 and earlier
Open the "src/app/view-elements/some-component-name/some-component-name.component.ts" file.
-
Add the
valueproperty to theSomeComponentNameComponentcomponent class. The property manages the component value. -
Flag the
valueproperty using the@Inputand@CrtInputdecorators. -
Import the required functionality from the libraries into the file.
-
Save the file.
"some-component-name.component.ts" file/* Import the required functionality from the libraries. */import { Component, Input, OnInit } from '@angular/core';import { CrtInput, CrtViewElement } from '@creatio-devkit/common';export class SomeComponentNameComponent implements OnInit {/* Add decorators to the value property. */@Input()@CrtInput()/* The component value. */public value: some_value_type;} -
-
Add the markup of the custom component to the "some-component-name.component.html" file.
-
Add the styles of the custom component to the "some-component-name.component.scss" file.
-
Run the
npm run buildcommand in the Visual Studio Code terminal to build the project.
As a result, the build will be added to the "dist" directory of the Angular project.
Examples that implement additional business logic of the custom Freedom UI component: Implement the validation in the custom Freedom UI component, Implement a custom converter using remote module.
5. Add the custom Freedom UI component to the Freedom UI Designer (optional)
We recommend adding the custom Freedom UI component to the library of the Freedom UI Designer if you are going to use the component as part of no-code development.
To add the custom Freedom UI component to the library of the Freedom UI Designer:
-
For Creatio version 8.3.4 and later, set up the component layout.
- Open the "runtime.designer-definitions.ts" file.
- Import the required functionality from the libraries into the file.
- Add the metadata of the custom component to the
viewElementscollection returned by theloadRuntimeDesignerDefinitions()function. - Specify the same public
typethat you registered in the "runtime.feature-definition.ts" file. - Specify the path to the image in the
toolbarConfig.iconproperty. You can specify the path in the constant and use its value in thetoolbarConfig.iconproperty. Make sure the icon meets the Requirements for icons of custom Freedom UI page components. - Set up the
toolbarConfigproperty that manages the element layout in the library of the Freedom UI Designer. - Specify the default property values of the component in the
defaultPropertyValuesproperty. - Save the file.
- Localize the custom Freedom UI component if needed. Instructions: Localize custom Freedom UI component implemented using remote module.
"runtime.designer-definitions.ts" file/* Import the required functionality from the libraries. */import type {RemoteDesignerDefinitionsLoadContext,RemoteFeatureDesignerDefinitions,} from '@creatio-devkit/common';import { ELEMENT_ICON, ELEMENT_TYPE } from './view-elements/some-component-name/some-component-name.constants';export async function loadRuntimeDesignerDefinitions(context: RemoteDesignerDefinitionsLoadContext): Promise<RemoteFeatureDesignerDefinitions> {return {viewElements: [{type: ELEMENT_TYPE,toolbarConfig: {caption: 'Some component name',/* The path to the component image. */icon: ELEMENT_ICON,},defaultPropertyValues: {label: 'Some component name'}}]};}For Creatio version 8.3.3 and earlier
Set up the component layout.
- Open the "some-component-name.component.ts" file.
- Flag the component using the
@CrtInterfaceDesignerItemdecorator that has thetoolbarConfigproperty. The property manages the element layout in the library of the Freedom UI Designer. - Import the required functionality from the libraries into the file.
- Upload the icon to display in the library of the Freedom UI Designer. Make sure the icon meets the Requirements for icons of custom Freedom UI page components.
- Specify the path to the image in the
toolbarConfig.iconproperty. - Run the
npm i raw-loader --save-devcommand in the Visual Studio Code terminal to transfer the icon in thestringformat. - Set up the
toolbarConfigproperty that manages the element layout in the library of the Freedom UI Designer. - Specify the default property values of the component in the
toolbarConfig.defaultPropertyValuesproperty. - Save the file.
- Localize the custom Freedom UI component if needed. Instructions: Localize custom Freedom UI component implemented using remote module.
"some-component-name.component.ts" file/* Import the required functionality from the libraries. */import { CrtInterfaceDesignerItem } from '@creatio-devkit/common';/* Add the CrtInterfaceDesignerItem decorator to the SomeComponentNameComponentcomponent. */@CrtInterfaceDesignerItem({/* Manages the element layout in the library of the Freedom UI Designer. */toolbarConfig: {/* The localizable name of the component. */caption: localize('SomeComponentName.Caption'),name: 'usr_some-component-name',/* The path to the component image. */icon: require('!!raw-loader?{esModule:false}!./some_picture_name.svg'),defaultPropertyValues: {/* The localizable name of the component in the library of the Freedom UIDesigner. */label: 'Some component name'}}}) -
For Creatio 8.3.3 and later, create Freedom UI Designer setup area for a custom Freedom UI component if needed. Instructions: Freedom UI Designer setup area for a custom Freedom UI component.
-
Run the
npm run buildcommand in the Visual Studio Code terminal to build the project.
As a result, the build will be added to the "dist" directory of the Angular project.
6. Add the custom Freedom UI component to the Freedom UI page
-
Create a custom app if needed. Instructions: Create an app manually (user documentation).
-
Upload packages to Creatio using the Clio utility.
- Go to the "../Terrasoft.WebApp/Terrasoft.Configuration/Pkg/SomePackage/Files" directory.
- Create a "src/js" directory.
- Copy the build artifacts from the "dist" project directory to the "../Terrasoft.WebApp/Terrasoft.Configuration/Pkg/SomePackage/Files/src/js" directory.
- Run the
clio pushw -e SomeApplicationNamecommand in the Visual Studio Code terminal to upload the changes to Creatio.
-
Open the needed app in the Application Designer.
-
Open the needed page in the Freedom UI Designer.
-
Drag the custom Freedom UI component to the canvas.
-
Click
 → Source code to open the source code of the Freedom UI page.
 -
Bind the
valueproperty of the custom Freedom UI component to the corresponding model attribute in theviewConfigDiffschema section.viewConfigDiff schema sectionviewConfigDiff: /**SCHEMA_VIEW_CONFIG_DIFF*/[{"operation": "insert","name": "SomeComponentName","values": {/* The property that defines the element type. */"type": "usr.SomeComponentName",/* The property that defines the component value. Bound to theSomeAttributeName attribute. */"value": "$SomeAttributeName"}}]/**SCHEMA_VIEW_CONFIG_DIFF*/, -
Click Save.
As a result, the custom Freedom UI component will be added to the Freedom UI page. When the page loads, Creatio resolves the component type declared in the runtime feature and activates its implementation.
See also
Custom Freedom UI component based on a Classic UI element
Custom converter implemented using remote module
Operations with schemas in Creatio IDE
Requirements for icons of custom Freedom UI page components
Resources
Remote module template (for Creatio version 8.3.4 and later)
Remote module template (for Creatio version 8.3.3 and earlier)
Angular elements overview (official vendor documentation)
Module Federation (official vendor documentation)