Creatio implements the "Problem management" ITSM process in the Problems section. Use this section to manage registered problems and plan the working time for problem resolution. Effective problem management decreases the influence of cases on service performance and prevents further cases.
A “problem” is the root cause of one or more occurred (possible) cases. For example, frequent breakdowns of a certain product node can be identified as a “problem.”
Identify problems
Identify problems by analyzing multiple similar incidents and determining their common cause. Multiple incidents linked to the same service or configuration item, indicate a problem with that element of the IT infrastructure or the elements it depends on. To identify the faulty element:
-
Check the values of the Service and Configuration item fields on the incident page.
-
Check the dependencies of the incident service and configuration item using the service model on the case page.
Once the problem has been identified, proceed with the problem registration:
-
Add a new record in the Problems section. There are several ways you can do so:
-
Go to the Problems section and click New.
-
To add a problem from the incident page, go to the Closure and feedback tab → Problems →
 → New.
-
-
Populate the fields on the problem page:
Subject
Brief description of the problem.
Description
Detailed description of the problem. For example, specify the circumstances that contributed to the problem cause or its influence on service availability.
Owner
Service team member who is responsible for resolving the problem.
Assigned team
Group of specialists within the department who are responsible for resolving the selected problem. You can customize user groups as the elements of the organizational structure in the Roles and users section.
Priority
Relative importance of resolving the problem.
-
Populate the fields on the Problem profile tab of the problem page:
Type
Select the problem type, e.g., “Known error” or “Problem”.
Service
Specify the service where the problem is. Resolving the problem would require making changes to this service.
Configuration item
Specify the configuration item where the problem is. Resolving the problem would require making changes to this CI.
-
Add incidents that are caused by the problem to the Cases detail by clicking Problem profile → Cases →
 and selecting checkboxes next to the corresponding incidents.
 -
Click Save.
As a result, a new problem record will be created. And the incidents caused by the problem will be added to the Cases detail of the problem page.
Determine the scope of a problem
Because of the complexity and interdependence of various elements in the IT infrastructure, the scope of a problem may be larger than simply the cases connected to the faulty service or CI. Use the service model to check other infrastructure elements that may be affected by the problem. As a result, additional incidents may be linked to the problem.
To view relations between a service and a configuration item:
-
Open the Problems section.
-
Select a record in the section list and click Open.
-
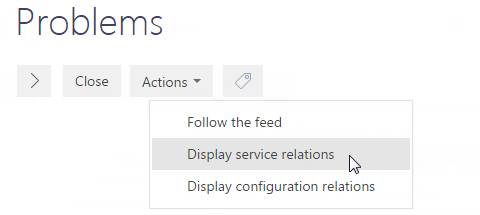
In the Actions menu of the problem page, select the Display configurations relations or Display service relations option (Fig. 1).
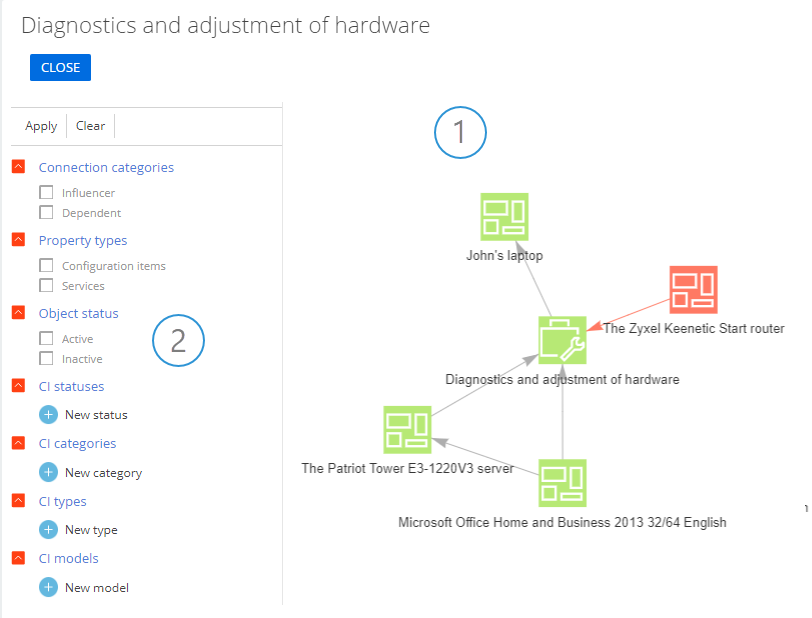
As a result, a service connection diagram for the selected IT infrastructure item will display (Fig. 2).
-
The Display service relations action opens a connection diagram for the service specified in the Service field of the problem page.
-
The Display configuration relations action opens a connection diagram for the configuration item specified in the Configuration item field of the problem page.
As a result of using the connection diagrams, a service team specialist can define which IT infrastructure items cause the current problem. The faulty item of the IT infrastructure is considered the most probable reason for service delivery failure.
Resolve and close problems
The problems are resolved by finding temporary workarounds or making changes to the IT infrastructure. Once a solution to a problem is implemented, the problem management process requires that the corresponding problem is marked as “resolved” and eventually – “Closed.”
To do so:
-
Open the resolved problem page. There are several ways you can do this:
-
Go to the Problems section, select the needed record, and click Open.
-
To open a problem from the change page, go to the Classification tab → Problems and click the needed problem record.
-
-
In the Status field of the problem page, select the needed status:
-
Select “Resolved” when the change has been implemented, or if a workaround has been accepted temporarily.
-
Select “Closed” when you have a confirmation that the problem has been eliminated as part of a change.
-
-
Populate the fields on the Resolution tab:
Resolution
Describe how the problem was resolved as a result of the change.
Actual resolution time
Date when the problem was resolved.
Closed on
Date when the problem was finally closed.
-
Click Save.