Campaign diagrams consist of campaign elements connected with flows.
|
Campaign elements |
Status details |
|---|---|
 |
Sends a trigger email to campaign participants who are transferred via the element's incoming flows. |
|
|
Adds campaign audience from a dynamic or static folder, as well as from a custom filter. |
|
|
The element adds participants to the campaign audience automatically, on a trigger. |
|
|
Adds the audience of the event to the campaign's participant list. |
 |
Adds participants to the campaign when a web form is filled out on a landing page. |
 |
Adds participants from the campaign to an event. |
 |
Creates new Creatio records based on the data of the campaign's participants. |
 |
Modifies existing records. |
 |
Validates the campaign's audience using the specified rules and suspends the further participation of duplicates. |
 |
Advances participants to different outgoing flows randomly. For example, use it for A/B testing. |
 |
Integrates landing pages and campaigns. |
 |
Launches a campaign or activates the following campaign element at a specific time, either once or regularly. |
 |
The element enables participants who correspond to the specified filter conditions and those transferred to this element by incoming flows to exit the campaign. |


The Marketing email element
The Marketing email  element lets you use trigger emails (created in the Email section) in your campaigns.
The execution time of this step depends on the configured flows.
To set up the Marketing email element:
- Drag the item to the diagram.
-
Select a trigger email from the Email section to send to the email audience in the Which trigger email to send? field (Fig. 1).
The other fields are locked and populated with the value specified upon the creation of the trigger email.
Fig. 1 Set up the Marketing email element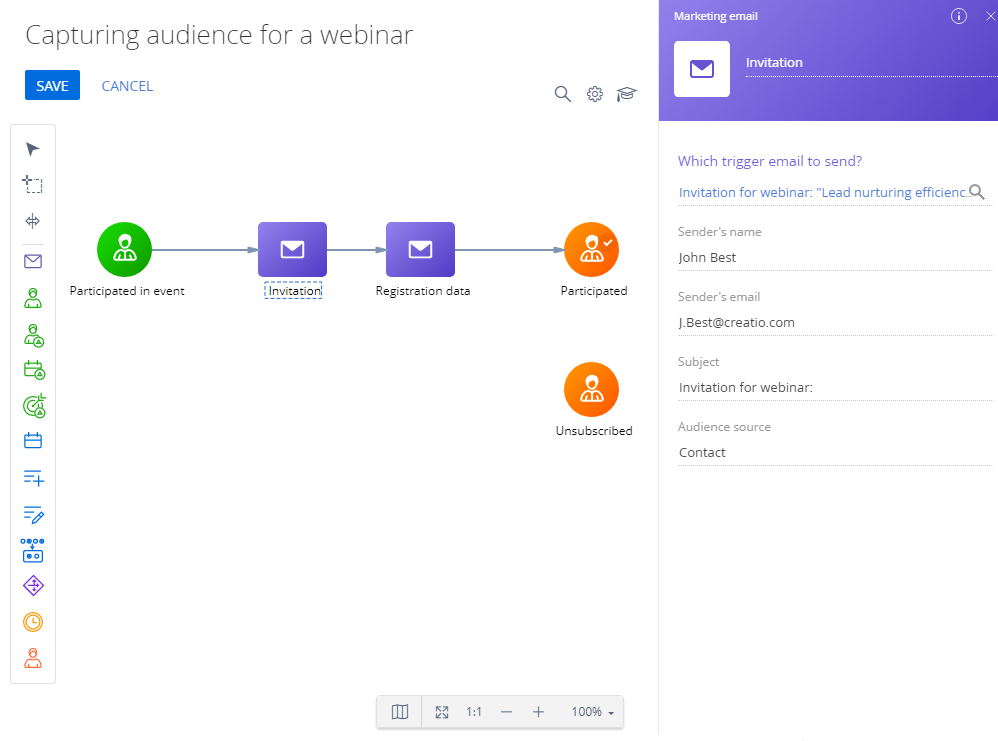
- Select email responses to advance the participants down the outgoing flows if available. You can transfer participants down a flow unconditionally or only advance those participants whose responses match the selected options in the flow's properties area.
-
Select one or several links from the email template (Fig. 2) when selecting the Email clicked response.
Only the participants who click the selected links will proceed down the condition flow.
Fig. 2 Transition based on the email response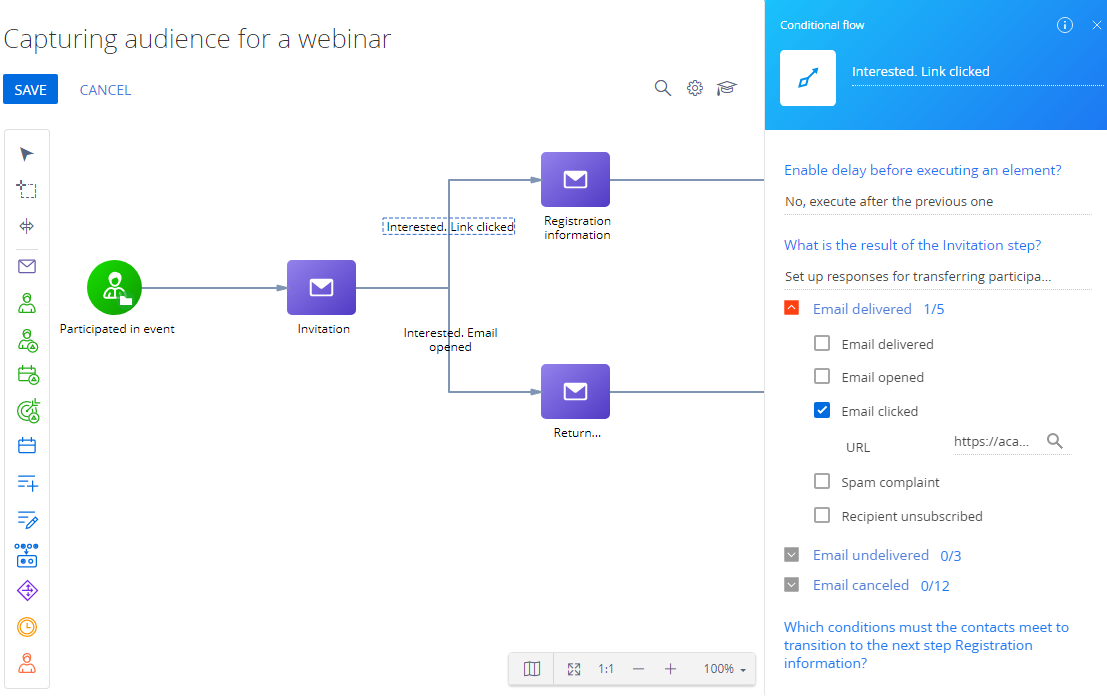
If the trigger email template has dynamic content, Creatio will treat all URLs in each replica as unique URLs. When you fill out the Redirection URL field for a trigger email with dynamic content, you will see the list of links from all template replicas. Select all available link variants to enable recipients of each replica to go down the condition flow.
Delay countdown starts as soon as the participant reaches the element. For example, if you set a 3-day transition delay for the “Email opened” condition, all contacts who open the email within 3 days will move down this conditional flow.
The Add audience element
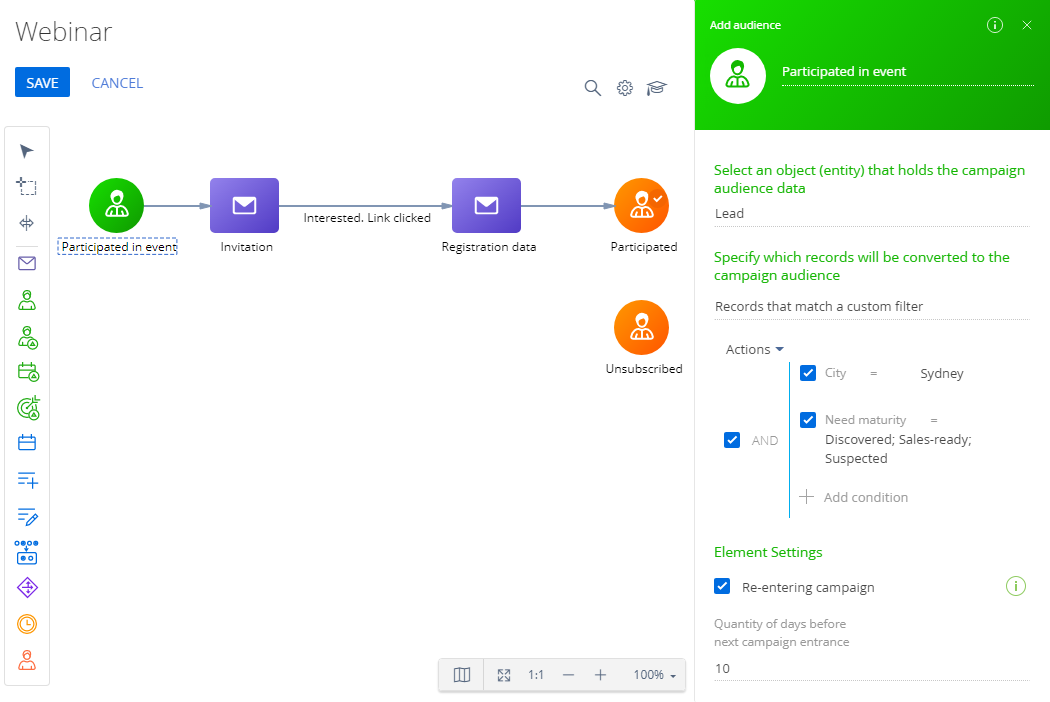
The Add audience element ![]() adds campaign participants from a dynamic or static folder or using the specified filter settings (Fig. 3). You can add an unlimited number of Add audience elements to the campaign diagram. The audience always consists of contacts. Creatio stores associated entities, such as leads, accounts, or orders, separately.
adds campaign participants from a dynamic or static folder or using the specified filter settings (Fig. 3). You can add an unlimited number of Add audience elements to the campaign diagram. The audience always consists of contacts. Creatio stores associated entities, such as leads, accounts, or orders, separately.
To set up the Add audience element:
- Drag the
 element to the diagram.
 - Select the object for importing the campaign audience in the Select an object (entity) that holds the campaign audience data field. For example, you can import leads. In this case, the connected contacts will be imported to the campaign audience. The list of available entities is specified in the Entity settings for campaign signal lookup.
- Select “Folder” in the Specify which records will be converted to the campaign audience field to add contacts from a pre-configured group. Select “Filter” to filter records using filter conditions.
- If you select “Folder,” specify the folder name in the Which folder to add participants from? field.
- If you select “Filter,” set up the filtering conditions. For example, filter leads with a certain need maturity who live in a specific city.
-
Select the Re-entering the campaign checkbox to enable participants to go through the campaign multiple times. By default, the participants from the specified folder do not re-enter the campaign after they exit it. You can specify the number of days before the participants can re-enter the campaign in the Quantity of days before next campaign entrance field. For example, you can set up an NPS campaign to launch every 90 days. The countdown starts the moment the participant is added.
The participants who have not yet completed the campaign and are set to re-enter again will receive the “Suspended” status. Learn more: Re-entering the campaign.
Re-entering the campaign
You can select the Recurring entrance checkbox in the Participation rules group when setting up the properties of the Triggered adding element (Fig. 4).
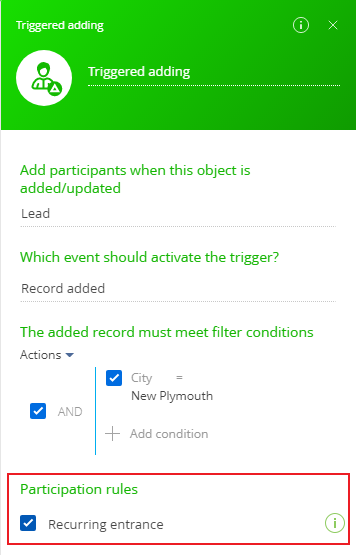
The Recurring entrance checkbox is selected: when a participant is re-added from a trigger, their current campaign progress will be suspended. Use this option to make the contact start the campaign anew after re-adding. For example, the contact can be sent an introductory email upon each lead registration.
The Recurring entrance checkbox is cleared: when a participant is re-added, the campaign fragment before the delay will be executed. The contact will proceed their transition through the campaign. You can use this feature to send confirmation emails (transaction emails). In this case, the contact will receive a corresponding email after a triggered adding of a lead and continue to transition through the campaign steps without restarting. Otherwise, the contact will change their current step, and a logical error will happen.
Add objects to the Entity settings for campaign signal lookup
You can edit the list of available objects in the Entity settings for campaign signal lookup (Fig. 5).
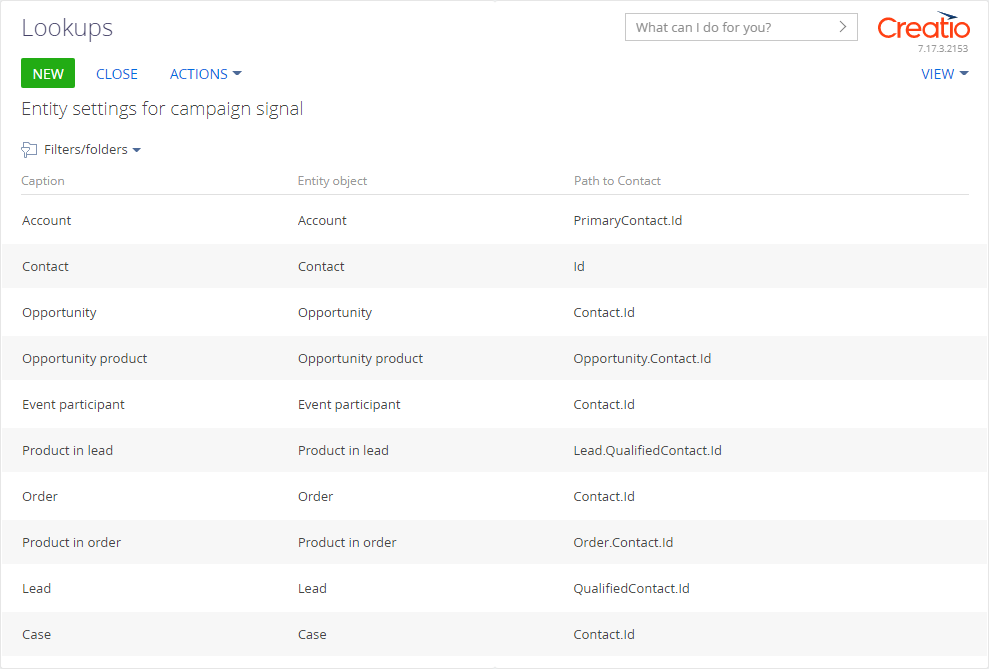
To add a new object:
- Click
 in the main Creatio application.
 - Click Lookups in the System setup block.
- Open the content of the Entity settings for campaign signal lookup
- Click New.
- Fill out the values of the new lookup record:
-
Specify the name of the object in the Caption column. This caption is displayed in the Add participants when this object is added/updated field in the setup area of the Triggered adding element.
-
Specify the name of the object in the database in the Object column. You can use the Section Wizard or Detail Wizard to look up the object (Fig. 6).
Fig. 6 Object name in the Section Wizard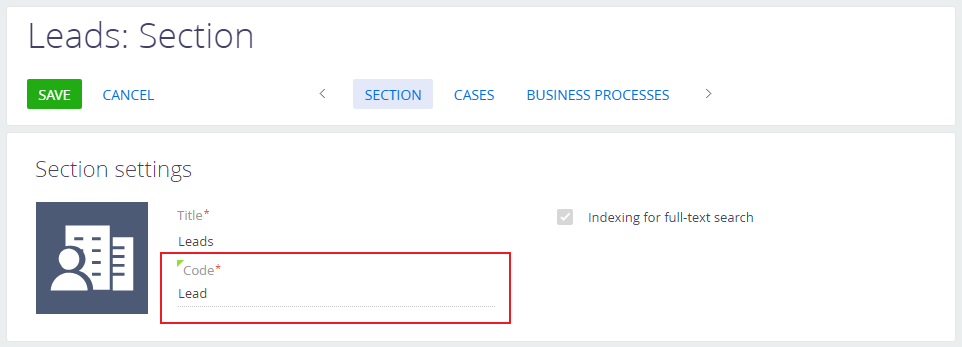
-
Specify the name of the column which connects the necessary object to the “Contact” object in the Path to contact object column.
-
The Triggered adding element
The Triggered adding start element ![]() adds participants to the campaign audience automatically, on a trigger.
adds participants to the campaign audience automatically, on a trigger.
The audience always consists of contacts. Creatio stores associated entities, such as leads, accounts, or orders, separately. For example, if you select the “Lead” record type in the element, Creatio adds the contact specified in the lead profile. The specifics for the connection between the added participant and the trigger record are specified for each object individually.
Participants are added to the campaign as soon as the trigger fires. The audience list on the Participants tab is updated when the campaign is launched (manually or automatically).
Triggers fire after the following events:
-
Existing record modified. Creatio adds participants to the campaign audience whenever an existing record is updated (modified) in a specific section. Tracked fields are specified during the element setup. The updated record must meet the filter conditions.
-
New record added. Creatio adds participants to the campaign audience whenever a new record is added to a specific section, detail, or lookup. The newly added record must meet the filter conditions.
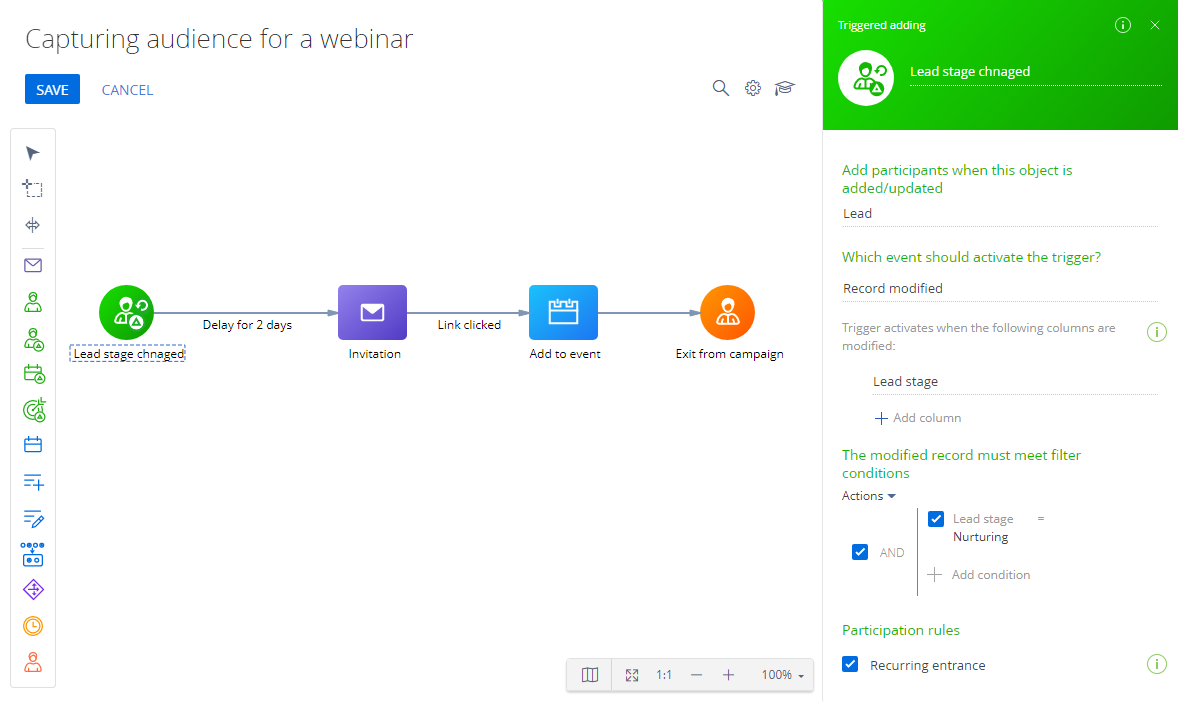
The “Record modified” trigger event
To set up the Triggered adding element for a record modification (Fig. 7):
- Drag the
 item to the diagram.
 -
Select the object whose record will trigger adding a new campaign participant in the Add participants when this object is added/updated field. The list of available field values is specified in the Entity settings for campaign signal lookup. For example, to add campaign participants whenever a lead record is modified (advances to the “Nurturing” stage), select the “Lead” object. All leads added to the campaign must be connected to a contact. Use the Entity settings for campaign signal lookup to map the contact fields.
-
Select “Record changing” in the What event should happen? field and fill out the fields that appear.
-
Specify the columns whose values must be modified for the “Record updated” event to occur in the Trigger activates when the following columns are modified field. For example, to add participants to the campaign if the lead stage is changed, select the “Lead stage” column.
-
Specify the conditions the record must meet to trigger the element in the The modified record must meet filter conditions field. For example, to add participants to the campaign once the lead stage is changed to “Nurturing,” set the “Lead stage = Nurturing” filter. If you do not specify the filter, any change in the specified columns will trigger adding new campaign participants.
-
Select the Re-entering the campaign checkbox to enable participants to go through the campaign multiple times. By default, the participants from the specified folder do not re-enter the campaign after they exit it. You can specify the number of days before the participants can re-enter the campaign in the Quantity of days before next campaign entrance field. For example, you can set up an NPS campaign to launch every 90 days. The countdown starts the moment the participant is added.
The participants who have not yet completed the campaign and are set to re-enter again will receive the “Suspended” status. Learn more: Re-entering the campaign.
As a result, each time a new lead reaches the Nurturing stage, the Triggered adding element will add the connected contact to the campaign audience.
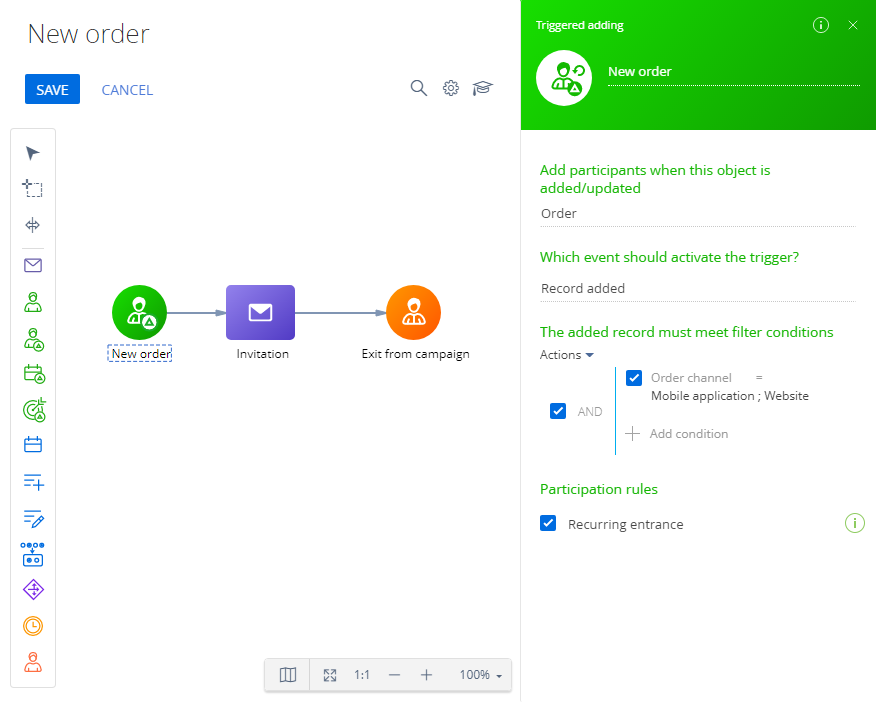
The “Record added” trigger event
To set up the Triggered adding element for adding a record (Fig. 8):
- Drag the element to the diagram.
-
Select the object whose record will trigger adding a new campaign participant in the Add participants when this object is added/updated field. The list of available field values is specified in the Entity settings for campaign signal lookup. For example, to add campaign participants when adding an order record, select the “Order” entity. All orders added to the campaign must be connected to a contact. Use the Entity settings for campaign signal lookup to map the contact fields.
-
Select “Add record” in the What event should happen? field and fill out the fields that appear.
-
Specify the conditions the record must meet to trigger the element in the The added record must meet filter conditions field. For example, to add campaign audience when adding a new order on the website or in the mobile app only, set the “Order channel = Website; Mobile application” filter. Without the filter, any new orders will trigger the adding of new campaign participants.
-
Select the Re-entering the campaign checkbox to enable participants to go through the campaign multiple times. By default, the participants from the specified folder do not re-enter the campaign after they exit it. You can specify the number of days before the participants can re-enter the campaign in the Quantity of days before next campaign entrance field. For example, you can set up an NPS campaign to launch every 90 days. The countdown starts the moment the participant is added.
The participants who have not yet completed the campaign and are set to re-enter again will receive the “Suspended” status. Learn more: Re-entering the campaign.
As a result, each time a new order is created on the site or in the mobile app, the Triggered adding element will add the connected contact to the campaign audience.
Specifics of the Triggered adding element
-
As soon as a new participant is added to the campaign, they move through the campaign steps until they reach an element or flow with a configured delay.
This occurs even if the Triggered adding element adds the same contact as the campaign participant several times (e. g., if two different leads with the same contact trigger the element at different times).
- Whenever such a participant goes down a conditional flow for the first time, any subsequent instances of the same participant will not be able to go down that conditional flow. If a campaign element must not execute for a participant more than once, place a conditional flow between it and the Triggered adding element. For example, the same participant will not be able to go down the “Wait 2 days” conditional flow twice (Fig. 7).
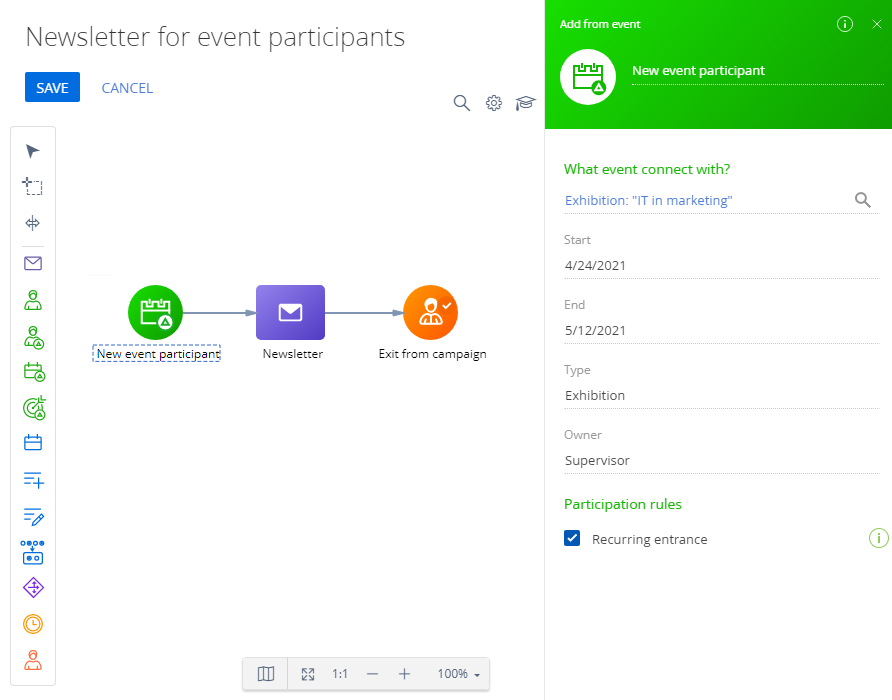
The Add from event element
Use the Add from event campaign element  to integrate event audiences with your campaigns. The Add from event element is triggered when new records are added to the list of event participants (Fig. 9). This element works similarly to a Triggered adding element configured for adding participants from an event audience.
Participants are added to the campaign as soon as they are added as the event's participants. The audience list on the Participants tab is updated when the campaign is launched (manually or automatically).
To set up the Add from event element:
- Drag the element to the diagram.
- Use the What event connect with? field to specify the event whose audience will be added to the campaign audience. A contact added to the Contacts detail on the Audience tab of the event will also be added to the campaign audience. After you fill out the parameter, the properties area will display the event's dates, type, and owner. These fields are locked and populated with values specified upon the creation of the event.
- Select the Recurring entrance checkbox to suspend the execution of the campaign's flow and start the campaign from step one when the contact is re-added to the event participant list. Learn more: Re-entering the campaign.
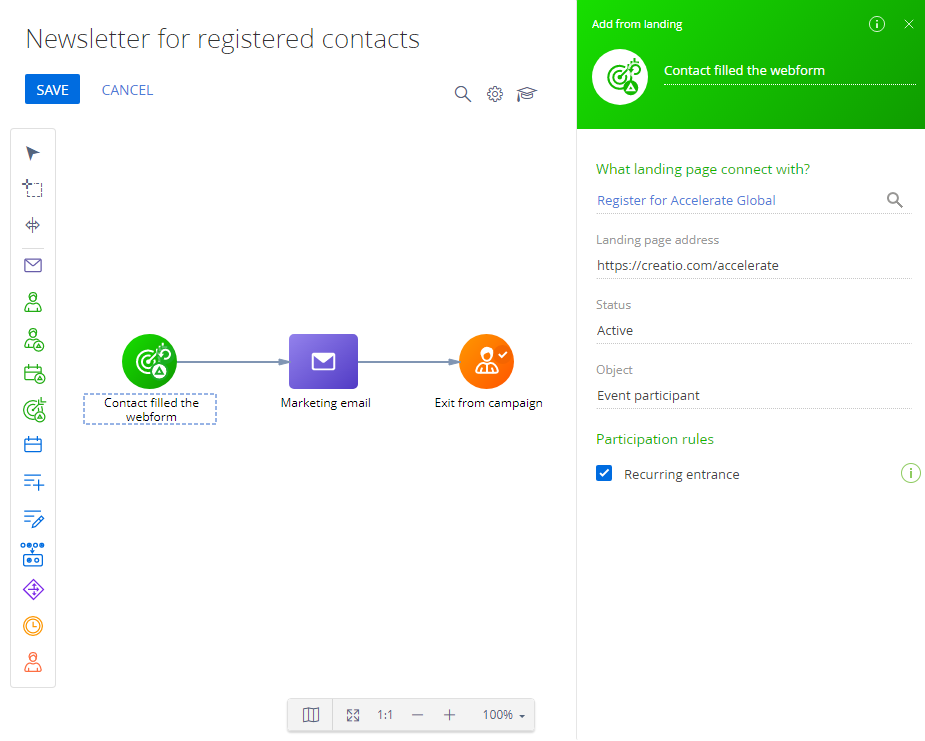
The Add from landing element
Use the Add from landing start element  to integrate landing pages and campaigns (Fig. 10).
The Add from landing element is triggered when a web form is filled out on a landing page. This element works similarly to a Triggered adding element configured for adding participants when creating a connected object. A contact will be added to the list of campaign participants as soon as a web form is filled out on a landing page. The audience list on the Participants tab is updated when the campaign is launched (manually or automatically).
To set up the Add from event element:
- Drag the element to the diagram.
- Select one of the previously added landing pages in the What landing page to connect with? field. After you fill out the parameter, the element's properties area will display the landing page URL, status, and the Creatio object bound to the landing page. These fields are locked and populated with the value specified upon the creation of the landing page.
- Select the Recurring entrance checkbox to suspend the execution of the campaign's flow and start the campaign from step one when the contact is re-added to the event participant list. Learn more: Re-entering the campaign.
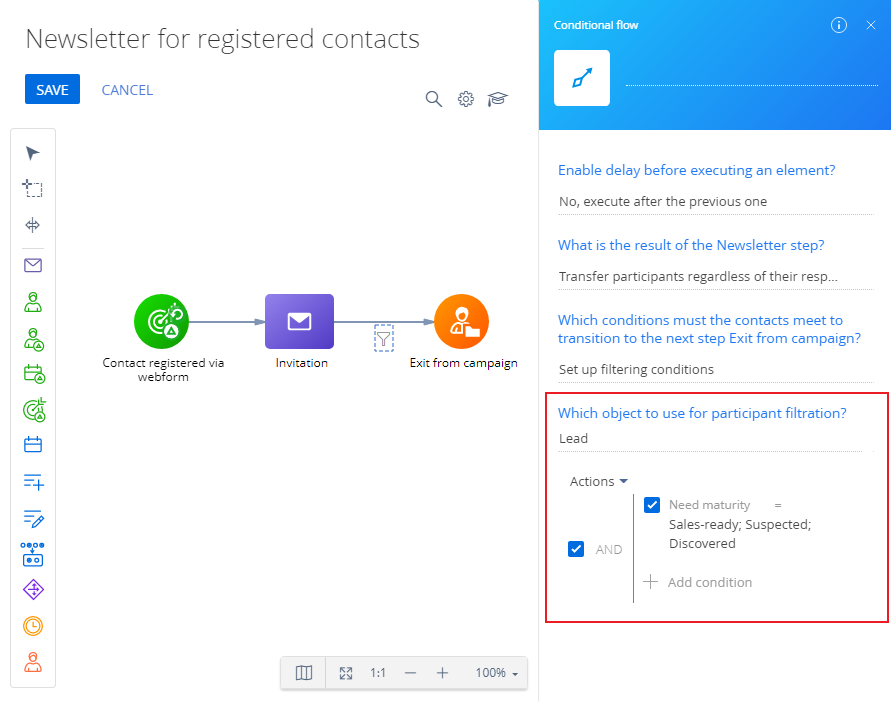
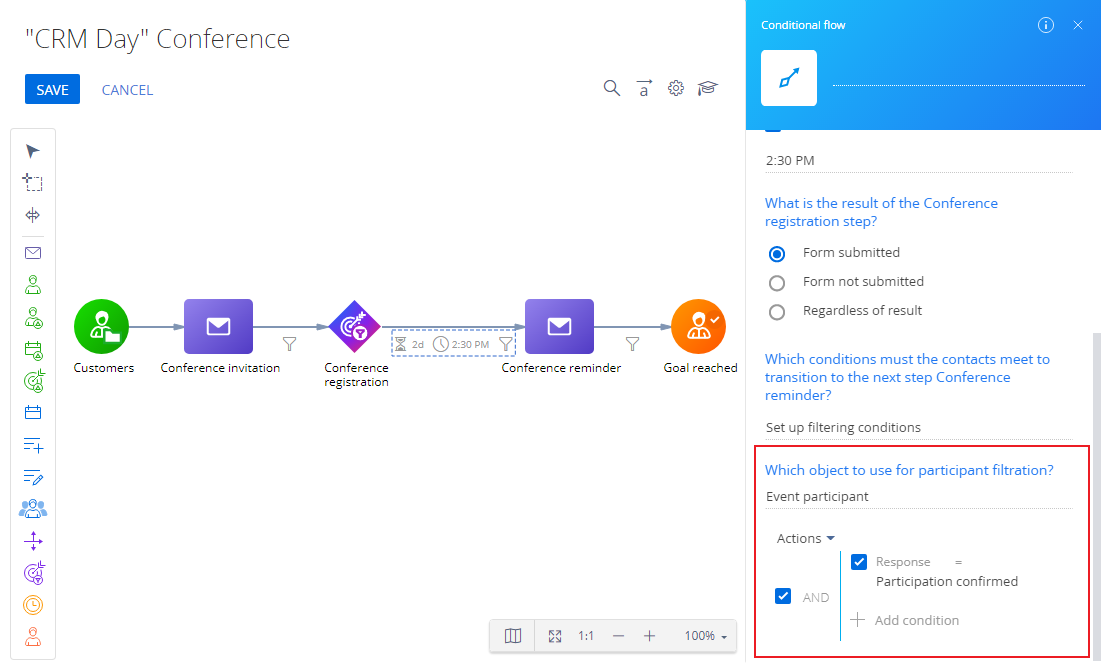
You can set up the filtering by the object specified in the properties of the Add from landing element when moving to the next campaign element. For example, as displayed on Fig. 11.
The Add to event element
The Add to event element  adds campaign participants to an event (Fig. 12).
To set up the Add to event element:
- Drag the element to the diagram.
- Use the What event connect with? field to select the event whose audience will be populated with new contacts from the campaign audience. After you fill out the parameter, the properties area will display the event's dates, type, and owner. These fields are locked and populated with the value specified upon the creation of the event.
Fig. 12 Set up the Add to event element
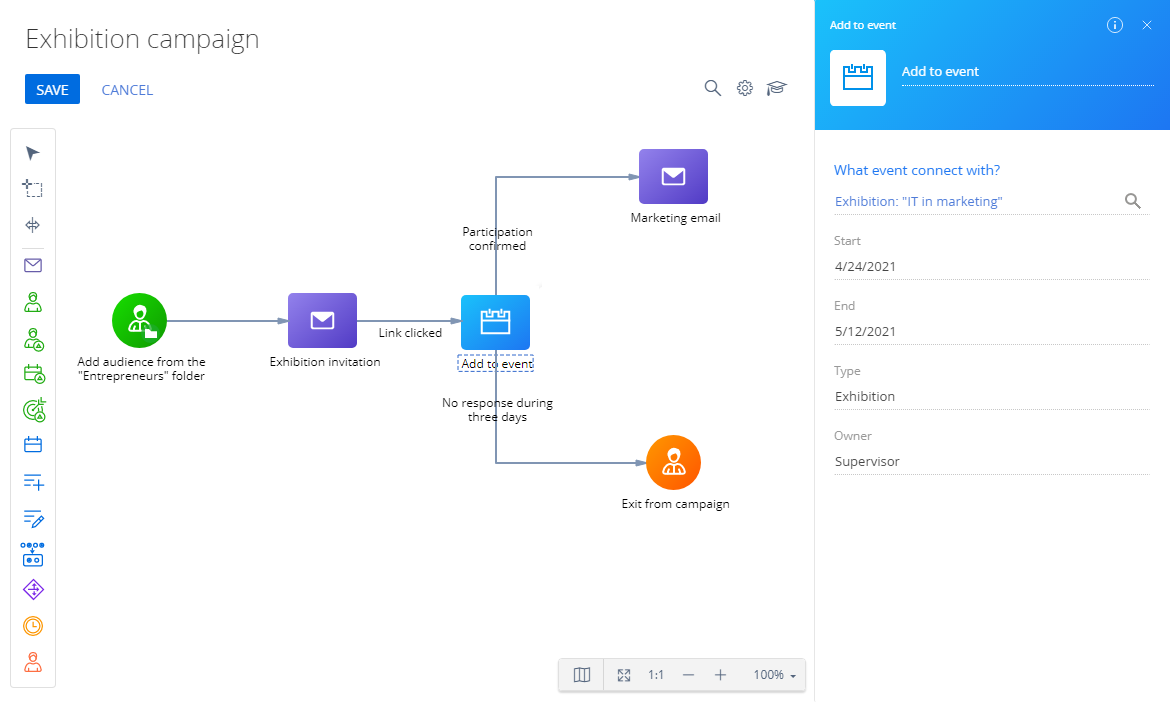
- Select email responses for the transition of the participants if the element has outgoing conditional flows. Possible audience responses will be available in the condition list (Fig. 13).
Fig. 13 Use the Add to event element with conditional flows
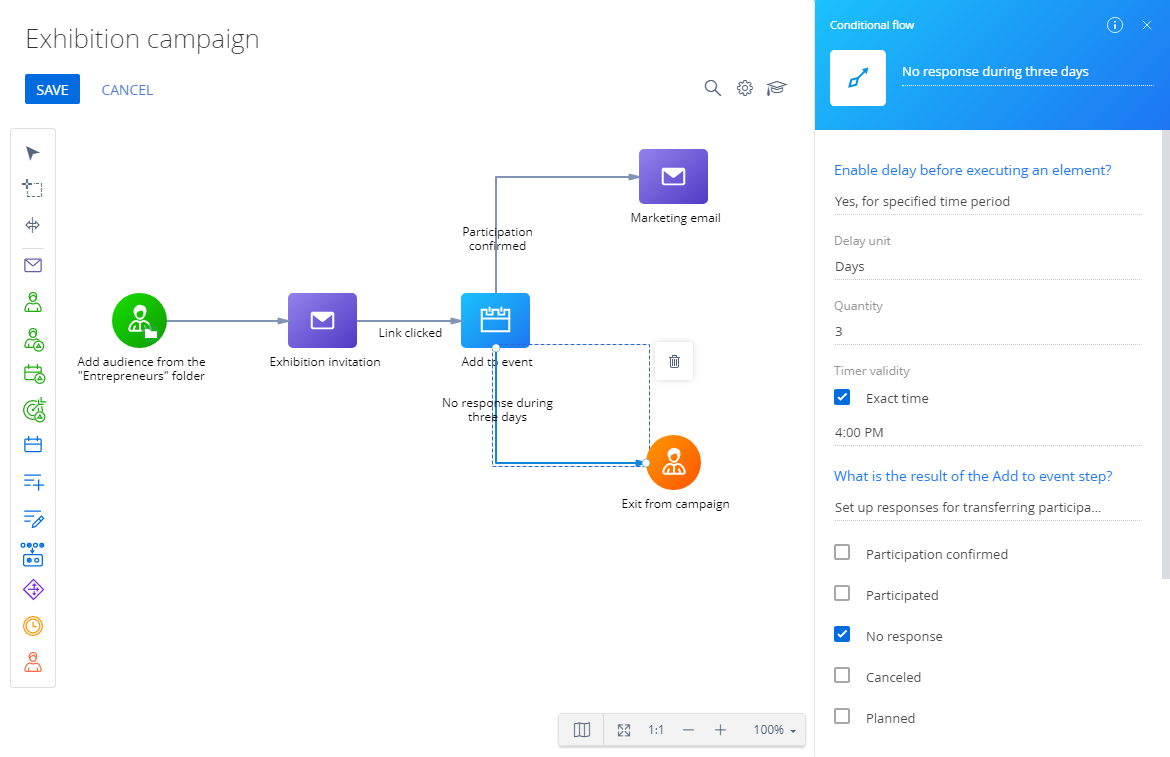
This way, only the participants whose campaign responses correspond to those selected in the conditional flow will move down that flow. The campaign will take into account the responses available at the time of movement for participants who have not moved yet. For example, if you set a 3-day transition delay for the “No response” condition, all contacts who have the “No response” response by the end of the 3-day period will move down this conditional flow.
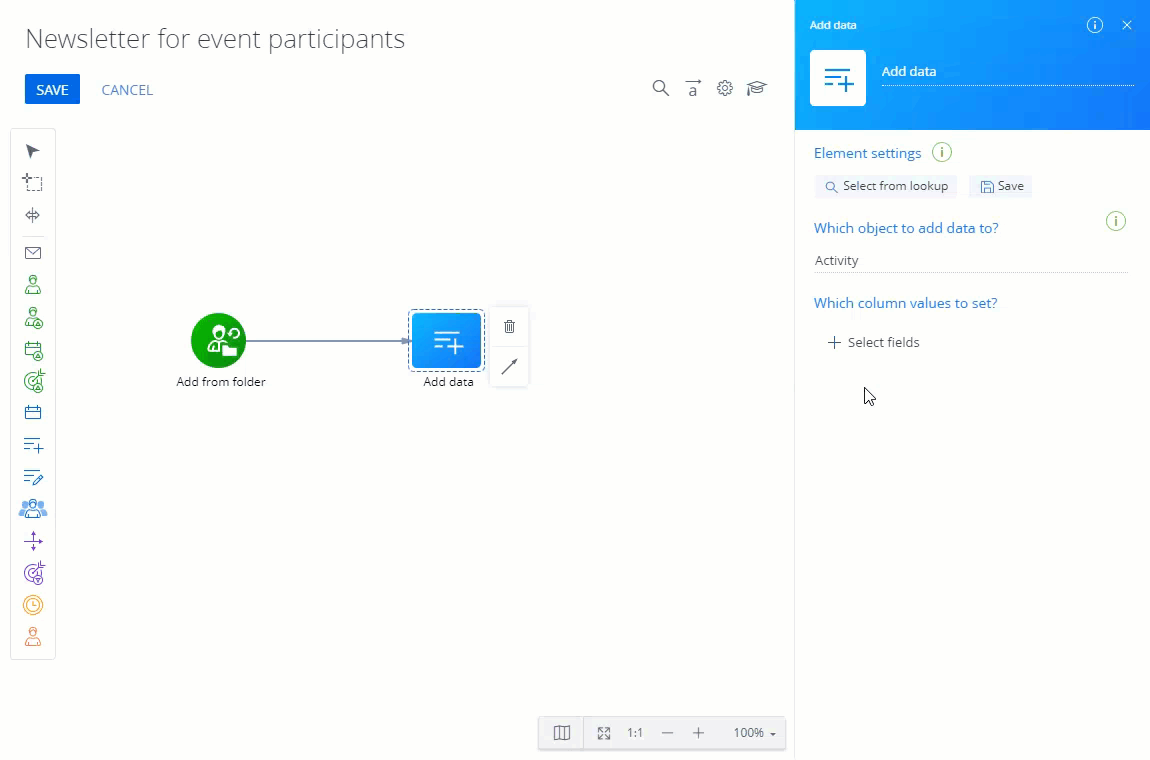
The Add data element
The Add data element ![]() adds new Creatio records and populates them with data from the participant's contact record or any records directly connected to the participant's contact record (Fig. 15).
adds new Creatio records and populates them with data from the participant's contact record or any records directly connected to the participant's contact record (Fig. 15).
To set up the Add data element:
- Drag the
 element to the diagram.
 - Select the target object (section, detail, or lookup) in the Which object to add data to? field. For example, to add a new activity, select the “Activity” object.
- Click + in the Which column values to set? area and select the fields to populate for the newly added record. For example, to connect the new activity to the participant's account, select the “Account” field. All selected fields will appear in the element properties area. By default, the element lets you add data to the following system objects: “Call,” “Activity,” “Contact in folder,” and “Lead”. You can configure the list of available objects in the "Add data" element - allowed objects lookup.
- Use the Which column values to set? area to specify how each of the fields will be populated in the record that the Add data element will create. All required fields in the new record must be populated. The following methods are available:
-
Manual input. You can specify the field value manually, using the same controls that are available for the same type of field on a regular record page: enter the values of text and numeric fields, select checkboxes for boolean fields, select the value from lookups for lookup fields, and enter specific dates in the date fields. For example, to create an activity of the “Call” type, select “Call” in the Type field.
-
Out-of-the-box macro. Certain columns have ready-made macros. For example, select the “Date and time” macro in the “Start” field to populate the field with the date and time when the new record was added.
-
Custom macro. Use custom macros to populate the fields of the updated record with values from the participant's contact record or records in other objects that are connected to the Contact object. For example, you can populate the “Owner” field of the new activity record with the same value as the one specified in the “Owner” field for the campaign participant's contact (Fig. 14).
-

Add objects to the "Add data" element - allowed objects lookup
Edit the list of available objects in the "Add data" element - allowed objects lookup (Fig. 16) to add data using the Add data element.
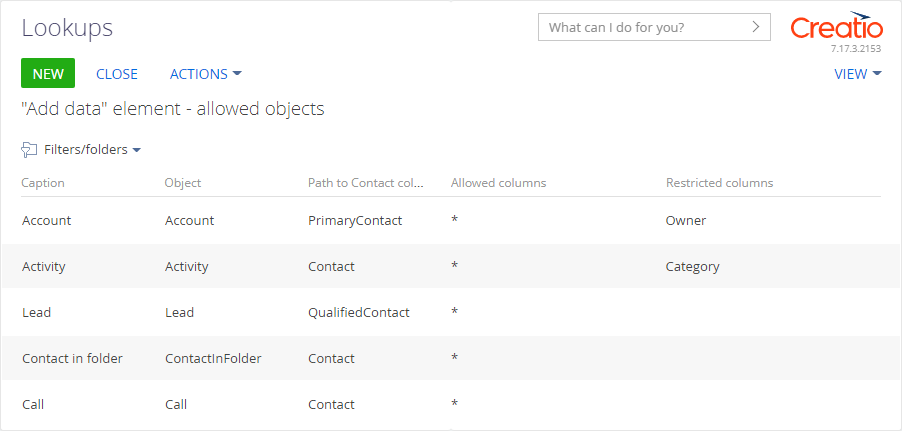
To add a new object:
- Click in the main Creatio application.
- Click Lookups in the System setup block.
- Open the content of the "Add data" element - allowed objects lookup.
- Click New.
- Fill out the values of the new lookup record:
-
Specify the name of the object in the Caption column. This name is displayed in the Which object to add data to? field.
-
Specify the name of the object in the database in the Object column. You can use the Section Wizard or Detail Wizard to look up the object (Fig. 17).
Fig. 17 Object name in the Section Wizard -
Specify the name of the column that connects the necessary object to the “Contact” object in the Path to contact object column. The column is usually named “Contact.”
-
Specify the list of available columns as comma-separated values in the Allowed columns column. This determines which object columns are available for selection in the Which column values to set? field. Enter “*” to make all columns available.
-
Specify the list of restricted columns as comma-separated values in the Restricted columns column. These columns will not be available for selection in the Which column values to set? field. Values in this column have a higher priority than values in the Allowed columns column. If you make all columns available in the Allowed columns column (the “*” value), the restricted columns will not be available for selection during the setup.
-
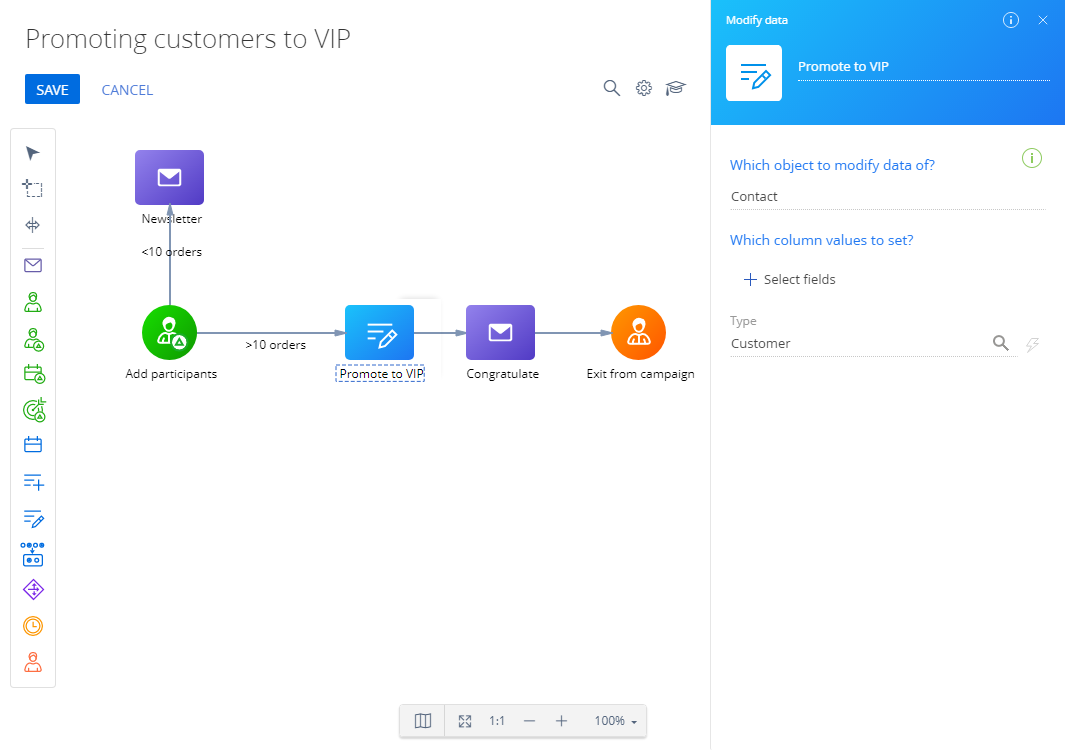
The Modify data element
The Modify data element ![]() modifies the existing section records, detail records, or lookup entries. With the Modify data element, you can use data from the participant's contact record, as well as the connected objects, to set the corresponding values in the modified record (Fig. 18).
modifies the existing section records, detail records, or lookup entries. With the Modify data element, you can use data from the participant's contact record, as well as the connected objects, to set the corresponding values in the modified record (Fig. 18).
To set up the Modify data element:
- Drag the
 element to the diagram.
 - Use the Which object to modify data of? field to select the object whose records to modify. For all objects, except the “Contact” object, the record must be connected to the participant's contact. For example, if you select the “Lead” object, the element will modify the data of all the leads connected to the participant's contact record. By default, the element only lets you modify the “Contact” object data. You can configure the list of available objects in the Modify data element - allowed objects lookup. Add new objects to the lookup the same way as with the "Add data" element - allowed objects lookup.
- Specify the list of record fields to modify in the Which column values to set? field. For example, select the Type field to change the type of the contact. The fields specified in this area are populated with custom values. Other fields do not change their value during campaign execution. Fill out the fields the same way as the Add data element's fields.
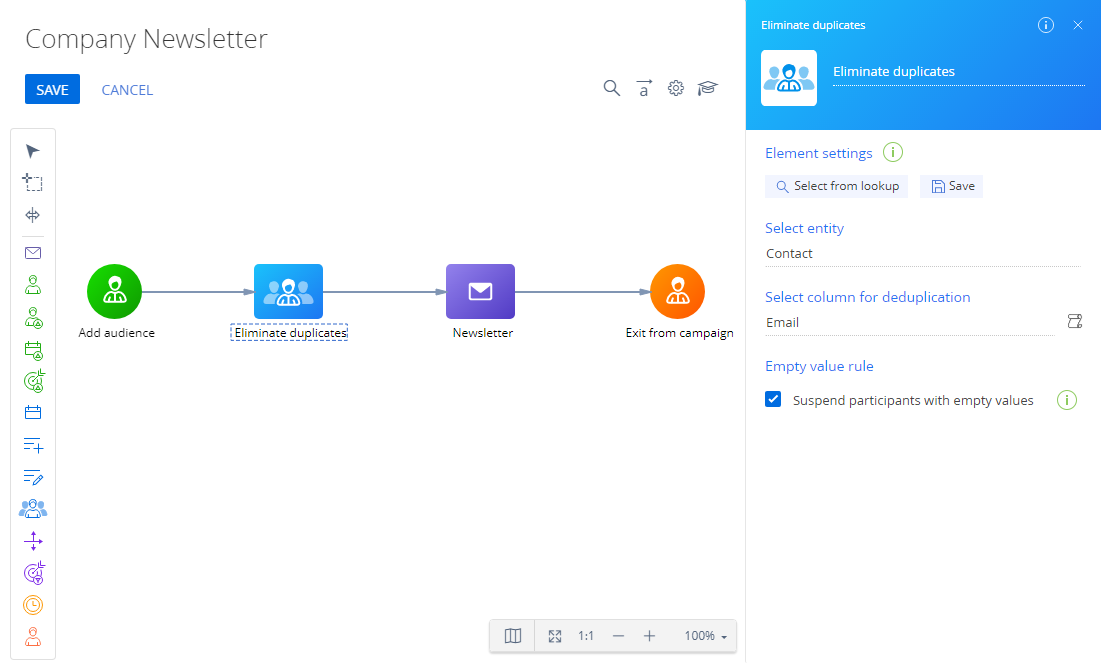
The Eliminate duplicates element
The Eliminate duplicates element ![]() validates the campaign's audience using the specified rules and eliminates active duplicate participants.
validates the campaign's audience using the specified rules and eliminates active duplicate participants.
A campaign can have a single Eliminate duplicates element or multiple elements with different rules (Fig. 19).
To set up the Eliminate duplicates element:
- Place the
 element on the diagram.
 - Select the lookup with potential campaign participants in the Select entity dropdown list. For example, “Contact.”
- Select the lookup column in the Select column for deduplication field to search for duplicates. Select any column of the relevant lookup or that of its connected object. For example, if you select “Contact” in the Select entity field, you can select “Email” in the Select column for deduplication field. To set up deduplication using multiple fields, add multiple Eliminate duplicates elements and configure a different rule for each element.
- Select the Suspend participants with empty values checkbox to exclude participants whose column for deduplication is not populated.
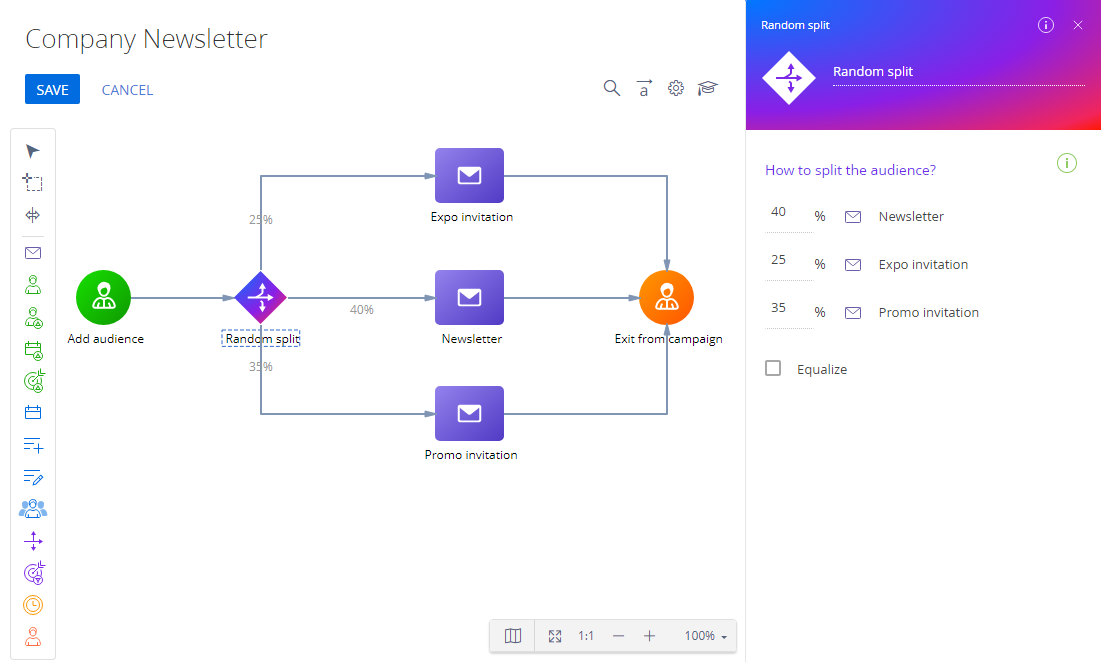
The Random split element
The Random split element ![]() advances participants to different outgoing flows randomly. This is useful for A/B testing and promo campaigns of different products for a single target audience (Fig. 20).
advances participants to different outgoing flows randomly. This is useful for A/B testing and promo campaigns of different products for a single target audience (Fig. 20).
To set up the Random split element:
- Place the
 element on the diagram.
 - Add an outgoing flow to each subsequent campaign element.
- Clear Equalize checkbox to specify a custom audience distribution ratio. By default, the element distributes the audience automatically.
- Set up the audience distribution in the How to split the audience? field by specifying the audience percentage for each outgoing flow. Nonuniform audience distribution cannot be configured if the Equalize checkbox is selected.
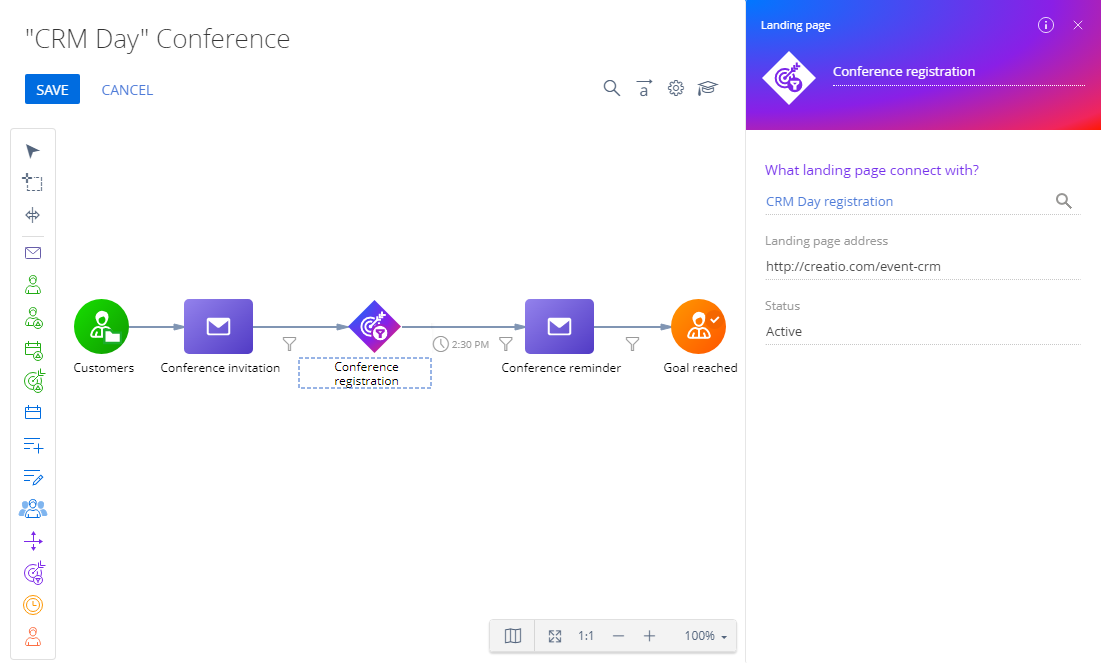
The Landing page element
Use the Landing page element ![]() to integrate landing pages and campaigns (Fig. 21).
to integrate landing pages and campaigns (Fig. 21).
Unlike the Add from landing element, the Landing page element lets you filter participants who filled out a landing page web form based on their response on any intermediate campaign step. For example, notify your entire audience of an upcoming event but send the reminders only to those who confirmed their intention on the landing page.
To set up the Landing page element:
- Drag the
 element to the diagram. This element must have incoming flows.
 - Select one of the previously added landing pages in the What landing page to connect with? field. After you fill out the parameter, the element's properties area will display the landing page URL and status, as well as the Creatio object bound to the landing page. These fields are locked and populated with the value specified upon the creation of the landing page.
The Landing page element's outgoing flow properties include the results of user interaction with the web form in the What is the result of the Landing page step? block (Fig. 22).
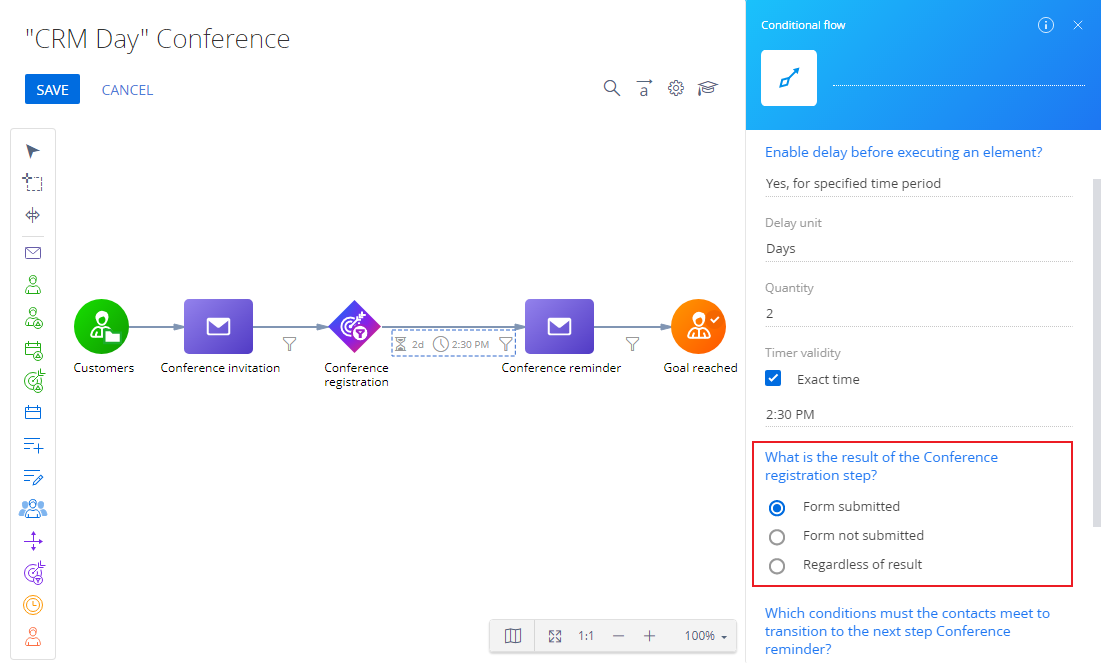
Depending on the user response, you can:
- advance only those participants who submitted the landing web form
- advance only those participants who did not submit the landing web form
- advance participants regardless of the result
Much like any campaign element, the Landing page element advances the participants through the outgoing flows based on the flow's delay or the campaign execution frequency (if a delay is not enabled in the flow properties).
You can set up filters by response type and additional object parameters when moving to the next campaign element. For example, as displayed on Fig. 23.
The Timer element
Use the Timer element ![]() to exercise complete control over the campaign element execution time frames (Fig. 24). You can transfer participants to the following campaign steps at the time and frequency specified in the timer properties.
to exercise complete control over the campaign element execution time frames (Fig. 24). You can transfer participants to the following campaign steps at the time and frequency specified in the timer properties.
The timer can be set to trigger once or regularly based on a schedule (daily, weekly, monthly, etc.). The parameters of the Timer event will differ depending on the selected “Frequency of timer start” option.
To set up the Timer element:
- Drag the
 element to the diagram.
 - Specify the Timer element's operation using the Timer validity field. For example, “Once.” The base settings of the element are different depending on the frequency. The following frequency options are available:
- In the Process start time field, specify the time of day when the timer triggers the process. You can select 1 of the following:
-
“Period:” the timer will trigger for each campaign execution that falls within the specified hours. For example, campaign frequency is set to 1 hour and the campaign starts at 1:00 PM. A timer with the Execution time set as a period from 3:40 PM to 4:40 PM will be triggered 3 times (1 for each campaign execution): at 2:00 PM, 3:00 PM, and 4:00 PM.
-
“Exact time:” a specific time of day at which the timer is triggered, regardless of the campaign default frequency. For example, execution time of a Timer element is set to 2:40 PM. The campaign frequency is 1 hour and it starts at 1:00 PM. In this case, the campaign will execute all elements that go before the timer in the campaign diagram at 2:00 PM and the timer will advance the campaign participants to the next elements at 2:40 PM.
-
-
Use the Timer validity field to specify the frequency of the Timer element. Fill out these fields if you need to limit the time frames of the Timer element operation. For example, you can set the timer to trigger during the next two months only. Use this parameter to deactivate part of the campaign flow without termination of the whole campaign. To configure the timer validity, select the Start date and time and End date and time fields.
- Start date and time: the timer starts working on this date and time according to the selected frequency options.
- End date and time: the timer stops working on this date and time. Any participants who are transferred to the Timer element after the specified time will not advance to the next campaign elements.
- Select the Set time zone checkbox to set the timer time zone if it is different from the campaign time zone. If campaign participants are located in different time zones, use several Timer elements to execute campaign steps at an appropriate time for each time zone.
“Once”
Select the “Once” timer frequency option to advance campaign participants to the next elements only once, at a specific time. For example, you can send a notificatino email about an event planned for a specific date.
Any participants who arrive at the Timer element after the specified time do not advance to the next campaign element.
“Every day”
Select the “Every day” frequency option to advance campaign participants to the next elements once a day during the time or period specified via the Execution time settings. For example, you can send emails only during working hours.
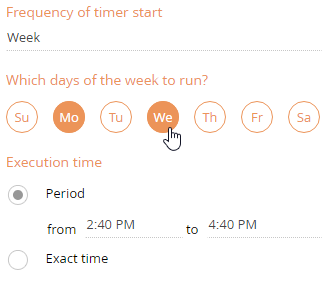
“Week”
Select the “Week” option in the Frequency of timer start field to advance campaign participants to the next elements every week, on selected weekdays, according to the Execution time settings (Fig. 25). For example, you can send marketing emails on workdays only.
“Month”
Select the “Month” option in the Frequency of timer start field to have the timer triggered at the specific days of the month (i. e., on the first Monday of every third month), at the time specified in the Execution time settings (Fig. 26). For example, you can send monthly newsletters on every tenth day of the month.

The “Month” timer frequency includes the following additional properties:
Run every: specify the timer frequency in months. For example, set the timer to trigger every third month.
Start day: select days on which the timer triggers.
-
Day of the month: the timer will trigger on the specified day of month (e. g., every tenth of the month).
-
Day of the week: the timer will trigger on the specified day of week (e. g., every third Friday of the month).
-
First/last work day: the timer will trigger on the first or last business/regular day of the month.
“Other frequency”
Select the “Other frequency” option in the Frequency of timer start field to set a custom timer frequency via a cron expression (Fig. 27).
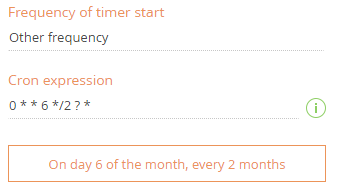
Fill out the Cron expression field with a cron expression to set a custom timer that runs every day or less frequently. If the expression is valid, Creatio displays its interpretation under the Cron expression field.
Learn more about using cron expressions in QUARTZ documentation.
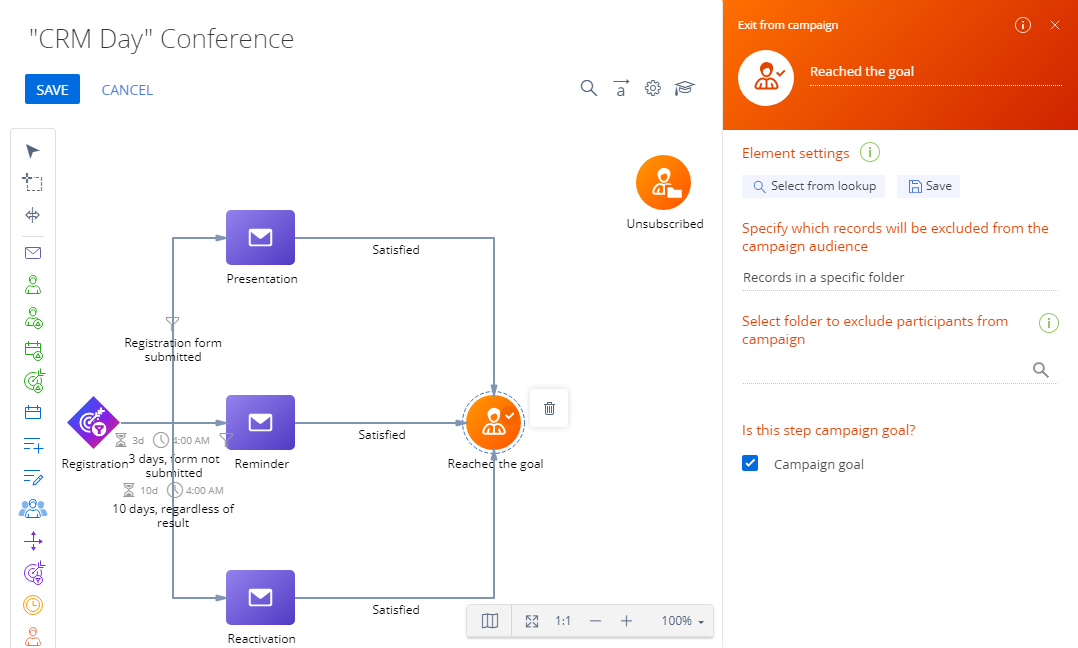
The Exit from campaign element
The Exit from campaign element ![]() enables participants to exit from a campaign (Fig. 28):
enables participants to exit from a campaign (Fig. 28):
-
by meeting the filter conditions of a specific static or dynamic folder (regardless of the current campaign step)
-
by reaching the Exit from campaign element as part of the campaign flow
-
by both (the campaign flow and folder conditions) if the element has an incoming flow and the folder is specified
You can add several Exit from campaign elements to a campaign diagram.
To set up the Exit from campaign element:
- Drag the
 element to the diagram.
 - Select “Filter” or “Folder” in the Specify which records will be excluded from the campaign audience field.
- Specify “Folder” to exclude participants from a campaign based on their properties. Then, select a dynamic folder with the corresponding filter in the Select folder to exclude participants from campaign field. As a result, any participants who meet the filter conditions will exit from the campaign automatically regardless of their current step. For example, to set up a campaign exit point for participants who have unsubscribed from trigger emails and thus have not reached the goal, configure a dynamic folder with the “Unsubscribed” Email response and specify it as a folder for excluding the participants.
- Specify “Filter” and set up a filtering condition to exclude matching participants.
- Select the Campaign goal checkbox to mark the achievement of the campaign's goal upon exit. For example, you can use it to count participants who confirmed their participation in an event. All participants who transfer to this step via an incoming flow or by meeting the folder conditions will have the “Reached the goal” value in the Current step column on the Audience tab of the campaign page.
Participants exit from a campaign as follows:
- Via flows. If the Exit from campaign element has incoming flows, all participants who have reached this step exit the campaign.
- Via flows after going through all of the campaign's steps. If the incoming flows of the Exit from campaign element are configured without a group to exclude, all of the participants will go through all of the campaign steps.
- Via folder conditions and flows. The participants who reached this step via an incoming flow as well as those who meet the conditions of the dynamic folder (regardless of their current campaign step) all exit the campaign.