Open a page generated according to the specified parameters as part of the process using the Auto-generated page process element.
For example, open a page with the preset list of elements, such as buttons or specific fields.
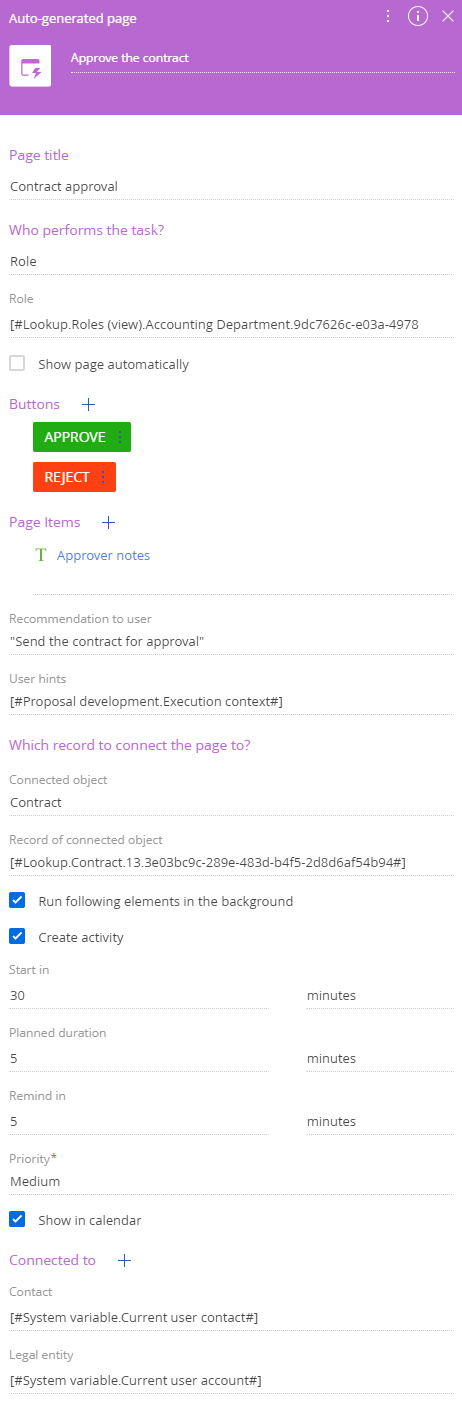
Specify the auto-generated page parameters in the element setup area (Fig. 1).
Fill out the fields using the parameter value menu:
- Enter the element caption at the top of the element setup area. Creatio will display the caption on the process diagram.
- Page title – enter the name of the page to display.
- Who performs the task? – select one of the options and fill out the field that opens:
- “User” – specify the user who will see the page in the Contact field.
- “Employee's manager” – specify the user whose manager will see the page in the Contact field.
-
“Role” – specify the role the users with which will see the page in the Role field.
You can specify a dynamic parameter value or select a constant value in the parameter value box.
- Show page automatically – select the checkbox to display the page automatically as soon as the process initiates the element.
-
Buttons – click
 and enter the desired parameters (Fig. 2):
- Caption – specify the button caption. Required parameter.
- Code – enter the unique button name you can use when coding the business logic. Required parameter.
- Style – select one of the common Creatio button styles. Required parameter.
- Generate signal – enter the signal to generate once the button is clicked. For example, “Sent for approval.” You can add other items that wait for this signal further down the process.
- Select the Active checkbox if the button must be active when the page opens.
-
Select the Performs value validation checkbox to check if the user filled out the required fields once the button is clicked. Click the Save button in the parameter value box.
Clicking any button added to the page completes the element and determines its result. If you add outgoing conditional flows to the auto-generated page, the buttons will be available as flow completion conditions.
Click the
 button to manage the button display order and edit the button properties.Fig. 2 Add a button to the auto-generated page
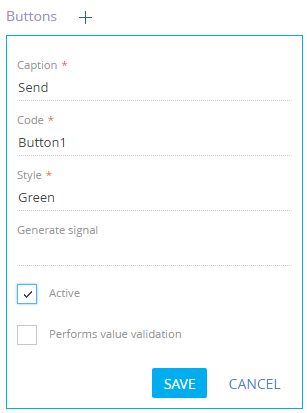
-
Page Items – click
 and select the type of the item to add to the page (Fig. 3).Fig. 3 Select the type of item to display on the auto-generated page
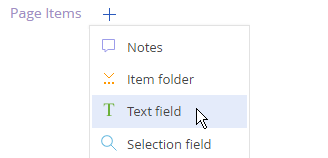
Fill out the item parameters. The available parameters depend on the item type (Fig. 4).
- Title – enter the page item caption. Required parameter.
- Code – enter a unique parameter name that will store the item value.
- Text – enter the text to display on the item. Available for the “Notes” item type.
- Can be minimized – select the checkbox to allow the user to minimize the item block. Available for the “Item block” item type.
- Minimized – select the checkbox to load the item values minimized when the page opens. Available for the “Item block” item type.
- Required – select the checkbox to make the field required. Available for the “Text field,” “Selection field,” “Date/time,” “Integer,” and “Decimal” item types.
- Multiline – select the checkbox to make the field multiline. Available for the “Text field” item type.
- Data source – specify the lookup object. Available for the “Selection field” item type.
- View – select how the user can fill out the field: by using a dropdown list or selecting a value from the lookup. Available for the “Selection field” item type.
-
Date format – select the display format for the “Date/time” item.
Use the menu that appears when you click the
 button to manage the page item display order, as well as edit and delete items.Fig. 4 Add an item to the auto-generated page
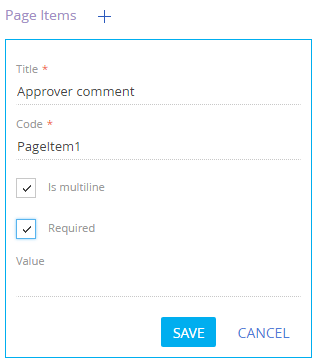
- Recommendation to user – enter the text to display on the page as part of the process. The recommendation text is a single line string, which does not support line breaks regardless of syntax. To display the text in the assignee's language, make sure the “Create business process tasks in the owner's language” (“UsePerformerCultureInUserTask” code) system setting is enabled and the Translation section includes the translation. Learn more: Localize UI via the Translation section.
- User hints – enter additional information about the task. Click the
 button on the page to view the hint.
 - Connected object – specify the object if the action is connected to a particular Creatio object record.
- Record of connected object – the record to which the action is connected.
- Run following elements in the background – select the checkbox to run the elements connected to the outgoing flows in the background.
- Create activity – select the checkbox to create a corresponding activity as part of this process step. If you select the checkbox, the following fields will become available:
- Start in – specify the period after which the activity must start, in minutes, hours, days, weeks, or months. The countdown starts after the activity is created. Creatio uses this parameter to populate the Start field of the activity page.
- Planned duration – enter the activity duration, in minutes, hours, days, weeks, or months. Creatio uses this parameter to populate the Due field of the activity page.
- Remind in – specify the period that ends before the activity starts. After this period, the notification for the owner or the role will be created automatically.
- Show in calendar – select the checkbox to display the task in the Calendar view of the Activities section.
- Connected to – connect the task to other Creatio entities. For example, an account. Creatio will display the task on the Activities detail of the connected record. By default, the element setup area displays account and contact connections. Click the
 button to connect the task to other Creatio entities.