Manage financial data in an application
Collect and verify a customer's income, expenses, and liabilities directly in a retail lending application. Creatio links the financial data to the contact profile and keeps it available for underwriting and for later applications, so you do not have to enter the same data twice.
Financial data is stored both as records on the contact page and in the application form. Learn more: Financial data overview.
Collect financial data for simple lending products
For simple products, such as credit cards, lines of credit, and unsecured personal loans, enter high-level financial data on the Customer details tab of the application.
-
Open the needed application and go to the Customer details tab → the Financial data expansion panel.
-
Fill out the following fields:
Field
Description
Monthly housing expense
Enter the customer's total monthly housing expense, for example, rent or mortgage payment.
Gross monthly income
Enter the customer's total monthly income before taxes and deductions.
-
Click Save.
-
Click Next stage to go to the Product details stage.
-
Fill out the required fields.
-
Upload the relevant documents.
-
Click Submit.
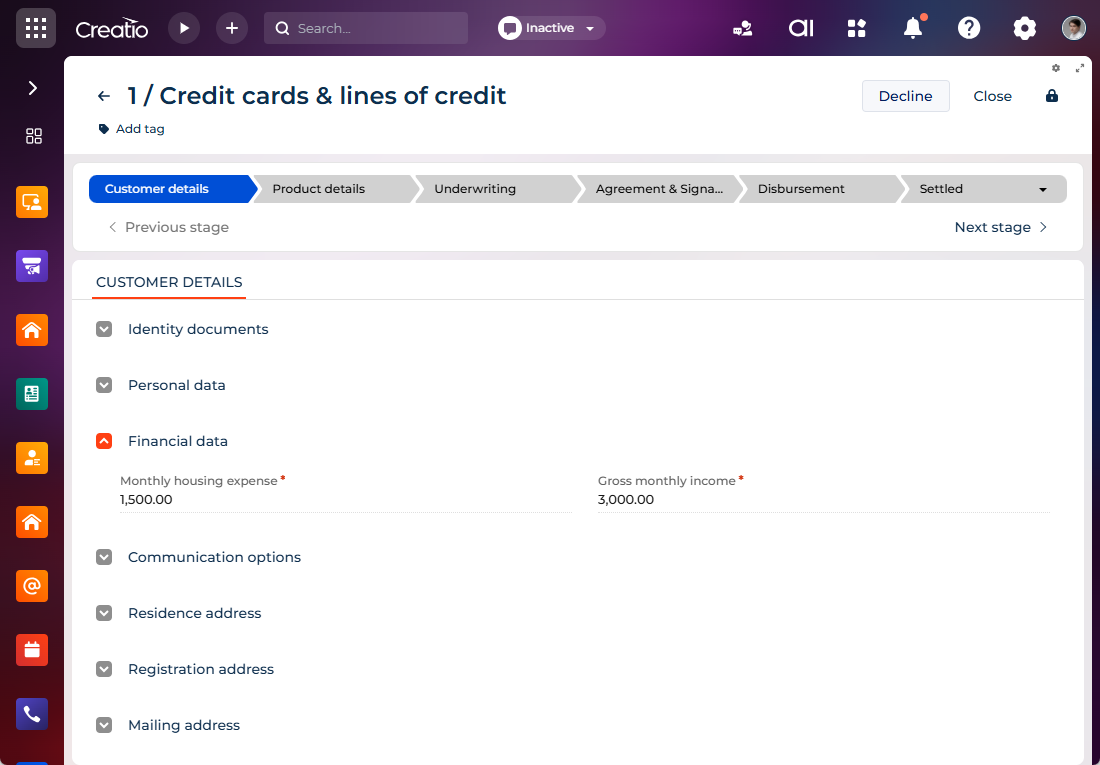
As a result, Creatio will add a "Contact expense" (ContactExpense code) object record and a linked "Contact expense in application form" (ContactExpenseInAppForm code) object record with the "Not started" verification status, and copy the value of the Gross monthly income field to the contact profile. After underwriting is complete, which for simple products usually happens automatically, both records change their verification status from "Not started" to "Self-reported" and become available for reuse in later applications.
Collect financial data for complex lending products
For complex products, such as auto loans, collect financial data on the Financial details tab of the application. The tab contains separate expanded lists for income, expenses, and liabilities.
Creatio permits only one active financial record of each type. If a record of the selected type already exists, Creatio blocks the creation of a second record with the same type.
Add a financial record
You can add a financial record at the "Financial details" stage of an application for a complex financial product, for example, auto loan. Learn more about creating a record: Submit an auto loan application. To add a finanical record:
-
Go to the Applications section.
-
Open the required application.
-
Go to the Income, Expenses, or Liabilities expanded list → click
 to add a new record. This opens a mini page.
 -
Fill out the following fields:
Field
Description
Type
Select the specific kind of income, expense, or liability, for example, "Salary & wages" or "Education."
Amount
Enter the monetary amount of the income, expense, or liability.
Currency
Select the currency of the amount.
Frequency
Select how often the amount recurs, for example, "Annual" or "Monthly."
Start date
Select the date the income, expense, or liability starts.
End date
Select the date the income, expense, or liability ends if applicable.
-
Click Save.
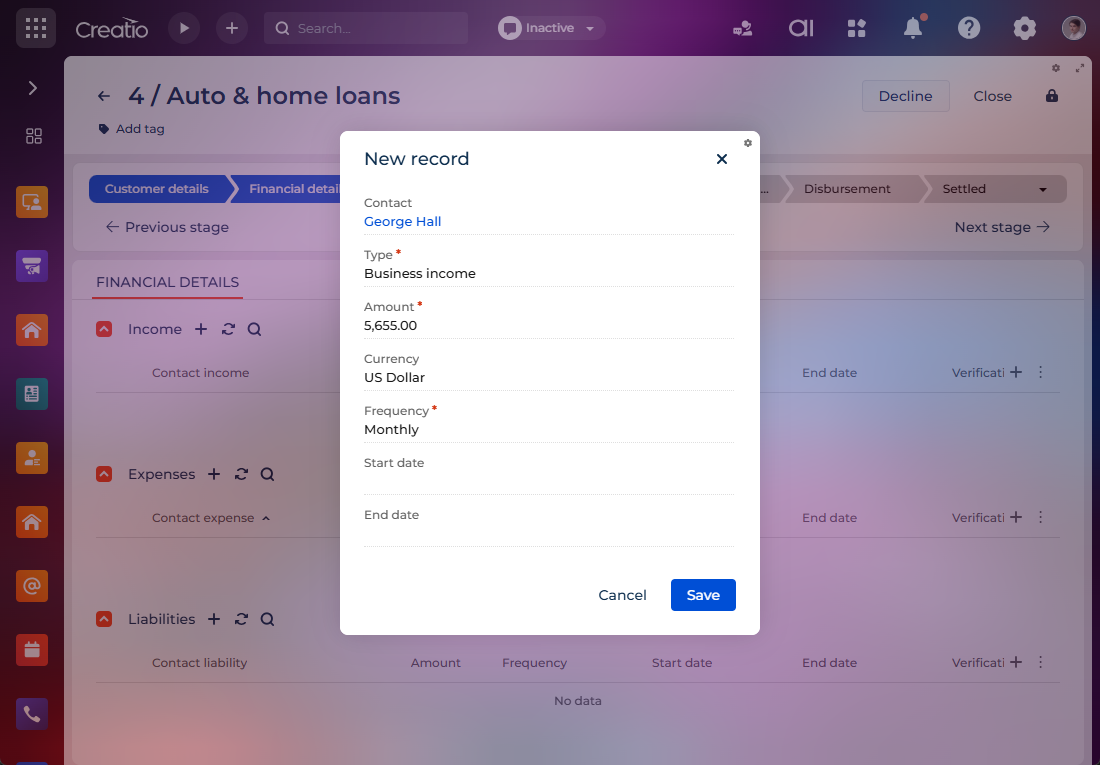
As a result, Creatio will add a record of the "Contact income" (ContactIncome code), "Contact expense" (ContactExpense code), or "Contact liability" (ContactLiability code) object, and a matching connector record of the "Contact income in application form" (ContactIncomeInAppForm code), "Contact expense in application form" (ContactExpenseInAppForm code), or "Contact liability in application form" (ContactLiabilityInAppForm code) object with the "Not started" verification status. The connector record will link the financial data to the application form and store the verification details.
Edit a financial record
- Go to the Applications section.
- Open the required application.
- Go to the Financial details tab → Income, Expenses, or Liabilities expanded list.
- Click the name of the record to edit.
- Edit the fields.
- Click Save.
As a result, Creatio will update the existing connector record if its verification status is "Not started." If the record has any other verification status, for example, "Self-reported" or "Verified," Creatio sets the existing connector record to "Archived" and creates a new connector record that has the "Not started" status, the updated values, and a link to the record stored on the contact page.
Verify financial data during underwriting
Verify the financial records collected in an application at the "Underwriting" stage. Verification confirms that income, expenses, and liabilities are accurate and traceable, which lets underwriters base their decision on reliable data. You can verify the records one by one or all at once.
A CSR submits the application. All underwriting actions are performed by a user with the "Underwriter" functional role.
Verify records individually
- Go to the Applications section.
- Open an application that reached the "Underwriting" stage.
- Go to the Financial details tab → Income, Expenses, or Liabilities expanded list.
- Fill out the "Verification status" column in the expanded list of the record to verify.
- Fill out the "Rejection reason" column if the record is rejected.
- Select the Verification performed checkbox.
- Click Save.
As a result, Creatio will change the verification status of the financial record according to the underwriting decision and update the object record stored on the contact page from the verified connector record. Creatio keeps the verification history in the connector record, which preserves traceability. Record that has the "Self-reported" or "Verified" status becomes available for reuse in later applications.
Verify all records at once
- Go to the Applications section.
- Open an application that reached the "Underwriting" stage.
- Go to the Underwriting tab → Manual checks expanded list.
- Select the Financial capacity verification checkbox → Mark selected as passed.
As a result, Creatio will change the verification status of the financial records according to the underwriting decision and update the object records stored on the contact page from the verified connector records. Creatio keeps the verification history in the connector records, which preserves traceability. Records that have the "Self-reported" or "Verified" status become available for reuse in later applications.