Set up a Slider input
Slider is a unique input that does not have a corresponding field type. Use sliders to enable users to specify quantity in an intuitive way. This is particularly useful for product orders.
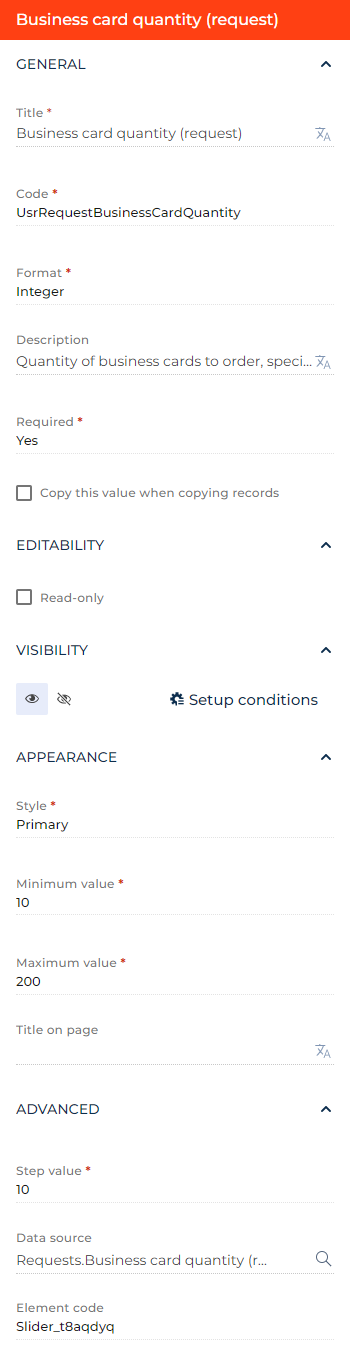
Set up a Slider input on the page of a request to print out business cards. The slider must specify the quantity of business cards to order. Enable users to order up to 200 cards in increments of 10.
Before you set up the slider, create a new or use an existing Number field to use as data source. Learn more about setting up the Number field in a separate article: Set up a Number field. For this example, create a new field and set it up as follows:
- Set Title to "Business card quantity (request)."
- Set Code to "UserRequestBusinessCardQuantity."
- Set Format to "Integer."
- Set Description to "Quantity of business cards to order, specified by the requester."
- Set Required to "Yes."
- Clear the Copy this value while copying records checkbox.
- Save the page.
- Delete the field from the canvas.
As a result, the app will contain the data source field for the input that will not be displayed on the page. Proceed to set up the input. To do this:
-
Drag a Slider input to the canvas and open the input setup area.
-
Select the Read-only checkbox in the Editability group to make the input read-only. For this example, leave the checkbox clear.
-
Click the
 or
or  button in the Visibility group to make the input visible or invisible by default on the page, respectively. For this example, leave the input visible.
 -
Click Setup conditions in the Visibility group to set up element business rules. For this example, do not add business rules. Learn more about setting up business rules in a separate article: Set up business rules.
-
Select the slider style in the Style parameter. For this example, select Primary.
-
Set the lowest available value in the Minimum value parameter. For this example, enter "10."
-
Set the highest available value in the Maximum value parameter. For this example, enter "200."
-
Enter Title on page parameter if the slider must have a title. For this example, clear the parameter. If you fill out the parameter, you can click the
 button to the right to localize the title to other languages you are going to use in the app. Learn more about localizing Freedom UI elements in a separate article: .
 -
Set the step value in the Step value parameter. For this example, enter "10."
-
Select the data source in the Data source parameter. For this example, select the "Business card quantity (request)" field of the "Requests" object.
This populates the General group in the setup area with values identical to settings of the "Business card quantity (request)" field automatically. You can change them in the slider settings for both the field and slider if needed. For this example, leave them unchanged.
-
View the unique slider code in the page schema in the Element code parameter. Creatio uses this code in page schemas. You can change it if needed. This helps software developers to customize the app easier, especially if you have multiple sliders on the page. For this example, leave the code as is.
As a result, Creatio will add the Slider input to the page of the request to print out business cards. The slider will specify the quantity of business cards to order. Users will be able to order up to 200 cards in increments of 10.
See also
Overview of Freedom UI Designer and its elements