Set up Timer components
Use Timer components to set up a counter to or from a specific date. For example, this is useful for specfifying deadlines or helping users to prioritize records to process.
Set up a Timer component that counts to a date
Set up the Timer component that displays the time before the requester requires a corporate vehicle on the request page.
-
Add and set up a "Date and time to provide a corporate vehicle" field. To do this, follow the steps in a separate article: Set up a date/time field.
-
Drag a Timer component to the canvas and open the component setup area
-
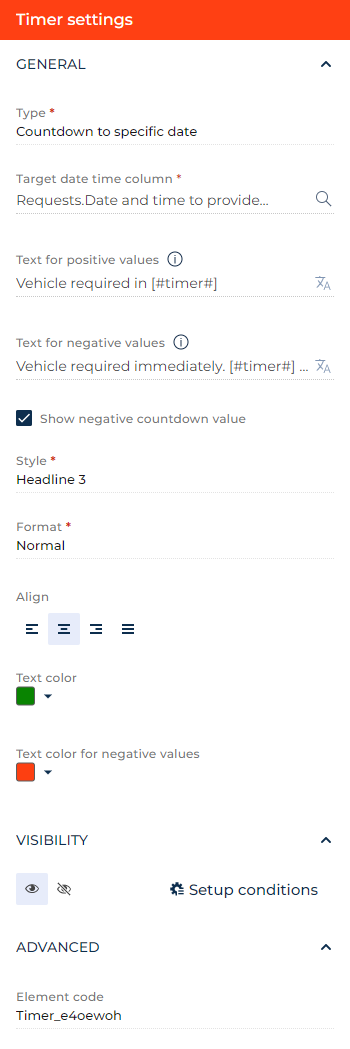
Select "Countdown to specific date" in the Type parameter.
-
Click the
 icon next to the Start date time column parameter → Requests → Requests fields tab → Date and time to provide a corporate vehicle checkbox → Select.
 -
Enter the timer caption before the countdown reaches the end date in the Text for positive values parameter. Use the "[#timer#]" macro to add the timer value. If you leave the parameter empty, the timer uses the "[#timer#] left" caption.
For this example, enter "Vehicle required in [#timer#]." You can click the
 button to the right to localize the text to other languages you are going to use in the app. Learn more about localizing Freedom UI elements in a separate article: Localize a Freedom UI element.
 -
Enter the timer caption after the countdown reaches the end date in the Text for negative values parameter. Use the "[#timer#]" macro to add the timer value. If you leave the parameter empty, the timer uses the "[#timer#] overdue" caption.
For this example, enter "Vehicle required immediately. [#timer#] overdue." You can localize the text similarly to the positive caption.
-
Specify whether to display the overdue time in the Show negative countdown value checkbox. If you clear the checkbox, the timer displays "Time is up" caption once the end date is reached. For this example, leave the checkbox selected.
-
Select the timer style to display on the app page in the Style parameter. For this example, select "Headline 3."
-
Select the font format in the Format parameter. For this example, select "Normal."
-
Select the text alignment option in the Align parameter. For this example, select center.
-
Select the color of the positive caption in the Text color parameter. For this example, leave it green.
-
Select the color of the positive caption in the Text color parameter. For this example, leave it green.
-
Select the timer background color in the Background color parameter. For this example, leave the color transparent.
-
Click the
 or
or  button in the Visibility group to make the component visible or invisible by default on the page, respectively. For this example, leave the component visible.
 -
Click Setup conditions in the Visibility group to set up element business rules. For this example, do not add business rules. Learn more about setting up business rules in a separate article: Set up business rules.
-
View the unique component code in the page schema in the Element code parameter. Creatio uses this code in page schemas. You can change it if needed. This helps software developers to customize the app easier, especially if you have multiple similar components on the page. For this example, leave the code as is.
As a result, Creatio will add the timer that displays the time before the requester requires a corporate vehicle to the request page.
Set up a Timer component that counts from a date
Set up the Timer component that displays the record age on the page of the request. This will helps employees to prioritize records to process without setting a strict deadline.
-
Drag a Timer component to the page and open its setup area.
-
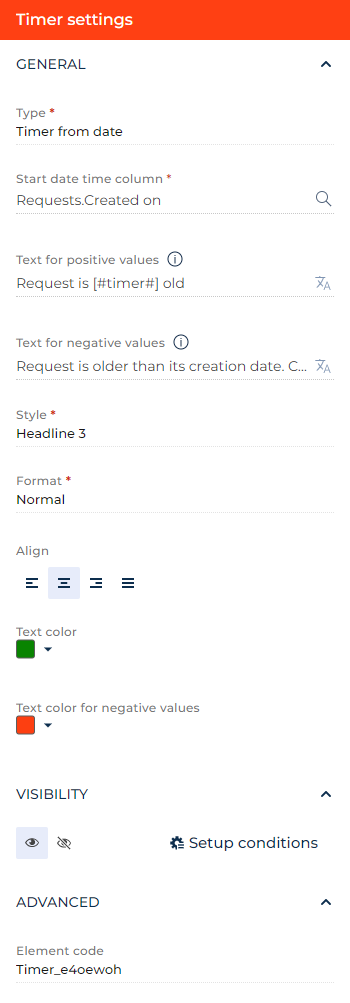
Select "Timer from date" in the Type parameter.
-
Click the
icon next to the Start date time column parameter → Requests → Requests fields tab → Created on checkbox → Select. -
Enter the timer caption after the count starts in the Text for positive values parameter. Use the "[#timer#]" macro to add the timer value. If you leave the parameter empty, the timer uses the "[#timer#] passed" caption.
For this example, enter "Request is [#timer#] old." You can click the
button to the right to localize the text to other languages you are going to use in the app. Learn more about localizing Freedom UI elements in a separate article: Localize a Freedom UI element. -
Enter the timer caption before the count starts in the Text for negative values parameter. Use the "[#timer#]" macro to add the timer value. If you leave the parameter empty, the timer uses the "[#timer#] before countdown begins" caption.
For this example, enter "Request is older than its creation date. Contact system administrator." You can localize the text similarly to the positive caption.
-
Select the timer style to display on the app page in the Style parameter. For this example, select "Headline 3."
-
Select the font format in the Format parameter. For this example, select "Normal."
-
Select the text alignment option in the Align parameter. For this example, select center.
-
Select the color of the positive caption in the Text color parameter. For this example, leave it green.
-
Select the color of the positive caption in the Text color parameter. For this example, leave it green.
-
Select the label background color in the Background color parameter. For this example, leave the color transparent.
-
Click the
or button in the Visibility group to make the component visible or invisible by default on the page, respectively. For this example, leave the component visible. -
Click Setup conditions in the Visibility group to set up element business rules. For this example, do not add business rules. Learn more about setting up business rules in a separate article: Set up business rules.
-
View the unique component code in the page schema in the Element code parameter. Creatio uses this code in page schemas. You can change it if needed. This helps software developers to customize the app easier, especially if you have multiple similar components on the page. For this example, leave the code as is.
As a result, Creatio will add the timer that displays the record age to the page of the request.
See also
Overview of Freedom UI Designer and its elements