Manage a list
Creatio can display data in app sections and on some pages as lists. A list is an index of records. Each record contains a set of fields (columns). The list can display any of the object columns as well as aggregated columns and data of linked objects.
Out of the box, Creatio displays list data as a simple table. Each record corresponds to a single row. Rows are numbered to streamline navigation and data management. You can select multiple records and manage the selected records in bulk.
The list displays phone numbers, emails, and URLs as links. If Creatio is integrated with a phone service, click the number to initiate a call from the communication panel. Otherwise, clicking the field runs the application that handles phone calls. Click an email to open the new email window of the default email client. Click an URL to open the web page in a new tab. If the lookup field references a record that has its own page, that record's page will be accessible as a link within lists. For example, the value of the Owner field is displayed as a link to enable users to open the page of the record owner from the list.
You can connect a list to another list to filter records, for example, display customers in specific countries.
List setting priority
Creatio applies list settings using a specific hierarchy. List settings are stored separately from other page data such as quick filters, active tabs, and active folders.
List settings apply in this priority order, from highest to lowest:
- Personal user settings. Individual user configurations are stored in the system table and have the highest priority.
- Default settings for all users. Default settings stored for both "All employees" and "All external users" roles.
- Settings from Freedom UI Designer. Default settings defined in the page metadata while designing the page have the lowest priority.
Creatio saves personal list settings automatically as you make changes to column visibility, order, and sizing. These personal settings remain active across sessions and override any default configurations set for all users.
When you reset to default settings, Creatio clears your personal configurations and applies the default settings that have been saved for all users. If users with appropriate permissions save new default settings for all users after you have created personal settings, those changes will not affect your personal view unless the "Overwrite current list settings for all users" action is used. New default settings take effect when you log in again or refresh the page.
Users that have appropriate permissions can use the "Overwrite current list settings for all users" action to force a specific configuration on everyone. This action, available since Creatio 8.2.3, removes all existing personal settings and applies the current configuration to all users after they refresh the page or log in again.
Set up list columns
You can customize the appearance of list columns, their sorting parameters, column properties, such as titles, and freeze or unfreeze columns (Fig. 1). Users that have permissions to the "List setup for all users" (CanCreateDefaultGridSettings code) system operation can customize list columns for all users, including external users. Learn more about customizing the columns in the table below. For data security reasons, external users cannot add system columns, for example, "Created on," "Modified by." If you want to display them to external users, a user that has the appropriate permissions can set up the list.
| Action | Steps to take |
|---|---|
| Add a column | Click You can add columns that contain aggregate functions and display the number of records. This includes columns that display the value of the first record linked via a reverse connection, with or without filter and sorting conditions. For example, this is useful if you need to display the results of the last contact activity. |
| Hide a column | Click  to the right of its title → Hide. to the right of its title → Hide. |
| Freeze a column | Click to the right of its title → Freeze. |
| Unfreeze a column | Click to the right of its title → Unfreeze. |
| Resize a column | Drag  to the right of the column title left to reduce the size or right to increase it. to the right of the column title left to reduce the size or right to increase it. |
| Move a column | Drag its title cell to the new place. |
| Sort the list records | Click a column header to sort list records by that column. The first click sorts in ascending order  , the second click switches to descending order , the second click switches to descending order  . . |
| Clear sorting | Click to the right of the column header → Clear sorting. |
| Reset to default settings | Click in the top right → Reset to default list settings. |
| Save list settings for all users as default | Click If a user has personal list settings applied, saving new default settings will not affect their current view. The new default settings will only apply when a user resets to default column settings. The action is available to users that have permissions to the "List setup for all users" ( |
| Overwrite current list settings for all users | Click This action removes all existing personal user settings and forces the current configuration for all users after page refresh or next login. The action is available to users that have permissions to the "List setup for all users" ( |
| Save list settings for the folder | Click |
Add an aggregated column
You can set up aggregation for numeric, date, datetime columns of the connected objects and filter the aggregated values. Numeric columns support minimum, maximum, sum, average functions. Date and datetime columns support minimum and maximum functions. For example, you can get the summary information about the "Account" object by the connected "Activity" object.
Display the number of current contact's activities connected to each account in the list of the Accounts section.
-
Open the Accounts section.
-
Click
 in the top right. This opens a window.
 -
Click Related objects → Activity (by column Account) → Number of records → Select. This opens a window (Fig. 2).
-
Enter the column caption, for example, "Number of activities." You can click the
 button to the right to localize the caption to other languages you use in the app.
 -
Specify the data aggregation filter. For example, to display the number of activities whose owner is the current contact, apply filtering by "Owner: Current contact."
Fig. 2 Set up an aggregate column 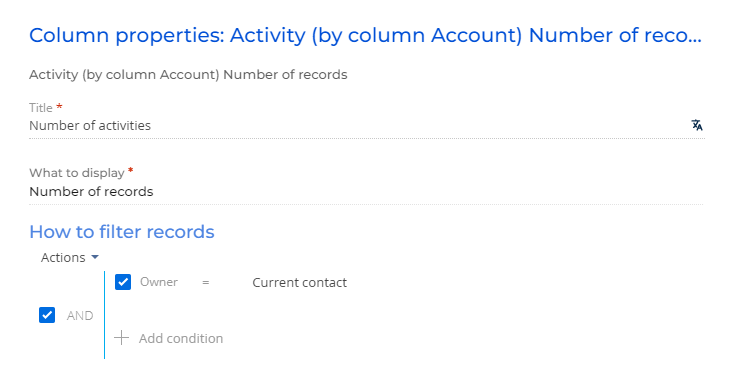
-
Click Save.
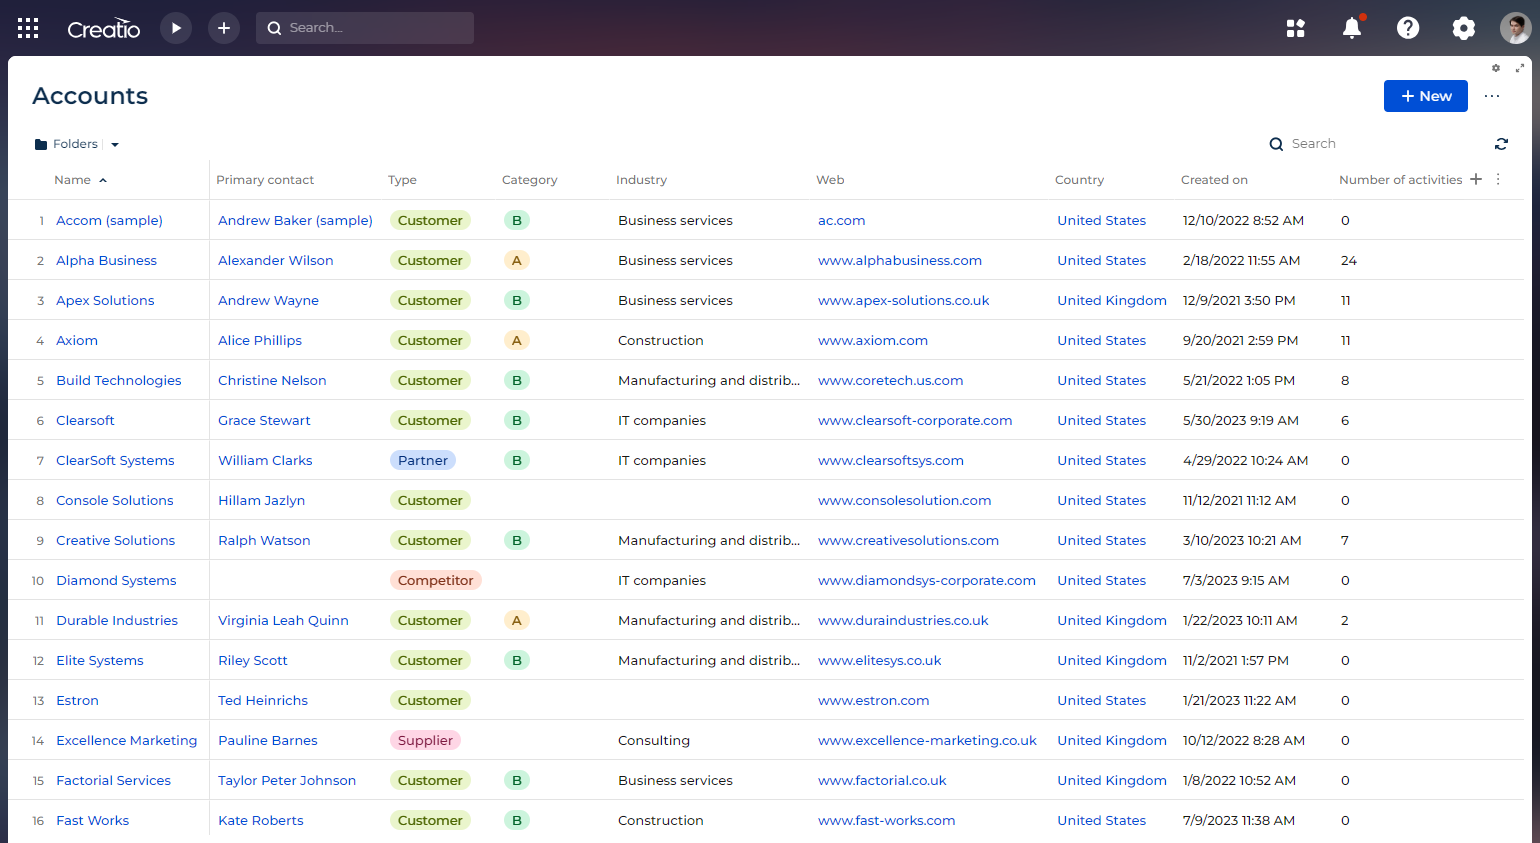
As a result, the accounts list will display the number of activities of the current user for each account (Fig. 3).
Edit data directly in the list
The component can let you edit records directly in the list without opening their form pages. To edit a list cell:
- Double-click an editable cell. The editability status is represented by the
 or
or  icon on selected cells.
 - Enter the new cell value. This brings up the floating edit panel at the bottom.
- Click the Save all or Discard button on the floating edit panel to save or cancel changes, respectively. Alternatively, you can use Save or Cancel buttons if they are available on the page.
If Creatio is unable to validate the edited data, the  icon appears to the right of the cell. Hold the pointer over the icon to view the error description. You can view all errors in a row by hovering over the icon at the beginning of the row. This action also displays a button that allows you to undo any changes made to the line containing errors.
Cells of the following columns and records are non-editable:
- System columns, for example, Created on.
- Aggregate columns.
- Columns of linked objects.
- Columns you lack permissions to edit. Creatio checks column permissions when you try to save changes.
- Records you lack permissions to edit. Creatio checks record permissions when you try to save changes.
Set up list settings for the folder
You can customize the list for a specific folder and save the settings for all users that can view the folder. You can only use this functionality with folders for which you have edit permissions.
-
Open the folder for which you want to set up the list.
-
Set up the list. The process is similar to other lists in Creatio.
-
Click
in the top right → Save list settings for the folder. Changes made to a list within an active folder are not saved automatically. You need to save changes to preserve them. Otherwise, they will be lost if you refresh the page.Fig. 4 Save list settings for the folder 
As a result, the settings will be saved for the selected folder for you and for all users that can view the folder.
Keyboard shortcuts
Keys | Action |
|---|---|
Arrow keys | Move between individual list cells. Works in both editable and non-editable lists. |
Ctrl + C | Copy the content of the selected cell. Works in both editable and non-editable lists. |
Enter | Edit the selected cell. Apply changes to the selected cell and select the cell below. |
Arbitrary characters | Replace the cell value with the characters. |
Tab | Apply changes to the selected cell and select the cell to the right. |
Delete | Clear the selected cell. |
Shift + Delete | Delete the record that contains the selected cell. |
Spacebar | Switch the checkbox value. |
Ctrl + S | Save changes. |
Shift + Enter | Add a record below the selected cell. |
Ctrl + LMB | Select multiple records one by one. |