Implement a custom UI component using remote module
Add a custom UI component to the record page of the custom Requests section. Implement the custom UI component using a remote module created in Angular framework.
1. Create an Angular project to develop a custom UI component using remote module
Create an Angular project to develop a custom UI component using a *.zip archive of an Angular project that contains the template of a remote module.
To create an Angular project using a *.zip archive:
-
Download and unpack the *.zip archive.
-
Open the project in Microsoft Visual Studio Code.
-
Change the
<%projectName%>macro of the Angular project name tosdk_remote_module_packagein every project file. -
Change the
<%vendorPrefix%>prefix macro tousrin every project file. -
Install the
npmmodules. To do this, run thenpm icommand at the command line terminal of Microsoft Visual Studio Code. The installation might take some time. -
Update the
@creatio-devkit/commonlibrary version. To do this, run thenpm update @creatio-devkit/commoncommand at the command line terminal of Microsoft Visual Studio Code.
As a result, Microsoft Visual Studio Code will create an Angular project to develop a custom UI component using remote module.
2. Create a custom UI component using remote module
-
Create an Angular component in the project. To do this, run the
ng g c view-elements/input --view-encapsulation=ShadowDomcommand at the command line terminal of Microsoft Visual Studio Code.As a result, Microsoft Visual Studio Code will add the
InputComponentcomponent files to thesrc/app/view-elements/inputproject directory.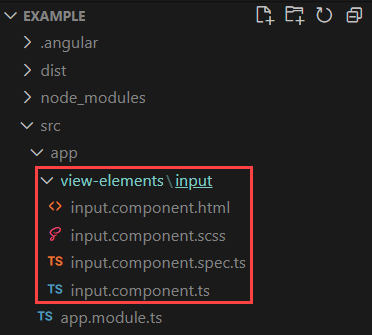
-
Specify that the
InputComponentcomponent is a view element.- Open the
input.component.tsfile. - Flag the component using the
CrtViewElementdecorator. - Import the required functionality from the libraries to the component.
- Save the file.
input.component.ts file/* Import the required functionality from the libraries. */
import { Component, OnInit, ViewEncapsulation } from '@angular/core';
import { CrtViewElement } from '@creatio-devkit/common';
@Component({
selector: 'usr-input',
templateUrl: './input.component.html',
styleUrls: ['./input.component.scss'],
encapsulation: ViewEncapsulation.ShadowDom
})
/* Add the CrtViewElement decorator to the InputComponent component. */
@CrtViewElement({
selector: 'usr-input',
type: 'usr.Input'
})
export class InputComponent implements OnInit {
constructor() { }
ngOnInit(): void {
}
} - Open the
-
Register the
InputComponentview element as a component.- Open the
app.module.tsfile. - Add the
InputComponentview element to theCrtModuledecorator. - Register the
InputComponentview element as a component, i. e., Angular Element, in thengDoBootstrap()method of theAppModuleroot module. - Save the file.
app.module.ts file/* Import the required functionality from the libraries. */
import { DoBootstrap, Injector, NgModule, ProviderToken } from '@angular/core';
import { createCustomElement } from '@angular/elements';
import { BrowserModule } from '@angular/platform-browser';
import { bootstrapCrtModule, CrtModule } from '@creatio-devkit/common';
import { InputComponent } from './view-elements/input/input.component';
@CrtModule({
/* Specify that InputComponent is a view element. */
viewElements: [InputComponent]
})
@NgModule({
declarations: [
InputComponent
],
imports: [BrowserModule],
providers: [],
})
export class AppModule implements DoBootstrap {
constructor(private _injector: Injector) {}
ngDoBootstrap(): void {
/* Register InputComponent as an Angular Element. */
const element = createCustomElement(InputComponent, {
injector: this._injector,
});
customElements.define('usr-input', element);
/* Bootstrap CrtModule definitions. */
bootstrapCrtModule('create_view_element_from_scratch', AppModule, {
resolveDependency: (token) => this._injector.get(<ProviderToken<unknown>>token)
});
}
} - Open the
-
Build the project. To do this, run the
npm run buildcommand at the command line terminal of Microsoft Visual Studio Code.
As a result, Microsoft Visual Studio Code will add the build to the dist directory of the Angular project. The build will have the sdk_remote_module_package name.
3. Add the custom UI component implemented using remote module to the Freedom UI page
-
Use the Records & business processes template to create a custom
Requestsapp. To do this, follow the instruction in the user documentation: Manage apps. -
Set up Creatio for file system development. To do this, follow the instruction in a separate article: External IDEs.
-
Download the packages to the file system using the Creatio IDE. On the Creatio IDE toolbar, select Download packages to the file system in the File system development mode action group.
/scr_download_to_fs.png)
-
Create a
Files/src/jsdirectory in the file system’sUsrRequestspackage directory. -
Copy the build from the
distproject directory to theFiles/src/jsdirectory. The path to the project build is as follows:Files/src/js/sdk_remote_module_package. -
Compile the configuration. To do this, follow the instruction in a separate article: Operations in Creatio IDE.
-
Open the
Requestsapp page workspace and go to the Requests form page page. -
Click the
 button in the action panel of the Freedom UI Designer. After you save the page settings, Creatio opens the source code of the Freedom UI page.
 -
Add the configuration object of the custom component to the
viewConfigDiffschema section.viewConfigDiff schema sectionviewConfigDiff: /**SCHEMA_VIEW_CONFIG_DIFF*/[
...,
{
"operation": "insert",
"name": "UsrInput",
"values": {
"layoutConfig": {
"column": 1,
"row": 2,
"colSpan": 1,
"rowSpan": 1
},
/* The property that defines the element type. */
"type": "usr.Input",
},
"parentName": "SideAreaProfileContainer",
"propertyName": "items",
"index": 1
}
]/**SCHEMA_VIEW_CONFIG_DIFF*/, -
Click Save on the client Module Designer’s toolbar.
Outcome of the example
To view the outcome of the example:
- Open the
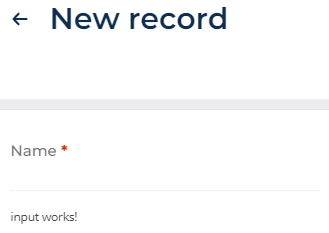
Requestsapp page and click Run app. - Click New on the
Requestsapp toolbar.
As a result, Creatio will display the custom UI component on the request page. The custom UI component is implemented using a remote module created in Angular framework.
You can proceed to implement the business logic. For example, you can implement validation or a custom converter. Learn more in separate articles: Implement the business logic of the custom UI component using remote module, Implement the validation in the custom UI component using remote module, Implement a custom converter in the custom UI component using remote module.
Source codes
define("UsrRequests_FormPage", /**SCHEMA_DEPS*/[]/**SCHEMA_DEPS*/, function/**SCHEMA_ARGS*/()/**SCHEMA_ARGS*/ {
    return {
        viewConfigDiff: /**SCHEMA_VIEW_CONFIG_DIFF*/[
            {
                "operation": "merge",
                "name": "Feed",
                "values": {
                    "dataSourceName": "PDS",
                    "entitySchemaName": "UsrRequests"
                }
            },
            {
                "operation": "merge",
                "name": "AttachmentList",
                "values": {
                    "columns": [
                        {
                            "id": "df093806-a8ed-40ae-979c-770bec690b3c",
                            "code": "AttachmentListDS_Name",
                            "caption": "#ResourceString(AttachmentListDS_Name)#",
                            "dataValueType": 28,
                            "width": 200
                        }
                    ]
                }
            },
            {
                "operation": "insert",
                "name": "UsrName",
                "values": {
                    "layoutConfig": {
                        "column": 1,
                        "row": 1,
                        "colSpan": 1,
                        "rowSpan": 1
                    },
                    "type": "crt.Input",
                    "label": "$Resources.Strings.UsrName",
                    "control": "$UsrName",
                    "labelPosition": "auto"
                },
                "parentName": "SideAreaProfileContainer",
                "propertyName": "items",
                "index": 0
            },
            {
                "operation": "insert",
                "name": "UsrInput",
                "values": {
                    "layoutConfig": {
                        "column": 1,
                        "row": 2,
                        "colSpan": 1,
                        "rowSpan": 1
                    },
                    /* The property that defines the element type. */
                    "type": "usr.Input",
                },
                "parentName": "SideAreaProfileContainer",
                "propertyName": "items",
                "index": 1
            }
        ]/**SCHEMA_VIEW_CONFIG_DIFF*/,
        viewModelConfigDiff: /**SCHEMA_VIEW_MODEL_CONFIG*/{
            "attributes": {
                "UsrName": {
                    "modelConfigDiff": {
                        "path": "PDS.UsrName"
                    }
                },
                "Id": {
                    "modelConfigDiff": {
                        "path": "PDS.Id"
                    }
                }
            }
        }/**SCHEMA_VIEW_MODEL_CONFIG*/,
        modelConfigDiff: /**SCHEMA_MODEL_CONFIG*/{
            "dataSources": {
                "PDS": {
                    "type": "crt.EntityDataSource",
                    "config": {
                        "entitySchemaName": "UsrRequests"
                    },
                    "scope": "page"
                },
                "AttachmentListDS": {
                    "type": "crt.EntityDataSource",
                    "scope": "viewElement",
                    "config": {
                        "entitySchemaName": "SysFile",
                        "attributes": {
                            "Name": {
                                "path": "Name"
                            }
                        }
                    }
                }
            },
            "primaryDataSourceName": "PDS"
        }/**SCHEMA_MODEL_CONFIG*/,
        handlers: /**SCHEMA_HANDLERS*/[]/**SCHEMA_HANDLERS*/,
        converters: /**SCHEMA_CONVERTERS*/{}/**SCHEMA_CONVERTERS*/,
        validators: /**SCHEMA_VALIDATORS*/{}/**SCHEMA_VALIDATORS*/
    };
});
Resources
*.zip archive that contains the implemented Freedom UI app