Implement a custom web service that uses anonymous authentication and non-standard text encoding
This functionality is available for Creatio deployed on .NET Framework only.
To implement the example:
- Implement a custom web service. Read more >>>
- Register the web service. Read more >>>
- Register a non-standard text encoding. Read more >>>
- Enable both HTTP and HTTPS support for the web service. Read more >>>
- Enable access to the web service for all users. Read more >>>
1. Implement a custom web service
-
Open the Configuration section. Instructions: Open the Configuration section.
-
Create a user-made package. Instructions: Create a user-made package using Configuration section.
For this example, create the
sdkEncodingServicepackage. -
Change the current package. Instructions: Change the current package.
For this example, change the current package to
sdkEncodingServiceuser-made package. -
Create the source code schema. To do this, click Add → Source code.
-
Fill out the schema properties.
For this example, use the following schema properties.
Property
Property value
Code
UsrEncodingService
Title
Service that has custom encoding
-
Apply the changes.
-
Create a service class.
- Add the
Terrasoft.Configurationnamespace in the Schema Designer. - Add the namespaces the data types of which to utilize in the class using the
usingdirective. - Add a class name that matches the schema name (the Code property).
- Specify the
Terrasoft.Nui.ServiceModel.WebService.BaseServiceclass as a parent class. - Add the
[ServiceContract]and[AspNetCompatibilityRequirements(RequirementsMode = AspNetCompatibilityRequirementsMode.Required)]attributes to the class. - Use
SystemUserConnectionto access the database in the custom anonymous web service. Out of the box, database operations in an anonymous web service are executed on behalf of a system-level user. If your integration requires a specific user context, implement a custom web service that uses cookie-based authentication instead. Learn more: Implement a custom web service that uses cookie-based authentication.
- Add the
-
Implement a class method.
For this example, add the
public string ReceiveEncodedText(string EncodedText)method that implements the endpoint of the custom web service. Depending on theEncodedTextparameter value specified in the ISO-8859-1 encoding, the response body returns the same parameter value in the same encoding. -
Specify the user on whose behalf to process the current HTTP request. To do this, call the
SessionHelper.SpecifyWebOperationIdentitymethod of theTerrasoft.Web.Commonnamespace after retrievingSystemUserConnection. This method enables business processes to manage the database record (Entity) from the custom web service that uses anonymous authentication./* The user on whose behalf to process the HTTP request. */Terrasoft.Web.Common.SessionHelper.SpecifyWebOperationIdentity(HttpContextAccessor.GetInstance(),SystemUserConnection.CurrentUser);View the source code of the
UsrEncodingServicecustom web service below.UsrEncodingServicenamespace Terrasoft.Configuration.UsrEncodingServiceNamespace{using System;using System.ServiceModel;using System.ServiceModel.Web;using System.ServiceModel.Activation;using Terrasoft.Core;using Terrasoft.Web.Common;using Terrasoft.Core.Entities;[ServiceContract][AspNetCompatibilityRequirements(RequirementsMode = AspNetCompatibilityRequirementsMode.Required)]public class UsrEncodingService : BaseService{private SystemUserConnection _systemUserConnection;private SystemUserConnection SystemUserConnection{get{return _systemUserConnection ??(_systemUserConnection =(SystemUserConnection)AppConnection.SystemUserConnection);}}/* The method that returns the value of the passed parameter in thespecified encoding. */[OperationContract][WebInvoke(Method = "POST",RequestFormat = WebMessageFormat.Xml,BodyStyle = WebMessageBodyStyle.Wrapped,ResponseFormat = WebMessageFormat.Xml)]public string ReceiveEncodedText(string EncodedText){/* The user on whose behalf to process the HTTP request. */SessionHelper.SpecifyWebOperationIdentity(HttpContextAccessor.GetInstance(),SystemUserConnection.CurrentUser);/* Return the result. */return EncodedText;}}} -
Publish the schema.
As a result, Creatio will add the custom UsrEncodingService REST web service that has the ReceiveEncodedText endpoint.
2. Register the web service
-
Go to the "..\Terrasoft.WebApp\ServiceModel" directory.
-
Create and open the "UsrEncodingService.svc" file.
-
Register the web service. To do this, add the following record.
"UsrEncodingService.svc" file<% @ServiceHostService = "Terrasoft.Configuration.UsrEncodingServiceNamespace.UsrEncodingService"Debug = "true"Language = "C#"%>The
Serviceattribute includes the full name of the web service class and specifies the namespace. -
Save the changes.
3. Register a non-standard text encoding
-
Register a non-standard text encoding for HTTP.
-
Open the "..\Terrasoft.WebApp\ServiceModel\http\bindings.config" file.
-
Go to the
<bindings>section. -
Add
<customBinding>section to the root<bindings>section. -
Add attributes to the
<customBinding>file section.For this example, add and set the following attributes:
- Set the
nameattribute of the<binding>element to "ISO88591Encoding." - Set the
encodingattribute of the<customTextMessageEncoding>element to "ISO-8859-1." - Set the
manualAddressingattribute of the<httpTransport>element totrue.
"..\Terrasoft.WebApp\ServiceModel\http\bindings.config" file<bindings>...<customBinding><binding name="ISO88591Encoding"><customTextMessageEncoding encoding="ISO-8859-1" /><httpTransport manualAddressing="true"/></binding></customBinding>...</bindings> - Set the
-
Save the changes.
-
-
Register a non-standard text encoding for HTTPS. To do this, repeat steps 2–5 of the previous step in the "..\Terrasoft.WebApp\ServiceModel\https\bindings.config" file.
4. Enable both HTTP and HTTPS support for the web service
-
Enable HTTP support.
-
Open the "..\Terrasoft.WebApp\ServiceModel\http\services.config" file.
-
Go to the
<services>section. -
Add the following record to the root
<services>section."..\Terrasoft.WebApp\ServiceModel\http\services.config" file<services>...<servicename="Terrasoft.Configuration.UsrEncodingServiceNamespace.UsrEncodingService"><endpointname="UsrEncodingServiceEndPoint"address=""binding="customBinding"bindingConfiguration="ISO88591Encoding"behaviorConfiguration="RestServiceBehavior"bindingNamespace="http://Terrasoft.WebApp.ServiceModel"contract="Terrasoft.Configuration.UsrEncodingServiceNamespace.UsrEncodingService" /></service></services>The
bindingattribute specifies the binding type. Use "customBinding" to apply a non-standard encoding.The
bindingConfigurationattribute includes the name of the registered character encoding. Must match the value of the<binding>element'snameattribute specified on the previous step. For this example,bindingConfiguration="ISO88591Encoding". -
Save the changes.
-
-
Enable HTTPS support. To do this, repeat steps 1–4 of the previous step in the "..\Terrasoft.WebApp\ServiceModel\https\services.config" file.
5. Enable access to the web service for all users
-
Open the "..\Terrasoft.WebApp\Web.config" file.
-
Go to the
<configuration>section. -
Add the
<location>element to the root<configuration>section after the<appSettings>element. The<location>element defines the relative path and access permissions to the web service."..\Terrasoft.WebApp\Web.config" file<configuration>...<location path="ServiceModel/UsrEncodingService.svc"><system.web><authorization><allow users="*" /></authorization></system.web></location>...</configuration> -
Check if the
<appSettings>element includes thekeyattribute whose value is set to "AllowedLocations". If the<add key="AllowedLocations" value="" />element is omitted, add it to the root<appSettings>section. -
Add the relative web service path (
ServiceModel/UsrEncodingService.svc) to thevalueattribute.We do not recommend adding a separate value for an existing
keyattribute, since values are only read from the lastkeyattribute whose name matches."..\Terrasoft.WebApp\Web.config" file<configuration>...<appSettings>...<addkey="AllowedLocations"value="[Previous values];ServiceModel/UsrEncodingService.svc" />...</appSettings>...</configuration> -
Save the changes.
-
Apply the changes. To do this, restart Creatio in IIS.
View the result
Use Postman to view the outcome of the example. Learn more about working in Postman: official vendor documentation. Learn more about using Postman to query Creatio: Test requests using Postman. Learn more about using Postman to call a web service: Call a custom web service from Postman.
To view the outcome of the example:
-
Create a request.
-
Add a request string. To do this, access the
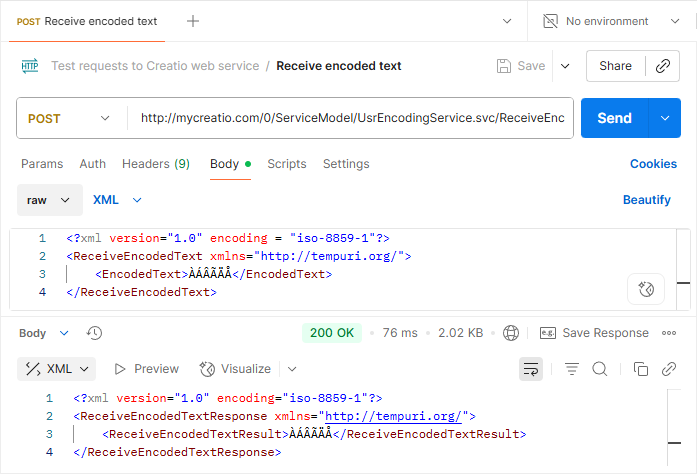
/ServiceModel/UsrEncodingService.svc/ReceiveEncodedTextendpoint.Request stringPOST {CreatioURL}/0/ServiceModel/UsrEncodingService.svc/ReceiveEncodedText -
Add a request body.
- Open the Body tab.
- Select
raw=XMLin the Body option parameter. - Pass the request body. The
EncodedTextparameter includes the characters in the ISO-8859-1 character encoding. Learn more: ISO/IEC 8859-1 (Wikipedia).
Request body<?xml version="1.0" encoding="ISO-8859-1"?><ReceiveEncodedText xmlns="http://tempuri.org/"><EncodedText>ÀÁÂÃÄÅ</EncodedText></ReceiveEncodedText> -
Save the changes.
-
-
Execute the request.
As a result, Postman will display:
- 200 OK status code.
- The response body in
XMLformat. The response body is displayed on the Body tab. The body includes the value of theEncodedTextparameter in the ISO-8859-1 character encoding. View the result >>>
Source code
namespace Terrasoft.Configuration.UsrEncodingServiceNamespace
{
    using System;
    using System.ServiceModel;
    using System.ServiceModel.Web;
    using System.ServiceModel.Activation;
    using Terrasoft.Core;
    using Terrasoft.Web.Common;
    using Terrasoft.Core.Entities;

    [ServiceContract]
    [AspNetCompatibilityRequirements(
        RequirementsMode = AspNetCompatibilityRequirementsMode.Required)]
    public class UsrEncodingService : BaseService
    {

        private SystemUserConnection _systemUserConnection;
        private SystemUserConnection SystemUserConnection
        {
            get
            {
                return _systemUserConnection ??
                    (_systemUserConnection =
                        (SystemUserConnection)
                            AppConnection.SystemUserConnection);
            }
        }

        /* The method that returns the value of the passed parameter in the
        specified encoding. */
        [OperationContract]
        [WebInvoke(
            Method = "POST",
            RequestFormat = WebMessageFormat.Xml,
            BodyStyle = WebMessageBodyStyle.Wrapped,
            ResponseFormat = WebMessageFormat.Xml)]
        public string ReceiveEncodedText(string EncodedText)
        {
            /* The user on whose behalf to process the HTTP request. */
            SessionHelper.SpecifyWebOperationIdentity(
                HttpContextAccessor.GetInstance(),
                SystemUserConnection.CurrentUser);

            /* Return the result. */
            return EncodedText;
        }
    }
}