Configuration elements of the User task type
Configuration element of the User task type is an entity that lets you implement routine operations and execute them in business processes. Learn more about business processes in a user documentation guide: BPM tools. User task process element lets you select the needed task type. The schema of the User task type configuration element implements this task type. Learn more about the User task element in user documentation: User task process element.
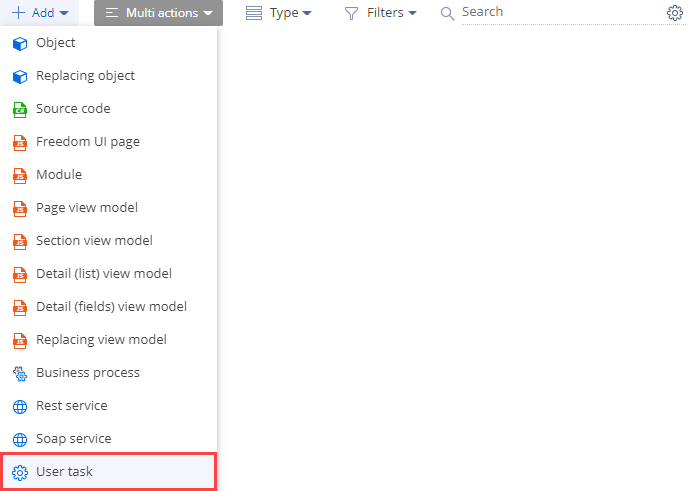
The item of the Add drop-down list in the toolbar of the Configuration section workspace represents the user task schema you can add in Creatio IDE.
Learn more about configuration element types in a separate article: Operations in Creatio IDE.
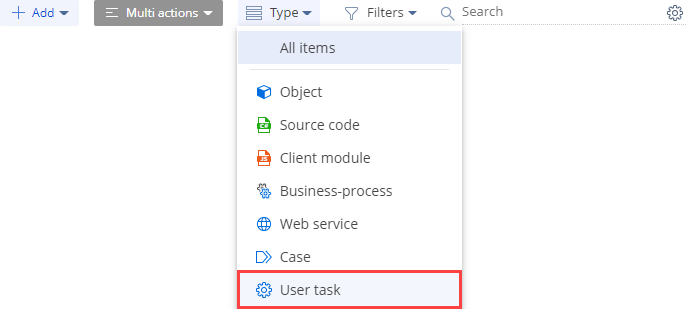
The User task type schema in the Type drop-down list in the toolbar of the Configuration section workspace represents the configuration element of the User task type. A schema is the basis of Creatio configuration.
View the user task schema type in the figure below.
Learn more about configuration element types in a separate article: Operations in Creatio IDE.
Implement a user task
By default, Creatio includes a set of preconfigured custom user tasks. Creatio IDE lets you implement a custom user task. In its simple implementation, the user task mechanism is partially similar to the Script task process element. Learn more about the Script task element in user documentation: Script task process element.
Creatio lets you use the implemented custom user task in various business processes. When you change the custom user task, Creatio applies the changes to every business process that contains the task.
To implement a user task:
-
Go to the Configuration section and select a custom package to add the schema.
-
Click Add → User task on the section list toolbar.
-
Fill out the schema properties in the User Task Designer.
The main schema properties are as follows:
- Code is the schema name. Required. Starts with the prefix specified in the Prefix for object name (
SchemaNamePrefixcode) system setting,Usrby default. Can contain Latin characters and digits. When a configuration element schema is created, the prefix specified in the Prefix for object name (SchemaNamePrefixcode) system setting is added to the current field automatically. Creatio checks for the prefix and whether it matched the system setting value when saving the schema properties. If the prefix is missing or does not match, the user receives a corresponding notification. - Title is the localizable schema title. Required. The title of the configuration element schema is generated automatically and matches the value of the Code property without a prefix.
- Package is the custom package where you create the schema. The property is populated automatically and non-editable.
- Description is the localizable schema description.
- Parameters edit page is the user task’s parameter setup page. Creatio displays the page when you set up an element in a business process. Create the page before setting up the user task. Otherwise, the list of user task parameters will be displayed.
- Dcm parameters edit page is the user task’s parameter setup page. Creatio displays the page when you set up the element in the Case Designer. Create the before settings up the user task. Otherwise, the list of user task parameters will be displayed.
- Color is the hex color code. It affects the appearance of the current configuration element in the Business Process Designer. By default, "#839DC3."
- Small vector image is the user task icon in the action menu. Make sure the icon meets the requirements. Read more >>>
- Large vector image is the user task icon in the business process schema. Make sure the icon meets the requirements. Read more >>>
- Title vector image is the user task icon in the element setup area of the Business Process Designer. Make sure the icon meets the requirements. Read more >>>
- Small vector image for DCM is an image that affects the appearance of the user task in the Business Process Designer.

Click Apply to apply the properties.
As a result, Creatio will save the properties of the User task type configuration element. The User Task Designer will close. When you reopen the schema of the User task type configuration element, you will see the C# code generated upon saving in the workspace of the User Task Designer.
The properties area of the User Task Designer lets you:
- edit the main schema properties (
 button)
 - specify the additional schema properties (
 button)
The additional schema properties are as follows:
- Localizable strings
- Parameters. User task parameters return the task result. To add parameters, follow the instructions in a different step: Add a user task parameter.
- Code is the schema name. Required. Starts with the prefix specified in the Prefix for object name (
-
Add the source code in the User Task Designer. To implement the business logic of the user task, follow the instructions in a different step: Implement the business logic of the user task.
-
Click Save on the User Task Designer’s toolbar to save the changes to Creatio properties temporarily.
-
Click Publish on the User Task Designer’s toolbar to apply the changes to the database level.
Requirements for user task icons
A user task contains the following icon type:
- small vector image
- large vector image
- title vector image
Requirements for small vector images
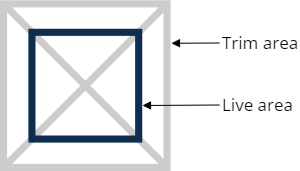
View example small vector images of out-of-the-box user tasks that meet the requirements below.

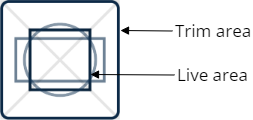
The icon structure is as follows.
Make sure the custom small vector images meet the following requirements:
-
Format: *.svg.
-
Line width of a trim area: 1 pixel.
-
The small vector image visualizes the functionality of the business process element. The small vector image matches large and title vector images.
-
Do not round the corners of the small vector image.
-
The small vector image detailing matches the other small vector images.
-
Color.
Trim area
Background color: transparent
Live area
#54657D -
Size.
Trim area
24x24 pixels or larger proportionally
Live area
16x16 pixels. Minor details can go beyond the live area.
Requirements for large vector images
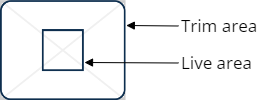
View example large vector images of out-of-the-box user tasks that meet the requirements below.

The icon structure is as follows.
Make sure the custom large vector images meet the following requirements:
-
Format: *.svg.
-
Line width of a trim area: 1 pixel.
-
The large vector image visualizes the functionality of the business process element. The large vector image matches small and title vector images.
-
The large vector image detailing matches the other large vector images.
-
Color.
Trim area
Background color: color from indicated area.
Cool colors

For example, #889CC0, #77C286, #B46DCB, #669AC7, #65BAD3.
Warm colors
For example, #F0C242, #EE7950, #E99535.
Live area
#FFFFFF -
Size.
Trim area
69x55 pixels or larger proportionally
Live area
24x24 pixels. Minor details can go beyond the live area.
-
Corner radius.
Trim area
6 pixels
Live area
1–2 pixels
Requirements for title vector images
View example title vector images of out-of-the-box user tasks that meet the requirements below.

The icon structure is as follows.
Make sure the custom title vector images meet the following requirements:
-
Format: *.svg.
-
Line width of a trim area: 2 pixels.
-
The live area must be filled.
-
The title vector image visualizes the functionality of the business process element. The title vector image matches small and large vector images.
-
The title vector image detailing matches the other title vector images.
-
Color.
Trim area
Background color: #FFFFFF
Live area
Color matches background color of large vector image. Read more >>>
-
Size.
Trim area
42x42 pixels or larger proportionally
Live area
22x22 pixels. Minor details can go up to 32 pixels beyond the live area.
-
Corner radius.
Trim area
3 pixels
Live area
1–2 pixels
Add a user task parameter
-
Click
in the properties area of the Parameters node’s context menu. -
Fill out the parameter properties in the User Task Designer.
The main parameter properties are as follows:
- Code is the parameter name. Required.
- Title is the localizable parameter title. Required.
- Type is the parameter type. Required. Depending on the selected value, you can link the current parameter to other user task parameters.
- Lookup is a lookup. The property becomes available if you select "Lookup" in the Type property.
- Schema is the name of the schema connected to the parameter. The property is non-editable.
- Required specifies the parameter is required.
- Resulting specifies the parameter is resulting, i. e., to enable users to use the values of the current parameter in the condition of a conditional flow.
- Contains performer Id specifies the ID of the contact who performs the task in the parameter. The property becomes available if you select "Lookup" in the Type property.
- Lazy load specifies the load the process diagram without delays. If you select the checkbox, Creatio loads the parameter immediately before using it. Learn more about lazy loading in Wikipedia.
- Serializable specifies the save the value of the current parameter as part of the user task execution, i. e., between
InternalExecute()andCompleteExecuting()method calls. Required for interactive user tasks. Learn more about user task types in a different step: Implement the business logic of the user task. - Copy value specifies the enable copying the parameter value when reusing it. The property is deprecated. We do not recommend using it.
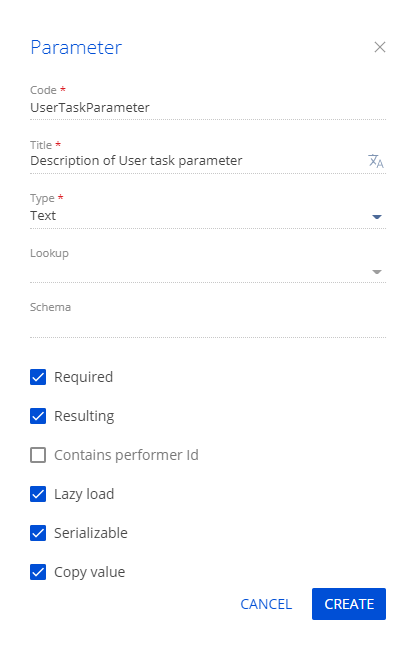
Click Create to add a parameter.
User Task Designer lets you perform the following parameter actions:
- Edit parameter properties ( button).
- Delete the parameter (
 button).
Implement the business logic of the user task
The following custom classes let you implement the business logic of the user task:
- The class that inherits from the
Terrasoft.Core.Process.ProcessUserTaskclass. The purpose of the class is to implement the base user task mechanism. The class matches the Code property of the user task schema. - The class that inherits from the
Terrasoft.Core.Process.ProcessUserTaskSchemaExtensionclass. The purpose of the class is to implement additional capabilities of the user task, for example, parameter synchronization, dependency setup, etc. To create a name of the inheritor class, add aSchemaExtensionsuffix to the name of the user task class. For example, the name of the inheritor class for thePerformHardWorkUserTaskuser task isPerformHardWorkUserTaskSchemaExtension.
Learn more about the ProcessUserTask class methods in a separate article: ProcessUserTask class. Learn more about the ProcessUserTaskSchemaExtension class methods in a separate article: ProcessUserTaskSchemaExtension class.
The methods that the User Task Designer lets you replace in the inheritor class of the ProcessUserTask class depend on the user task type. View user task types in the table below.
User task types
User task type | Description | Replaced methods |
|---|---|---|
Interactive | User or Creatio input is required to complete the user task. Interaction includes entering additional data, selecting a mode, and waiting for the object signal. |
|
| ||
| ||
Non-interactive | User input is not required to complete the user task. |
|
Add a user task to the Process element tab
If you are going to use the custom user task element often, add it to the Process element tab of the Process Designer to streamline the workflow.
To add a user task to the Process elements tab of the Process Designer:
-
Execute the SQL script provided below in the database.
- MSSQL
- PostgreSQL
insert into SysProcessUserTask(SysUserTaskSchemaUId, Caption)
select s.UId, s.Caption from SysSchema s
where s.Name = 'UsrSomeProcessUserTask'
INSERT INTO "SysProcessUserTask" ("SysUserTaskSchemaUId", "Caption")
VALUES
(
SELECT s."UId", s."Caption" FROM "SysSchema" AS s
WHERE s."Name" = 'UsrSomeProcessUserTask'
)UsrSomeProcessUserTaskis the name (the value of the Code property) of the user task schema. -
Log out of and log back in to Creatio or compile Creatio. Learn more about compilation in a separate article: Operations in Creatio IDE.
Use hot keys
To display the index of available hot keys:
- Open the User Task Designer.
- Click
 on the toolbar.
Hot key | Action |
|---|---|
| Select all |
| Undo |
| Redo |
| Find |
| Find next |
| Find previous |
| Replace |
| Replace all |
| Delete line |
| Go to line start |
| Go to line end |
| Jump to line |
| Fullscreen code editor |
| Exit fullscreen mode |
| Call autocomplete |
| Save the changes. |