Implement a custom group of campaign elements
This functionality is available for Creatio 8.3.3 and later.
To implement the example:
- Create a group. Read more >>>
- Add the group to the Campaign Designer. Read more >>>
- Implement a custom campaign element. Read more >>>
- Bind the custom campaign element to the custom group. Read more >>>
- Bind the base element to the custom group. Read more >>>
Create a custom "Communication" group in the Elements area of the Campaign Designer. Add both the custom SMS element and base Bulk email element to the "Communication" group. For the group, use the icon provided at the link.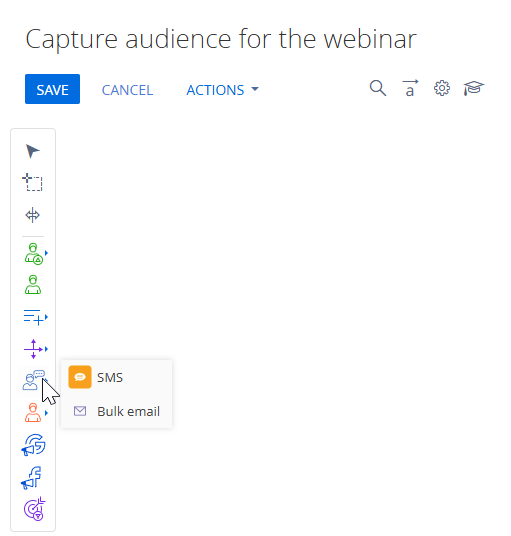
1. Create a group
-
Open the Configuration section. Instructions: Open the Configuration section.
-
Create a
sdkCustomCampaignElementGrouppackage. Instructions: Create a user-made package using Configuration section. -
Change the current package to
sdkCustomCampaignElementGroup. Instructions: Change the current package. -
Click Add → Module.
-
Fill out the schema properties.
For this example, use the following schema properties.
Property
Property value
Code
UsrCommunicationGroup
Title
"Communication" group
-
Add a localizable string that stores the group name.
-
Create a localizable string. Instructions: Add a localizable string.
-
Fill out the localizable string parameters.
Parameter
Parameter value
Code
CommunicationGroupCaption
Value
Communication
-
Click Add.
-
-
Add an icon that represents the "Communication" group in the Campaign Designer. If omitted, the first element's icon in the group is used as the group image.
For this example, use the icon provided at the link.
-
Go to the properties area → Images → click
/scr_add_button.png) .
. -
Fill out the image properties.
Property
Property value
Code
CommunicationGroupImage
Image
Click
 → select the icon provided at the link.
 -
Click Add.
-
-
Add the source code.
UsrCommunicationGroupdefine("UsrCommunicationGroup", ["terrasoft",
"UsrCommunicationGroupResources",
"CampaignBaseElementSchema"],
function(Terrasoft, resources) {
Ext.define("Terrasoft.manager.UsrCommunicationGroup", {
extend: "Terrasoft.CampaignBaseElementSchema",
alternateClassName: "Terrasoft.UsrCommunicationGroup",
/* ID of new element group. */
managerItemUId: "28da8553-7c53-41b4-9a0c-e0d4e728d480",
/* Group name. */
name: "Communication",
/* Position of element. */
elementPosition: 55,
/* Group caption. */
caption: resources.localizableStrings.CommunicationGroupCaption,
/* Group icon. */
groupImage: resources.localizableImages.CommunicationGroupImage,
/* Flag to indicate this is a group. */
isGroup: true
});
return Terrasoft.UsrCommunicationGroup;
}); -
Click Save.
2. Add the group to the Campaign Designer
-
Open the "CampaignElementSchemaManagerEx" (
CampaignElementSchemaManagerExcode) schema. -
Add the "Communication" group" (
UsrCommunicationGroupcode) schema.CampaignElementSchemaManagerExrequire(["CampaignElementSchemaManager", "UsrSmsElement", "UsrCommunicationGroup"],
function() {
/* Register the "UsrSmsElement" in the Campaign Designer. */
var coreElementClassNames = Terrasoft.CampaignElementSchemaManager.coreElementClassNames;
/* Add the custom schema to the list of available schemas. */
coreElementClassNames.push({
itemType: "Terrasoft.UsrSmsElement"
},
{
itemType: "Terrasoft.UsrCommunicationGroup"
});
}
); -
Click Save.
3. Implement a custom campaign element
Instructions: Implement a custom campaign element.
4. Bind the custom campaign element to the custom group
-
Open the "SMS element" (
UsrSmsElementcode) schema. -
Add the
groupsToproperty to assign the campaign element to the "Communication" group. -
Add the
elementPositionproperty to set the element position.UsrSmsElementdefine("UsrSmsElement", ["UsrSmsElementResources",
"CampaignBaseCommunicationSchema"], function(resources) {
Ext.define("Terrasoft.manager.UsrSmsElement", {
/* Parent schema. */
extend: "Terrasoft.CampaignBaseCommunicationSchema",
/* Alternative class name. */
alternateClassName: "Terrasoft.UsrSmsElement",
/* ID of the new campaign element. */
managerItemUId: "a1226f93-f3e3-4baa-89a6-11f2a9ab2d71",
/* Mixins that extend functionality. */
mixins: {
campaignElementMixin: "Terrasoft.CampaignElementMixin"
},
/* Element code. */
name: "Sms",
/* Localizable strings. */
caption: resources.localizableStrings.SmsElementCaption,
titleImage: resources.localizableImages.TitleImage,
largeImage: resources.localizableImages.LargeImage,
smallImage: resources.localizableImages.SmallImage,
/* Schema code of the record page. */
editPageSchemaName: "UsrSmsElementPropertiesPanel",
/* Element type. */
elementType: "Sms",
/* Full name of the class that implements the campaign element logic.
This class saves and reads the element properties from the schema
properties. Since the class is placed in the regular package, use the
"Terrasoft.Configuration.UsrSmsElement, Terrasoft.Configuration"
typeName. If the class is placed in the assembly package, use
typeName: "Terrasoft.Configuration.UsrSmsElement,
SomeAssemblyPackageName" */
typeName: "Terrasoft.Configuration.UsrSmsElement, sdkCustomCampaignElement",
/* CSS styles. */
color: "rgba(249, 160, 27, 1)",
width: 69,
height: 55,
/* Custom element properties. */
smsText: null,
phoneNumber: null,
/* Bind to the "Communication" group. One element can belong to multiple groups. */
groupsTo: ["Communication"],
/* Position of element within the group. */
elementPosition: 10,
/* Define the types of outbound connections supported by this element. */
getConnectionUserHandles: function() {
return ["CampaignSequenceFlow", "CampaignConditionalSequenceFlow"];
},
/* Include custom properties in serialization. */
getSerializableProperties: function() {
var baseSerializableProperties = this.callParent(arguments);
return Ext.Array.push(baseSerializableProperties, ["smsText",
"phoneNumber"]);
},
/* Configure the element icons that are displayed on the campaign flow. */
getSmallImage: function() {
return this.mixins.campaignElementMixin.getImage(this.smallImage);
},
getLargeImage: function() {
return this.mixins.campaignElementMixin.getImage(this.largeImage);
},
getTitleImage: function() {
return this.mixins.campaignElementMixin.getImage(this.titleImage);
}
});
return Terrasoft.UsrSmsElement;
}); -
Click Save.
5. Bind the base element to the custom group
-
Click Add → Module.
-
Fill out the schema properties.
For this example, use the following schema properties.
Property
Property value
Code
UsrBulkEmailElement
Title
"Bulk email" element
-
Add the source code that binds the Bulk email campaign element to the custom "Communication" group.
UsrBulkEmailElementdefine("UsrBulkEmailElement", ["MarketingEmailSchema"], function() {
Ext.define("Terrasoft.manager.UsrBulkEmailElement", {
/* Parent schema. */
extend: "Terrasoft.MarketingEmailSchema",
/* Alternative class name. */
alternateClassName: "Terrasoft.UsrBulkEmailElement",
/* ID of the base campaign element. */
managerItemUId: "523e76dc-b63e-48a8-9566-97f5173cee09",
/* Element code. */
name: "MarketingEmail",
/* Bind to the "Communication" group. One element can belong to multiple groups. */
groupsTo: ["Communication"],
/* Position of element within the group. */
elementPosition: 20
});
return Terrasoft.UsrBulkEmailElement;
}); -
Click Save.
-
Display the "Bulk email" element within the "Communication" group in the Campaign Designer.
-
Open the "CampaignElementSchemaManagerEx" (
CampaignElementSchemaManagerExcode) schema. -
Add the "Bulk email" element" (
UsrBulkEmailElementcode) schema and remove the base "MarketingEmailSchema" (MarketingEmailSchemacode) schema.CampaignElementSchemaManagerExrequire(["CampaignElementSchemaManager",
"UsrSmsElement",
"UsrCommunicationGroup",
"UsrBulkEmailElement",
"MarketingEmailSchema"],
function() {
/* Register the "UsrSmsElement" in the Campaign Designer. */
var coreElementClassNames = Terrasoft.CampaignElementSchemaManager.coreElementClassNames;
/* Remove the base "MarketingEmailSchema" from the Campaign Designer. */
for (var i = coreElementClassNames.length - 1; i >= 0; i--) {
if (coreElementClassNames[i].itemType === "Terrasoft.MarketingEmailSchema") {
coreElementClassNames.splice(i, 1);
}
}
/* Add the custom schema to the list of available schemas. */
coreElementClassNames.push({
itemType: "Terrasoft.UsrSmsElement"
},
{
itemType: "Terrasoft.UsrCommunicationGroup"
},
{
itemType: "Terrasoft.UsrBulkEmailElement"
});
}
); -
Click Save.
-
View the result
- Compile the app. Instructions: Compile the configuration.
- Clear browser cache.
- Open the Campaigns section.
- Create a campaign that has arbitrary parameters. Instructions: Add a campaign (user documentation).
- Click Edit campaign flow. This opens the Campaign Designer.
As a result, Creatio will display a custom "Communication" group in the Elements area of the Campaign Designer. The group includes both the custom SMS element and base Bulk email element. View the result >>>
Source code
- UsrSmsElement
- CampaignElementSchemaManagerEx
- UsrCommunicationGroup
- UsrBulkEmailElement
define("UsrSmsElement", ["UsrSmsElementResources",
"CampaignBaseCommunicationSchema"], function(resources) {
Ext.define("Terrasoft.manager.UsrSmsElement", {
/* Parent schema. */
extend: "Terrasoft.CampaignBaseCommunicationSchema",
/* Alternative class name. */
alternateClassName: "Terrasoft.UsrSmsElement",
/* ID of the new campaign element. */
managerItemUId: "a1226f93-f3e3-4baa-89a6-11f2a9ab2d71",
/* Mixins that extend functionality. */
mixins: {
campaignElementMixin: "Terrasoft.CampaignElementMixin"
},
/* Element code. */
name: "Sms",
/* Localizable strings. */
caption: resources.localizableStrings.SmsElementCaption,
titleImage: resources.localizableImages.TitleImage,
largeImage: resources.localizableImages.LargeImage,
smallImage: resources.localizableImages.SmallImage,
/* Schema code of the record page. */
editPageSchemaName: "UsrSmsElementPropertiesPanel",
/* Element type. */
elementType: "Sms",
/* Full name of the class that implements the campaign element logic.
This class saves and reads the element properties from the schema
properties. Since the class is placed in the regular package, use the
"Terrasoft.Configuration.UsrSmsElement, Terrasoft.Configuration"
typeName. If the class is placed in the assembly package, use
typeName: "Terrasoft.Configuration.UsrSmsElement,
SomeAssemblyPackageName" */
typeName: "Terrasoft.Configuration.UsrSmsElement, sdkCustomCampaignElement",
/* CSS styles. */
color: "rgba(249, 160, 27, 1)",
width: 69,
height: 55,
/* Custom element properties. */
smsText: null,
phoneNumber: null,
/* Bind to the "Communication" group. One element can belong to multiple groups. */
groupsTo: ["Communication"],
/* Position of element within the group. */
elementPosition: 10,
/* Define the types of outbound connections supported by this element. */
getConnectionUserHandles: function() {
return ["CampaignSequenceFlow", "CampaignConditionalSequenceFlow"];
},
/* Include custom properties in serialization. */
getSerializableProperties: function() {
var baseSerializableProperties = this.callParent(arguments);
return Ext.Array.push(baseSerializableProperties, ["smsText",
"phoneNumber"]);
},
/* Configure the element icons that are displayed on the campaign flow. */
getSmallImage: function() {
return this.mixins.campaignElementMixin.getImage(this.smallImage);
},
getLargeImage: function() {
return this.mixins.campaignElementMixin.getImage(this.largeImage);
},
getTitleImage: function() {
return this.mixins.campaignElementMixin.getImage(this.titleImage);
}
});
return Terrasoft.UsrSmsElement;
});
require(["CampaignElementSchemaManager",
"UsrSmsElement",
"UsrCommunicationGroup",
"UsrBulkEmailElement",
"MarketingEmailSchema"],
function() {
/* Register the "UsrSmsElement" in the Campaign Designer. */
var coreElementClassNames = Terrasoft.CampaignElementSchemaManager.coreElementClassNames;
/* Remove the base "MarketingEmailSchema" from the Campaign Designer. */
for (var i = coreElementClassNames.length - 1; i >= 0; i--) {
if (coreElementClassNames[i].itemType === "Terrasoft.MarketingEmailSchema") {
coreElementClassNames.splice(i, 1);
}
}
/* Add the custom schema to the list of available schemas. */
coreElementClassNames.push({
itemType: "Terrasoft.UsrSmsElement"
},
{
itemType: "Terrasoft.UsrCommunicationGroup"
},
{
itemType: "Terrasoft.UsrBulkEmailElement"
});
}
);
define("UsrCommunicationGroup", ["terrasoft",
    "UsrCommunicationGroupResources",
    "CampaignBaseElementSchema"],
    function(Terrasoft, resources) {
        Ext.define("Terrasoft.manager.UsrCommunicationGroup", {
            extend: "Terrasoft.CampaignBaseElementSchema",
            alternateClassName: "Terrasoft.UsrCommunicationGroup",
            /* ID of new element group. */
            managerItemUId: "28da8553-7c53-41b4-9a0c-e0d4e728d480",
            /* Group name. */
            name: "Communication",
            /* Position of element. */
            elementPosition: 55,
            /* Group caption. */
            caption: resources.localizableStrings.CommunicationGroupCaption,
            /* Group icon. */
            groupImage: resources.localizableImages.CommunicationGroupImage,
            /* Flag to indicate this is a group. */
            isGroup: true
        });
    return Terrasoft.UsrCommunicationGroup;
});
define("UsrBulkEmailElement", ["MarketingEmailSchema"], function() {
    Ext.define("Terrasoft.manager.UsrBulkEmailElement", {
        /* Parent schema. */
        extend: "Terrasoft.MarketingEmailSchema",
        /* Alternative class name. */
        alternateClassName: "Terrasoft.UsrBulkEmailElement",
        /* ID of the base campaign element. */
        managerItemUId: "523e76dc-b63e-48a8-9566-97f5173cee09",
        /* Element code. */
        name: "MarketingEmail",
        /* Bind to the "Communication" group. One element can belong to multiple groups. */
        groupsTo: ["Communication"],
        /* Position of element within the group. */
        elementPosition: 20
    });
    return Terrasoft.UsrBulkEmailElement;
});