Set up client credentials grant
OAuth 2.0 is one of the supported authorization types in Creatio. Learn more: OAuth 2.0 authorization types overview.
This article covers setup procedure of client credentials grant. Creatio also supports authorization code grant. Learn more: Set up authorization code grant.
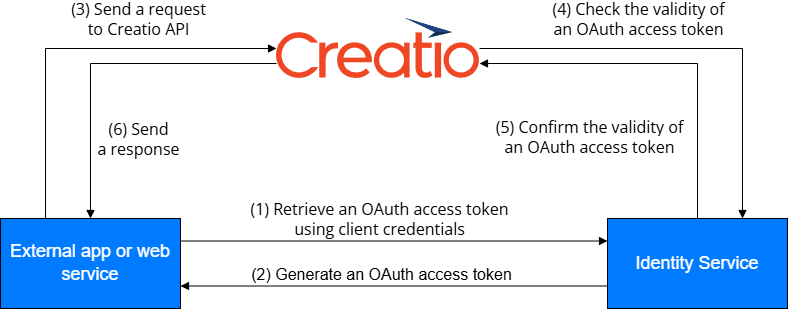
The client credentials grant builds server-to-server OAuth integration and provides access to Creatio data and API for integrated apps outside the context of a specific user (Fig. 1). Learn more: official vendor documentation (OAuth 2.0).
The client credentials grant works with OAuth access token only. Learn more: Access Token (OAuth 2.0 Authorization Framework).
General procedure
- Perform preliminary setup (for Creatio on-site). Read more >>>
- Generate OAuth 2.0 client credentials. Read more >>>
1. Perform preliminary setup (for Creatio on-site)
Identity Service implements OAuth 2.0 in Creatio and authorizes external apps and web services you integrate with Creatio using OAuth 2.0.
- If you use Creatio in the cloud, the Identity Service is deployed out of the box.
- If you use Creatio on-site, deploy the Identity Service and connect it to Creatio. Instructions: Deploy the Identity Service, Connect the Identity Service to Creatio.
2. Generate OAuth 2.0 client credentials
Generate dedicated OAuth 2.0 client credentials for each external app and web service you need to authorize using client credentials grant.
To generate OAuth 2.0 client credentials:
-
Open the System Designer. To do this, click
 in the top right.
 -
Open the OAuth integrated applications page (Fig. 2). To do this, click OAuth 2.0 integrated applications in the Import and integration block.
Fig. 2 OAuth integrated applications page 
-
If you use Creatio on-site, make sure that all checkboxes on the Diagnostic tab are selected (Fig. 3).
Fig. 3 Diagnostic tab 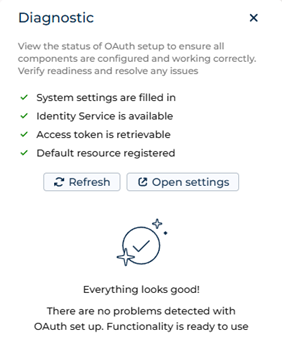
If at least one of the checkboxes is cleared, identify potential issues or errors in the Identity Service or OAuth setup and usage. Instructions: OAuth health monitoring.
-
Click New → Server-to-server (client credentials). This opens a new record window.
-
Fill out parameters of the external app (Fig. 4).
Fig. 4 Fill out parameters of the external app 
Parameter
Parameter value
Name*
Name of the integration that Creatio and logs will use. Required.
Application URL
The URL of the external app or web service.
Description
The purpose of the integration.
Create separate technical user for this integration
Whether to create a separate technical user for this integration automatically. The name of the technical user matches the name of the integration. Out of the box, the checkbox is selected. After generating OAuth 2.0 client credentials, grant sufficient permissions to the created technical user. We recommend using a dedicated user who has permissions only to read and edit the fields the integrated external app or web service need to change. For example, if you integrate a web service that passes the currency exchange rates to Creatio, grant permissions only to read and edit the Rate, Start, End fields of the Currency lookup.
If you have already created a technical user for your integration, you can use those credentials. To do this:
- Clear the Create separate technical user for this integration checkbox. This displays the User parameter.
- Select a previously created technical user.
-
Save the changes.
As a result:
-
If the Create separate technical user for this integration checkbox is selected, a separate technical user whose name matches the name of the integration will be created (Fig. 4). Otherwise, the manually created technical user will be used for the integration.
-
The "Client Id" and "Client secret" parameters will be populated (Fig. 5). Use these parameter values in external apps and web services you integrate with Creatio.
Fig. 5 Client Id and Client secret parameters 
-
The new integration will be added to the OAuth integrated applications page (Fig. 6).
Fig. 6 OAuth integrated applications page 
The next steps depend on your business goals. Use OAuth 2.0 client credentials in the following ways:
- Authorize ready-to-use external apps and web services you integrate with Creatio. For example, webhook service, Power BI Connector, Clio.
- Provide OAuth 2.0 client credentials to colleagues or partners who need to work with your Creatio instance using API.
- Authorize self-developed external apps and web services you integrate with Creatio. Learn more: Authorize external requests using client credentials grant (developer documentation).
You can set up automated monitoring systems based on OAuth health monitoring. Instructions: OAuth health monitoring. If needed, use Postman to check the health of OAuth functionality. The Postman request collection that tests requests is available in Creatio API documentation.
Operations with OAuth integrations
Modify the integration parameters
If the settings of the external app change, you can modify the parameters of the previously created integration. To do this:
- Open the System Designer. To do this, click in the top right.
- Open the OAuth integrated applications page. To do this, click OAuth 2.0 integrated applications in the Import and integration block.
- Open the window of integration whose parameters you want to modify.
- Modify the needed parameters.
- Save the changes.
As a result:
- The parameters for external app integration will be updated.
- The "Client Id" and "Client secret" parameters will remain unchanged.
Revoke the integration access
Creatio lets you temporarily revoke the integration access without deleting it. For example, when an integrated external app generates high-load requests, revoke the integration access temporarily to solve the issue. To do this:
- Open the System Designer. To do this, click in the top right.
- Open the OAuth integrated applications page. To do this, click OAuth 2.0 integrated applications in the Import and integration block.
- Clear the Active checkbox for a dedicated integration.
- Save the changes.
As a result, integration access will be revoked temporarily.
To resume the integration, select the Active checkbox for a dedicated integration.
See also
Connect the Identity Service to Creatio
Authorize external requests using client credentials grant (developer documentation)
E-learning courses
Tech Hour - Integrate like a boss with Creatio, part 2 (Odata)