Set up LDAP synchronization
LDAP directory synchronization lets you automate user account administration in Creatio. Users synchronized with LDAP can log in to Creatio using their domain credentials. Learn more in a separate article: Set up LDAP authentication.
Creatio supports synchronization with the following LDAP servers:
- Active Directory. Learn more in the official vendor documentation.
- OpenLDAP. Learn more in the official vendor documentation.
In general, the LDAP synchronization setup consists of the following steps:
- Set up LDAP integration. Read more >>>
- Bind LDAP elements to Creatio users and roles. Read more >>>
- Run LDAP synchronization. Read more >>>
Set up LDAP integration
Set up LDAP integration to enable the LDAP synchronization functionality. Perform the setup once, unless the LDAP directory structure changes. Basic knowledge about the structure of the needed LDAP directory is required to set up LDAP integration.
Depending on the structure of each LDAP directory, LDAP element attributes in your directory might differ from the attributes specified in the article.
In general, the LDAP integration setup consists of the following steps:
- Set up the LDAP server connection. Read more >>>
- Set up the user synchronization. Read more >>>
- Set up the synchronization between LDAP user groups and Creatio roles. Read more >>>
- Set up the filter conditions. Read more >>>
1. Set up the LDAP server connection
-
Click the
 button to open the System Designer.
 -
Click "LDAP integration setup" in the "Import and integration" block. This opens a page.
-
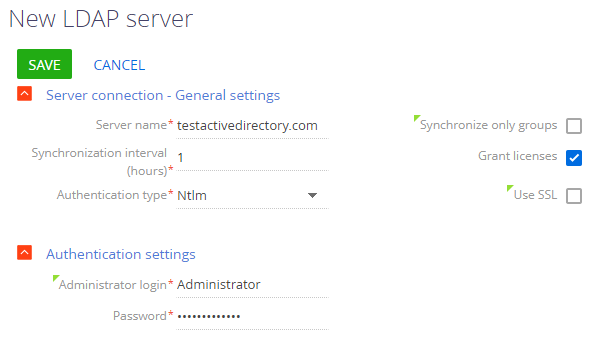
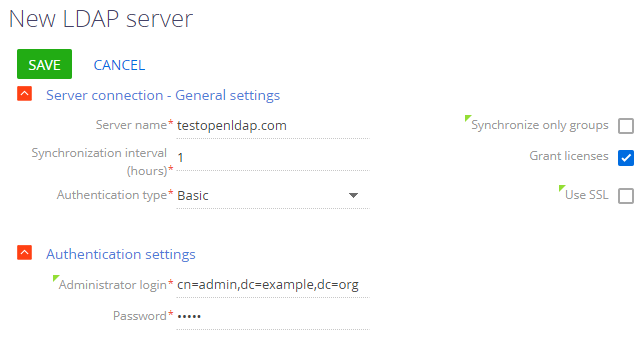
Specify the general connection settings of the LDAP server (Fig. 1 and 2):
-
Enter the LDAP server name or IP address in the Server name field.
-
Set the automatic LDAP synchronization interval in the Synchronization interval (hours) field. Learn more in a different section: Set up the automatic synchronization.
-
Select the connection protocol of the LDAP server in the Authentication type field. The authentication type depends on your LDAP server and the authentication security requirements. For example, select "Ntlm" for the NT LanManager authentication supported by Windows. You can use the default value.
noteIf you select the "Kerberos" authentication type, the Server name and Key Distribution Center fields only support URLs, not IP addresses. Your Creatio application server must be joined to the same domain as the LDAP server and the key distribution center.
-
Select the Synchronize only groups checkbox to automatically deactivate and activate Creatio users that are manually excluded from and included in the synchronized groups in the LDAP directory. You can use the default value.
-
Select the Grant licenses checkbox to grant licenses to users on LDAP synchronization automatically. You can use the default value.
-
Select the Use SSL checkbox to enable SSL for the synchronization. If you select the checkbox, specify the value of the Server name field in the "server:port" format. You can use the default value. Creatio .NET Framework version 7.17.2 and later as well as Creatio .NET Core version 8.0.2 Atlas and later support LDAP server connection via the TLS 1.2 protocol.
The default port for LDAPS connection is 636.
The default port for LDAP connection is 389.
noteIf you use self-signed certificate in Creatio cloud, use the extracted block service and send the certificate to Creatio support so that they can mark it as trusted.
-
-
Specify the authentication settings (Fig. 1 and 2):
-
Enter the administrator credentials in the Administrator login, Password fields. If your Creatio server is installed on Linux, use the "domain\login" format.
noteMake sure that the administrator has sufficient permissions to read the user and group data.
-
2. Set up the user synchronization
-
Map the required attributes of LDAP elements that contain the user data to import (Fig. 3 and 4):
- Enter the unique name of the LDAP organizational structure element that contains the users to synchronize in the Domain name field. You can synchronize users subordinate to the specified LDAP element, either directly or to its child elements. For example, if you specify the root element of the directory structure, you can synchronize all users of the directory.
- Specify the LDAP attribute that contains the full name of an LDAP user in the User name field. Required to populate the Full name field of the contact page when importing users. For example, the "name" or "cn" ("Common Name") attributes can contain the full name of the user. You can use the default value.
- Specify the attribute that contains the LDAP username required to log in to Creatio in the Username field. The synchronized LDAP user will log in to Creatio using this name. For example, "sAMAccountName." You can use the default value.
- Specify the attribute that stores the time and date of the last change to the LDAP element in the Modification date attribute field. This lets you optimize the synchronization by excluding the previously imported records.
- Specify the attribute that contains the unique user ID in the User Id field. You can use the default value.
ImportantIf any of the required user attributes are missing, LDAP integration throws an error.
-
You can also map optional attributes Creatio uses to populate the fields on the user contact page (Fig. 3 and 4):
-
Specify the attribute that contains the user's email address in the Email field. Required to populate the Email field on the contact page. You can use the default value.
-
Specify the attribute that contains the name of the user's employer in the Company name field. Required to populate the Account field on the contact page. If an account name matches the value of the specified attribute verbatim, Creatio links the user’s contact to that account during synchronization. You can use the default value.
-
Specify the attribute that contains the user's phone number in the Phone number field. Required to populate the Business phone field on the contact page. You can use the default value.
-
Specify the attribute that contains the user's job title in the Job title field. Required to populate the Job title field on the contact page. If an existing job title matches the value of the specified attribute verbatim, Creatio selects that job title for the user during synchronization. You can use the default value.
noteCreatio does not add new organizations and job titles as part of the synchronization. Add them manually.
ImportantIf you leave any additional attribute fields empty, Creatio does not populate the corresponding contact page fields when importing users from LDAP.
-


3. Set up the synchronization between LDAP user groups and Creatio roles
Set up the group synchronization to bind LDAP directory groups to elements of Creatio organizational structure.
To set up the synchronization between LDAP user groups and Creatio roles, map the required attributes of the LDAP directory elements that contain the user data to import (Fig. 5 and 6):
- Specify the attribute that contains the name of the LDAP user group in the LDAP group name field. For example, the "cn" ("Common Name") attribute. You can use the default value.
- Specify the unique name of the LDAP element that contains the user groups to synchronize in the Groups domain name field. You can synchronize groups subordinate to the specified LDAP element, either directly or to its child elements. For example, if you specify the root element of the directory structure, you can synchronize all groups of the directory.
- Specify the attribute to use as a unique group ID in the Group Id field. You can use the default value.


Creatio verifies users included in the groups to synchronize as part of synchronization. If the date stored in the Modification date attribute attribute is later than the last synchronization date, Creatio updates the user entry in Creatio organizational structure.
If any of these attributes are missing, LDAP integration throws an error.
4. Set up the filter conditions
Set up the filter conditions to specify which LDAP elements to include in the list of groups and users to synchronize.
To set up the filter conditions, specify the general attributes of the LDAP server connection (Fig. 7 and 8):
- Specify the elements of the general LDAP directory index to synchronize with Creatio users in the List of users filter. The search filter must select active elements only. You can use the default value.
- Specify the LDAP elements to synchronize with Creatio organizational roles (user groups) in the List of groups filter. The search filter must select active elements only. You can use the default value.
- Build an index of users included in the LDAP group in the List of group users filter. One or more attributes determine whether a user is a member of a group. For example, most directories use the "memberOf" attribute. The (memberOf=[#LDAPGroupDN#]) filter contains a Creatio macro and lets you filter all objects (users) who are in the [#LDAPGroupDN#] group. You can use the default value.
Enclose each logical expression in brackets () to ensure the filter works correctly both on Windows and Linux. Learn more in a separate article: Set up Active Directory filters.


Bind LDAP elements to Creatio users and roles
In Creatio, you can synchronize the organizational and functional user roles with the Active Directory groups. After the LDAP synchronization, you can transfer the company organizational structure and role settings from Active Directory to Creatio.
LDAP directory elements are bound to the corresponding Creatio elements (users and organizational structure elements) when you add new users or organizational roles. You can bind existing Creatio users or import users from Active Directory. Learn more in a separate article: Import new users and roles from Active Directory.
In general, the procedure to bind LDAP elements to Creatio users and roles consists of the following steps:
- Set up the synchronization between Creatio organizational roles and Active Directory groups. Read more >>>
- Set up the synchronization between Creatio functional roles and Active Directory groups. Read more >>>
- Connect Creatio user accounts to LDAP users. Read more >>>
1. Set up the synchronization between Creatio organizational roles and Active Directory groups
-
Click the
 button to open the System Designer.
 -
Click "Organizational roles" in the "Users and administration" block. This opens a page.
-
Select the needed role from the organizational tree. If the tree lacks such a role, add it. Learn more in a separate article: Organizational roles.
noteEach organizational role is an element in a tree-like structure of roles, where each element is an organization or a department.
-
Open the Users tab and set the main parameters (Fig. 9):
- Select the Synchronize with LDAP checkbox.
- Select the Active Directory group that corresponds to the Creatio organizational role in the LDAP element field.
Fig. 9 Select the Active Directory group for the synchronization setup 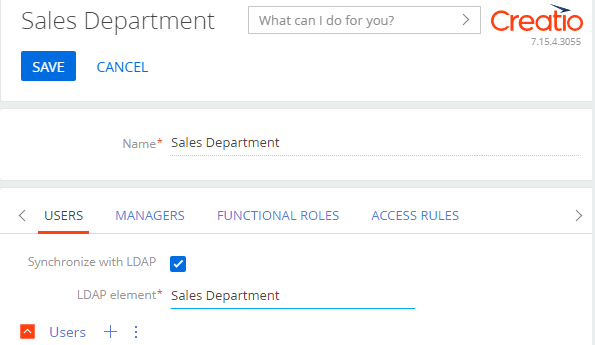
-
Add new users if needed. To do this, click the
 button on the Users detail and select the users.note
To synchronize a large number of users not yet registered in Creatio, we recommend importing the users from the LDAP directory. Learn more in a separate article: Import new users and roles from Active Directory.
As a result, Creatio will synchronize the selected organizational role as part of the next synchronization session.
2. Set up the synchronization between Creatio functional roles and Active Directory groups
- Click the
 button to open the System Designer.
 - Click "Functional roles" in the "Users and administration" block.
- Repeat steps 3-5 of the procedure to synchronize Creatio organizational roles with Active Directory groups.
3. Connect Creatio user accounts to LDAP users
- Click the
 button to open the System Designer.
 - Click "Organizational roles" or "Functional roles" in the "Users and administration" block, depending on what user groups you would like to synchronize. This opens a page.
- Select the role of the needed user.
- Open the Users tab.
- Select the needed user and open their page.
- Open the General information tab and select LDAP authentication.
- Select the needed LDAP user in the Login field.
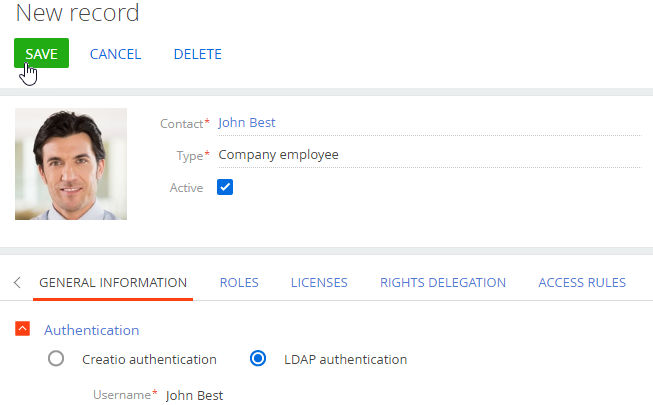
As a result, Creatio will connect the user to the LDAP user. The user will be able to log in to Creatio using credentials stored in the LDAP directory, such as the domain login and password.
Run the LDAP synchronization
Synchronize Creatio users and organizational structure elements with the connected LDAP directory elements to update data in accordance with the LDAP directory changes made since the previous synchronization. As part of the synchronization, Creatio transfers changes made to users and groups in the LDAP directory to the corresponding connected organizational structure elements. Creatio lets you run the LDAP synchronization automatically or manually.
Set up the automatic LDAP synchronization
Creatio runs the LDAP synchronization automatically at the interval specified in the Synchronization interval (hours) field of the LDAP integration setup page. Learn more in a different section: Set up the LDAP server connection.
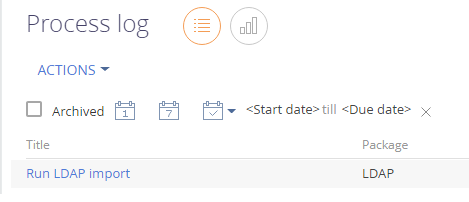
After you save the setup page, Creatio will start the LDAP integration automatically by running the "Run LDAP import" process (Fig. 11).
Run the LDAP synchronization manually
- Click the
 button to open the System Designer.
 - Click "Organizational roles" in the "Users and administration" block. This opens a page.
- Select the Synchronize with LDAP action in the section action menu (Fig. 12).
Fig. 12 Synchronize with LDAP action 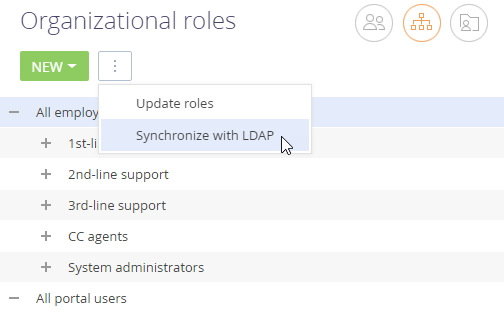
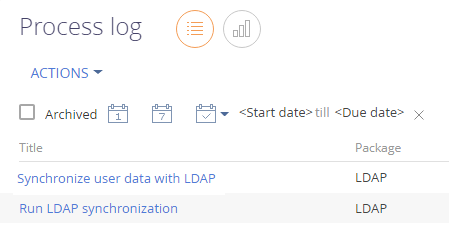
As a result, Creatio will run the "Run LDAP synchronization" process, which will, in turn, call the "Synchronize user data with LDAP" process (Fig. 13).
Creatio will notify you when the synchronization is complete.
If the number of synchronized users exceeds the number of available licenses, Creatio notifies system administrators via the communication panel and email.
Special features of LDAP synchronization
- If an LDAP user is no longer among the active users, Creatio clears the Active checkbox on the page of the synchronized user. The user will not be able to log in.
- If a previously inactive LDAP user is activated, Creatio selects the Active checkbox on the page of the synchronized user.
- If an LDAP user or user group is renamed, Creatio renames the synchronized users and roles.
- If an LDAP user is excluded from an LDAP group linked to an element of Creatio organizational structure and the Synchronize only groups checkbox is selected, Creatio deactivates the user and excludes them from the corresponding organizational structure element.
- If a LDAP user is added to an LDAP group linked to an element of Creatio organizational structure and the Synchronize only groups checkbox is selected, Creatio activates the user and adds them to the corresponding organizational structure element.
- If you add new unsynchronized users to the synchronized LDAP element, Creatio imports the users.
- If Creatio includes users (not imported from LDAP) whose names match LDAP user names, they are not synchronized.
- If a synchronized LDAP user is deleted from a group connected to a Creatio organizational structure element, the user remains active in Creatio, but they will not be able to log in.
- If the Grant licenses checkbox is selected, Creatio grants licenses to the synchronized users. Learn more in a different section: Set up the LDAP server connection.
As a result of the LDAP synchronization, the users will be able to use their credentials to log in to Creatio. Learn more in a separate article: Set up LDAP authentication.