1. Create system settings
-
Create a system setting that contains the product code pattern.
- Click
 to open the System Designer.
 - Go to the System setup block → System settings.
- Click Add setting on the section toolbar.
-
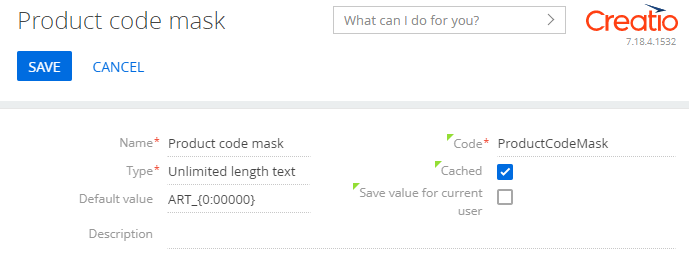
Fill out the properties of the system setting.
- Set Name to "Product code mask."
- Set Code to "ProductCodeMask."
- Select "Unlimited length text" in the Type property.
- Set Default value to "ART_{0:00000}."
- Click
-
Create a system setting that contains the current product code.
- Click to open the System Designer.
- Go to the System setup block → System settings.
- Click Add setting on the section toolbar.
-
Fill out the properties of the system setting.
- Set Name to "Product last number."
- Set Code to "ProductLastNumber."
- Select "Integer" in the Type property.

- Click
2. Create a replacing object schema
- Go to the Configuration section and select a custom package to add the schema.
-
Click Add → Replacing object on the section list toolbar.
/scr_add_entity_schema_replaced.png)
-
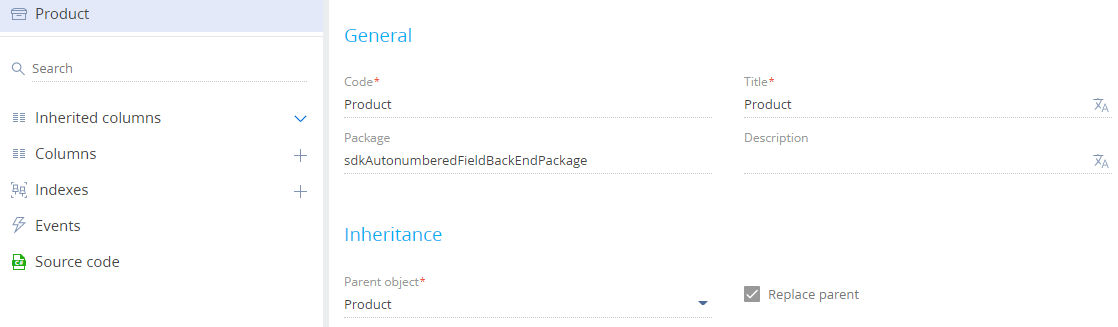
Fill out the schema properties.
- Set Code to "Product."
- Set Title to "Product."
- Select "Product" in the Parent object property.
-
Add an event to the schema.
- Open the Events node of the object structure.
-
Go to the Adding block → select the Before record added checkbox. Creatio names the event ProductInserting.

- Click Save on the Object Designer's toolbar.
-
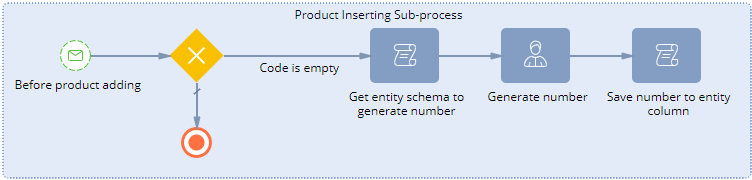
Implement an event sub-process.
- Click Open process on the Object Designer's toolbar.
-
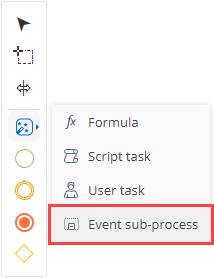
Click System actions in the element area of the Designer and drag the Event sub-process element to the working area of the Process Designer.
- Set the Title property in the element setup area to "Product Inserting Sub-process."
-
Set up the event sub-process elements.
-
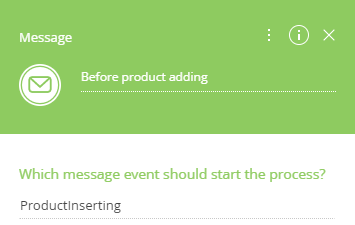
Set up the Message start event.
- Set Title to "Before product adding."
- Set Which message event should start the process? to "ProductInserting."
-
Add the Exclusive gateway (OR) gateway .
To do this, select Exclusive gateway (OR) in the menu of the Message start event.
-
Add the Script task system action.
-
Click System actions in the element area of the Designer and drag the Script task system action to the working area of the sub-process.
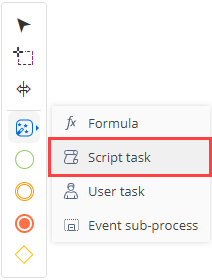
- Name the Script task system action "Get entity schema to generate number."
-
Add the code of the Script task system action.
UserTask1 is the code of the Generate number system action of the User task type. The element setup procedure is covered on the next step. You can edit the code in the advanced setup mode of the User task system action.
- Click Save on the Process Designer's toolbar.
-
-
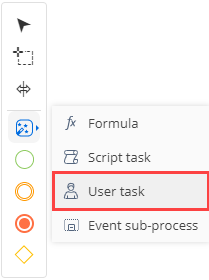
Add the User task system action.
-
Click System actions in the element area of the Designer and drag the User task action to the working area of the sub-process.
-
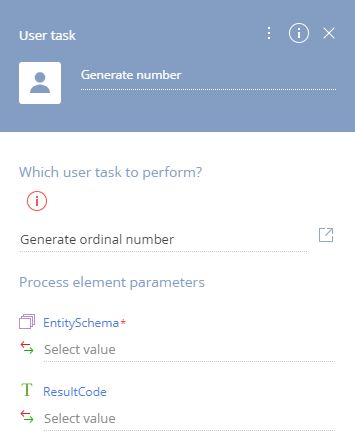
Specify the properties of the system action.
- Set Title to "Generate number."
- Select "Generate ordinal number" in the Which user task to perform? property. The system action generates the current ordinal number based on the pattern specified in the ProductCodeMask system setting.
-
-
Add the Script task system action.
-
Click System actions in the element area of the Designer and drag the Script task system action to the working area of the sub-process.
- Name the Script task system action "Save number to entity column."
-
Add the code of the Script task system action.
- Click Save on the Process Designer's toolbar.
-
-
Add the Terminate event.
To do this, click Terminate in the element area of the Designer and drag the event to the working area of the sub-process.

-
-
Set up the flows.
-
Set up the conditional flow between the Exclusive gateway (OR) gateway and Get entity schema to generate number system action.
- Click
 in the menu of the Exclusive gateway (OR) gateway and connect the Exclusive gateway (OR) gateway to the Get entity schema to generate number system action.
 -
Fill out the conditional flow properties.
- Set Title to "Code is empty."
-
Set up the Condition to move down the flow property.
- Click
 on the element setup area next in the Condition to move down the flow property.
 -
Specify the formula.
- Save the changes.
- Click
- Click
-
Set up the default flow between the Exclusive gateway (OR) gateway and Terminate event.
- Click in the menu of the Exclusive gateway (OR) gateway and connect the Exclusive gateway (OR) gateway to the Terminate event.
-
Convert the sequence flow into a default flow. To do this, click
 in the flow menu → Default flow.
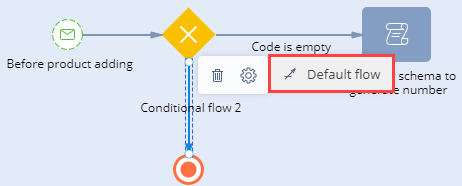
- Click
-
Set up the sequence flows.
- Click in the menu of the Get entity schema to generate number system action and connect the Get entity schema to generate number system action to the Generate number system action.
- Click in the menu of the Generate number system action and connect the Generate number system action to the Save number to entity column system action.
- Click
-
View the event sub-process in the figure below
- Click Save then Publish on the Process Designer's toolbar.
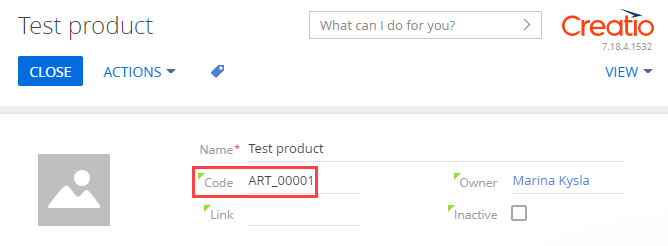
Outcome of the example
To view the outcome of the example:
- Clear the browser cache.
- Refresh the Products section page.
- Add and save a new product. For example, Test product.
Creatio generates the code automatically and saves it to the column server-side when the Before Record Saved event is triggered. The event is triggered server-side when the query to add a record is sent from the front-end. As such, Creatio cannot display the code on the page that adds a product immediately. The number will be displayed when you save the product.
As a result, Creatio will enable the automatic numbering of the Code field on the product page.