1. Create a view model schema of the mini page
- Go to the Configuration section and select a custom package to add the schema.
-
Click Add → Page view model on the section list toolbar.
/scr_minicard_creating_1.png)
-
Fill out the schema properties in the Schema Designer:
- Set Code to "UsrProductMiniPage."
- Set Title to "Product Mini Page."
- Set Parent object to "BaseMiniPage."
/scr_props.png)
Click Apply to apply the properties.
2. Display the fields of the primary object
Add the needed source code in the Schema Designer.
- Specify the Product schema as the object schema.
-
Declare the MiniPageModes attribute. Assign the array that has the collection of the needed mini page operations to the attribute.
-
Add the needed modifications to the diff array of view model modifications.
The view model elements of the base mini page are as follows:
- MiniPage is the page field.
- HeaderContainer is the page heading. By default, the mini page places it in the first row of the field.
In this example, the diff modification array contains two new objects that configure the Name and Code fields.
View the source code of the view model schema below.
3. Register the mini page in the database
Register new mini pages in the database. Run the following SQL query to do that.
As a result of the query, Creatio will add the unique mini page identifier to the [MiniPageSchemaUId] field of the [SysModuleEdit] table record that corresponds to the Products section.

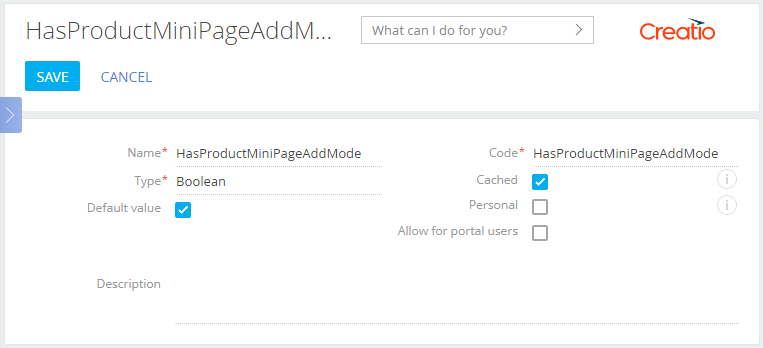
4. Add the system setting
Add the system setting that has the following properties to the System settings section of the System Designer:
- Set Name to "HasProductMiniPageAddMode."
- Set Code to "HasProductMiniPageAddMode."
- Set Type to "Boolean."
- Set Default value to selected checkbox.
Outcome of the example
As a result, Creatio will display the mini page with two fields when you add a new product.
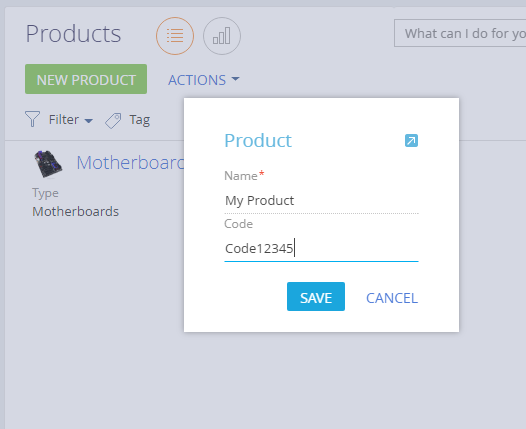
After you save the mini page, the corresponding record will appear in the section list.