Use the Campaign designer to set up marketing campaigns. Using this designer, you can create a campaign diagram that consists of interconnected elements. In addition to default campaign elements you can create custom ones.
Algorithm for adding a custom campaign element
- Create a new element for the Campaign designer.
- Create the element’s edit page.
- Expand the Campaign designer menu with a new element.
- Create the element’s server part.
- Create executable element for the new campaign element.
- Add custom logic for processing campaign events.
Example implementation algorithm
1. Creating a new element for the Campaign designer
To display the element in the Campaign designer UI, add a new module schema for the campaign element. The procedure for creating a module schema is covered in the “Create a client schema” article. Set the following properties for the created schema:
- Title – "Test SMS Element Schema".
- Name – "TestSmsElementSchema".
Add a localized string to the schema:
- Name – "Caption".
- Value – "Test SMS".

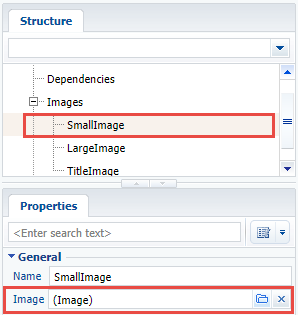
Add images that will represent the campaign element in the Campaign designer. Use the SmallImage, LargeImage and TitleImage properties to add the images.
In this example we used a scalable vector graphics (SVG) image available here.
Add following source code on the Source Code section of the schema":
Specifics:
- The managerItemUId property value must be unique for the new element and not repeat the value of the other elements.
- The typeName property contains the name of the C# class that corresponds to the campaign element name. This class will be saving and reading the element’s properties from the schema metadata.
Save the schema to apply changes.
Adding a group of elements
If a new group of elements, such as Scripts must be created for the campaign element, the schema source code must be supplemented with the following code:
Also, add a localized string with the following properties:
- Name – "ScriptsElementGroupCaption".
- Value – "Scripts".
Save the schema to apply changes.
2. Creating the element’s edit page
Create the campaign element’s edit page in the custom package to enable the users to view and edit the element’s properties. To do this, create a schema that expands BaseCampaignSchemaElementPage (CampaignDesigner package). The procedure for creating a replacing client schema is covered in the “Create a client schema” article.
Set the following properties for the created schema:
- Title – "TestSmsElementPropertiesPage".
- Name – "TestSmsElementPropertiesPage".
- Parent object – "BaseCampaignSchemaElementPage".
Add localized strings to the created schema with properties given in the table.
Localized string properties
| Name | Value |
|---|---|
| PhoneNumberCaption | Sender phone number |
| SmsTextCaption | Message |
| TestSmsText | Which text message should be sent? (Which SMS text to send?) |
Add following source code on the Source Code section of the schema":
Save the schema to apply changes.
3. Expanding the Campaign designer menu with a new element
To display the new element in the Campaign designer menu, expand the campaign element base schema manager. Add a schema that expands CampaignElementSchemaManagerEx (the CampaignDesigner package) to the custom package. The procedure for creating a replacing client schema is covered in the “Create a client schema” article.
Set the following properties for the created schema:
- Title – "TestSmsCampaignElementSchemaManagerEx".
- Name – "CampaignElementSchemaManagerEx".
- Parent object – "CampaignElementSchemaManagerEx".
Add following source code on the Source Code section of the schema":
Save the schema to apply changes.
4. Creating server part of the custom campaign element
To implement saving the campaign element properties, create a class that interacts with the application server part. The class must inherit CampaignSchemaElement and override the ApplyMetaDataValue() and WriteMetaData() methods.
Create a source code schema with the following properties:
- Title – "TestSmsElement".
- Name – "TestSmsElement".
For more information on creating source code schemas, please see the Create the Source code schema article.
Add the following source code on the Source Code section of the schema":
Publish the source code schema.
5. Creating executable element for the new campaign element
For the custom campaign element to execute the needed logic, add an executable element. It is a class that inherits the CampaignProcessFlowElement class, where the SafeExecute() method is implemented.
To create an executable element, add a source code schema element with the following properties in the custom package:
- Title – "TestSmsCampaignProcessElement".
- Name – "TestSmsCampaignProcessElement".
Add following source code on the Source Code section of the schema":
Publish the source code schema.
6. Adding custom logic for processing campaign events
Use the event handler mechanism to implement custom logic on saving, copying, deleting, running and stopping campaigns. Create a public sealed handler class that inherits CampaignEventHandlerBase. Implement interfaces that describe specific event handler signatures. This class must not be generic. It must have a constructor available by default.
The following interfaces are supported in the current version:
- IOnCampaignBeforeSave – contains method that will be called before saving the campaign.
- IOnCampaignAfterSave – contains method that will be called after saving the campaign.
- IOnCampaignDelete – contains method that will be called before deleting the campaign.
- IOnCampaignStart – contains method that will be called before running the campaign.
- IOnCampaignStop – contains method that will be called before stopping the campaign.
- IOnCampaignValidate – contains method that will be called on validating the campaign.
- IOnCampaignCopy – contains method that will be called after copying the campaign.
If an exception occurs during the event processing, the call chain is stopped, and campaign status is reverted to the previous one in DB.
Additional case conditions
In order for the new custom campaign element to work, SMS gateway connection is required. The connection, account status and other parameters must be checked during campaign validation. The messages must be sent when campaign starts.
To implement these conditions, add a source code schema element with the following properties in the custom package:
- Title – "TestSmsEventHandler".
- Name – "TestSmsEventHandler".
Add following source code on the Source Code section of the schema":
After making the changes, publish the schema. Compile the application and clear the cache.
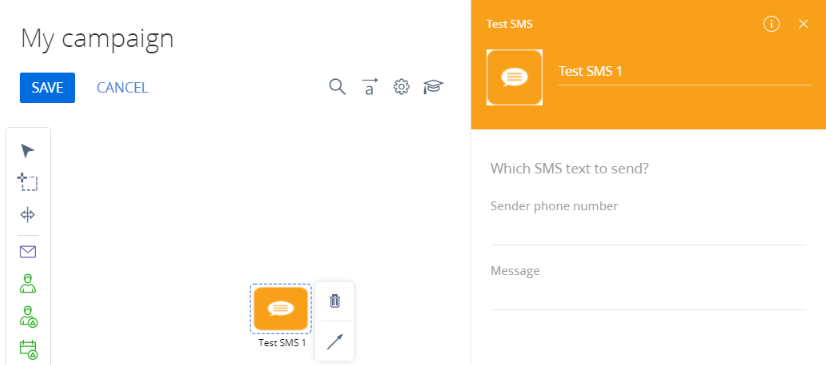
As a result, a new TestSMS element will be added in the campaign element menu (1) that the users can add to the campaign diagram (2). When an added element is selected, its edit page will be displayed (3).