Add users
Each Creatio user has a unique name and password to log in to the system. A user account is linked to a corresponding contact record and each contact record can only be linked to one user account. You can add users to Creatio in multiple ways:
- Create users manually in the System users section. Read more >>>
- Import users from Excel. Read more >>>
- Import users and roles from LDAP. Read more >>>
- Create users automatically during their first login via SSO. Read more >>>
Manage Creatio users in the System users section. User settings determine what operations users can perform, what data they can see and how they can work with this data.
By default, only system administrators have access to the System users section.
Click  → System users to access the System users section.
Add a regular employee user
To create a new user account for a regular employee:
- Create a contact for the new user in the Contacts section or make sure that the relevant contact already exists. If you use Creatio Studio without other Creatio apps, you can skip this step. Read more >>>.
- Create a new user in the System users section and specify the contact in the user profile. Read more >>>.
- Assign the user a role, if applicable. Read more >>>.
- Distribute licenses to the user. Read more >>>.
Add a new contact
-
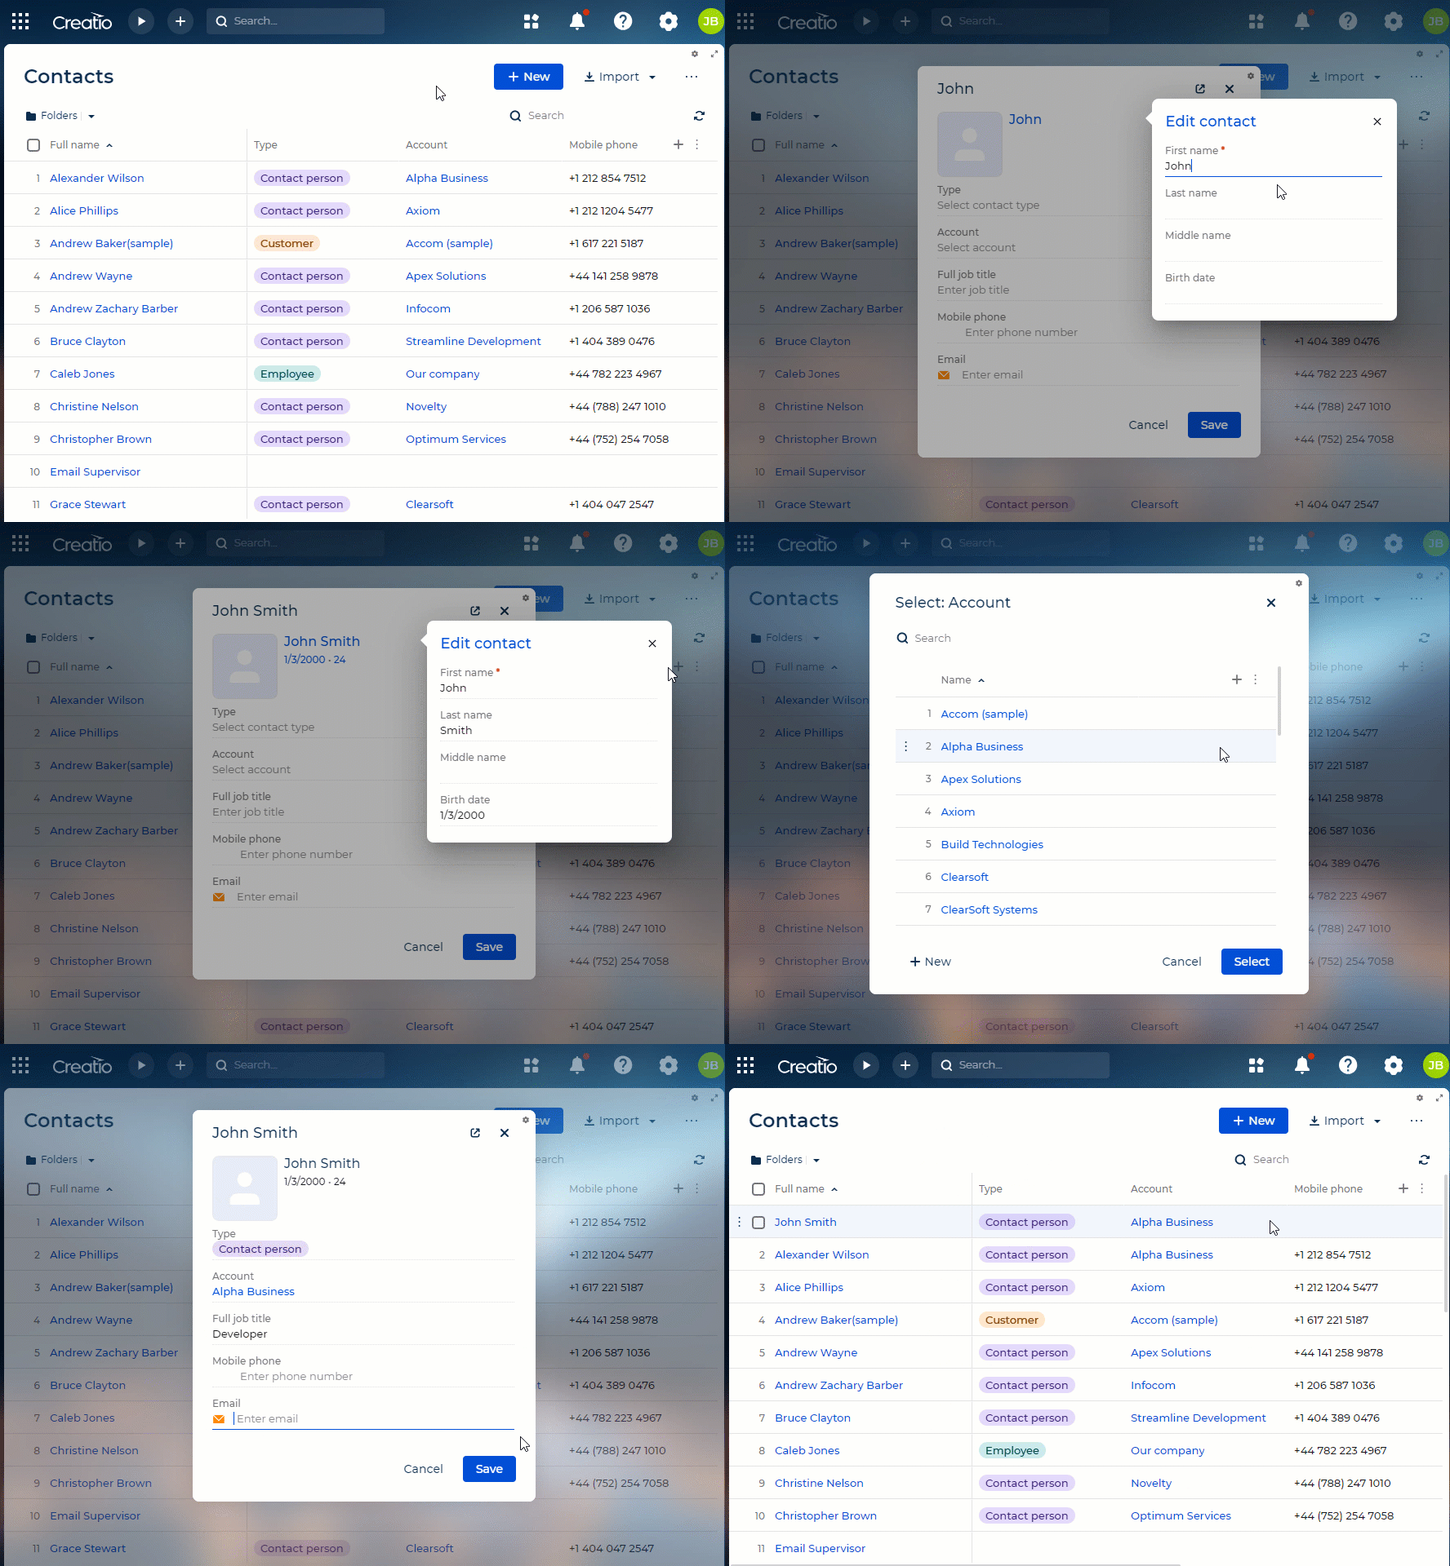
Go to the Contacts section → Create contact.
-
Fill out the required fields on the contact mini-page and click Save (Fig. 3).
Fig. 1 Adding a new contact 
As a result, a new contact will be added to Creatio, and you will be able to create a user for this contact.
You can also add a new contact directly from the contact lookup page when filling out the Contact field on the user page. Click  in the Contact field, then click New in the lookup box that pops up. Fill out the contact page that opens. After you save the contact page, you will return to the new user page, with the Contact field populated with the newly created contact.
Create a user
-
Click
 → System users.
 -
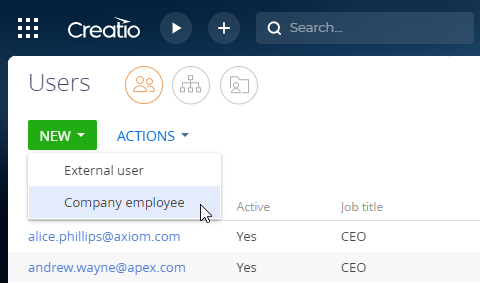
Click New → Company employee (Fig. 4). This opens the new page.
Fig. 2 Select a user type  note
noteYou can change the type of the user ("Company employee" or External user") once you save the new user record and reopen the user page.
-
Fill out the fields:
Field
Field value
Contact
Select the user’s contact in the Contacts section.
Type
Creatio populates the field automatically when you select the user type at step 2. Available values are "External user" or "Company employee".
Active
A status checkbox selected automatically for active users. Clear the checkbox to deactivate a user.
Culture
The UI language for the current user. Creatio populates the value automatically, the user can change the UI language in the user profile. The field displays active languages. To select other languages, activate them in the Languages section of the System Designer. Learn more about Creatio cultures: Manage UI languages.
Home page
Select a section page that will open by default when the user logs in to Creatio. If you leave the field empty, the user will be redirected to the Main Menu, and upon subsequent logins – to the last opened page during the previous session.
Date and time format
Specify the format that will be used to display dates for the user. You can leave the field empty, the user will be able to specify the format later in the user profile.
-
Fill out the Authentication detail:
Field
Field value
Username
Enter the Creatio user login. This is a required field.
Email
Enter the Creatio user login email. If you fill out this field, the user will be able to log in with either the username or the email.
Password, Password confirmation
Enter the password the user will use to log in to Creatio. These are required fields.
Password expiration date
The field is non-editable and displays the date when the password expires. The date is calculated based on the Default value field of the "Password validity term, days" ("MaxPasswordAge" code) system setting. The value is set to "0" out of the box, in which case the password has no expiration date, and the Password expiration date field on the user page remains blank and locked.
Reset password
Select this checkbox if you want to force the user to change their password when logging in for the next time. If the checkbox is selected on the user page, Creatio will notify the user that their password has expired and request changing it at the next login attempt.
noteIf you use the LDAP authentication, select the LDAP authentication checkbox and specify the username from the LDAP lookup in the Username field. The lookup in this field contains the list of LDAP users that have not been synchronized with Creatio yet. Learn more: Set up LDAP synchronization.
-
Save the page.
As a result, a new user for a company employee will be added to Creatio.
Add a system administrator user
Out-of-the-box Creatio has a "System administrators" organizational role whose members have full access to all data in Creatio. This is achieved through access to the following system operations:
- "Add any data" ("CanInsertEverything" code)
- "Delete any data" ("CanDeleteEverything" code)
- "Edit any data" ("CanUpdateEverything" code)
- "View any data" ("CanSelectEverything" code)
Learn more: Description of system settings.
To add a new system administrator user in Creatio:
-
Create a contact for the new user or make sure that the relevant contact already exists in the Contacts section. Learn more: Add a new contact.
-
Create a new user in the System users section and specify the contact in the user profile. Learn more: Create a user.
-
Add the user to the "System administrators" role.
ImportantAccess to these operations overrides any object permissions a user might have. For example, a user that has permission to the "View any data" system operation can view all records in objects, even if you try to deny the "Read" permission for that user in the object permission UI.
You can assign the system administrator role to a user in multiple ways:
- from the user page
- from the role page
Method 1. Assign a system administrator role to a user from the user’s page
-
Click
 → System Designer → System users.
 -
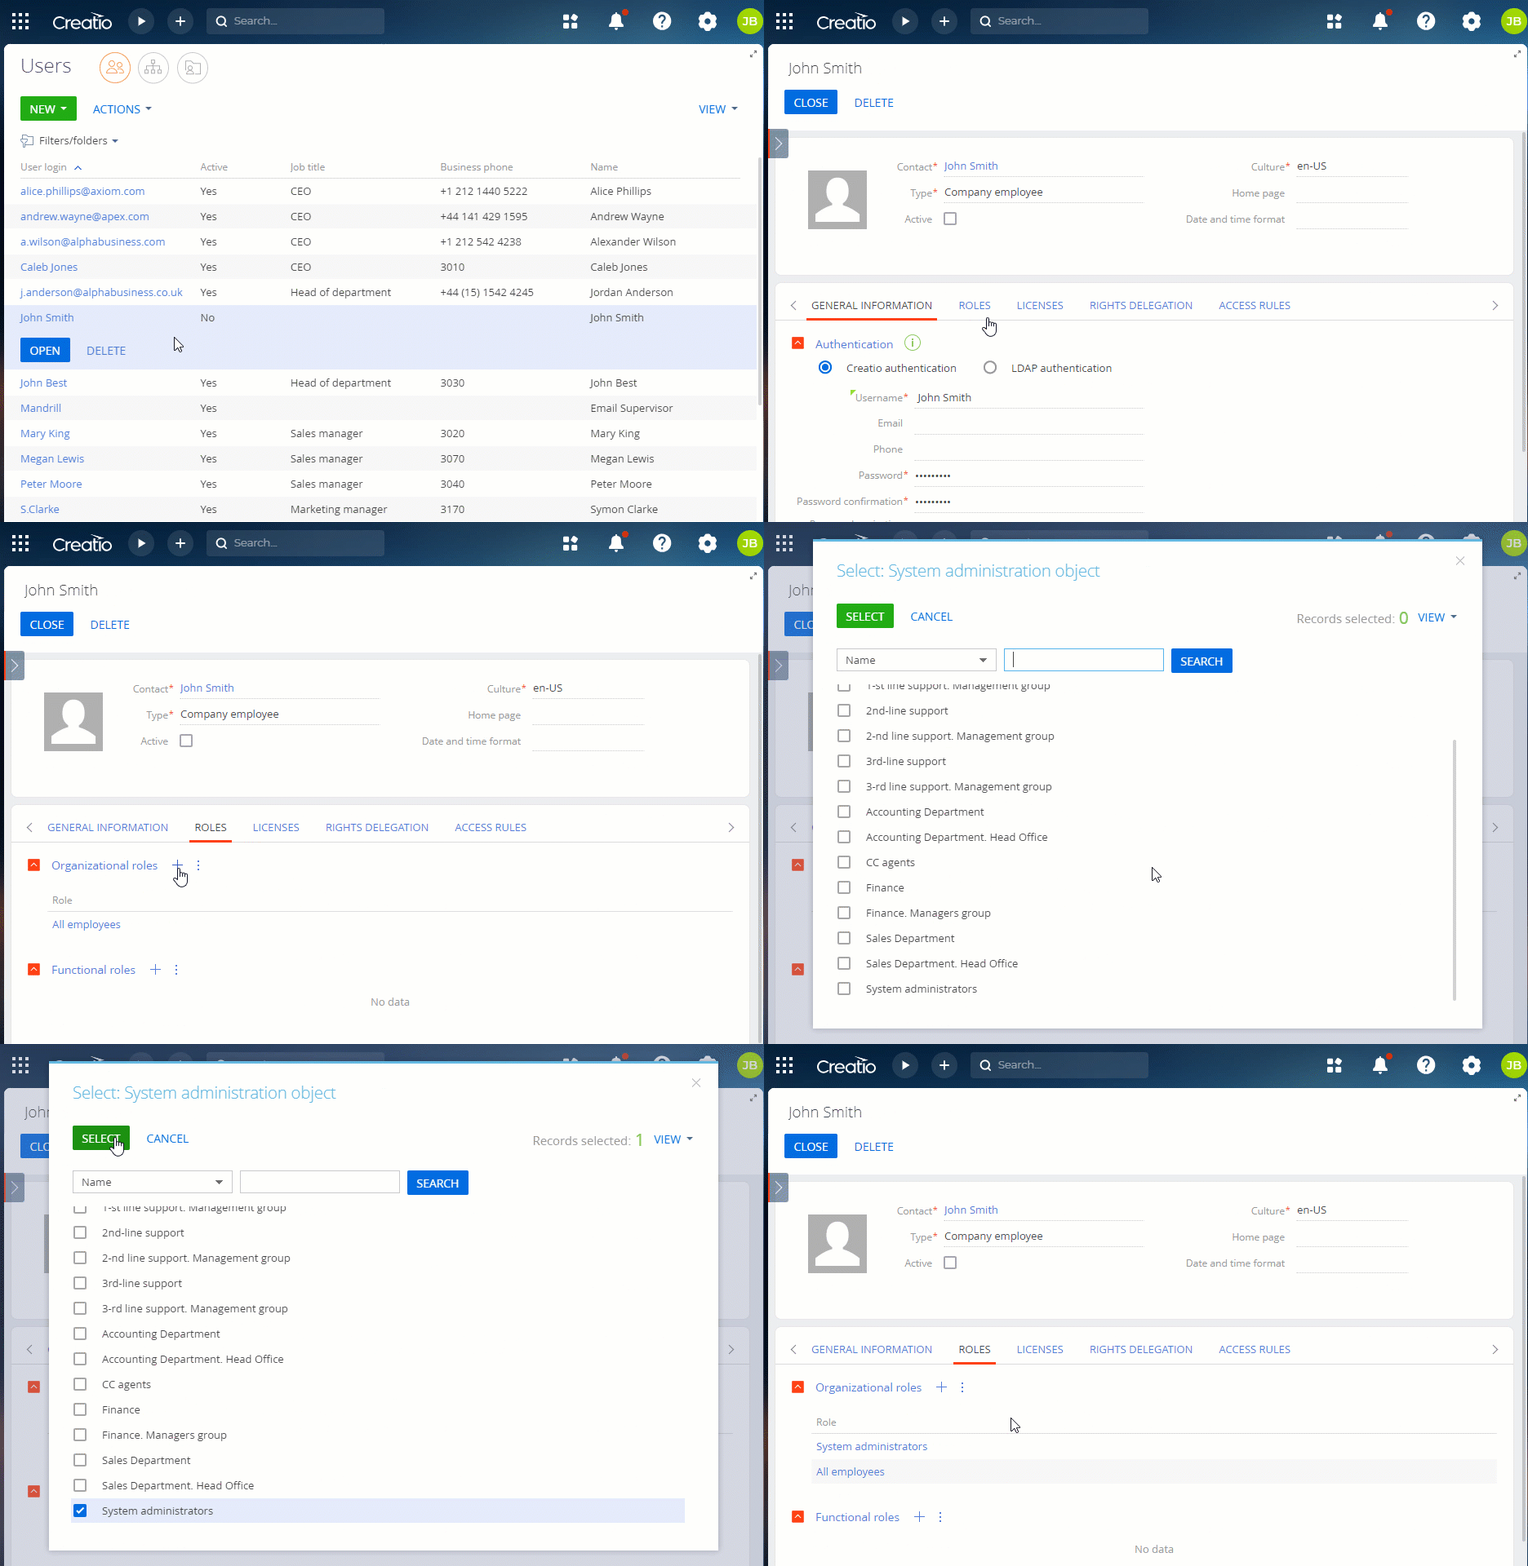
Open the user page → the Roles tab.
-
Click
 in the Organizational roles detail and specify the "System administrators" role (Fig. 1).
Fig. 3 Assigning a system administrator role to a user from the user’s page 
As a result, the user will be added to the "System administrators" role and will receive full access to all Creatio data.
Method 2. Assign a system administrator role to a user from the role page
-
Click
 → Organizational roles.
 -
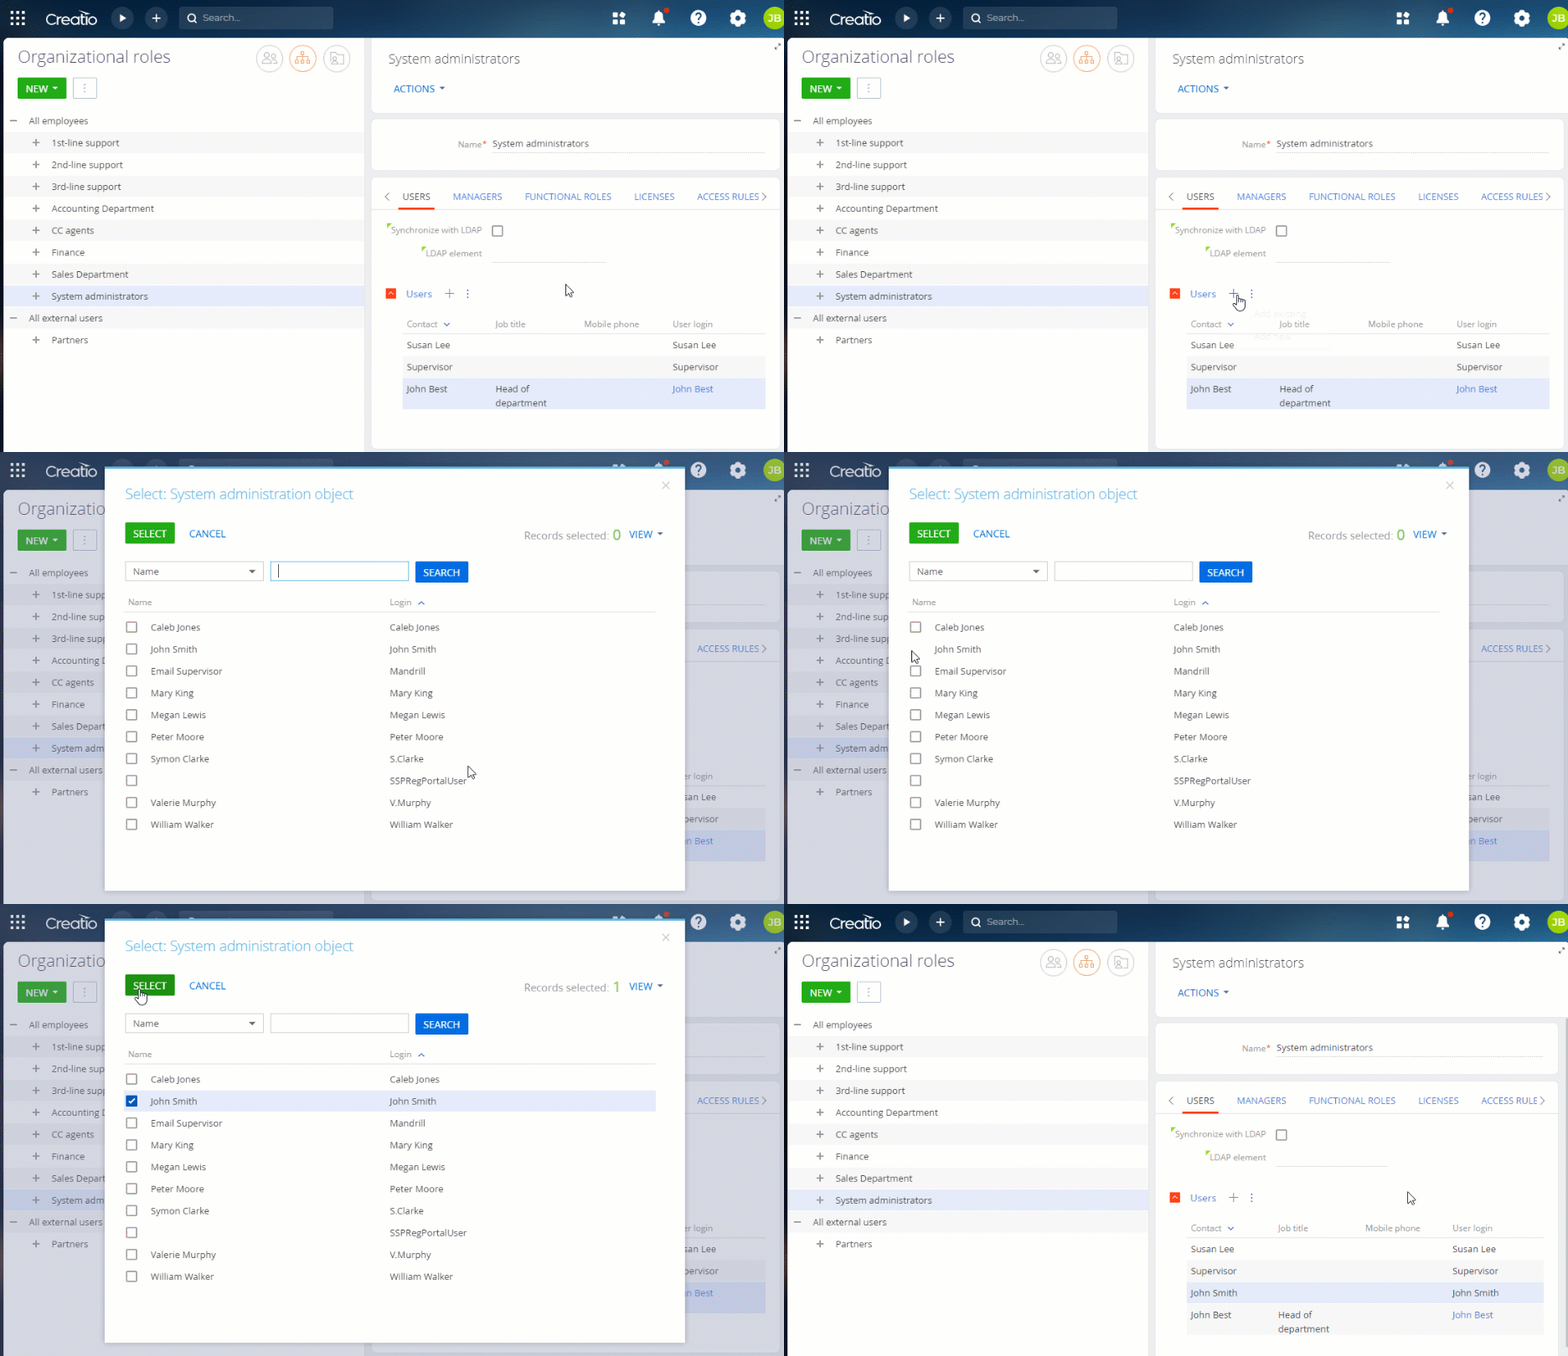
Select the "System administrators" role in the list of organizational roles represented in the form of a folder tree. The area to the right of the roles tree will show the page of the selected role.
-
On the Users tab:
-
Click
 and select Add existing to add an existing user. This opens a window.
 -
Select the corresponding user (Fig. 2).
-
Click
 and select Add new to add a new user assigned to this role. You will need to fill out the new user page.
Fig. 4 Assigning a system administrator role to a user via the Organizational roles section 
-
As a result, the user will be added to the "System administrators" role and will receive full access to all data in Creatio.