Update guide
This guide covers the process of updating Creatio application to the latest available version. Our team at Creatio is constantly working to deliver advanced capabilities to automate your sales, service and marketing processes. You can learn more about the new features included in the Creatio latest version in the release notes.
These instructions are universal for Creatio 7.11.0 and later. You can use them to update to the latest version of Creatio.
If you are using version 7.11.0 and lower, contact Creatio technical support for further instructions.
How to update
We recommend updating in two stages:
-
First, perform the update on a pre-production website using a copy of your current Creatio database.
-
If the first stage completes successfully, perform the update of the production Creatio website of the application.
ImportantCarry out the update of the production version outside of during business hours, as the site will be unavailable.
The update process consists of the following steps:
- Copy the database and the binary files of the production website that will be required to deploy the pre-production site. To back up the binary files, archive them in any other directory. Learn more: Back up database.
- Create a new pre-production website in IIS. Learn more: General Creatio deployment procedure.
- Install the update into the pre-production website. Learn more: Installing updates.
- Verify that the pre-production website is fully operational. If the primary and frequently used functionality runs without errors, you can begin updating the production site. Learn more: Maintain Creatio website in IIS.
- Create copies of the database and application. You will need them to return to a working version in case of problems. Learn more: Back up database.
- Install the update into the production website. Learn more: Installing updates.
- Verify that the updated version is operational. Learn more: Maintain Creatio website in IIS.
Install updates
To install the update:
- Prepare system to update. Read more >>>
- Get artifacts for update. Read more >>>
- Run Updater. Read more >>>
- Complete the update. Read more >>>
Prepare system to update
Before proceeding with the update, verify the following software for availability and compliance with the specified versions:
- .NET - minimum 8 (for all applications)
- .NET Core - minimum 3.1 (only for .NET Core applications). Download .NET Core SDK 3.1 x64
- .NET Framework - minimum 4.7.2 (only for .NET Framework applications). Download .NET Framework 4.7.2. Download Developer pack
- Microsoft Visual C++ (only for .NET Framework applications)
- exact Microsoft Visual C++ 2013 Redistributable (x64)
- exact Microsoft Visual C++ 2015-2022 Redistributable (x64)
- Internet Information Services - minimum 10.0 (only if IIS hosting is used)
- For corresponding Database Management System:
- Microsoft SQL Server - minimum 2022
- PostgreSql - minimum 16.0
Learn more: Server-side system requirements and Requirements calculator.
If your Creatio instance has installed cultures that are not used by company employees, we recommend removing these cultures before starting the update. This reduces the amount of data that needs to be downloaded as part of the update. Learn more: Clean up the drive space.
Also, before starting the update, go to the Configuration section and run the Generate source code for all items action, then run the Compile all items action. If taking these steps causes any errors, fix them before starting the update.
Get artifacts for update
-
Get the distribution downloading service: download the service.
noteYou need a Nexus account to download the update package. If you do not have an account, contact Creatio support.
When your application server is not connected to the Internet
You need a machine that is connected to the Internet to run the update process. Follow the instructions below up to and including step 3 on that machine. After you complete step 3, switch to the application server.
-
Open the downloader.json script file to edit. Fill out its parameters with the corresponding values:
Parameter
Value
WorkDirectory
Path to the directory where all installation packages and the update utility will be stored.
HubUser
Nexus username (login).
HubPassword
Nexus password.
WebRootDirectory
Path to the website root folder.
Site
Name of your website.
Product
Name of the product where the website is deployed.
Products
- Studio
- SalesTeam
- SalesCommerce
- SalesEnterprise
- Marketing
- CustomerCenter
- ServiceEnterprise
- SalesTeam_Marketing
- SalesTeam_Marketing_CustomerCenter
- SalesCommerce_Marketing_CustomerCenter
- SalesEnterprise_Marketing_CustomerCenter
- SalesEnterprise_Marketing_ServiceEnterprise
- BankCustomerJourney
- BankSales_BankCustomerJourney
- BankSales_BankCustomerJourney_Lending_Marketing
- BankSales
- Lending
Version
Current version of your application.
ApplicationType
Type of the application.
Application types
- NetFramework
- Net
- NetCore
HostingType
Type of the hosting, one of the values:
Hosting types
- IIS
- Kestrel
DbEngineType
Type of the DBMS.
DBMS types
- MSSQL
- PostgreSQL
ConnectionString
Database connection string. Copy this string from your connection to the database.
CurrentSchemaName
Current database schema.
Database schemas
- for MS SQL — "dbo"
- for PostgreSql — "public"
RedisServer
Redis server.
RedisDB
The number of Redis database.
RedisPort
Redis port.
RedisPassword
Redis password.
Example of a downloader.json script file configuration:
{"WorkDirectory": "/temp/delivery","WebRootDirectory": "/wwwroot/delivery","Site": "site name","Product": "Studio","Version": "8.0.0","ApplicationType": "NetFramework","HostingType": "IIS","DbEngineType": "MSSQL","HubUser": "j.smith","HubPassword": "12345678"}The parameters below are not required. If you do not specify them in downloader.json, they will be defined automatically by the WebRootDirectory path.
- ConnectionString
- CurrentSchemaName
- DbEngineType
- RedisServer
- RedisDB
- RedisPort
- RedisPassword
When your application server is not connected to the Internet
Use the following example of the
downloader.jsonfile if your application server is not connected to the Internet and you are transferring data from another machine.{"WorkDirectory": "/temp/delivery","Site": "site name","Product": "Studio","Version": "8.0.0","ApplicationType": "NetFramework","HostingType": "IIS","DbEngineType": "MSSQL","CurrentSchemaName": "dbo","RedisServer": "localhost","RedisDB": 1,"RedisPort": 6379,"HubUser": "j.smith","HubPassword": "12345678"} -
Run the Downloader.ps1 Powershell script. Powershell 5.1 or later must be installed to run the script.
When you run the script, the following elements are created in the directory that you specified in the
#WorkDirectory#:- an
InstallPackagesdirectory containing a set of update packages - a directory that contains the Updater utility
The following folder/file structure will be used in the InstallPackages folder:
- A separate directory appears for each version in alphabetical order as per the update schedule.
- Each version directory contains an archive that has files of the corresponding version (the archive will be unpacked automatically to the App and Pkg folders during the update process) and a
Scenariofolder.
Fig. 2 Example of the file structure 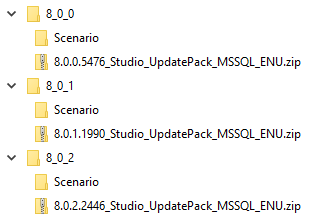
When your application server is not connected to the Internet
Before you take the next step, switch to the application server. To do this:
-
Copy the
#WorkDirectory#and transfer it to the server where your application is placed. -
Open the install.xml script file from the
Updaterfolder for editing. Populate its parameters with the corresponding values:Parameter
Value
WebRootDirectory
Path to the website root folder.
InstallPackagesPath
Path to the folder where all installation packages and the update utility are stored.
ConnectionString
Database connection string. Copy this string from your connection to the database.
-
Save the changes.
- an
Run Updater
Open a terminal window as administrator. Navigate to the directory containing the update utility (#WorkDirectory#/Updater). Run the following command:
dotnet Updater.dll
Multiple commands will be executed sequentially during the update process. Please wait for the entire process to finish.
If you encounter the error Installed components/software have an outdated/incorrect version. In order to start the Creatio update, please upgrade it, review the list of software components above the error message for any missing software. Install any missing components before proceeding with the Creatio update.
Update together with product upgrade
To perform a product upgrade, e.g., from Creatio Sales Enterprise edition to the CRM product lineup, use the distribution files of the new product of the same version as the current product.
Add the parameter --features:ExtendProduct with true value to the command line of Updater invocation:
dotnet Updater.dll --features:ExtendProduct=true
Update the web farm
If your application operates in the web farm mode, perform additional steps after you complete the update of the pre-production website and one of the production websites:
-
Set the ConnectionString in the
Terrasoft.Tools.WorkspaceConsole.exe.configfile. -
Disable all websites except for websites that were updated.
-
Copy the contents of the
#Application#myapp\\webapp\\conffolder from the updated website to the disabled sites. -
Enable all websites.
noteTo enable domain-based authentication in Creatio, transfer Windows authentication settings to the updated application. Learn more in the "How to setup Windows authentication" article.
Learn more about the web farm mode: Application server web farm.
Complete the update
If the update is completed successfully, flush the Redis server cache.
After the update is complete, ensure you are using the latest versions of all microservice components. If any components are outdated, update them.
If you've made any customizations to your web.config files, e.g., integrations or external services, manually transfer those changes to the updated configuration after a successful update.
Licenses need to be re-ordered after each update. It's recommended that you generate a license request and upload the licenses either before or after upgrading. If you request the license before the update but upload it afterward, you might encounter license format errors. In that case, you'll have to send the license request to Creatio support again. Learn more: Creatio licensing.
Compile and verify the website
After the update process is complete, open the Creatio website in browser, compile the application and test whether the website functions as intended.
-
Open the web site.
-
To re-generate client static content, run the Compile all items action in the Configuration section.
-
Open the application in a web browser and verify that your routine operations function correctly.
noteIf ISS session state settings were upset by the changes you implemented this makes it impossible to log in to the mobile application. After an update, make sure the "Use Cookies" mode is enabled in the ISS cookies settings.
Roll back the Creatio application before re-updating
If the update process has failed, follow these steps:
- Restore the application files:
- Delete all current application files.
- Copy the binary files to the application directory from the backup that you made before the update.
- Restore the database using the database backup that you made before the update.
- If you plan to contact support, gather all relevant logs.
- Log directories for each version:
#WorkDirectory#/InstallPackages/%Version%/Log - Updater file logs:
#WorkDirectory#/Updater/UpdateExtendedLog-yyyyMMddTHHmmss.txt, whereyyyyMMddTHHmmssis start date and time of the update - In child directories of
#WorkDirectory#/InstallPackagesthat have the version numbers, delete theApp,Log,Pkg,Tempdirectories if they exist.
- Log directories for each version:
- Make the necessary corrections recommended by the Creatio technical support.
- Restart the system update process.
Special features of version updates
Update to 7.11.1 (for Creatio Financial Services, lending edition)
Take these steps before you update from Creatio version 7.11.0 to version 7.12.0 as well.
If you are using Bank.AI, lending edition and have a custom application page (FinApplicationPage), take the following steps after the base update scenario is complete.
-
Update packages from SVN.
-
Run the UpdateFinAppLendingPage utility.
Running the UpdateFinAppLendingPage from Windows command prompt: UpdateFinAppLendingPage.exe "Path to the downloaded operational copy of svn".
Example: UpdateFinAppLendingPage.exe C:\MyPackagesFromSvn\.
-
Commit changes to SVN.
-
Update the configuration from SVN by running the Restore from repository command in the Configuration section.
Update to 7.15.2 - 7.18.3 (if you use Redis Sentinel)
If your Redis configuration is fail-proof, please contact Creatio support for more information about Redis Sentinel (that ensures Redis remains reliable) before updating to version 7.15.2 and later.
The Redis Sentinel mechanism was retired in Creatio version 7.18.3. We recommend switching to Redis Cluster after updating Creatio to version 7.18.0 and later.
Update to version 7.15.3
Take these steps before you update from Creatio version 7.15.0 to version 7.16.0 as well.
Before you update to version 7.15.3, make sure no ReportService customization has been performed in your configuration.
To do this, download and execute one of the following scripts depending on which DBMS you use: download the script for Microsoft SQL, download the script for PostgreSQL.
If the script returns no results, proceed with the following update steps.
If the script returns a list of replaced schemas, compare them with the out-of-the-box schema.
-
Check which packages contain the schemas from the selection below:
- If the selection contains any of the schemas from the base packages: verify whether the base package is blocked. The "Maintainer" value of the base package should be "Terrasoft".
- If the selection only contains schemas from custom packages, analyze the selection schemas.
-
If the custom schema contains "using Terrasoft.Reports:", delete "using" (the action is recommended but will not affect the update).
-
If the replaced schema references other report designers, but the logic of using it does not change as compared to the out-of-the-box logic, use the instruction.
-
If the replaced schema references other report designers and the logic of issuing the reports is changed, analyze the replaced schemas and adapt them to work with the package (the package is part of your configuration starting from version 7.15.0).
Update to 7.16.0
After you update to version 7.16.0, deploy the Exchange Listener synchronization service to make sure the IMAP/SMTP and Exchange services work correctly.
Update to 7.16.1 and 7.16.2
Take these steps before you update from Creatio version 7.16.0 to version 7.17.0 as well.
Before you update to versions 7.16.1 and 7.16.2 make sure you do not have any customization using the obsolete library and the Terrasoft.Mail.SmtpClient class in your configuration.
To do this, run the script.
Script for Microsoft SQL:
SELECT SysSchema.Name AS SchemaName FROM SysSchema (NOLOCK)

WHERE SysSchema.Id IN (

SELECT SysSchemaId FROM SysSchemaSource

WHERE SysSchemaId IN (

SELECT

ss.Id

FROM SysSchema ss WITH (NOLOCK)

INNER JOIN SysPackage sp WITH (NOLOCK) ON ss.SysPackageId = sp.Id

WHERE sp.Name NOT IN ('Base', 'ProcessDesigner', 'NUI', 'SSP')

AND sp.Maintainer != 'Terrasoft'

AND ss.ManagerName NOT IN ('ClientUnitSchemaManager', 'DcmSchemaManager', 'PageSchemaManager')

)

AND (Source LIKE '%MailBe%' OR (Source like '%SmtpClient%' AND Source like '%Terrasoft.Mail%'))

)
If the script does not return anything, proceed with the following update steps.
If the script returns a list of schemas:
-
Check the packages for the schemas from the selection:
-
If the selection contains base package schemas, check whether the base package is blocked and if the "Maintainer" value of the base package is set to "Terrasoft".
-
If the selection only contains the custom package schemas, analyze the selection schemas.
-
-
If the custom schema contains the "using" directive but does not involve its types, delete "using".
-
If the custom schema contains obsolete directives, change the mechanism as per the following instructions:
Enjoy the new version of Creatio!