Set up business rules
Business rules control the page UI behavior and business logic. You can specify conditions and actions to take when those conditions are met. This lets you customize page behavior to better suit your needs, streamline data entry, enforce data standards, and improve data quality.
To access business rule configuration on an app page:
-
Click
 in the top right → Application Hub.
 -
Open the needed app or create a custom app. Learn more: Manage apps.
-
Open the page or create a custom page.
-
Click the
 button in the top right (Fig. 1).
Fig. 1 Open the business rules setup page 
View the list of business rules
You can set up business rules on the page or object level. After you set up a page-level rule, Creatio applies it to the elements only on the selected page. After you set up an object-level rule, Creatio applies it to every Freedom UI page that uses the corresponding object, including editable lists. You can set up multiple business rules for a page or object. The list of business rules is displayed on the business rules setup page (Fig. 2).
If multiple rules affect the same page element, only the first rule is activated.
-
Click Add rule to create a new business rule.
-
Select a rule in the list and click its name to view or edit the rule.
-
Select a rule in the list and click the Enabled toggle in the setup area to turn the rule on or off (Fig. 3).
Fig. 3 Turn on the rule 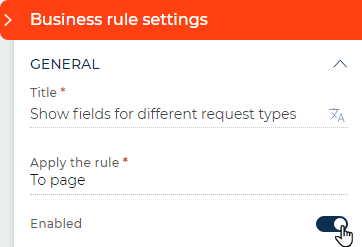
-
Select a rule in the list and click
 → Copy to copy the rule.
 -
Select a rule in the list and click
→ Delete to delete the rule. -
Each rule in the list displays a dynamic trigger text that describes when the rule will be triggered.
Show/hide an element on a Freedom UI page
You can set up a business rule that makes certain elements on record pages visible or hidden under specific conditions.
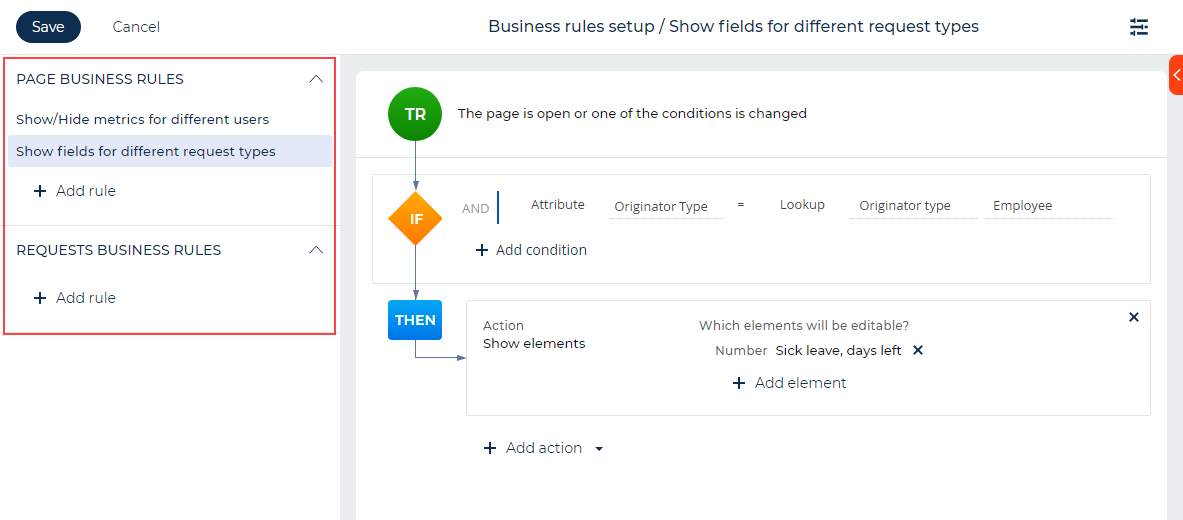
Show the Sick leave, days left field on a request page for requests whose Originator type attribute is an employee.
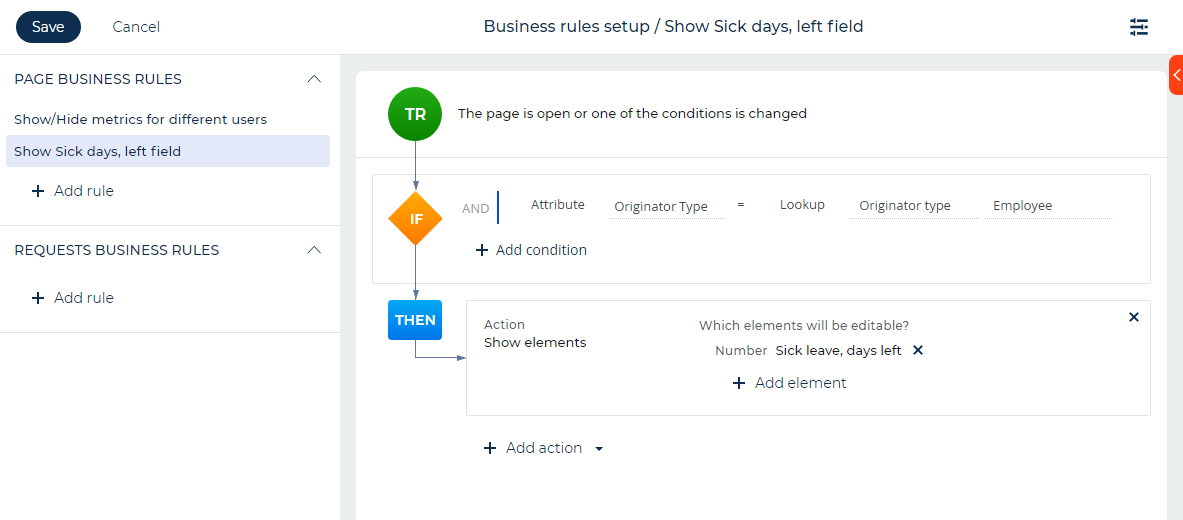
To implement this, the Sick leave, days left field must be visible only if the value of the Originator type field is "Employee." To do this:
-
Open the needed section (for example, the "Requests" custom app) and add a business rule.
-
Set the filter to define the conditions that trigger the business rule in the IF block. For this example, apply the rule to requests that have the "Employee" originator type:
- Click Add condition. This adds a condition row.
- Select the "Originator Type" attribute in the new row.
- Leave the "=" (equal) sign as it is.
- Click the
 icon and select the "Lookup" field type in the drop-down list. This adds a lookup value field to the right.
 - Select the "Employee" lookup value.
-
Set up the action that implements the needed business logic in the THEN block. For this example, show the Sick leave, days left field:
- Click Add action → "Show elements."
- Select the element type to show in the Which element will be shown? block. For this example, select Input. This opens a window.
- Select the field to show on the page, e. g., Sick leave, days left, and click Select.
-
Save the changes.
As a result, Creatio will show the Sick leave, days left field only for requests whose Originator type field is set to "Employee." If the Originator type field is set to any other value, Creatio will hide the Sick leave, days left field.
Make a field required or optional
You can set up a business rule that makes elements required under specific conditions.
Make the Start date and Due date fields on a request page required for requests whose Type attribute is "Vacation."
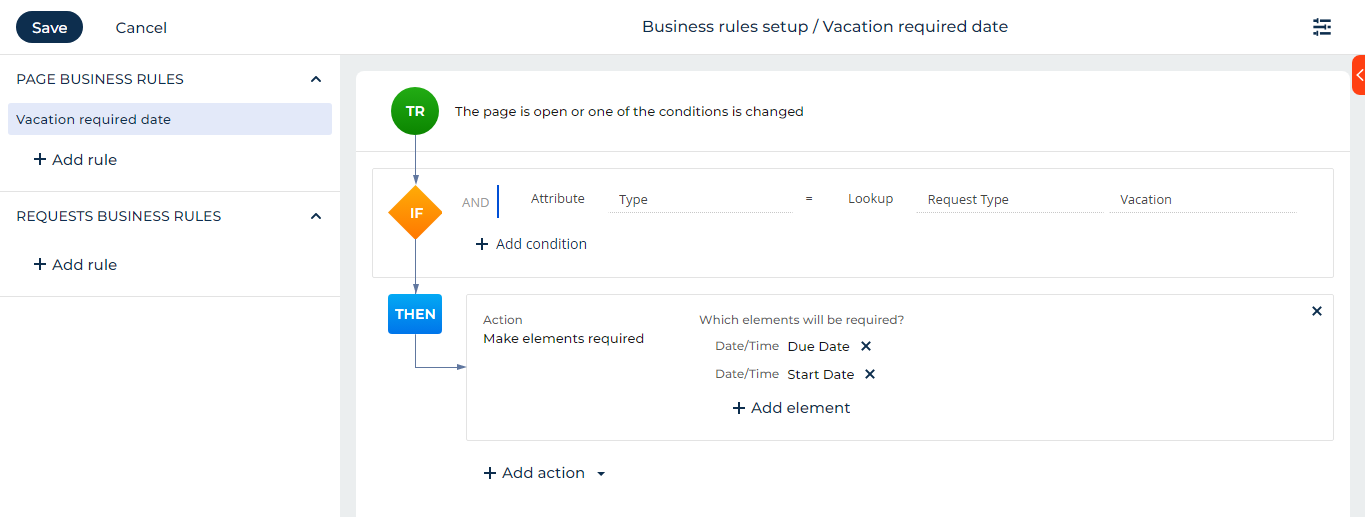
To do this:
-
Open the needed section (for example, the "Requests" custom app) and add a business rule.
-
Set the filter to define the conditions that trigger the business rule in the IF block. For this example, apply the rule to requests that have the "Vacation" type:
- Click Add condition. This adds a condition row.
- Select the "Type" attribute in the new row.
- Leave the "=" (equal) sign as it is.
- Click the icon and select the "Lookup" field type in the drop-down list. This adds a lookup value field to the right.
- Select the "Vacation" lookup value.
-
Set up the action that implements the needed business logic in the THEN block. For this example, make the Start date and Due date fields required:
- Click Add action → "Make elements required."
- Select the element type to make required in the Which element will be required? block. This opens a window.
- Select the fields to make required on the page, e. g., Start date and Due date, and click Select.
-
Save the changes.
As a result, Creatio will make the Start date and Due date fields required for requests whose Type field is set to "Vacation." If the Type field is set to any other value, the fields mentioned will be optional.
Enable or disable an element
You can set up a business rule that enables or disables any page component under specific conditions. For fields, this means making them editable or read-only.
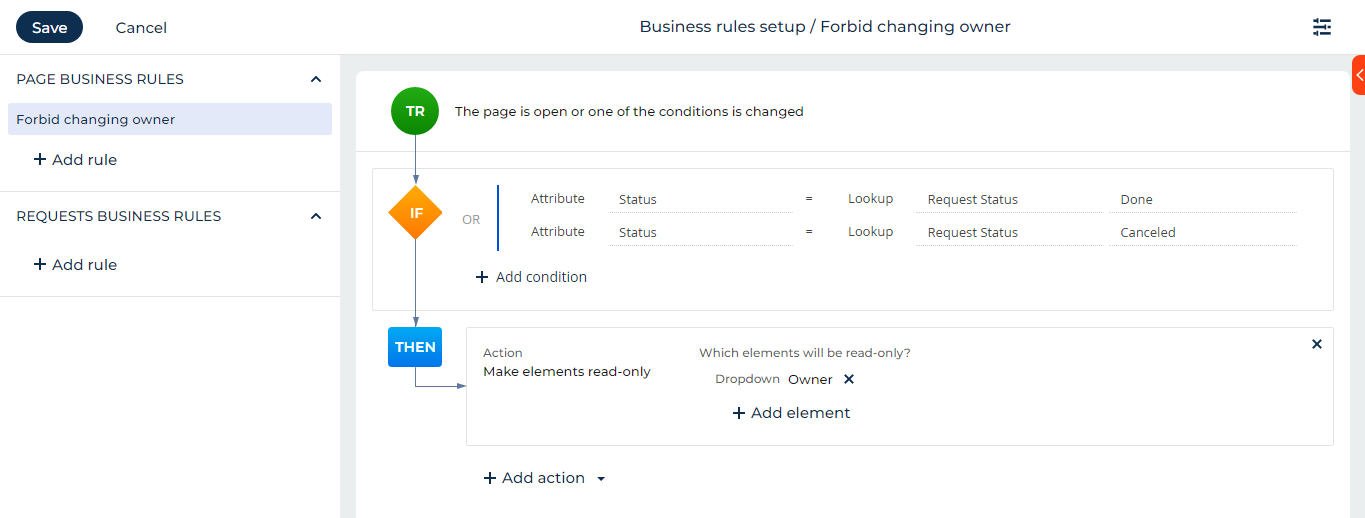
Make the Owner field on a request page read-only for requests whose Status attribute is "Done" or "Canceled."
To do this:
-
Open the needed section (for example, the "Requests" custom app) and add a business rule.
-
Set the filter to define the conditions that trigger the business rule in the IF block. For this example, apply the rule to requests that have the "Done" or "Canceled" status:
- Click Add condition. This adds a condition row.
- Select the "Status" attribute in the new row.
- Leave the "=" (equal) sign as it is.
- Click the icon and select the "Lookup" field type in the drop-down list. This adds a lookup value field to the right.
- Select the "Done" lookup value.
- Click Add condition. This adds a condition row.
- Select the "Status" attribute in the new row.
- Leave the "=" (equal) sign as it is.
- Click the icon and select the "Lookup" field type in the drop-down list. This adds a lookup value field to the right.
- Select the "Canceled" lookup value.
-
Set up the action that implements the needed business logic in the THEN block. For this example, make the Owner field read-only:
- Click Add action → "Make elements read-only."
- Select the element type to make required in the Which element will be read-only? block. This opens a window.
- Select the fields to make required on the page, for example, Owner, and click Select.
-
Save the changes.
As a result, Creatio will make the Owner field read-only for requests whose Status field is set to "Done" or "Canceled." If the Status field is set to any other value, the field will be editable.
Apply a static filter
You can set up a business rule that will apply filter to the list of values in the lookup field. This will make the list shorter.
Show only employees in the Contact lookup field for internal requests.

To do this:
-
Open the needed section (for example, the "Requests" custom app) and add a business rule.
-
Set the filter to define the conditions that trigger the business rule in the IF block. For this example, apply the rule to internal requests:
- Click Add condition. This adds a condition row.
- Select Attribute in the IF block → "Request category."
- Leave the "=" (equal) sign as it is.
- Select Lookup → "Internal requests."
-
Set up the action that implements the needed business logic in the THEN block. For this example, filter the Contact field to only have employees:
- Click Add action → Apply static filter.
- Select the lookup field for the static filter in the Filter field. For example, select "Contact."
- Click Setup filter to configure the static filter. A modal will open.
- Click Add condition to add a new static filter condition. A dialog box will open.
- Select the name of the field whose value will be used in the current static filter condition in the Column lookup. For example, select "Type" and click Select. This will close the dialog box and add a static filter condition.
- Click the icon to update the static filter condition. This will open a modal with the lookup values for the Type field of the Contact entity.
- Select all eligible checkboxes (for example, "Employee") and click Select. This will close the dialog box.
-
Save the changes.
As a result, when the "Internal requests" lookup value is selected in the Request category field, only contacts of the Employee type will be available in the Contact field on the requests form page.
Filter lookup values based on another lookup
You can make lookup fields in forms more user-friendly and efficient by setting up filtering rules based on another lookup. When one lookup field depends on the value of another, you can configure Creatio to show only the relevant choices in the dependent field based on what was selected in the first field. You can also set the dependent field to automatically clear its current value if the filtering field changes, and autopopulate with a new value if available. These behaviors are enabled by default in Freedom UI's custom business rules, making forms more intuitive and reducing manual data entry.
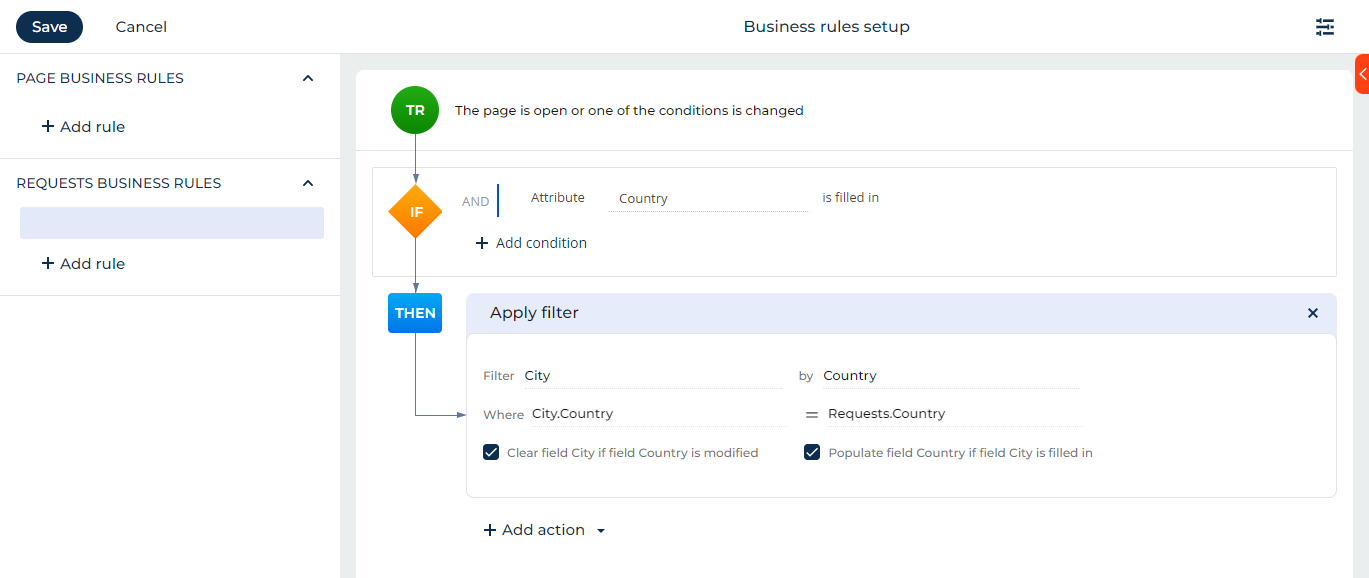
Filter cities by the country selected in the Country lookup field for requests that must be related to a given location.
To filter lookup values based on another lookup:
-
Open the needed section (for example, the "Requests" custom app) and add a business rule.
-
Set the filter to define the conditions that trigger the business rule in the IF block. For this example, apply the rule to requests that have the Country field filled in:
- Click Add condition. This adds a condition row.
- Click Add rule in the Requests business rules block in the left pane.
- Select Attribute → "Country" → "Is filled in."
- Select "Is filled in."
-
Set up the action that implements the needed business logic in the THEN block. For this example, filter the City field to only have cities that are located in the current country:
- Click Add action → Apply filter.
- Select the lookup field to filter in the Filter field. For this example, it is the "City" field.
- Select the lookup field whose value will be used to filter the other field in the By field. For this example, select "Country."
- Business rules have automatic clearing and population of lookup values enabled by default. To disable automatic clearing, clear the Clear value... checkbox. To disable automatic population, clear the Populate value... checkbox.
-
Save the changes.
As a result, when a Country field on the request page is filled in, the lookup options for the City field will be filtered based on the selected country.
Set field values
Constant
You can set up a business rule that automatically populates field values based on specified conditions. This business rule is useful for automating data entry and ensuring data consistency.
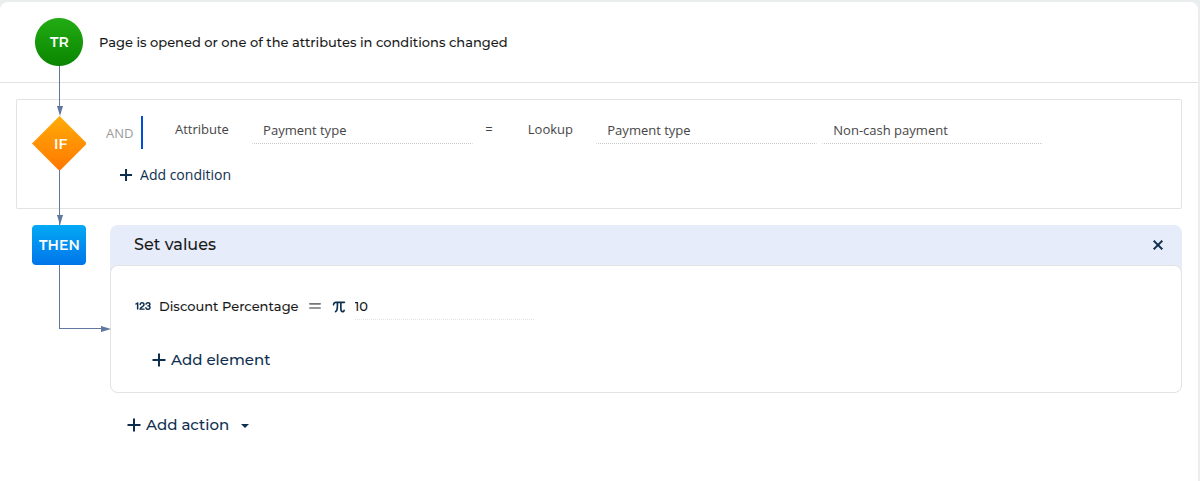
Automatically specify a 10% discount for orders paid with a cashless payment (Fig. 9).
The "Set field values" action is currently available in object business rules and is not available in page business rules. Values are set when a new record is created or when any attribute used in the conditions changes via the UI.
To set field values using a business rule:
-
Open the needed section (for example, the Order and Contract Management out-of-the-box app that has a custom Discount percentage numeric field).
-
Click the
 button in the top right of the current app page → Edit page.
 -
Add a "Discount percentage" custom filed:
- Drag a Number field to the canvas and open the field setup area.
- Enter "Discount percentage" in the Title parameter.
- Enter
UsrOrderDiscountPercentagein the Code parameter.
-
Add a business rule.
-
Set the filter to define when to set the value in the IF block. For this example, apply the rule when the "Payment type" field equals "Non-cash payment":
- Click Add condition. This adds a condition row.
- Select the "Payment type" attribute in the new row.
- Leave the "=" (equal) sign as it is.
- Click the icon and select the "Lookup" field type in the drop-down list.
- Select the "Non-cash payment" lookup value.
-
Set up the action that implements the needed business logic in the THEN block:
- Click Add action → Set values.
- Select the field to set a value for in the Which field will be set? block. For this example, select "Discount percentage".
- Hover the mouse pointer over Set up value and click
 → Constant.
 - Enter a fixed value. For example, "10".
-
Save the changes.
As a result, when a record has the "Non-cash payment" payment type, the specified field will be automatically populated using the set value.
Formula
You can set up a business rule that automatically calculates field values based on specified conditions. Only numeric values can be used in a formula. This business rule is useful for automating discount calculations and ensuring data consistency.
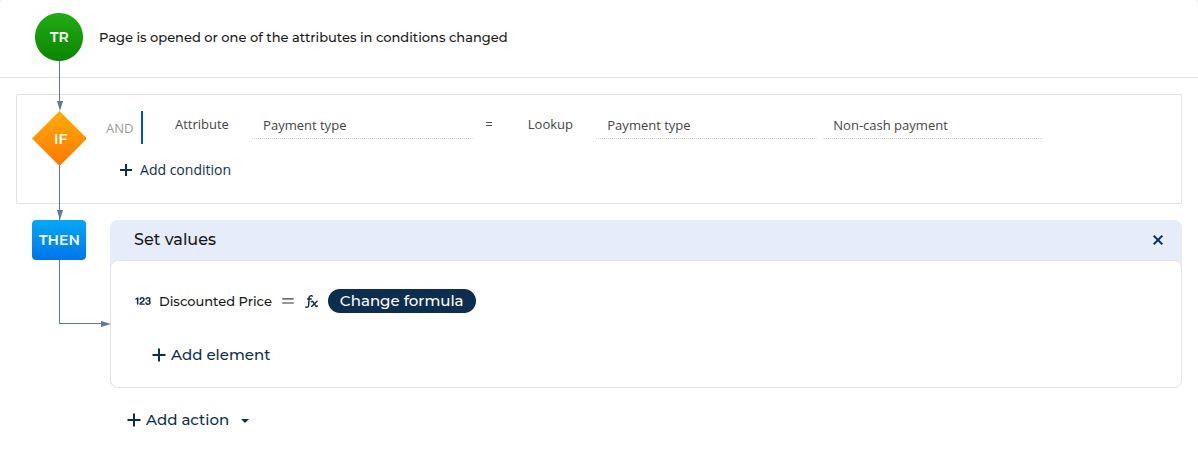
Automatically calculate the discounted payment amount for orders based on the order discount percentage (Fig. 10).
The "Set field values" action is currently available in object business rules and is not available in page business rules. Values are set when a new record is created or when any attribute used in the conditions changes via the UI.
To set field values using a formula in a business rule:
-
Open the needed section (for example, the Order and Contract Management out-of-the-box app that has a custom Discount percentage numeric field).
-
Click the
button in the top right of the current app page → Edit page. -
Add a "Discount percentage" custom filed:
- Drag a Number field to the canvas and open the field setup area.
- Enter "Discount percentage" in the Title parameter.
- Enter
UsrOrderDiscountPercentagein the Code parameter.
-
Add a "Discount amount" custom filed:
- Drag a Number field to the canvas and open the field setup area.
- Enter "Discount amount" in the Title parameter.
- Enter
UsrOrderDiscountAmountin the Code parameter.
-
Add a business rule.
-
Set the filter to define when to calculate the value in the IF block. For this example, apply the rule when the "Payment type" field equals "Non-cash payment":
- Click Add condition. This adds a condition row.
- Select the "Payment type" attribute in the new row.
- Leave the "=" (equal) sign as it is.
- Click the icon and select the "Lookup" field type in the drop-down list.
- Select the "Non-cash payment" lookup value.
-
Set up the action that implements the needed business logic in the THEN block:
- Click Add action → Set values.
- Select the field to set a value for in the Which field will be set? block. For this example, select "Discount amount".
- Click Set up formula. This will open the Formula designer. The designer has numeric fields from the same object as the selected target field available, with the exception of the target field itself.
- Click Payment amount → Add.
- Click Discount percentage → Add.
- Enter the formula:
#OrderRecord.PaymentAmount# * (100 - #OrderRecord.UsrOrderDiscountPercentage#)/100.
-
Save the changes.
As a result, when a record has the "Non-cash payment" payment type, the specified field will be automatically calculated using the discount percentage.
When switching from Formula to Constant, your previously created formula might be lost. Also, it is not possible to set an empty value using the "Set field value" action.
Value from another field
Since Creatio 8.3.2, you can set up a business rule that sets the value of a field based on the value of another field. You can select fields from the same object or from related objects via forward references. This lets you automate data propagation without writing code.
The "Set field values" action is currently available in object business rules and is not available in page business rules. Values are set when a new record is created or when any attribute used in the conditions changes via the UI.
To set a field value from another field using a business rule:
-
Open the needed section (for example, the Order and Contract Management out-of-the-box app) and add a business rule.
-
Set the filter to define the conditions in the IF block.
-
Set up the action that implements the needed business logic in the THEN block:
- Click Add action → Set values.
- Click Add element → select the field whose value to set → Select.
- Point to Specify value and click → Value from another field. This opens a window.
- Select the field whose value to set → Select. You can select fields from the current object or traverse forward references to select a field from a related object.
-
Save the changes.
As a result, when the rule conditions are met, the specified field will be automatically populated with the value of the selected source field.
Use user roles in business rule conditions
Starting from Creatio version 8.2.2, you can set up business rules that take into account the current user's roles. This lets you customize the interface and behavior based on organizational and functional roles.
Since Creatio 8.3.2, the Current user role condition is also supported in business rules for mobile pages created in the Freedom UI Mobile Designer.
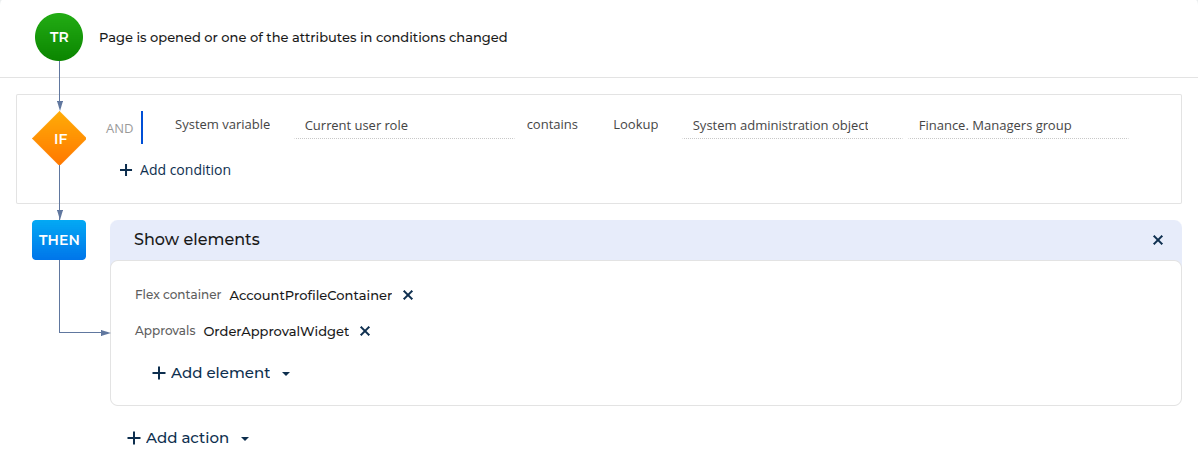
Show the "Approval" field only to users that have the "Manager" role (Fig. 11).
To set up a business rule based on user roles:
-
Open the needed section (for example, the Order and Contract Management out-of-the-box app) and add a business rule.
-
Set the filter to check the user's role in the IF block:
- Click Add condition. This adds a condition row.
- Select System setting → Current user role.
- Leave the contains operator as is.
- Click <?> → Lookup. Creatio will select "System administration object".
- Select the role from the list, for example, "Finance. Managers group".
-
Set up the action in the THEN block. For example, to show the Approval widget:
- Click Add action → Show elements.
- Select the element to show, for example,
OrderApprovalWidget.
-
Save the changes.
As a result, Creatio will show the Approval field only to users who belong to the finance manager role. Other users will not see this field.
Use business rules with the Summaries component
Since Creatio 8.3.3, you can manage the Summaries component and its individual summary items on Freedom UI pages using visibility and activity business rules. The rules execute consistently regardless of the default visibility configuration of the targeted element.
When a business rule makes the Summaries component read-only:
- The Summary actions button is not displayed.
- All summary items within the component also become read-only.
To set up a business rule for the Summaries component or for individual summary items:
-
Open the needed section (for example, the Order and Contract Management out-of-the-box app) and add a business rule.
-
Set the filter to define the conditions that trigger the business rule in the IF block.
-
Set up the action that implements the needed business logic in the THEN block:
- Click Add action → Show elements, Hide elements, Make elements editable, or Make elements read-only.
- Click Add element → Component → select the Summaries component or a specific summary item → Select.
-
Save the changes.
As a result, Creatio will show, hide, or set the activity state of the Summaries component or the selected summary items based on the specified conditions.
Debug business rules
Creatio provides built-in debugging capabilities to help you identify and resolve issues with business rules. When a business rule encounters an error during execution, the system displays informative messages in the browser console to guide you through the troubleshooting process.
Console debugging
The console provides specific details about which business rule failed and why, helping you quickly identify and fix the issue.
To access the browser console:
- Open your browser's developer tools (typically F12 or right-click → Inspect).
- Go to the Console tab.
- Reproduce the error by performing the action that triggers the business rule.
- Review the error messages to identify the problematic business rule and its specific issue.
Business rule identification
To help you map console error messages to specific business rules in the Designer, each business rule displays its title and code in the business rule setup area. You can view these identifiers in the right panel when editing a business rule (Fig. 12).
The Title field shows the human-readable name of the business rule, while the Code field displays the unique system identifier. Both values are read-only and automatically generated by Creatio.
As a result, when you encounter a business rule error, you can quickly locate the problematic rule in the Designer by matching the information from the console error message to the business rule details displayed in the setup area.
Debug business rule errors example
Debug a business rule that calculates taxable payment amounts but encounters a division by zero error due to formula issues and missing field validation.
-
Open the needed section, for example, Orders in the Order and Contract Management app.
-
Open the page that contains the needed business rule.
-
Open your browser's developer tools (typically F12 or right-click → Inspect).
-
Go to the Console tab.
-
Reproduce the error by performing the action that triggers the business rule.
-
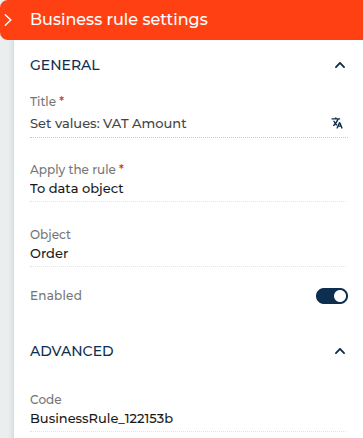
Review the error messages to identify the problematic business rule and its specific issue. In this example the console displays:
Business rule execution error: Rule Title - "Set values: Taxable Amount", Rule Code - "BusinessRule_122153b". Error message: "Error: Invalid operation: division by zero." -
Click
in the top right of the current app page → Edit page. -
Ensure the following fields are present and correctly configured:
- Primary Payment Amount includes VAT field is a Checkbox type with code
UsrIncludesVAT. - Taxable Payment Amount field is a Number type with Currency format and code
UsrTaxableAmount. - VAT Rate field is a Number type with Decimal (0.01) format and code
UsrVATRate.
- Primary Payment Amount includes VAT field is a Checkbox type with code
-
Locate the problematic business rule using the Rule Title from the console error message (e.g., "Set values: Taxable Amount") and click on its name in the business rules list. You can verify it's the correct rule by checking that the Code field matches "BusinessRule_122153b" when you open the rule.
-
Review the rule conditions in the IF block to confirm they match the expected trigger: Primary Payment Amount includes VAT attribute with "=" operator set to true (Boolean field type). This condition tells Creatio that the payment amount already includes VAT, so it should calculate the taxable amount by removing the VAT.
-
In the THEN block, open the Set values action for Taxable Payment Amount and review the formula:
#OrderRecord.PrimaryPaymentAmount# / ( 1 * #OrderRecord.UsrVATRate# )The problem is that the formula uses 1 * VAT Rate instead of 1 + VAT Rate for correct tax calculations. This causes division by zero when VAT Rate is 0.
-
Fix the formula:
-
Click Set up formula to open the Formula designer.
-
Replace the incorrect formula with the correct formula:
#OrderRecord.PrimaryPaymentAmount# / ( 1 + #OrderRecord.UsrVATRate# )
-
-
Save the changes.
-
Test the corrected business rule by triggering the same action that previously caused the error.
As a result, the business rule will execute successfully without division by zero errors, and the Taxable Payment Amount field will be calculated correctly using proper VAT calculations.