Set up an Image field
Level: beginner
Use Image fields to display images to users and enable users to upload images. Since the Attachments component does not display thumbnail images, this is particularly useful for images that require a preview.
Example
Set up an Updated contact photo (request) image field on the page of a request to update employee data. The field must accept images up to 8 MB.
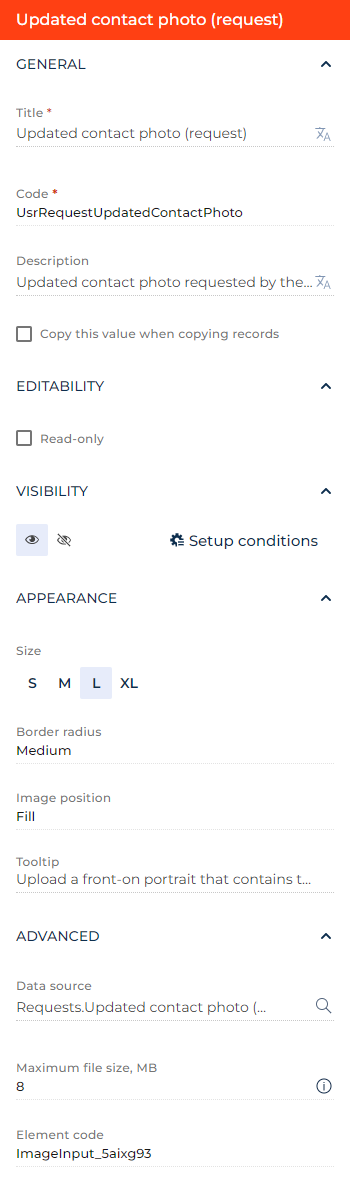
- Drag an Image field to the canvas and open the field setup area.
- Enter "Updated contact photo (request)" in the Title parameter. You can click the
 button to the right to localize the title to other languages you are going to use in the app. Learn more about localizing Freedom UI elements in a separate article: Localize a Freedom UI element.
 - Review the unique name Creatio uses to add a column in the Code parameter. The parameter is populated automatically. You can specify a custom code that starts with the prefix specified in the "Prefix for object name" ("SchemaNamePrefix") system setting (by default, "Usr") if needed. This helps no-code creators and software developers to grow and maintain the app easier. For this example, change the code to "UsrRequestUpdatedContactPhoto."
- Enter internal information about the field that helps to understand its functionality in the Description parameter. Creatio displays this information in the Object Designer. For this example, enter "Updated contact photo requested by the employee." You can localize the parameter similarly to the Title parameter.
- Clear the Copy this value while copying records checkbox to prevent Creatio from copying the field value to the record copy in the list. This option is useful for fields that contain system values, auto-populated data, or unique record data.
- Select the Read-only checkbox to make the field read-only. For this example, leave the checkbox clear.
- Click the
 or
or  button in the Visibility group to make the element visible or invisible by default on the page, respectively. For this example, leave the field visible.
 - Click Setup conditions in the Visibility group to set up element business rules. For this example, do not add business rules. Learn more about setting up business rules in a separate article: Set up business rules.
- Specify the image size in the Size parameter. For this example, select "L."
- Specify the radii of image corners in the Border radius parameter. For this example, select "Medium."
- Select the image scaling option in the Image position parameter. "Fill" resizes the image so that it fills the entirety of the field with possible cropping. "Fit" adjusts the image to fit the field boundaries without cropping. For this example, select "Fill."
- Enter the tooltip that contains the hint on how to fill out the field in the Tooltip parameter. Hold the pointer over the field to view the tooltip. For this example, enter "Upload a front-on portrait that contains the entire face, 300x300 px or larger proportionally." You can localize the parameter similarly to the Title parameter.
- Change the data source in the Data source parameter. For this example, use the original data source.
- Set the maximum image size in MB in the Maximum file size, MB parameter. For this example, set it to 8 MB.
- View the unique field code in the page schema in the Element code parameter. Creatio uses this code in page schemas. You can change it if needed. This helps software developers to customize the app easier, especially if you have multiple similar fields on the page. For this example, leave the code as is.
As a result, Creatio will add the Updated contact photo (request) image field to the request page. The field will accept images up to 8 MB.
See also
Overview of Freedom UI Designer and its elements