Add a new Microsoft Word report in Creatio
After you install the Microsoft Word plug-in, you can start setting up the report.
To add a new report:
- Add a new report record in Creatio. Read more >>>
- Open the record page and set up the fields and tables to display in the report. Read more >>>
Set up a "Meeting minutes" report in the Activities section.
Add a new Microsoft Word report record in Creatio
If you plan to migrate the package to a different environment, create a new package and set it as current.
-
Click
 to open the System Designer.
 -
Go to the System setup block → Report setup.
This opens the Report setup section.
-
Click New report (Fig. 1).
Fig. 1 Microsoft Word report setup 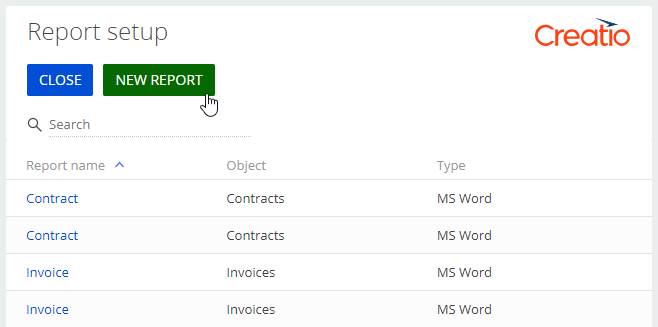
-
Enter the new report name in the Report name field, for example, "Meeting minutes."
-
Select an object to connect the report. For example, specify the "Activity" object for the "Meeting minutes" report.
-
Select the Show in the list view and/or Show in the record page checkboxes, depending on where the report must be available. This step only applies to Classic UI sections. (Fig. 2).
Fig. 2 Add the Meeting minutes report 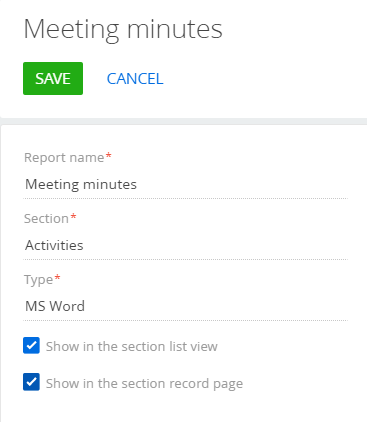
Proceed to configure the report data fields and tables.
Set up the content of a Microsoft Word report
You can add simple data, such as a contact name or activity date, as well as table data. In the table data, you can display records that are directly connected to the primary report object, as well as records of objects with the reverse connection.
Set up the report fields
-
Open a Microsoft Word report in the Report setup section. For example, open the "Meeting minutes" report created earlier.
-
Click
 on the report page in the Set up report data block. This will open a column selection window.
 -
Select all columns that hold the data required for the report (Fig. 3). For example, select the Subject column to display the activity name in the report. Add the Start and Due columns to display the activity time frame, etc.
Fig. 3 The report page field setup 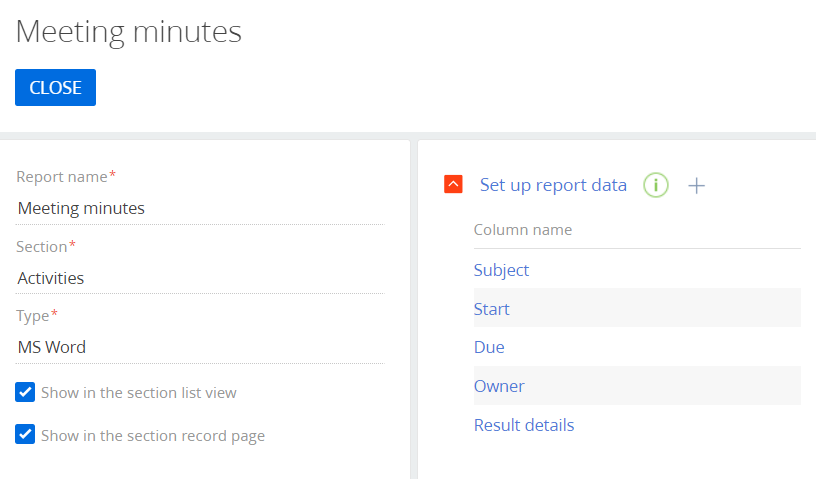
As a result, the added columns will become available when setting up the report layout in the Creatio Microsoft Word plug-in.
If necessary, add checkbox fields, such as the Do not use phone contact checkbox or Confirmed activity checkbox, to your report. Use special macros to set up displaying of the checkbox fields in the report. Learn more: Customize Microsoft Word reports.
Set up the report tables
In the tables, you can display a number of records connected to the primary report object. The displayed records can belong to objects that are connected to the report object directly, as well as to objects that have the reverse connection.
Set up a table by the connected object's data
The primary object of the "Meeting minutes" report is an activity. The report must display a table that contains the list of activity participants (records of the "Activity participant" object connected to the corresponding activity).
-
Open a Microsoft Word report in the Report setup section. For example, open the "Meeting minutes" report created earlier.
-
Click
 on the report page in the Set up report tables block.
 -
Fill out the fields on the report table page (Fig. 4):
- Select an object whose data to use to create a table in the Table object field. For example, select the "Activity participant" object to add a table that contains the list of meeting participants.
- Specify the table title to display when setting up the report layout in the Creatio Microsoft Word plug-in in the Table name field.
- Specify the column to link the records in the table object to the primary object of the report in the Column of report table object field. For example, the "Activity" column.
- Specify the column Creatio will use to filter the table records in the Column of the primary report object field. In most cases, the column of the report table object is "Id."
- Select the Hide the table if it contains no data checkbox to avoid displaying empty tables in the report.
Fig. 4 The general settings of the Activity participants table 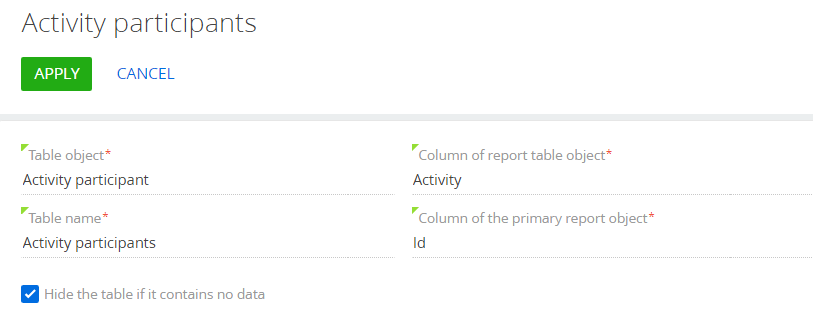
-
Set up the list of report table columns on the Table parameters tab. Click
 and select the columns to add to the list. For example, to create a list of activity participants together with their names and roles, add the Participant and Role columns.
 -
Set the sorting order of the table records. Click
 next to a column and select "Ascending" or "Descending" in the menu to sort the table records based on the values in that column. For example, set the "Ascending" sorting order for the "Participant" column to sort the list of participants alphabetically by name (Fig. 5).
Fig. 5 The report table record sorting settings 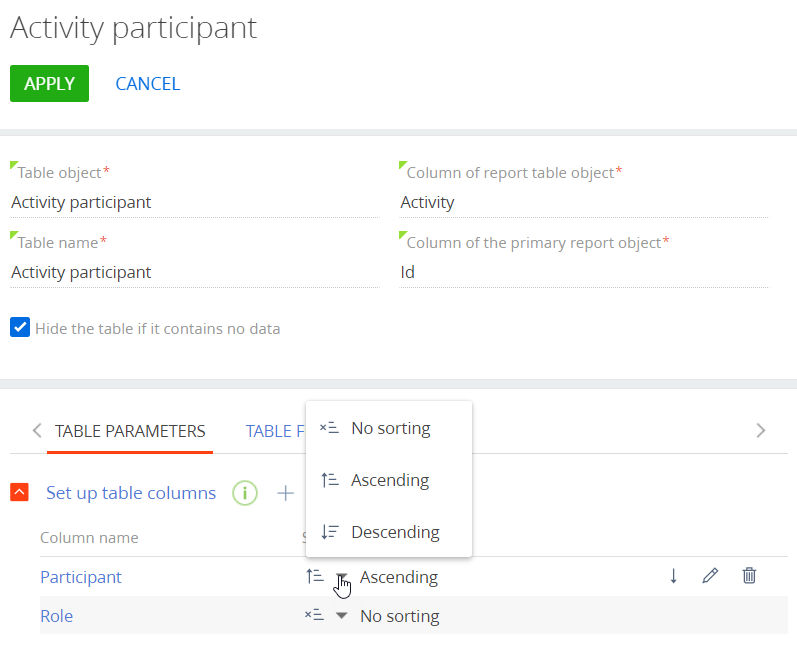
Make sure that your Microsoft Word template includes all the report table columns involved in the sorting rules to apply the sorting rules when printing the report. Learn more about adding table data to the template using the plug-in: Set up the report in the Microsoft Word plug-in and upload it in Creatio.
You can also sort the table records by multiple columns. The sorting is performed by the column that has a higher position in the group of settings of the table columns.
-
If necessary, go to the Table filters tab and set up an additional filter whose conditions will define which records should appear in the report table. For example, use the following filter to display only those participants who are the company's employees: "Participant.Type = Employee; Customer" (Fig. 6).
Fig. 6 Report table record filters 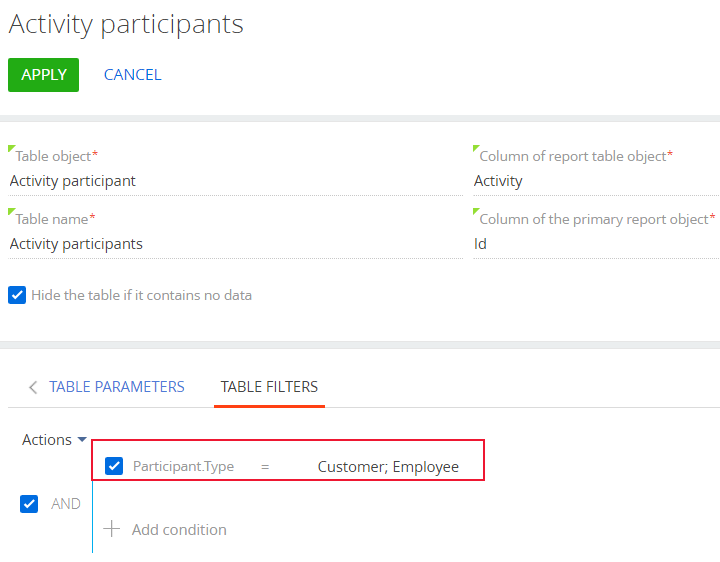
-
Click Apply to save the report table settings.
-
Save the settings on the report page.
As a result, the added table columns will become available when setting up the report layout in the Creatio Microsoft Word plug-in.
Set up table by data of object that has reverse connection
The primary object of the "Meeting minutes" report is an activity. Besides the table that contains the list of activity participants, the report must display a list of participants of the opportunity connected to the current meeting.
-
Open a Microsoft Word report record in the Report setup section. For example, open the "Meeting minutes" report created earlier.
-
Click
 in the report page under Set up report tables.
 -
Fill out the fields on the report table page (Fig. 7):
- Select an object whose data to use to create a table in the Table object field. For example, to add a table with the opportunity participants, select "Opportunity participant."
- Specify the table title to display when setting up the report layout in the Creatio Microsoft Word plug-in in the Table name field.
- Specify the column to link the records in the table to the primary object of the report, the activity, in the Column of report table object field. In our example, it is the "Opportunity" column of the "Opportunity participant" objects.
- Specify the column of the primary report object that connects the object to the table in the Column of the primary report object field. In our example, it is the "Opportunity" column of the "Activity" object.
- Select the Hide the table if it contains no data checkbox to avoid displaying empty tables in the report.
Fig. 7 The general settings of the Opportunity participants table 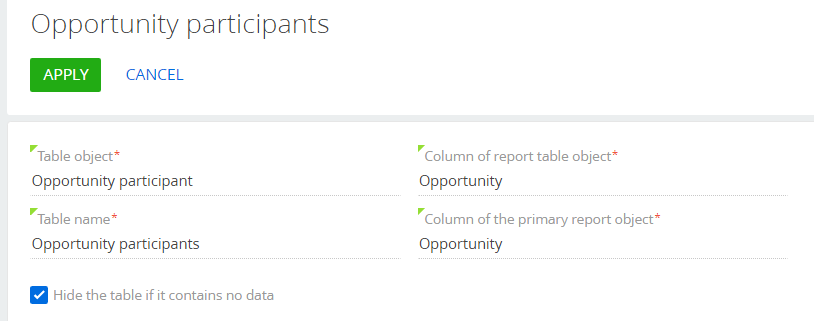
-
Set up the list of report table columns on the Table parameters tab. Click
 and select the column to add it to the list. For example, select the Contact, Role, and Account columns to display the addresses of the meeting participants.
 -
Set the sorting order of the table records. Click
 next to a column and select "Ascending" or "Descending" in the menu to sort the table records based on the values in that column.
 -
If necessary, go to the Table filters tab and set up an additional filter whose conditions will define which records should appear in the report table. For example, use the following filter to display the participants who are the company's customers: "Account.Type = Customer."
-
Click Apply to save the report table settings.
-
Save the settings on the report page.
As a result, the added table columns will become available when setting up the report layout in the Creatio Microsoft Word plug-in.
After you create a report in Creatio, you can set up the report in the Microsoft Word plug-in.
Copy the Microsoft Word report
Copy the report to set up similar reports faster.
The report copy keeps the original report template and the following settings:
- columns
- macros
- tables
- filters
Click Copy in the Report setup section to copy a report.
Click  next to the table's name to copy a table to the same report.
Transfer the package that contains the report to another development environment (optional)
-
Click
to open the System Designer. -
Go to the Admin area block → Advanced settings.
-
Click Add → Data in the section list's toolbar (Fig. 8).
Fig. 8 Add menu in the Configuration section 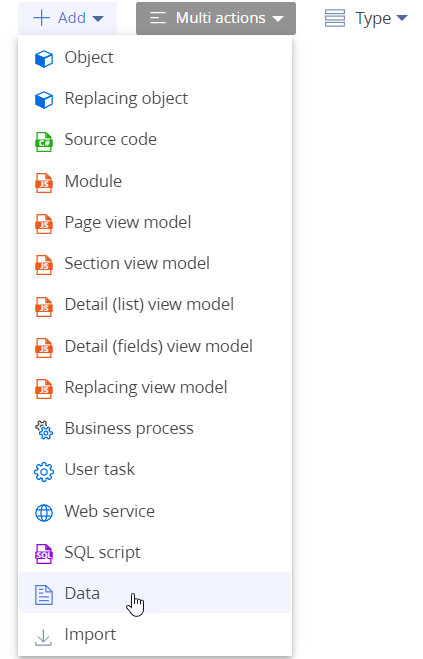
-
Bind the data to the following elements (Fig. 9):
- SysModuleReport_ReportName: the report. Use the report Id from the dbo.SysModuleReport database table to bind it. For example, it is "SysModuleReport_MeetingMinutes" for the "Meeting minutes" report.
- SysModuleReportTable_ReportName: the table part of the report. Use the report Id from the dbo.SysModuleReportTable database table to bind it. For example, it is "SysModuleReportTable_MeetingMinutes" for the "Meeting minutes" report.
Fig. 9 Bound report data in the Configuration section list 
Proceed to transfer the package that contains the report to another environment.
See also
Install Creatio plug-in for Microsoft Word
Set up the report in the Microsoft Word plug-in and upload it in Creatio