Develop Creatio.ai Skill
Develop an AI Skill that writes a marketing copy up to 150 words long for the Products section. Target audience are men from 35 to 54 years old whose hobby is car collecting and who enjoy manual labor.
Step 1. Design the AI Skill
-
Click
 to open the System Designer.
 -
Go to the System setup block → Creatio AI setup.
-
Click New. This opens a page.
-
Fill out the fields on the left.
Field
Field value
Title
AI Skill title. For this example, enter "Marketing copy for products."
Code
Code of the AI Skill required for custom development. For this example, enter "UsrProductMarketingCopy."
Description
Description of the AI Skill. Creatio.ai uses it to determine which AI Skill to run upon user's request. For this example, enter "Write a marketing copy for a product."
Status
Whether the AI Skill is active. For this example, select "Active."
Usage mode
Whether to use the AI skill in the chat or directly on the system level. For this example, select "Chat."
-
Enter the detailed AI Skill prompt in the Prompt field. Learn more about creating the most efficient prompts: AI Skill development recommendations. For this example, enter the following:
Your task is to help the user to generate a marketing copy of a product we are going to use on our website. To generate the copy, follow these steps:
1.	Read the context of the current product page. Most importantly the following fields: Name, Benefits, Notes, Category.
2.	Retrieve the least of technical product features using the [Read Product data] function.
3.	Generate a marketing copy of a product as if you were an experienced salesperson who knows our main target audience well. The target audience is men from 35 to 54 years old whose hobby is car collecting and who enjoy manual labor. The copy must be no longer than 150 words and must elaborate why the product is interesting for the audience, what its special features are, and what its advantage over other products is.
4.	Approve the copy with the user and make changes to it if needed.
5.	If the user confirms this is what they need, save the copy to the product page using the [Save product copy] function.

Proceed to step 2.
Step 2. Develop actions
-
Click
to open the System Designer. -
Go to the System setup block → Creatio AI setup.
-
Open the needed AI Skill.
-
Click
 next to the name of the Action list expanded list → Create new. This opens the Business Process Designer. You can also select an existing business process if needed. Learn more about working in the Designer: BPM tools.
-
Go to the Settings tab of the process setup area and fill out the following process parameters (Fig. 3).
Fig. 3 Process parameters 
Parameter
Parameter value
Name
Process name. For this example, enter "Read product data."
Code
Process code. For this example, enter "UsrReadProductData."
Process description
Description of the process. Creatio.ai uses it to determine which action to run. For this example, enter "Read data of a product with which the user works."
-
Open the Parameters tab → Add parameter → Lookup. This opens the list of parameter properties.
-
Fill out the parameter properties (Fig. 4).
Fig. 4 Product ID parameter properties 
Property
Property value
Title
Parameter title. For this example, enter "ProductId."
Description
Parameter description. For this example, enter "ID of the product with which user works."
Code
Parameter code. For this example, enter "ProductId."
Lookup
Parameter lookup. For this example, select "Product."
Direction
Parameter direction. For this example, enter "Input."
-
Click Save in the list of parameter properties.
-
Drag the Read data process element to the canvas between the Start and Finish process elements.
-
Fill out the element parameters (Fig. 5).
Fig. 5 Parameters of the Read data element 
Parameter
Parameter value
Name
Element name. For this example, enter "Read product data."
Which data read mode to use?
For this example, select "Read collection of records."
Which object to read data from?
For this example, select "Product feature."
How to filter records?
Click Add condition → Object instance → Select → <?> → Compare with parameter → "ProductId."
Read first records
For this example, leave the field as is.
How to sort records?
For this example, leave the field as is.
What record data should the process read?
Select "Read data from selected columns only" → Add column → select "Feature," "Value," "Value (Boolean)," "Value (decimal)," "Value (drop-down list)," "Value (integer)" → Save.
-
Go to the Parameters tab of the process setup area → Add parameter → Other → Collection of records. This opens the list of parameter properties.
-
Fill out the parameter properties (Fig. 6).
Fig. 6 Features parameter properties 
Property
Property value
Title
Parameter title. For this example, enter "Features."
Code
Parameter code. For this example, enter "Features."
Direction
Parameter direction. For this example, enter "Output."
Value
Click the property → Process parameter → Process elements → Collection of records → Select.
-
Click Save in the list of parameter properties.
-
Set up the nested parameters of the collection parameter.
-
Click **Add nested parameter → Lookup.
-
Fill out the parameter properties (Fig. 7).
Fig. 7 Feature parameter properties 
Property
Property value
Title
Parameter title. For this example, enter "Feature."
Code
Parameter code. For this example, enter "Feature."
Lookup
Parameter lookup. For this example, select "Specification."
Value
Click the property → Process parameter → Process elements → Collection of records → Feature.
-
Click Save in the list of parameter properties.
-
Click Add nested parameter → Text.
-
Fill out the parameter properties (Fig. 8).
Fig. 8 Value parameter properties 
Property
Property value
Title
Parameter title. For this example, enter "Value."
Code
Parameter code. For this example, enter "Value."
Data type
Parameter data type. For this example, select "Unlimited length text."
Value
Click the property → Process parameter → Process elements → Collection of records → Value.
-
Click Save in the list of parameter properties.
-
Click Add nested parameter → Boolean.
-
Fill out the parameter properties (Fig. 9).
Fig. 9 Value (Boolean) parameter properties 
Property
Property value
Title
Parameter title. For this example, enter "Value (Boolean)."
Code
Parameter code. For this example, enter "ValueBoolean."
Value
Click the property → Process parameter → Process elements → Collection of records → Value (Boolean).
-
Click Save in the list of parameter properties.
-
Click Add nested parameter → Decimal.
-
Fill out the parameter properties (Fig. 10).
Fig. 10 Value (Decimal) parameter properties 
Property
Property value
Title
Parameter title. For this example, enter "Value (Decimal)."
Code
Parameter code. For this example, enter "ValueDecimal."
Value
Click the property → Process parameter → Process elements → Collection of records → Value (Decimal).
- Click Save in the list of parameter properties.
- Click Add nested parameter → Lookup.
- Fill out the parameter properties (Fig. 11).
Fig. 11 Value (drop-down list) parameter properties 
Property
Property value
Title
Parameter title. For this example, enter "Value (Drop-down list)."
Code
Parameter code. For this example, enter "ValueDropdown."
Lookup
Parameter lookup. For this example, select "Feature value."
Value
Click the property → Process parameter → Process elements → Collection of records → Value (drop-down list).
- Click Save in the list of parameter properties.
- Click Add nested parameter → Integer.
- Fill out the parameter properties (Fig. 12).
Fig. 12 Value (integer) parameter properties 
Property
Property value
Title
Parameter title. For this example, enter "Value (integer)."
Code
Parameter code. For this example, enter "ValueInteger."
Value
Click the property → Process parameter → Process elements → Collection of records → Value (integer).
- Click Save in the list of parameter properties.
-
-
Save the business process.
Fig. 13 Read product data business process 
-
-
Click
next to the name of the Action list expanded list → Create new. This opens the Business Process Designer. You can also select an existing business process if needed. Learn more about working in the Designer: BPM tools. -
Go to the Settings tab of the process setup area and fill out the following process parameters (Fig. 14).
Fig. 14 Process parameters 
Parameter
Parameter value
Name
Process name. For this example, enter "Save product copy."
Code
Process code. For this example, enter "UsrSaveProductCopy."
Process description
Description of the process. Creatio.ai uses it to determine which action to run. For this example, enter "Save the product copy to a field."
-
Open the Parameters tab → Add parameter → Text. This opens the list of parameter properties.
-
Fill out the parameter properties (Fig. 15).
Fig. 15 Description parameter properties 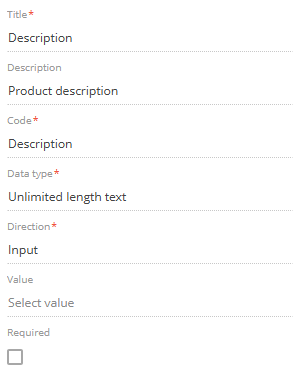
Property
Property value
Title
Parameter title. For this example, enter "Description."
Description
Parameter description. For this example, enter "Product description."
Code
Parameter code. For this example, enter "Description."
Data type
Exact type of data. For this example, select "Unlimited length text."
Direction
Parameter direction. For this example, enter "Input."
-
Click Save in the list of parameter properties.
-
Open the Parameters tab → Add parameter → Lookup. This opens the list of parameter properties.
-
Fill out the parameter properties (Fig. 16).
Fig. 16 ProductId parameter properties 
Property
Property value
Title
Parameter title. For this example, enter "ProductId."
Description
Parameter description. For this example, enter "ID of the product with which user works."
Code
Parameter code. For this example, enter "ProductId."
Lookup
Parameter lookup. For this example, select "Product."
Direction
Parameter direction. For this example, enter "Input."
-
Click Save in the list of parameter properties.
-
Drag the Modify data process element to the canvas between the Start and Finish process elements.
-
Fill out the element parameters (Fig. 17).
Fig. 17 Parameters of the Modify data element 
Parameter
Parameter value
Name
Element name. For this example, enter "Save product copy."
Which object to modify data of?
For this example, select "Product."
Which object to read data from?
For this example, select "Product feature."
Modify all records that match condition
Click Add condition → select Id in the Column field → Select → Compare with parameter → "ProductId."
Which column values to set for modified records?
Click Add field → select Note → Save → select the parameter that appears → Process parameter → Description → Select.
-
Save the business process.
Fig. 18 Save product copy business process 
-
Save the AI Skill.
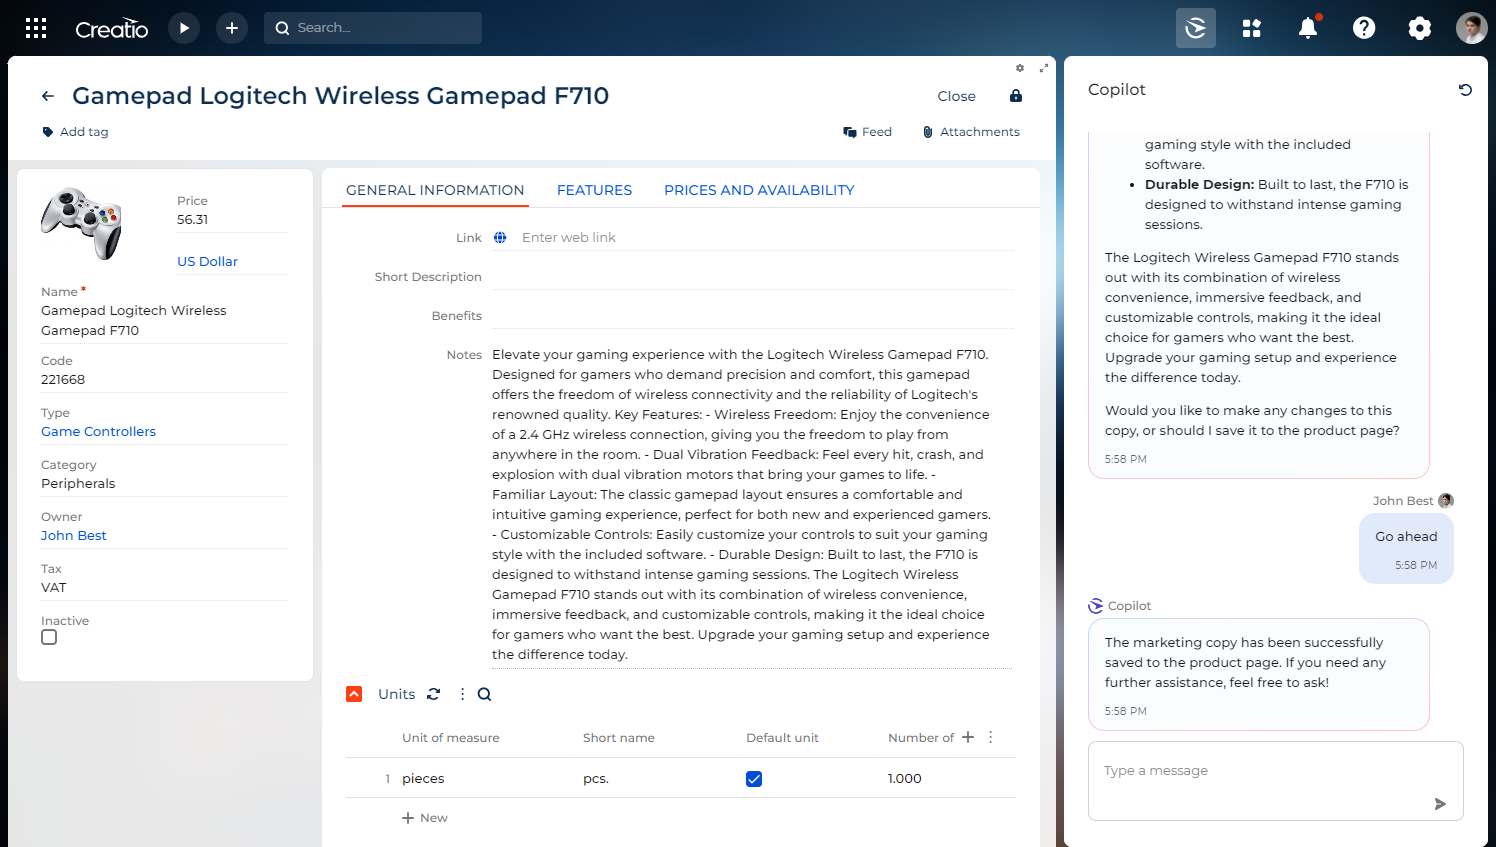
As a result, users will be able to generate a marketing copy for a product if they ask Creatio.ai to do that while on the product page. After they approve the copy, Creatio.ai will add the description to the product and save the changes.
Connect an AI Skill to Creatio.ai chat
You can enable users to launch your AI Skill quickly via a Creatio.ai chat button. This does not restrict the user from launching AI Skills on other pages. This functionality simply adds the ability to launch the AI Skill quickly from a specific page. To do this:
-
Click
to open the System Designer. -
Go to the System setup block → Lookups.
-
Open the "Copilot intent in page" lookup.
-
Click New.
-
Fill out the parameters as follows:
Parameter
Parameter value
AI Skill code
Code of the AI Skill specified on the AI Skill page.
Page name
Code of the Freedom UI page specified in the page settings.
-
Click
 .
.
As a result, when a user opens the page, they will see a quick launch button for the AI Skill in the Creatio.ai chat. If you need to add the AI Skill to other pages, perform the setup in a similar way.
Debug the AI Skill
If any issues occur as part of the event, you can use the following options to debug it:
- To debug AI interactions, click Debug info in Creatio.ai chat. This lets you see all technical message exchanges in real time. This button is available for system administrators out of the box. To enable it for other users or user groups, grant permission to the "Can debug skills" ("CanDebugSkills" code) system operation. Learn more: System operation permissions.
- To debug actions, follow the same procedure as for business processes as each action is a business process. Turn on process tracing in the business process properties, run the AI Skill, and check the input and output parameters of the process as well as the specific error that occurred during the AI Skill execution. Learn more: Trace process parameters.
- To display all Creatio.ai messages, including system messages from the LLM model, run the
require(["CopilotConsoleChat"]);command at the browser console. As a result, you will see user messages in the chat, Creatio.ai action requests and their input parameters, execution results, and responses from the LLM model. - To view the list of all system and user messages, context data, and all messages from the model in their raw format, run the
JSON.stringify(Copilot._messages)command at the browser console.