Case Designer
The purpose of the Case Designer is to automate, build, and customize the stages of your company's non-linear business processes, otherwise known as "cases." The concept of case management is aimed at ease of use and ease of design.
The Case Designer does not require knowledge of the complex process and provides simpler case management. Use case management if there are several ways to reach the goal of a business case and none of them can be predicted. You can set the order and parameters of case stages, and specify the steps and tasks for each stage.
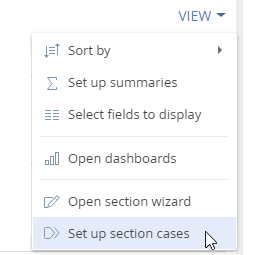
The Case Designer is accessed via the section wizard from the View section menu (Fig. 1).

The case diagram consists of steps and case elements.
The case is a workflow with a business value to a customer, partner, or stakeholder. The case consists of several tasks and steps that lead to the needed business result. The set of tasks and processes are coordinated within the case. For example, the creation of a bank account, application for insurance payment, etc.
Case Designer UI
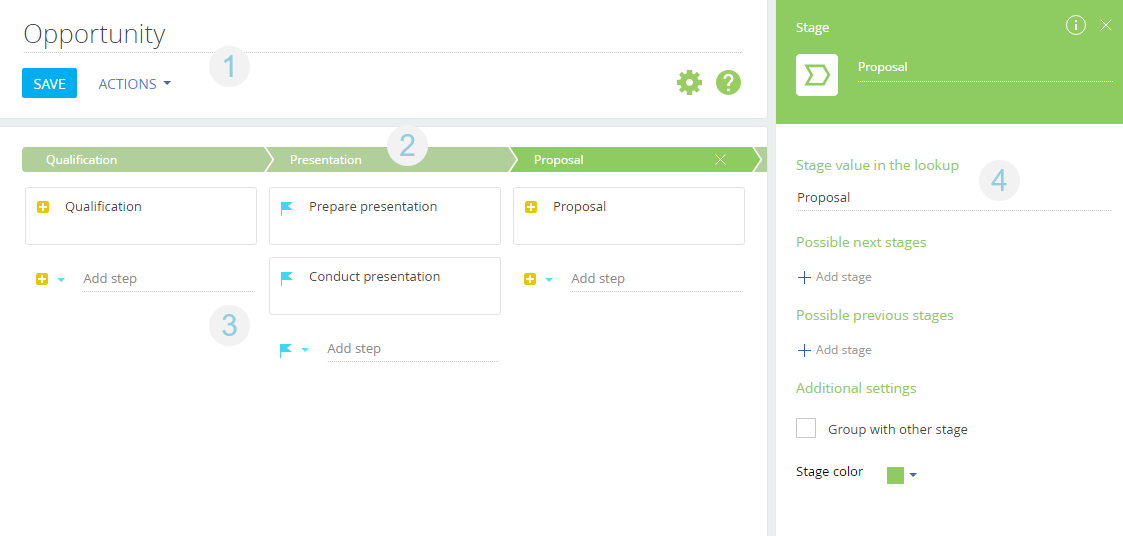
Use the Case Designer to configure case steps and their sequence. To configure a case, select it in the list of cases and click Open. Setting up and editing case steps and stages are performed in the Case Designer UI, which consists of the toolbar, the stage panel, the working area, and the element setup area (Fig. 2).

Toolbar
The toolbar (1) contains the following buttons:
- Save – saves changes made to the case in the Case Designer. All changes will immediately become available on the workflow bar of the new records in the corresponding section.
 – opens the case parameter page or parameter page of the currently selected case element.
 – opens the DCM help on the academy.creatio.com.
The Actions menu contains the following commands:
- Metadata – opens the metadata of the case.
- Metadata export – exports metadata to an MD (Markdown) lightweight markup language file.
Stages panel
Use the stages panel (2) to map and manage the workflow stages for the case. With the help of the stages panel, you can add, remove, and connect stages displayed on the workflow bar of the corresponding section.
Working area
The working area (3) of the Case Designer is used to manage case elements. Here you can add case elements as "steps" of the case stages and configure their parameters.
Setup area
Use the setup area (4) to set up process and process element parameters. The list of available settings depends on the type of the currently selected Case Designer element.
Case Designer hotkeys
Use the hotkeys to easily trigger certain operations in the Case Designer.
Hotkeys | Notes |
|---|---|
Ctrl + S | Save the case. |
F1 | Open help |
Ctrl + M | Show metadata |
Delete | Delete the currently selected task or sub-process. |
Case properties
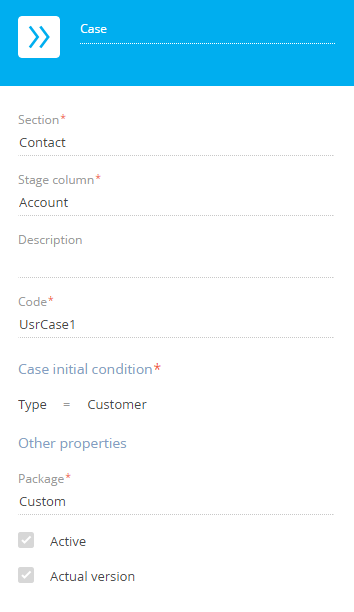
Case settings are available in the case setup area (Fig. 3). To open the case setup area, click the  button or double-click the Case Designer toolbar.

Title – enter the case name in the upper part of the setup area or in the field above the Case Designer toolbar. This is a required field.
Section – Creatio section where the current case is used. The Section value cannot be changed once the new case is saved. This is a required field.
Stage column – the column that contains the current stage of the section record. Select any of the section’s lookup columns here. This is a required field.
Description – optional notes and supplementary information for the case.
Code – the internal name of the case, used by the system to identify it in the system. The default code is generated automatically, but you can edit it. The code can only contain Latin characters and numbers and cannot contain any special characters. This is a required field.
Case initial condition – a field that determined which case can be run for the section record. Corresponds with the Which column to build the stages by? field on the section case page.
Package – the package that contains the dynamic case schema.
Active – uneditable. The field is filled in automatically and indicates that the case is enabled in the corresponding section. Additionally, you can activate this checkbox by clicking Activate case on the section case page.