Protect landing page forms from spam with Google reCAPTCHA
Google reCAPTCHA lets you verify that a form is submitted by a real person, not a bot, protecting your landing page from spam submissions that waste your team's time and skew lead data. Instead of editing the page code to add spam protection, configure reCAPTCHA via the Add script tab on a landing page in Creatio.
Landing Page Designer supports the following reCAPTCHA types:
- Score based (v3) — works silently in the background without interrupting the user.
- Challenge (v2) — shows the I'm not a robot checkbox that the visitor must select before submitting the form, or validates requests invisibly in the background using the invisible reCAPTCHA badge.
Before you start, make sure the following parameters are configured in the landing page form's Block options in Landing Page Designer:
- the Block identifier toggle is enabled
- the ID field includes an ID that connects the script to the form. Use a unique value without spaces. For example: "Demo_Form." If the ID contains multiple words, use an underscore instead of a space.
Run invisible background verification using reCAPTCHA v3
reCAPTCHA v3 works silently in the background without showing the I'm not a robot checkbox.
1. Get your reCAPTCHA v3 Site key from Google
- Open Google reCAPTCHA Admin Console.
- Create a new reCAPTCHA or select an existing reCAPTCHA.
- Select Score based (v3) in the reCAPTCHA type setting.
- Add your landing page domain to the Domains setting. For example,
example.comorwww.example.com. Use only the domain, not the full URL. - Click Submit. This opens the Adding reCAPTCHA to your site page.
- Click Copy site key. Use it when adding reCAPTCHA v3 scripts to the landing page.
Learn more: Create reCAPTCHA keys for websites (official vendor documentation).
2. Add the reCAPTCHA v3 scripts to the landing page
-
Open the Lead Generation app and go to the Landing pages section.
-
Open the landing page you want to customize.
-
Go to the Add script tab.
-
Add the reCAPTCHA API script.
-
Click Add script. This opens the Add script window.
-
Fill out the script parameters.
Parameter
Description
Name
An arbitrary script name. For example, "reCAPTCHA v3 API."
Position
Position in the page HTML. The position controls when the script loads and how it interacts with the rest of the page content. For this script, select "Head bottom." This loads the script before the page renders, after other head elements are in place.
Script
<script src="https://www.google.com/recaptcha/api.js"></script>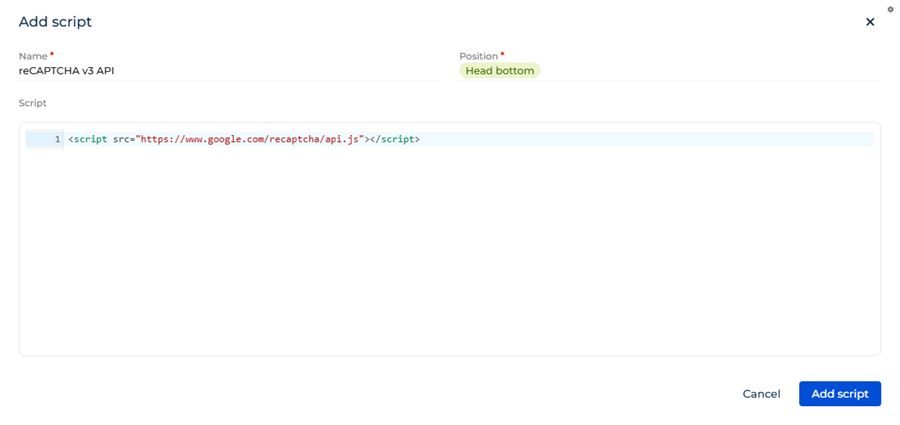
-
Click Add script.
-
-
Add the reCAPTCHA v3 configuration script.
-
Click Add script. This opens the Add script window.
-
Fill out the script parameters.
Parameter
Description
Name
An arbitrary script name. For example, "reCAPTCHA v3 config."
Position
Position in the page HTML. The position controls when the script loads and how it interacts with the rest of the page content. For this script, select "Body bottom." This ensures the script runs after all page content is loaded.
Script
Select how to trigger reCAPTCHA v3:
Trigger reCAPTCHA v3 automatically
Use this option when you want reCAPTCHA to trigger when the visitor clicks the Submit button. This option also lets you control the position of the reCAPTCHA badge on the page.
<script type="text/javascript">window.captchaCallback = (token) => crtLanding.getFormElement('ID_OF_SOME_LANDING_PAGE_FORM').requestSubmit();crtLanding.addCaptchaV3Attributes('ID_OF_SOME_LANDING_PAGE_FORM', {sitekey: 'SITE_KEY_FROM_GOOGLE',callback: 'captchaCallback',action: 'submit', // Optional.badge: 'inline' // Optional.});</script>Where:
ID_OF_SOME_LANDING_PAGE_FORMis the ID from the Block options of the landing page form in Landing Page Designer.SITE_KEY_FROM_GOOGLEis the site key copied from Google reCAPTCHA Admin Console.
Trigger reCAPTCHA v3 using API
Use this option when you need more control over when and how the challenge is invoked, for example, to run additional logic before the token is generated.
<script type="text/javascript">crtLanding.setFormConfig('ID_OF_SOME_LANDING_PAGE_FORM', {onSubmit: async (formData) => {grecaptcha.ready(() => {});const token = await grecaptcha.execute('SITE_KEY_FROM_GOOGLE', { action: 'submit' });formData.append('g-recaptcha-response', token);}});</script>Where:
ID_OF_SOME_LANDING_PAGE_FORMis the ID from the Block options of the landing page form in Landing Page Designer.SITE_KEY_FROM_GOOGLEis the site key copied from Google reCAPTCHA Admin Console.
reCAPTCHA v3 configuration script that is triggered automatically 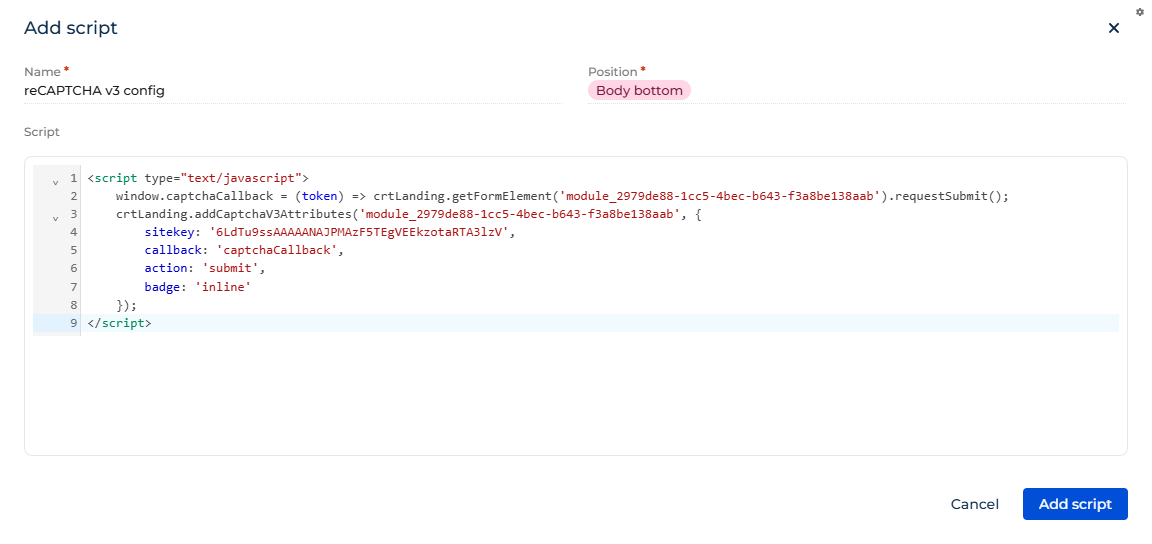
reCAPTCHA v3 configuration script that is triggered using API 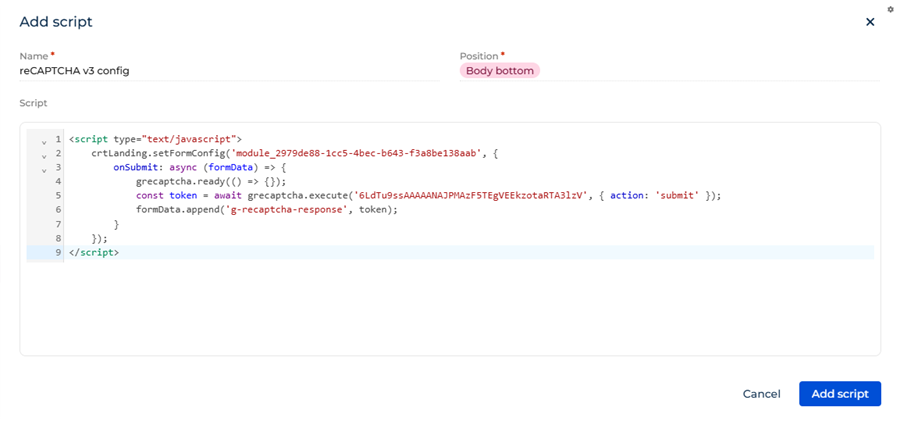
-
Click Add script.
-
-
Click Publish to apply the changes.
As a result:
- reCAPTCHA v3 runs in the background on every form submission.
- No I'm not a robot checkbox is shown to the visitor.
- Suspicious activity is detected without interrupting the user experience.
Show a verification checkbox or invisible badge using reCAPTCHA v2
reCAPTCHA v2 shows the I'm not a robot checkbox that the visitor must select before submitting the form, or validates requests invisibly in the background using the invisible badge.
1. Get your reCAPTCHA v2 Site key from Google
-
Create a new reCAPTCHA or select an existing reCAPTCHA.
-
Select Challenge (v2) in the reCAPTCHA type setting.
-
Select the Challenge (v2) subtype:
- When you need to validate requests using the I'm not a robot checkbox, select the "I'm not a robot" Checkbox option.
- When you need to validate requests in the background, select the Invisible reCAPTCHA badge option.
-
Add your landing page domain to the Domains setting. For example,
example.comorwww.example.com. Use only the domain, not the full URL. -
Click Submit. This opens the Adding reCAPTCHA to your site page.
-
Click Copy site key. Use it when adding reCAPTCHA v2 scripts to the landing page.
Learn more: Create reCAPTCHA keys for websites (official vendor documentation).
2. Add the reCAPTCHA v2 script to the landing page
-
Open the Lead Generation app and go to the Landing pages section.
-
Open the landing page you want to customize.
-
Go to the Add script tab.
-
Click Add script. This opens the Add script window.
-
Fill out the script parameters.
Parameter
Description
Name
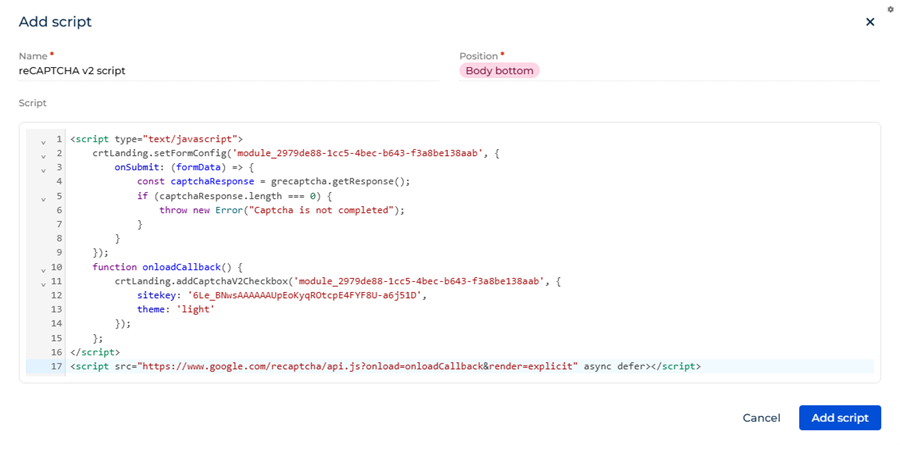
An arbitrary script name. For example, "reCAPTCHA v2 script."
Position
Position in the page HTML. The position controls when the script loads and how it interacts with the rest of the page content. For this script, select "Body bottom." This ensures the script runs after all page content is loaded.
Script
<script type="text/javascript">crtLanding.setFormConfig('ID_OF_SOME_LANDING_PAGE_FORM', {onSubmit: (formData) => {const captchaResponse = grecaptcha.getResponse();if (captchaResponse.length === 0) {throw new Error("Captcha is not completed");}}});function onloadCallback() {crtLanding.addCaptchaV2Checkbox('ID_OF_SOME_LANDING_PAGE_FORM', {sitekey: 'SITE_KEY_FROM_GOOGLE',theme: 'light' // Optional.});};</script><script src="https://www.google.com/recaptcha/api.js?onload=onloadCallback&render=explicit" async defer></script>Where:
ID_OF_SOME_LANDING_PAGE_FORMis the ID from the Block options of the landing page form in Landing Page Designer.SITE_KEY_FROM_GOOGLEis the site key copied from Google reCAPTCHA Admin Console.
-
Click Add script.
-
Click Publish to apply the changes.
As a result:
- The I'm not a robot checkbox will appear in the form, or the invisible badge will run in the background, depending on the selected reCAPTCHA v2 subtype.
- Visitors will not be able to submit the form until the checkbox is selected.
- Automated bot submissions will be blocked.
See also
Landing pages (user documentation)
Resources
Google reCAPTCHA Admin Console
Create a reCAPTCHA key (official vendor documentation)
Google Cloud Fraud Defense documentation (official vendor documentation)