Implement a custom request handler using remote module
Add request handlers that execute the following actions:
- Display current date and time in the Label type component on the record page of the custom Requests section.
- Change the value in the Label type component after a user clicks the custom button.
Implement handlers using a remote module created in Angular framework.
1. Create an Angular project to develop a custom request handler using remote module
To create an Angular project to develop a custom request handler using remote module, follow the instructions: Implement custom UI component using remote module.
2. Create a custom request using remote module
-
Create an Angular class in the project. To do this, run the
ng g class update-current-time.requestcommand at the command line terminal of Microsoft Visual Studio Code.As a result, Microsoft Visual Studio Code will add the
UpdateCurrentTimeRequestclass files to thesrc/app/project directory.
-
Implement the request.
- Open the
update-current-time.request.tsfile. - Inherit the
BaseRequestclass from the@creatio-devkit/commonlibrary. - Add the type and parameter of the request.
- Import the required functionality from the libraries into the class.
- Save the file.
update-current-time.request.ts file/* Import the required functionality from the libraries. */import { BaseRequest } from "@creatio-devkit/common";export class UpdateCurrentTimeRequest extends BaseRequest{/* The type and parameters of the request. */public dateTime!: string;} - Open the
-
Build the project. To do this, run the
npm run buildcommand at the command line terminal of Microsoft Visual Studio Code.
As a result, Microsoft Visual Studio Code will add the build to the dist directory of the Angular project. The build will have the sdk_remote_module_package name.
3. Create a custom service using remote module
-
Create an Angular class in the project. To do this, run the
ng g class date-time.servicecommand at the command line terminal of Microsoft Visual Studio Code.As a result, Microsoft Visual Studio Code will add the
DateTimeServiceclass files to thesrc/app/project directory.
-
Implement the service that generates current date and time.
- Open the
date-time.service.tsfile. - Flag the
DateTimeServiceclass using theInjectabledecorator. - Implement the
getCurrentDateTime()method that receives current date and time. - Import the required functionality from the libraries into the class.
- Save the file.
date-time.service.ts file/* Import the required functionality from the libraries. */import { formatDate } from "@angular/common";import { Injectable } from "@angular/core";@Injectable({providedIn: 'root',})export class DateTimeService {/* Receive current date and time. */public getCurrentDateTime(dateTime: string): Promise<{dateTime: Record<string, unknown>}> {/* Return current date and time. */return Promise.resolve({dateTime: {'dateTime': formatDate(new Date(), 'medium', 'en')}});}} - Open the
-
Build the project. To do this, run the
npm run buildcommand at the command line terminal of Microsoft Visual Studio Code.
As a result, Microsoft Visual Studio Code will add the build to the dist directory of the Angular project. The build will have the sdk_remote_module_package name.
4. Create custom request handlers using remote module
-
Create a custom handler that displays current date and time on the Freedom UI page.
-
Set up the Freedom UI page.
-
Use the Records & business processes template to create a custom
Requestsapp. To do this, follow the instruction in the user documentation: Manage apps. -
Open the Requests form page page in the working area of the
Requestsapp page. -
Add a Label type component to the canvas.
-
Click the
 button in the action panel of the Freedom UI Designer. After you save the page settings, Creatio opens the source code of the Freedom UI page.
 -
Add a
CurrentDateTimeattribute that stores data about the current date and time to theviewModelConfigDiffschema section.viewModelConfigDiff schema sectionviewModelConfigDiff: /**SCHEMA_VIEW_MODEL_CONFIG_DIFF*/[{"operation": "merge","path": ["attributes"],"values": {...,/* The attribute that stores the current date and time. */"CurrentDateTime": {}}}]/**SCHEMA_VIEW_MODEL_CONFIG_DIFF*/, -
Bind the
captionproperty of theLabelelement to the$CurrentDateTimemodel attribute in theviewConfigDiffschema section.viewConfigDiff schema sectionviewConfigDiff: /**SCHEMA_VIEW_CONFIG_DIFF*/[...,{"operation": "insert","name": "Label","values": {...,/* Bind the CurrentDateTime attribute to the caption property. */"caption": "$CurrentDateTime",...},...}]/**SCHEMA_VIEW_CONFIG_DIFF*/, -
Save the changes.
-
-
Create an Angular class in the project. To do this, run the
ng g class update-current-time.handlercommand at the command line terminal of Microsoft Visual Studio Code.As a result, Microsoft Visual Studio Code will add the
UpdateCurrentTimeHandlerclass files to thesrc/app/project directory.
-
Implement the handler.
-
Open the
update-current-time.handler.tsfile. -
Add the configuration object that declares the request handler.
- Set the
typeproperty tousr.UpdateCurrentTimeHandler. - Set the
requestTypeproperty tocrt.UpdateCurrentTimeRequest.
- Set the
-
Flag the
UpdateCurrentTimeHandlerclass using theCrtRequestHandlerdecorator. -
Inherit the
BaseRequestHandlerclass from the@creatio-devkit/commonlibrary. -
Implement the handling of the request result.
-
Generate the value to display in the component of Freedom UI page.
-
Import the required functionality from the libraries into the class.
-
Save the file.
update-current-time.handler.ts file/* Import the required functionality from the libraries. */import { BaseRequestHandler, CrtRequestHandler } from "@creatio-devkit/common";import { DateTimeService } from "./date-time.service";import { UpdateCurrentTimeRequest } from "./update-current-time.request";/* Add the CrtRequestHandler decorator to the UpdateCurrentTimeHandler class. */@CrtRequestHandler({type: 'usr.UpdateCurrentTimeHandler',requestType: 'crt.UpdateCurrentTimeRequest',})export class UpdateCurrentTimeHandler extends BaseRequestHandler{constructor(private _dateTimeService: DateTimeService) {super();}public async handle(request: UpdateCurrentTimeRequest): Promise<unknown> {const result = await this._dateTimeService.getCurrentDateTime(request.dateTime);const dateTime = result.dateTime[request.dateTime] ?? 0/* Generate the value to display in the component of Freedom UI page. */request.$context['CurrentDateTime'] = dateTime;return dateTime;}} -
-
-
Create a custom handler that is executed when Creatio initializes a Freedom UI page.
-
Create an Angular class in the project. To do this, run the
ng g class page-init-current-time.handlercommand at the command line terminal of Microsoft Visual Studio Code.As a result, Microsoft Visual Studio Code will add the
PageInitCurrentTimeHandlerclass files to thesrc/app/project directory.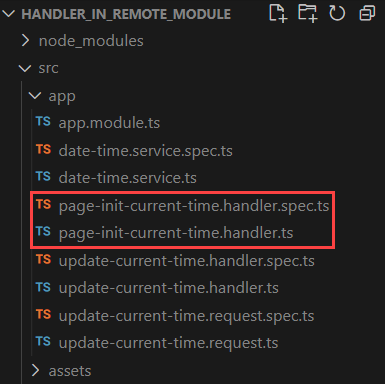
-
Implement the handler.
-
Open the
page-init-current-time.handler.tsfile. -
Add the configuration object that declares the request handler.
- Set the
typeproperty tousr.PageInitCurrentTimeHandler. - Set the
requestTypeproperty tocrt.HandleViewModelInitRequest. - Set the
scopesproperty toUsrRequests_FormPage. The request handler is executed when Creatio initializes the Freedom UI page that has theUsrRequests_FormPagecode.
- Set the
-
Flag the
PageInitCurrentTimeHandlerclass using theCrtRequestHandlerdecorator. -
Inherit the
BaseRequestHandlerclass from the@creatio-devkit/commonlibrary. -
Implement the update of the current date and time when Creatio initializes the Freedom UI page.
-
Import the required functionality from the libraries into the class.
-
Save the file.
page-init-current-time.handler.ts file/* Import the required functionality from the libraries. */import { BaseRequest, BaseRequestHandler, CrtRequestHandler, HandlerChainService } from "@creatio-devkit/common";import { UpdateCurrentTimeRequest } from "./update-current-time.request";/* Add the CrtRequestHandler decorator to the PageInitCurrentTimeHandler class. */@CrtRequestHandler({type: 'usr.PageInitCurrentTimeHandler',requestType: 'crt.HandleViewModelInitRequest',scopes: ['UsrRequests_FormPage'],})export class PageInitCurrentTimeHandler extends BaseRequestHandler{public async handle(request: BaseRequest): Promise<unknown> {/* Update the current date and time when Creatio initializes the Freedom UI page. */await HandlerChainService.instance.process({type: 'crt.UpdateCurrentTimeRequest',dateTime: 'dateTime',$context: request.$context} as UpdateCurrentTimeRequest);return this.next?.handle(request);}} -
-
-
Register the handlers.
- Open the
app.module.tsfile. - Add the
UpdateCurrentTimeHandlerandPageInitCurrentTimeHandlerhandlers to therequestHandlerssection in theCrtModuledecorator. - Import the required functionality from the libraries into the class.
- Save the file.
app.module.ts file/* Import the required functionality from the libraries. */import { CrtModule } from '@creatio-devkit/common';import { PageInitCurrentTimeHandler } from './page-init-current-time.handler';import { UpdateCurrentTimeHandler } from './update-current-time.handler';...@CrtModule({...,/* Specify that UpdateCurrentTimeHandler and PageInitCurrentTimeHandler are request handlers. */requestHandlers: [UpdateCurrentTimeHandler,PageInitCurrentTimeHandler],})... - Open the
-
Build the project. To do this, run the
npm run buildcommand at the command line terminal of Microsoft Visual Studio Code.
As a result, Microsoft Visual Studio Code will add the build to the dist directory of the Angular project. The build will have the sdk_remote_module_package name.
5. Add the request implemented using remote module to the Freedom UI page
-
Repeat steps 2-7 of the procedure to implement custom UI component using remote module.
-
Add a Button type component to the canvas.
-
Click the
button in the action panel of the Freedom UI Designer. After you save the page settings, Creatio opens the source code of the Freedom UI page. -
Change the
clickedproperty value for theRefreshCurrentDateTimeButtonelement in theviewConfigDiffschema section to request configuration object.- Enter the
crt.UpdateCurrentTimeRequestrequest name in therequestproperty. - Enter the configuration object of parameters in the
paramsproperty.
viewConfigDiff schema sectionviewConfigDiff: /**SCHEMA_VIEW_CONFIG_DIFF*/[{"operation": "insert","name": "RefreshCurrentDateTimeButton","values": {...,"clicked": {/* Bind the sending of the custom crt.UpdateCurrentTimeRequest request to the button click event. */"request": "crt.UpdateCurrentTimeRequest","params": {"dateTime": "dateTime"}}},...},...]/**SCHEMA_VIEW_CONFIG_DIFF*/, - Enter the
-
Save the changes.
As a result, Creatio will add the request to the Freedom UI page.
Outcome of the example
To view the outcome of the example:
- Open the
Requestsapp page and click Run app. - Click New on the
Requestsapp toolbar. - Click Refresh date and time on the request page toolbar.
As a result, Creatio will display current date and time on the request page.
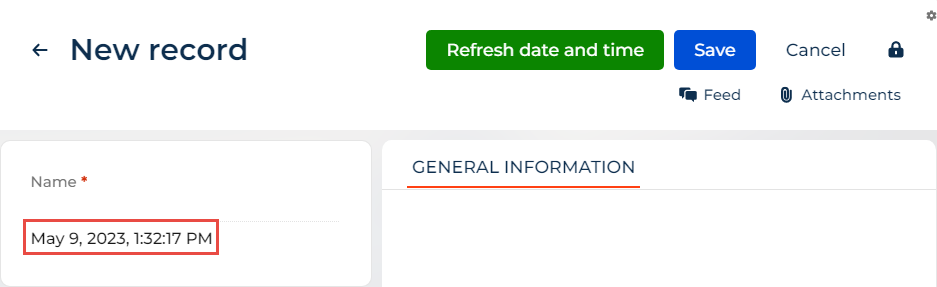
Creatio will update the current date and time when you click the Refresh date and time.
The handlers are implemented using the remote module created in Angular framework.
Source code
- app.module.ts file
- UsrRequests_FormPage
/* Import the required functionality from the libraries. */
import { DoBootstrap, Injector, NgModule, ProviderToken } from '@angular/core';
import { BrowserModule } from '@angular/platform-browser';
import { bootstrapCrtModule, CrtModule } from '@creatio-devkit/common';
import { PageInitCurrentTimeHandler } from './page-init-current-time.handler';
import { UpdateCurrentTimeHandler } from './update-current-time.handler';

@CrtModule({
    /* Specify that the component is a view element. */
    viewElements: [],
    /* Specify that UpdateCurrentTimeHandler and PageInitCurrentTimeHandler are request handlers. */
    requestHandlers: [
    UpdateCurrentTimeHandler,
    PageInitCurrentTimeHandler
    ],
})
@NgModule({
    declarations: [],
    imports: [BrowserModule],
    providers: [],
})
export class AppModule implements DoBootstrap {
    constructor(private _injector: Injector) {}

    ngDoBootstrap(): void {
    /* Bootstrap CrtModule definitions. */
    bootstrapCrtModule('sdk_remote_module_package', AppModule, {
        resolveDependency: (token) => this._injector.get(<ProviderToken<unknown>>token)
    });
    }
}
define("UsrRequests_FormPage", /**SCHEMA_DEPS*/[]/**SCHEMA_DEPS*/, function/**SCHEMA_ARGS*/()/**SCHEMA_ARGS*/ {
    return {
        viewConfigDiff: /**SCHEMA_VIEW_CONFIG_DIFF*/[
            {
                "operation": "merge",
                "name": "Feed",
                "values": {
                    "dataSourceName": "PDS",
                    "entitySchemaName": "UsrRequests"
                }
            },
            {
                "operation": "merge",
                "name": "AttachmentList",
                "values": {
                    "columns": [
                        {
                            "id": "df093806-a8ed-40ae-979c-770bec690b3c",
                            "code": "AttachmentListDS_Name",
                            "caption": "#ResourceString(AttachmentListDS_Name)#",
                            "dataValueType": 28,
                            "width": 200
                        }
                    ]
                }
            },
            {
                "operation": "insert",
                "name": "RefreshCurrentDateTimeButton",
                "values": {
                    "type": "crt.Button",
                    "caption": "#ResourceString(RefreshCurrentDateTimeButton_caption)#",
                    "color": "accent",
                    "disabled": false,
                    "size": "large",
                    "iconPosition": "only-text",
                    "visible": true,
                    "clicked": {
                            /* Bind the sending of the custom crt.UpdateCurrentTimeRequest request to the button click event. */
                        "request": "crt.UpdateCurrentTimeRequest",
                        "params": {
                            "dateTime": "dateTime"
                        }
                    }
                },
                "parentName": "ActionButtonsContainer",
                "propertyName": "items",
                "index": 0
            },
            {
                "operation": "insert",
                "name": "UsrName",
                "values": {
                    "layoutConfig": {
                        "column": 1,
                        "row": 1,
                        "colSpan": 1,
                        "rowSpan": 1
                    },
                    "type": "crt.Input",
                    "label": "$Resources.Strings.UsrName",
                    "control": "$UsrName",
                    "labelPosition": "auto"
                },
                "parentName": "SideAreaProfileContainer",
                "propertyName": "items",
                "index": 0
            },
            {
                "operation": "insert",
                "name": "Label",
                "values": {
                    "layoutConfig": {
                        "column": 1,
                        "row": 2,
                        "colSpan": 1,
                        "rowSpan": 1
                    },
                    "type": "crt.Label",
                    /* Bind the CurrentDateTime attribute to the caption property. */
                    "caption": "$CurrentDateTime",
                    "labelType": "body",
                    "labelThickness": "default",
                    "labelEllipsis": false,
                    "labelColor": "auto",
                    "labelBackgroundColor": "transparent",
                    "labelTextAlign": "start",
                    "visible": true
                },
                "parentName": "SideAreaProfileContainer",
                "propertyName": "items",
                "index": 1
            }
        ]/**SCHEMA_VIEW_CONFIG_DIFF*/,
        viewModelConfigDiff: /**SCHEMA_VIEW_MODEL_CONFIG_DIFF*/[
            {
                "operation": "merge",
                "path": [
                    "attributes"
                ],
                "values": {
                    "UsrName": {
                        "modelConfigDiff": {
                            "path": "PDS.UsrName"
                        }
                    },
                    "Id": {
                        "modelConfigDiff": {
                            "path": "PDS.Id"
                        }
                    },
                    "CurrentDateTime": {}
                }
            }
        ]/**SCHEMA_VIEW_MODEL_CONFIG_DIFF*/,
        modelConfigDiff: /**SCHEMA_MODEL_CONFIG_DIFF*/[
            {
                "operation": "merge",
                "path": [
                    "dataSources"
                ],
                "values": {
                    "PDS": {
                        "type": "crt.EntityDataSource",
                        "config": {
                            "entitySchemaName": "UsrRequests"
                        },
                        "scope": "page"
                    },
                    "AttachmentListDS": {
                        "type": "crt.EntityDataSource",
                        "scope": "viewElement",
                        "config": {
                            "entitySchemaName": "SysFile",
                            "attributes": {
                                "Name": {
                                    "path": "Name"
                                }
                            }
                        }
                    }
                },
                {
                    "operation": "merge",
                    "path": [],
                    "values": {
                        "primaryDataSourceName": "PDS"
                    }
                }
            }
        ]/**SCHEMA_MODEL_CONFIG_DIFF*/,
        handlers: /**SCHEMA_HANDLERS*/[]/**SCHEMA_HANDLERS*/,
        converters: /**SCHEMA_CONVERTERS*/{}/**SCHEMA_CONVERTERS*/,
        validators: /**SCHEMA_VALIDATORS*/{}/**SCHEMA_VALIDATORS*/
    };
});