Add a custom connected entity profile to a record page
Add a custom connected account profile to the contact page.
1. Create a view model schema of the connected account profile.
-
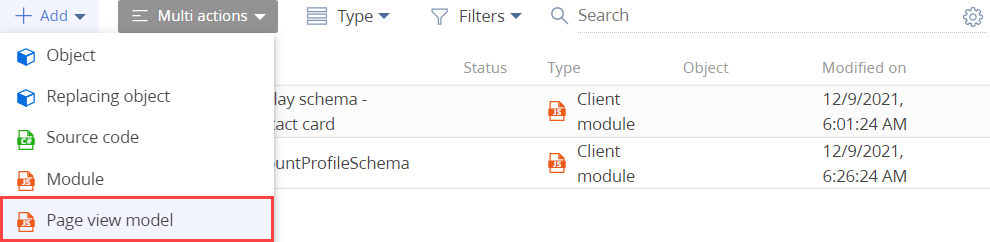
Go to the Configuration section and select a user-made package to add the schema.
-
Click Add → Page view model on the section list toolbar.
-
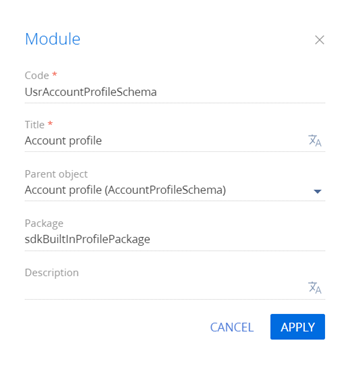
Fill out the schema properties.
- Set Code to "UsrAccountProfileSchema."
- Set Title to "Account profile."
- Select "AccountProfileSchema" in the Parent object property.
-
Add the
ProfileSchemaMixinmixin as a dependency to the declaration of the view model class. -
Set up the custom connected account profile.
- Add the
ProfileSchemaMixinmixin to themixinsproperty. - Add a configuration object with the settings of the custom connected account profile to the
diffarray of modifications.
View the source code of the view model schema of the connected account profile below.
UsrAccountProfileSchema/* Specify the ProfileSchemaMixin mixin as a dependency. */
define("UsrAccountProfileSchema", ["ProfileSchemaMixin"], function () {
return {
/* The name of the object schema. */
entitySchemaName: "Account",
/* Mixins. */
mixins: {
/* The mixin with functions that retrieve profile icons and images. */
ProfileSchemaMixin: "Terrasoft.ProfileSchemaMixin"
},
/* The diff array of modifications. */
diff: /**SCHEMA_DIFF*/[
{
/* The insert operation. */
"operation": "insert",
/* The entity name. */
"name": "Contact",
/* The name of the parent element to insert the element. */
"parentName": "ProfileContentContainer",
/* The parent element property on which to operate. */
"propertyName": "items",
/* The element value. */
"values": {
/* Bind the Contact object to the value of the Account property. */
"bindTo": "Account",
/* The layout configuration. Element position. */
"layout": {
"column": 3,
"row": 10,
"colSpan": 19
}
}
}
/* Other configuration objects of the array of modifications. */
]/**SCHEMA_DIFF*/
};
}); - Add the
-
Click Save on the Designer's toolbar.
2. Create a replacing view model schema of the contact page
-
Go to the Configuration section and select a user-made package to add the schema.
-
Click Add → Replacing view model on the section list toolbar.
/scr_add_replacing_module.png)
-
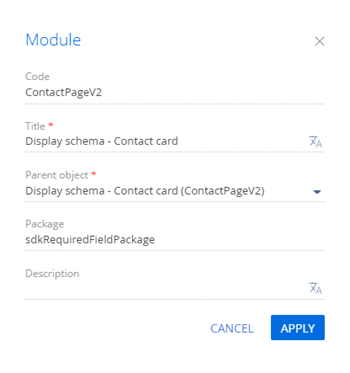
Fill out the schema properties.
- Set Code to "ContactPageV2."
- Set Title to "Display schema - Contact card."
- Select "ContactPageV2" in the Parent object property.
-
Add
BaseFiltersGenerateModule,BusinessRuleModule,ContactPageV2Resources,ConfigurationConstants,ContactCareer,DuplicatesSearchUtilitiesV2, andUsrAccountProfileSchemamodules to the declaration of the view model class as dependencies. -
Add the custom connected account profile to the contact page.
- Add a module of the custom connected account profile to the
modulesproperty. - Add a configuration object with the settings that determine the layout of the custom connected account profile to the
diffarray of modifications.
View the source code of the replacement view model of the contact page below.
ContactPageV2/* Define the record page schema and its dependencies. */
define("ContactPageV2", ["BaseFiltersGenerateModule", "BusinessRuleModule", "ContactPageV2Resources", "ConfigurationConstants", "ContactCareer", "DuplicatesSearchUtilitiesV2", "UsrAccountProfileSchema"], function (BaseFiltersGenerateModule, BusinessRuleModule, resources, ConfigurationConstants, ContactCareer) {
return {
entitySchemaName: "Contact",
/* The modules. */
modules: /**SCHEMA_MODULES*/{
/* The account profile module. */
"AccountProfile1": {
/* The profile configuration. */
"config": {
/* The schema name. */
"schemaName": "UsrAccountProfileSchema",
/* The flag that communicates the initialization of the schema configuration. */
"isSchemaConfigInitialized": true,
/* The flag that specifies that HistoryState is not used. */
"useHistoryState": false,
/* The profile parameters. */
"parameters": {
/* The view model configuration. */
"viewModelConfigDiff": {
/* The name of the connected entity column. */
masterColumnName: "Account"
}
}
}
}
}/**SCHEMA_MODULES*/,
/* The array of modifications. */
diff: /**SCHEMA_DIFF*/[
{
/* The insert operation. */
"operation": "insert",
/* The name of the parent element to insert the element. */
"parentName": "LeftModulesContainer",
/* The name of the parent element property on which to operate. */
"propertyName": "items",
/* The entity name. */
"name": "AccountProfile1",
/* The value of the element to add. */
"values": {
/* Set the element type to module. */
"itemType": Terrasoft.ViewItemType.MODULE
}
}
]/**SCHEMA_DIFF*/
};
}); - Add a module of the custom connected account profile to the
-
Click Save on the Designer's toolbar.
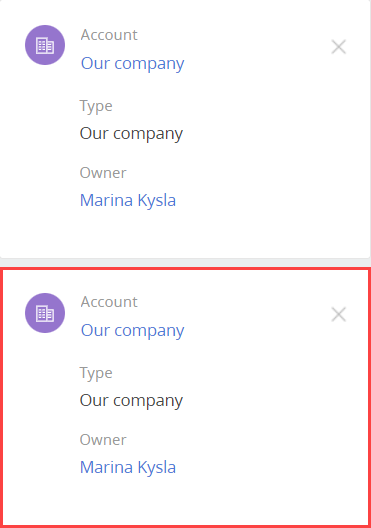
Outcome of the example
To view the outcome of the example, refresh the Contacts section page.
As a result, Creatio will add the custom connected account profile to the contact page.