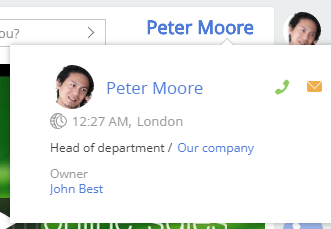
Add a mini page to a module
Display the current user in the top right of Creatio next to the profile icon. Hover over the link to the current user to open the mini page.
1. Create a module schema
-
Go to the Configuration section and select a user-made package to add the schema.
-
Click Add → Module on the section list toolbar.
/scr_minicard_creating_6.png)
-
Fill out the schema properties in the Schema Designer:
- Set Code to "UsrCurrentUserModule."
- Set Title to "Current user module."
/scr_minipage_anymodule_module_props.png)
Click Apply to apply the properties.
2. Create a view and view model of the module
Add the source code to the UsrCurrentUserModule module in the Schema Designer.
- Implement the class inherited from
Terrasoft.BaseViewModelto create a view model. - Enable the
Terrasoft.MiniPageUtilitiesutility class in themixinsproperty of the view model. The class lets you use the mini page call methods. - Implement the class inherited from
Terrasoft.BaseModuleto create a view. - Override the following methods of the
Terrasoft.BaseModuleclass in the new class:init()initializes the view model of the module.render()binds the view model to the container view display passed in therenderToparameter.getViewModel()creates the view model.getView()retrieves the view to display it. The view must contain the full name of the current user and a hyperlink to the contact page. Define the hover event handler when creating the hyperlink.
- Define the
viewModelproperty that stores the link to the retrieved view model.
View the source code of the module below.
/* Define the module. */
define("UsrCurrentUserModule", ["MiniPageUtilities"], function() {
    /* Define the CurrentUserViewModel class. */
    Ext.define("Terrasoft.configuration.CurrentUserViewModel", {
        /* The parent class name. */
        extend: "Terrasoft.BaseViewModel",
        /* The shortened class name. */
        alternateClassName: "Terrasoft.CurrentUserViewModel",
        /* The mixins used. */
        mixins: {
            MiniPageUtilitiesMixin: "Terrasoft.MiniPageUtilities"
        }
    });
    /* Define the UsrCurrentUserModule class. */
    Ext.define("Terrasoft.configuration.UsrCurrentUserModule", {
        /* The shortened class name. */
        alternateClassName: "Terrasoft.UsrCurrentUserModule",
        /* The parent class name. */
        extend: "Terrasoft.BaseModule",
        /* The Ext object. */
        Ext: null,
        /* The sandbox object. */
        sandbox: null,
        /* The Terrasoft object. */
        Terrasoft: null,
        /* The view model. */
        viewModel: null,
        /* Create the module views. */
        getView: function() {
            /* Retrieve the current user contact. */
            var currentUser = Terrasoft.SysValue.CURRENT_USER_CONTACT;
            /* The view that represents the Terrasoft.Hyperlink class instance. */
            return Ext.create("Terrasoft.Hyperlink", {
                /* Populate the link anchor text using the contact name. */
                "caption": currentUser.displayValue,
                /* The link hover event handler. */
                "linkMouseOver": {"bindTo": "linkMouseOver"},
                /* The property that contains the additional object parameters. */
                "tag": {
                    /* The ID of the current user. */
                    "recordId": currentUser.value,
                    /* The object schema name. */
                    "referenceSchemaName": "Contact"
                }
            });
        },
        /* Create the view model of the module. */
        getViewModel: function() {
            return Ext.create("Terrasoft.CurrentUserViewModel");
        },
        /* Initialize the module. */
        init: function() {
            this.viewModel = this.getViewModel();
        },
        /* Display the module view. */
        render: function(renderTo) {
            /* Retrieve the view object. */
            var view = this.getView();
            /* Bind the view to the view model. */
            view.bind(this.viewModel);
            /* Display the view in the renderTo element. */
            view.render(renderTo);
        }
    });
    return Terrasoft.UsrCurrentUserModule;
});
3. Add the module styles
Add styles to the module to customize the appearance of the hyperlink.
To add the module styles:
-
Select the LESS node in the Schema Designer.
-
Add the following source code.
Module styles.current-user-class a {
font-weight: bold;
font-size: 2.0em;
margin: 6px 20px;
}
.current-user-class a:hover {
text-decoration: none;
}
Save the module.
4. Create the view display container
To display a link to the user profile in the top right of Creatio, place the container and upload the view of the module to the container.
To do this, create the schema of the replacing view model that expands the functionality of the MainHeaderSchema schema.
-
Go to the Configuration section and select a user-made package to add the schema.
-
Click Add → Replacing view model on the section list toolbar.
/scr_add_replacing_module.png)
-
Select the
MainHeaderSchemaparent object in the Module Designer.After you confirm the parent object, Creatio will populate the other properties.
/scr_minipage_anymodule_page_props.png)
Click Apply to apply the properties.
-
Add the source code in the Module Designer.
Use the
diffproperty to display the view in the source code of the replacing view model schema. Set theRightHeaderContainerelement as a parent element of the container to display the container in the top right of the page. Then, override theonRender()method and implement the upload of the created module in the method.View the source code of the replacing view model schema below.
MainHeaderSchema.js/* Define the module. */
define("MainHeaderSchema", [], function() {
return {
methods: {
/* Execute the actions after displaying the view. */
onRender: function() {
/* Call the parent method. */
this.callParent(arguments);
/* Load the module of the current user. */
this.loadCurrentUserModule();
},
/* Load the module of the current user. */
loadCurrentUserModule: function() {
/* Retrieve the container to upload the module. */
var currentUserContainer = this.Ext.getCmp("current-user-container");
/* Check if the container exists. */
if (currentUserContainer && currentUserContainer.rendered) {
/* Upload the module to the container. */
this.sandbox.loadModule("UsrCurrentUserModule", {
/* The container name. */
renderTo: "current-user-container"
});
}
}
},
diff: [
{
/* The element insert operation. */
"operation": "insert",
/* The element name. */
"name": "CurrentUserContainer",
/* The parent container name. */
"parentName": "RightHeaderContainer",
/* The property name. */
"propertyName": "items",
/* The element values. */
"values": {
/* The container ID. */
"id": "current-user-container",
/* The element type. */
"itemType": Terrasoft.ViewItemType.CONTAINER,
/* The container classes. */
"wrapClass": ["current-user-class"],
/* The container items. */
"items": []
}
}
]
};
}); -
Click Save on the Module Designer's toolbar.
Outcome of the example
After you refresh the web page, Creatio will display the full name of the current user and a hyperlink to their contact page. Hover over the link to bring up the mini page that contains the data of the current user.
