Send email from an existing account using business process
Before you implement the example, add the email provider. Instructions: Set up the Microsoft Exchange and Microsoft 365 services (user documentation).
To implement the example:
- Create a business process. Read more >>>
- Implement a separate page to fill out the email parameters. Read more >>>
- Set up the email template. Read more >>>
- Set up the business process parameters. Read more >>>
- Set up the business process methods. Read more >>>
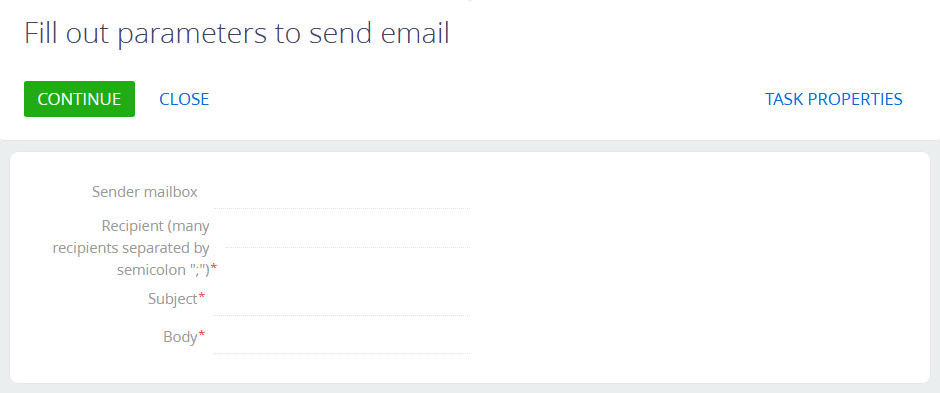
Create a "Send emails from existing account" business process that generates a "Fill out parameters to send email" page. The page sends an email that has the following parameters using an existing account:
- Sender mailbox that contains the mailbox of email sender
- Recipient (many recipients separated by semicolon ";") that contains the list of the recipient mailboxes. Required.
- Subject that contains the email subject. Required.
- Body that contains the email body. Required.

1. Create a business process
-
Open the Configuration section. Instructions: Open the Configuration section.
-
Create a package. Instructions: Create a user-made package using Configuration section.
For this example, create the
sdkSendEmailFromExistingAccountpackage. -
Add the package properties.
- Open the package properties. To do this, click
 → Properties. This opens the Dependencies tab on the Package properties page.
 - Click Add in the Depends on Packages block. This opens the Select package window.
- Select the checkbox for the
CrtBaseConstspackage. TheCrtBaseConstspackage includes theIntegrationApi.dllexternal assembly. - Click Select.
- Apply the changes.
- Open the package properties. To do this, click
-
Change the current package. Instructions: Change the current package.
For this example, change the current package to
sdkSendEmailFromExistingAccountuser-made package. -
Create the business process schema. To do this, click Add → Business process.
-
Open the Settings tab.
-
Fill out the schema properties.
For this example, use the following schema properties.
Property
Property value
Title
Send emails from existing account
Code
UsrSendEmailFromExistingAccountProcess
-
Save the changes.
As a result:
- The "Send emails from existing account" business process will be created.
- Creatio will add the "Send emails from existing account" business process to the Process library section.

2. Implement a separate page to fill out the email parameters
-
Add an auto-generated page.
-
Click
 → place the Auto-generated page element between the Simple and Terminate page elements in the working area of the Process Designer.
 -
Fill out the element properties.
Property
Property value
Title
Fill out the email parameters
Page title
Fill out parameters to send email
Creatio populates the Contact property using the "[#System variable.Current user contact#]" value.
-
-
Add a button.
For this example, add a button that sends the email. To do this:
-
Go to the Buttons block.
-
Click
 and fill out the button properties.
Property
Property value
Caption
Continue
Code
ContinueButton
Style
Green
-
Save the changes.
As a result, the Buttons property block of the "Fill out the email parameters" auto-generated page will be as follows.

-
-
Add the email parameters.
For this example, add the following parameters:
- parameter that contains the mailbox of email sender
- parameter that contains the list of the recipient mailboxes
- parameter that contains the email subject
- parameter that contains the email body
To do this:
-
Go to the Page Items block.
-
Click
 and select a parameter of the needed type.
 -
Fill out the parameter properties.
Element
Element type
Property
Property value
Parameter that contains the mailbox of email sender
Selection field
Title
Sender mailbox
Code
SenderMailbox
Data source
Mailbox synchronization settings
View
Drop down list
Parameter that contains the list of the recipient mailboxes
Text field
Title
Recipient (many recipients separated by semicolon ";")
Code
Recipient
Required
Select the checkbox
Parameter that contains the email subject
Text field
Title
Subject
Code
Subject
Required
Select the checkbox
Parameter that contains the email body
Text field
Title
Body
Code
Body
Required
Select the checkbox
As a result, the Page Items property block of the "Fill out the email parameters" auto-generated page will be as follows.

3. Implement sending emails
-
Add a Script task element. To do this, click
 → place the Script task element between the Auto-generated page user action and Terminate page element in the working area of the Process Designer.
 -
Fill out the element properties.
Property
Property value
Title
Send email
-
Implement the logic of working with process parameters. To do this, go to the element setup area and add the source code.
Send email script task// IMPORTANT: When implementing
// long-running operations,
// it is crucial to enable timely and
// responsive cancellation. To achieve
// this, ensure that your code
// is designed to respond appropriately
// to cancellation requests using
// the context.CancellationToken
// mechanism. For more detailed
// information and examples,
// please, refer to our documentation.
/* ID of selected mailbox. */
var mailBoxSettingId = Get<Guid>("SenderMailbox");
/* Create an instance of the "EmailClientFactory." */
var emailClientFactory = ClassFactory.Get<IEmailClientFactory>(
new ConstructorArgument("userConnection", UserConnection));
/* Create an instance of the "IEmailSender." */
var emailSender = ClassFactory.Get<IEmailSender>(
new ConstructorArgument("emailClientFactory", emailClientFactory),
new ConstructorArgument("userConnection", UserConnection));
var entity = UserConnection.EntitySchemaManager.GetInstanceByName("MailboxSyncSettings").CreateEntity(UserConnection);
if (entity.FetchFromDB("Id", mailBoxSettingId, new List<string> { "SenderEmailAddress" })) {
/* Receive the sender mailbox from selected mailbox. */
var senderEmailAddress = entity.GetTypedColumnValue<string>("SenderEmailAddress");
/* Fill out the email parameters. */
var message = new Terrasoft.Mail.Sender.EmailMessage {
/* Mailbox of email sender. */
From = senderEmailAddress,
/* List of the recipient mailboxes. */
To = Get<string>("Recipient").Split(';').ToList<string>(),
/* List of the recipient mailboxes to send copy of the email. Optional.
Cc = List<string>{ "first@recepient.co", "second@recepient.co"},
List of the recipient mailboxes to send blind copy of the email. Optional.
Bcc = List<string>{ "first@recepient.co", "second@recepient.co"},*/
/* Email subject. */
Subject = Get<string>("Subject"),
/* Email body. */
Body = Get<string>("Body"),
/* Email priority. The value from the "Terrasoft.Mail.Sender.EmailPriority" enumeration. */
Priority = Terrasoft.Mail.Sender.EmailPriority.Normal
};
/* If needed, attach file to the email. */
/* Create an attachment. */
var attachment = new Terrasoft.Mail.Sender.EmailAttachment {
/* Attachment ID. */
Id = Guid.NewGuid(),
/* Attachment title. For example, "Some file.txt." */
Name = "Some file.txt",
/* Attachment data. For example, "Some data." */
Data = Encoding.ASCII.GetBytes("Some data")
};
/* Attach file to the email. */
message.Attachments.Add(attachment);
/* Send the email. */
emailSender.Send(message);
}
return true;
4. Set up the business process parameters
-
Open the properties of the business process schema. To do this, click an arbitrary place in the working area of the Process Designer.
-
Open the Parameters tab.
-
Add the business process parameters.
For this example, add the following parameters:
- parameter that contains the mailbox of email sender
- parameter that contains the list of the recipient mailboxes
- parameter that contains the email subject
- parameter that contains the email body
To do this:
-
Click Add parameter and select a parameter of the needed type.
-
Fill out the parameter properties.
Element
Element type
Property
Property value
Parameter that contains the mailbox of email sender
Other → Unique identifier
Title
Sender mailbox
Code
SenderMailbox
Value
Click
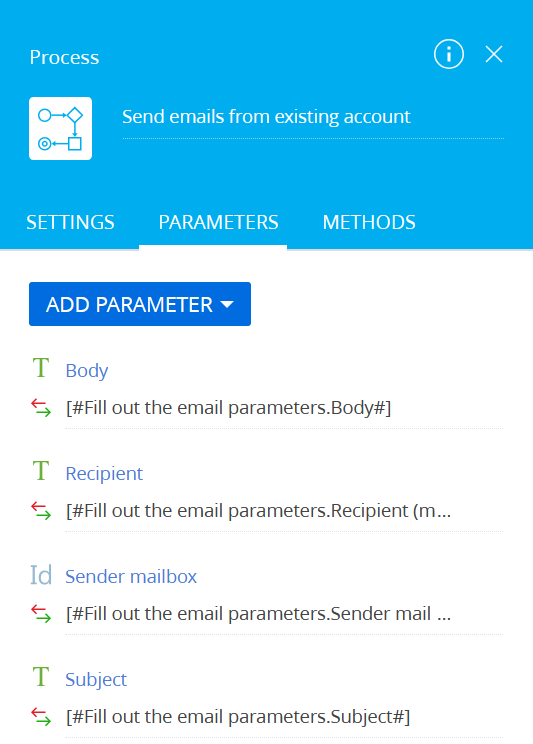
 → Process parameter → Sender mailbox → Select. This populates the property using the "[#Fill out the email parameters.Sender mailbox#]" value.
Parameter that contains the list of the recipient mailboxes
Text
Title
Recipient
Code
Recipient
Value
Click
 → Process parameter → Recipient (many recipients separated by semicolon ";") → Select. This populates the property using the "[#Fill out the email parameters.Recipient (many recipients separated by semicolon ";")#]" value.
Parameter that contains the email subject
Text
Title
Subject
Code
Subject
Value
Click
 → Process parameter → Subject → Select. This populates the property using the "[#Fill out the email parameters.Subject#]" value.
Parameter that contains the email body
Text
Title
Body
Code
Body
Value
Click
 → Process parameter → Body → Select. This populates the property using the "[#Fill out the email parameters.Body#]" value.
As a result, the Parameters tab of the "Send emails from existing account" business process will be as follows.

5. Set up the business process methods
-
Open the properties of the business process. To do this, click an arbitrary place in the working area of the Process Designer.
-
Open the Methods tab.
-
Add the business process methods.
-
Click
 and fill out the method properties.
Property
Property value
Namespace
Terrasoft.Configuration
-
Click Save.
-
Add the following methods similarly.
- Terrasoft.Mail.Sender
- Terrasoft.Core.Factories
- Terrasoft.Core
- Terrasoft.Mail
- IntegrationApi
- System.Linq
-
-
Save the changes.
-
Publish the changes.
As a result:
-
The Methods tab of the "Send emails from existing account" business process will be as follows.

-
The diagram of the "Send emails from existing account" business process will be as follows.

View the result
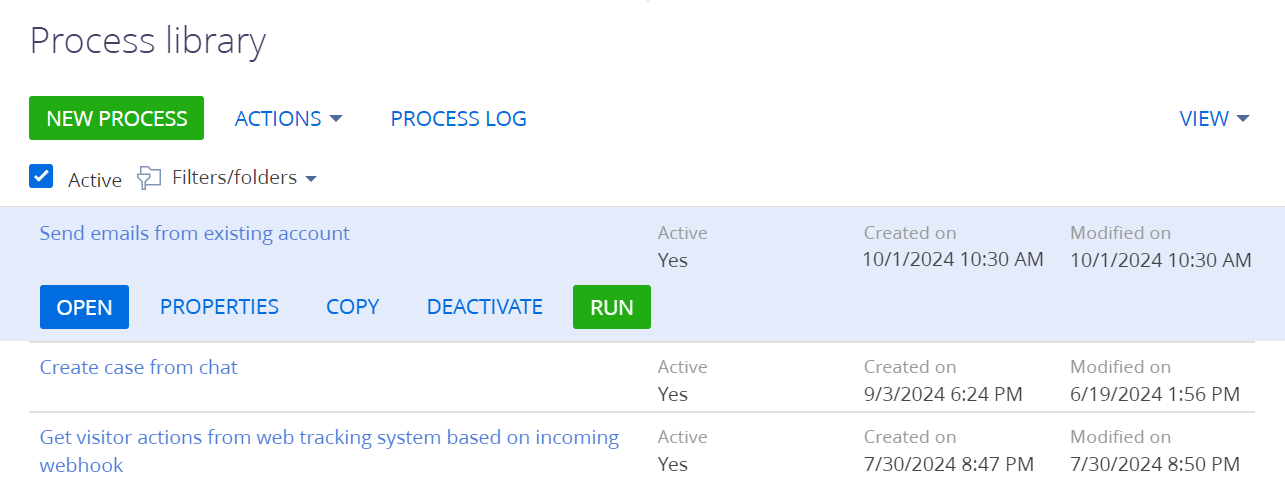
- Open the Process library section. To do this, click
 → Processes → Process library.
 - Select the "Send emails from existing account" business process in the section list.
- Run the business process. To do this, click Run.
- Open the Process log section. To do this, click Process log.
- Open the "Send emails from existing account" business process.
- Open the "Fill out parameters to send email" page. To do this, go to the Process elements expanded list → Fill out parameters to send email → click Run item.
As a result:
-
Creatio will run a "Send emails from existing account" business process.

-
The "Send emails from existing account" business process will generate a "Fill out parameters to send email" page.

-
The "Fill out parameters to send email" page will include the parameters to send the email using an existing account. View the result >>>
To send an email, fill out the parameters and click Continue.
Source code
// IMPORTANT: When implementing
// long-running operations,
// it is crucial to enable timely and
// responsive cancellation. To achieve
// this, ensure that your code
// is designed to respond appropriately
// to cancellation requests using
// the context.CancellationToken
// mechanism. For more detailed
// information and examples,
// please, refer to our documentation.

/* ID of selected mailbox. */
var mailBoxSettingId = Get<Guid>("SenderMailbox");

/* Create an instance of the "EmailClientFactory." */
var emailClientFactory = ClassFactory.Get<IEmailClientFactory>(
new ConstructorArgument("userConnection", UserConnection));

/* Create an instance of the "IEmailSender." */
var emailSender = ClassFactory.Get<IEmailSender>(
    new ConstructorArgument("emailClientFactory", emailClientFactory),
    new ConstructorArgument("userConnection", UserConnection));

var entity = UserConnection.EntitySchemaManager.GetInstanceByName("MailboxSyncSettings").CreateEntity(UserConnection);
if (entity.FetchFromDB("Id", mailBoxSettingId, new List<string> { "SenderEmailAddress" })) {

    /* Receive the sender mailbox from selected mailbox. */
    var senderEmailAddress = entity.GetTypedColumnValue<string>("SenderEmailAddress");

    /* Fill out the email parameters. */
    var message = new Terrasoft.Mail.Sender.EmailMessage {

        /* Mailbox of email sender. */
        From = senderEmailAddress,

        /* List of the recipient mailboxes. */
        To = Get<string>("Recipient").Split(';').ToList<string>(),

        /* List of the recipient mailboxes to send copy of the email. Optional.
        Cc = List<string>{ "first@recepient.co", "second@recepient.co"},

        List of the recipient mailboxes to send blind copy of the email. Optional.
        Bcc = List<string>{ "first@recepient.co", "second@recepient.co"},*/

        /* Email subject. */
        Subject = Get<string>("Subject"),

        /* Email body. */
        Body = Get<string>("Body"),

        /* Email priority. The value from the "Terrasoft.Mail.Sender.EmailPriority" enumeration. */
        Priority = Terrasoft.Mail.Sender.EmailPriority.Normal
    };

    /* If needed, attach file to the email. */

    /* Create an attachment. */
    var attachment = new Terrasoft.Mail.Sender.EmailAttachment {

        /* Attachment ID. */
        Id = Guid.NewGuid(),

        /* Attachment title. For example, "Some file.txt." */
        Name = "Some file.txt",

        /* Attachment data. For example, "Some data." */
        Data = Encoding.ASCII.GetBytes("Some data")
    };

    /* Attach file to the email. */
    message.Attachments.Add(attachment);

    /* Send the email. */
    emailSender.Send(message);
}

return true;