Add a custom widget to the mobile app
The Mobile Creatio application supports dashboards since version 7.10.3 (version 7.10.5 of the mobile application). To receive settings and data for a dashboard, use the AnalyticsService service (AnalyticsService). The following widget types are supported: "Chart", "Indicator", "List" and "Gauge."
To add a custom widget to the mobile application:
- Implement a widget setup interface in the Creatio application.
- Add the instance of the implemented custom widget to the application.
- Configure the display of the widget in the mobile application.
This article only describes the implementation of widget display in the mobile application.
To display a custom widget in the mobile application:
- Implement the data receiving process of a custom widget.
- Add the implementation of displaying the widget in the mobile application.
Add a custom widget to the dashboards page of the mobile application.
Example implementation algorithm
1. Implementation of the data receiving process of a custom widget
To receive data of each custom widget type, create a class that will implement the IDashboardItemData interface or will be inherited from the BaseDashboardItemData base class. To do this, the class must be decoded by the DashboardItemData attribute. To implement the class, add the Source code schema to the user-made package.
The class implementation to the CustomDashboardItem custom widget type.
namespace Terrasoft.Configuration
{
    using System;
    using Newtonsoft.Json.Linq;
    using Terrasoft.Core;

    // Attribute indicating the custom widget type.
    [DashboardItemData("CustomDashboardItem")]
    public class CustomDashboardItemData : BaseDashboardItemData
    {
        // Class constructor.
        public CustomDashboardItemData(string name, JObject config, UserConnection userConnection, int timeZoneOffset)
            : base(name, config, userConnection, timeZoneOffset)
        {

        }
        // A method that returns the required data.
        public override JObject GetJson()
        {
            JObject itemObject = base.GetJson();
            itemObject["customValue"] = DateTime.Now.ToString();
            return itemObject;
        }
    }
}
2. Implementation of displaying a custom type of a widget.
2.1. Add a data displaying class
To do this, create a client module in a user-made package (for example, UsrMobileCustomDashboardItem). In the created module, implement a class that extends the Terrasoft.configuration.controls.BaseDashboardItem base class.
Ext.define("Terrasoft.configuration.controls.CustomDashboardItem", {
    extend: "Terrasoft.configuration.controls.BaseDashboardItem",
    // Displays the value transferred through the customValue property.
    updateRawConfig: function(config) {
        this.innerHtmlElement.setHtml(config.customValue);
    }

});
2.2. Add a new type and a class that implements this type to the Terrasoft.DashboardItemClassName enumeration
Add the source code to the module created on a previous step.
Terrasoft.DashboardItemClassName.CustomDashboardItem = "Terrasoft.configuration.controls.CustomDashboardItem";
2.3. Add a name of a new custom schema to the mobile application manifest
In the mobile application manifest file, add the name of the created module schema to the CustomSchemas schema section.
{
    "SyncOptions": {
        ...
    },
    "CustomSchemas": ["UsrMobileCustomDashboardItem"],
    "Modules": {...},
    "Models": {...}
}
After saving all changes, the widget will be displayed in the Dashboars section of the mobile application.
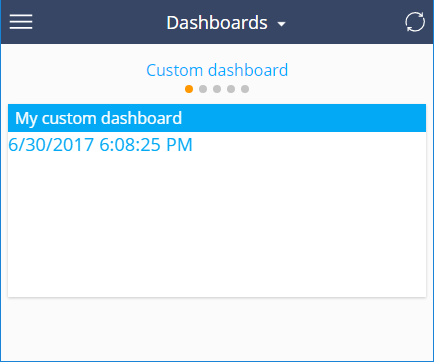
Add the dashboard widget to the main Creatio application. The mobile application will be synchronized with the main application and the widget will be displayed there.