Develop custom functions using TypeScript
You can use languages that can be compiled to JavaScript when developing the file contents of the custom functionality. For example, TypeScript. Learn more about TypeScript in documentation.
When a user saves the account record, validate the value of the Also known as field and display the message with the validation results. The field must contain only letters. Code the validation logic in TypeScript.
1. Install TypeScript
One way to install TypeScript is to use the NPM package manager for Node.js.
To install TypeScript:
-
Make sure your OS has the
Node.jsruntime environment. -
Run the following command at the Windows console:
TypeScript installation commandnpm install -g typescript
2. Switch to the file system development mode
To set up Creatio for file system development:
-
Enable the file system development mode.
Set the value of the
fileDesignModeelement'senabledattribute totruein theWeb.configfile in Creatio root directory. -
Disable the retrieval of static file content from the file system.
Set the
UseStaticFileContentflag tofalsein theWeb.configfile in Creatio root directory.Web.config<filedesignmode enabled="true"/>
...
<add key="UseStaticFileContent" value="false"/> -
Compile Creatio.
Run the Compile all action in the Configuration section.

-
Grant IIS access to the configuration directory.
To ensure Creatio works with the configuration project correctly, grant the OS user on whose behalf you run the IIS application pool full access to the
[Path to Creatio]\Terrasoft.WebApp\Terrasoft.Configurationdirectory. Usually, this is a built-inIIS_IUSRSuser.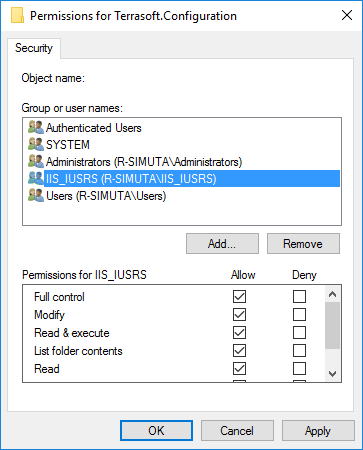
Learn more about the file system development mode: External IDEs. Visual Studio.
3. Establish the structure of the file content storage
To establish the structure of the file content storage:
-
Create the
Filesdirectory in the user-made package downloaded to the file system. -
Create the
srcsubdirectory in theFilesdirectory. -
Create the
jssubdirectory in thesrcdirectory. -
Create the
descriptor.jsonfile in theFilesdirectory.descriptor.json{
"bootstraps": [
"src/js/bootstrap.js"
]
} -
Create the
bootstrap.jsfile in theFiles\src\jsdirectory.bootstrap.js(function() {
require.config({
paths: {
LettersOnlyValidator: Terrasoft.getFileContentUrl(
"sdkTypeScript",
"src/js/LettersOnlyValidator.js"
),
},
});
})();
4. Code the validation in TypeScript
To code the validation in TypeScript:
-
Create the
Validation.tsfile in theFiles\src\jsdirectory and declare theStringValidatorinterface in the file.Validation.tsinterface StringValidator {
isAcceptable(s: string): boolean;
}
export = StringValidator; -
Create the
LettersOnlyValidator.tsfile in theFiles\src\jsdirectory. Declare theLettersOnlyValidatorclass that implements theStringValidatorinterface in the file.LettersOnlyValidator.ts// Import the module that implements the StringValidator interface.
import StringValidator = require("Validation");
// The new class must belong to the Terrasoft namespace (module).
module Terrasoft {
// Declare the value validation class.
export class LettersOnlyValidator implements StringValidator {
// The regular expression that only accepts letters.
lettersRegexp: any = /^[A-Za-z]+$/;
// The validating method.
isAcceptable(s: string) {
return !Ext.isEmpty(s) && this.lettersRegexp.test(s);
}
}
}
// Create and export a class instance for require.
export = new Terrasoft.LettersOnlyValidator();
5. Compile the TypeScript source code to JavaScript source code
To compile the TypeScript source code to JavaScript source code:
-
Add the
tsconfig.jsonconfiguration file to theFiles\src\jsdirectory to set up the compilation.tsconfig.json{
"compilerOptions":
{
"target": "es5",
"module": "amd",
"sourceMap": true
}
} -
Go to the
Files\src\jsdirectory via the Windows console and run thetsccommand.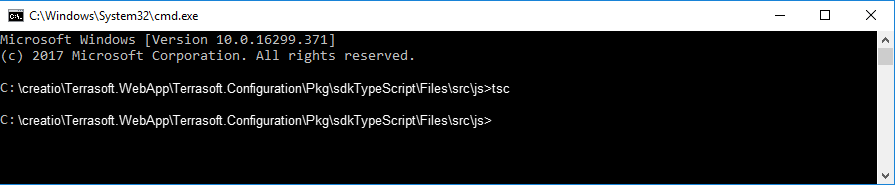
As a result, Windows will create the JavaScript version of the
Validation.tsandLettersOnlyValidator.tsfiles, as well as the *.map files that streamline debugging in the browser, in theFiles\src\jsdirectory.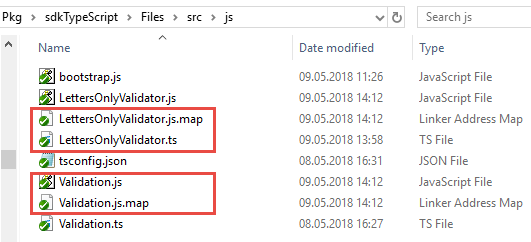
The contents of the automatically generated
LettersOnlyValidator.jsfile to be used in Creatio.LettersOnlyValidator.jsdefine(["require", "exports"], function(require, exports) {
"use strict";
var Terrasoft;
(function(Terrasoft) {
var LettersOnlyValidator = /** @class */ (
(function() {
function LettersOnlyValidator() {
this.lettersRegexp = /^[A-Za-z]+$/;
}
LettersOnlyValidator.prototype.isAcceptable = function(s) {
return !Ext.isEmpty(s) && this.lettersRegexp.test(s);
};
return LettersOnlyValidator;
})()
);
Terrasoft.LettersOnlyValidator = LettersOnlyValidator;
})(Terrasoft || (Terrasoft = {}));
return new Terrasoft.LettersOnlyValidator();
});
//# sourceMappingURL=LettersOnlyValidator.js.map
6. Generate the auxiliary files
To generate the _FileContentBootstraps.js and FileContentDescriptors.js auxiliary files:
- Go to the Configuration section.
- Run the Update packages from file system action to upload packages from the file system.
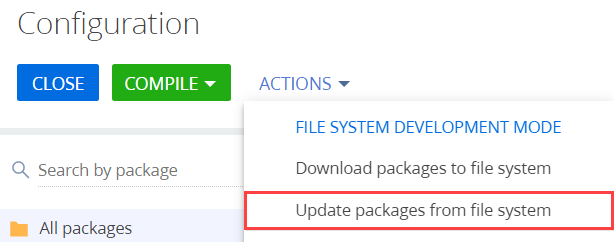
- Run the Compile all action to apply the changes to the
bootstrap.jsfile.
7. Verify the example implementation results
To enable the validation:
- Go to the Configuration section.
- Run the Update packages from file system action to upload packages from the file system.
- Create the replacing view model schema for the account page.

-
Run the Download packages to the file system action to download packages to the file system.
-
Modify the
..\sdkTypeScript\Schemas\AccountPageV2\AccountPageV2.jsfile in the file system...\sdkTypeScript\Schemas\AccountPageV2\AccountPageV2.js// Declare the module and its dependencies.
define("AccountPageV2", ["LettersOnlyValidator"], function(LettersOnlyValidator) {
return {
entitySchemaName: "Account",
methods: {
// The validation method.
validateMethod: function() {
// Determine if the value of the AlternativeName column is valid.
var res = LettersOnlyValidator.isAcceptable(this.get("AlternativeName"));
// Display the results to the user.
Terrasoft.showInformation("Is 'Also known as' field valid: " + res);
},
// Redefine the parent schema method called when saving the record.
save: function() {
// Call the validation method.
this.validateMethod();
// Call the base functionality.
this.callParent(arguments);
}
},
diff: /**SCHEMA_DIFF*/ [] /**SCHEMA_DIFF*/
};
}); -
Save the file with the schema source code and refresh the account page.
Creatio will validate the field and display the message with the validation results when you save the record.

