External IDEs basics
External IDEs let you create, edit, and compile Creatio solution code as well as debug it, develop in a multi-user environment, use version control systems, and much more. Use an external IDE like Visual Studio or WebStorm to speed up Creatio solution development. You can use Community, Professional, Enterprise editions of Microsoft Visual Studio version 2017 (with latest updates) and later to develop in the file system.
Development in the file system
Creatio lets you use file system development mode only for environments deployed on-site.
Creatio supports external IDEs using the file system development mechanism of configuration packages.
File system development mode lets you:
- Download package contents from the database as files.
- Edit the schema source code using the IDE.
- Upload changed packages to the database.
File system development mode has the following special features:
-
If file system development mode is enabled, only schemas of the Source code and Client module types support full-fledged development.
ImportantIf file system development mode is enabled and you save schemas of the Source code and Client module types in the Creatio IDE, Creatio will also save resources of those schemas to the file system.
The following rules apply to other package elements, for example, resources or SQL scripts:
- After you download the elements from the database to the file system, the downloaded elements will replace the elements in the file system. Schemas of the Source code and Client module type are not replaced.
- After you upload the elements from the file system to the database, the uploaded elements will replace the existing elements in the database. Creatio will still work with schemas of the Source code and Client module types from the file system.
-
If file system development mode is enabled, integrate a version control system (SVN) using a third-party tool instead of the out-of-the-box Creatio SVN integration.
The Configuration section still lets you install packages from the SVN repository to help to manage all the connected packages. We recommend using third-party utilities, such as TortoiseSVN, to install individual packages.
To use the out-of-the-box SVN repository integration, disable file system development mode.
Set up Creatio to work with the file system
-
Enable file system development mode.
For .NET Framework:
- Open the
Web.configfile in Creatio root directory. - Go to the
fileDesignModeelement. - Set the
enabledattribute totrue.
For .NET:
- Open the
Terrasoft.WebHost.dll.configfile in Creatio root directory. - Go to the
fileDesignModeelement. - Set the
enabledattribute totrue.
Enable file system development mode<fileDesignMode enabled="true"/> - Open the
-
Disable the retrieval of static file content from the file system. File system development mode is not currently set up to work with retrieving static content from files that have already been generated. To ensure that file system development mode works correctly, disable retrieving static client content from the file system.
For .NET Framework:
- Open the
Web.configfile in Creatio root directory. - Set the
UseStaticFileContentflag tofalse.
For .NET:
- Open the
Terrasoft.WebHost.dll.configfile in Creatio root directory. - Set the
UseStaticFileContentflag tofalse.
Enable file system development mode<add key="UseStaticFileContent" value="false"/>This activates the File system development mode action group in the Configuration section. Learn more: Manage the file system.
- Open the
-
Compile Creatio. To do this, execute the Compile all action in the Configuration Creatio section.
-
Grant IIS access to the configuration directory.
To make sure Creatio works as intended with the configuration project, grant the OS user who runs the IIS application pool full access to the
[Path to Creatio]\Terrasoft.WebApp\Terrasoft.Configurationdirectory. Usually, this is a built-inIIS_IUSRSuser.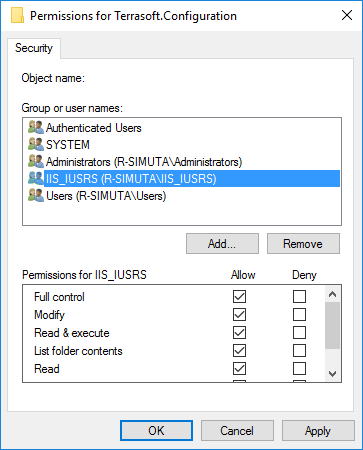
Manage packages
Create a package
If you are not using SVN, the procedure to with file system development mode enabled is the same as the general procedure. Learn more: Create a user-made package using Configuration section.
If you do not fill out the Version control system repository field, Creatio does not bind the package to a repository. You can version such a package only if you connect it from the file system manually. Instructions: Create a package in the file system development mode.
Add a configuration element
We recommend adding new configuration elements to the package only from the Configuration section. To create and edit a new configuration element in a user-made package:
-
Open the Configuration section. Instructions: Open the Configuration section.
-
Select a user-made package to add the schema.
-
Add a schema. Instructions: Configuration elements.
-
Download packages to file system. To do this, click Actions → File system development mode group → Download packages to file system.
-
Edit the source code of the schema or localizable resource stored in the files of the
...\Terrasoft.WebApp\Terrasoft.Configuration\Pkg\SomePackagedirectory using the external IDE, for example, Visual Studio. -
Update packages from file system. To do this, click Actions → File system development mode group → Update packages from file system.
Changes to client schemas are available in Creatio immediately. You do not need to upload the client schemas from the file system. You only need to refresh the browser page.
-
Compile the configuration if you changed schemas of the Source code type.
noteWhen developing configuration element schemas of the Source code type, it is more convenient to compile the code directly in Visual Studio, rather than in the Configuration section in Creatio. Learn more: Save, compile, and debug the source code.
Write C# code
Compilation options in Visual Studio
-
Use the default Visual Studio compiler. However, this option might not take into account package dependencies and positions.
-
Use the WorkspaceConsole utility integrated with Visual Studio. The option has the following advantages:
- Compilation is sped up since the configuration assembly is divided into separate compilable modules. The utility recompiles only modules whose packages were changed.
- You do not need to exit debugging mode or detach from the IIS process to recompile a configuration assembly.
Set up WorkspaceConsole for compilation
-
Enable file system development mode for WorkspaceConsole.
The WorkspaceConsole utility is delivered together with Creatio. Before using the utility, ensure that it is set up correctly. Besides general setup, enable file system development mode:
-
Open the
..\Terrasoft.WebApp\DesktopBin\WorkspaceConsole\Terrasoft.Tools.WorkspaceConsole.exe.configconfiguration file. -
Go to the
fileDesignModeelement. -
Set the
enabledattribute totrue.Enable file system development mode<fileDesignMode enabled="true" /> -
Divide the configuration assembly into separate compilable modules to speed up compilation.
- Open the
Web.configfile in Creatio root directory. - Go to the
appSettingselement. - Set the
CompileByManagerDependencieskey totrue. - Open the
..\Terrasoft.WebApp\DesktopBin\WorkspaceConsole\Terrasoft.Tools.WorkspaceConsole.exe.configfile. - Go to the
appSettingselement. - Set the
CompileByManagerDependencieskey totrue.
Divide the configuration assembly<appSettings>...<add key="CompileByManagerDependencies" value="true" />...</appSettings> - Open the
-
-
Integrate Microsoft Visual Studio with WorkspaceConsole.
-
Go to the Microsoft Visual Studio's toolbar → click Tools → External Tools....
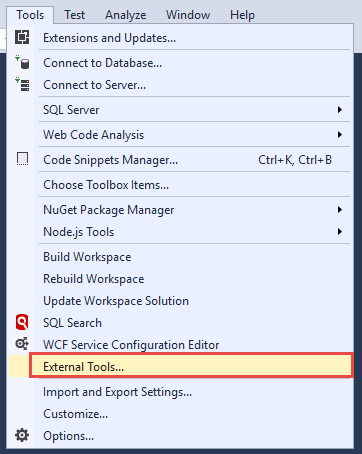
This opens a window.
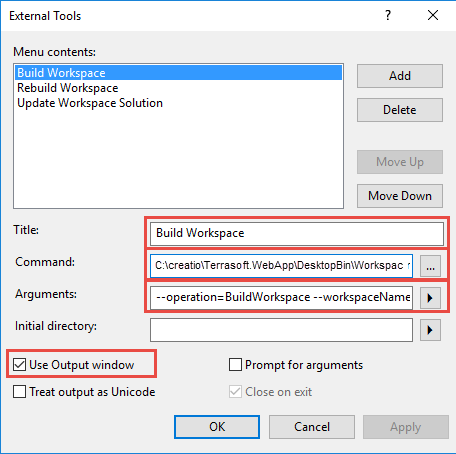
-
Click Add.
-
Fill out the command properties.
Property
Property value
Build Workspace command
Title
Build Workspace
Command
[Path to the directory that contains an installed Creatio instance]\Terrasoft.WebApp\DesktopBin\WorkspaceConsole\Terrasoft.Tools.WorkspaceConsole.exe
Arguments
-operation=BuildWorkspace -workspaceName=Default -webApplicationPath="[Path to the directory that contains an installed Creatio instance]\Terrasoft.WebApp" -confRuntimeParentDirectory="[Path to the directory that contains an installed Creatio instance]\Terrasoft.WebApp"
Use Output window
Select the checkbox
Rebuild Workspace command
Title
Rebuild Workspace
Command
[Path to the directory that contains an installed Creatio instance]\Terrasoft.WebApp\DesktopBin\WorkspaceConsole\Terrasoft.Tools.WorkspaceConsole.exe
Arguments
-operation=RebuildWorkspace -workspaceName=Default -webApplicationPath="[Path to the directory that contains an installed Creatio instance]\Terrasoft.WebApp" -confRuntimeParentDirectory="[Path to the directory that contains an installed Creatio instance]\Terrasoft.WebApp"
Use Output window
Select the checkbox
Update Workspace Solution command
Title
Update Workspace Solution
Command
[Path to the directory that contains an installed Creatio instance]\Terrasoft.WebApp\DesktopBin\WorkspaceConsole\Terrasoft.Tools.WorkspaceConsole.exe
Arguments
-operation=UpdateWorkspaceSolution -workspaceName=Default -webApplicationPath="[Path to the directory that contains an installed Creatio instance]\Terrasoft.WebApp" -confRuntimeParentDirectory="[Path to the directory that contains an installed Creatio instance]\Terrasoft.WebApp"
Use Output window
Select the checkbox
-
Set up debugging
-
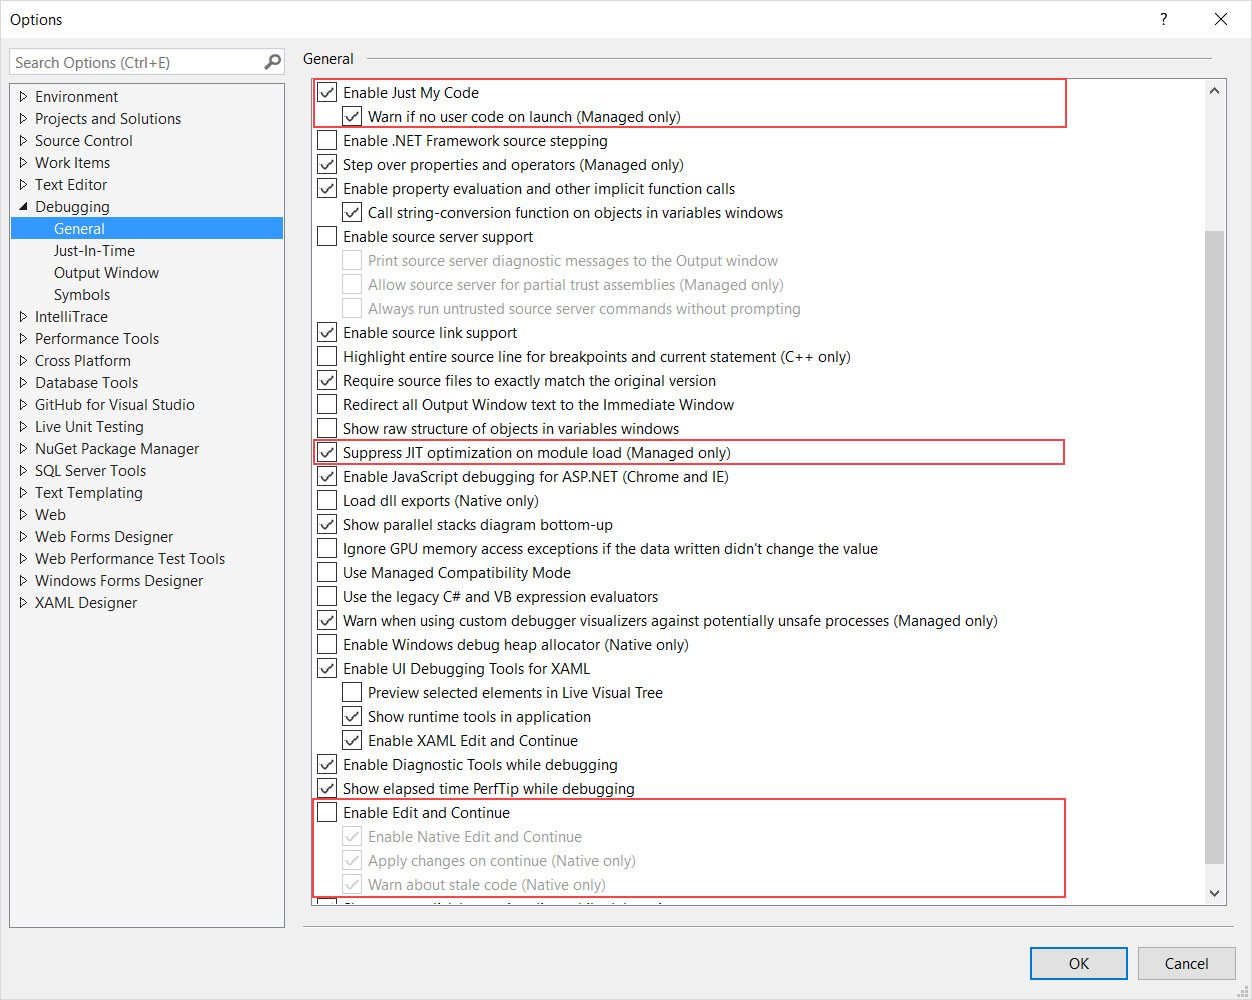
Go to the Microsoft Visual Studio's toolbar → click Debug → Options.... This opens a window.
-
Change the debugging settings.
- Select the Enable Just My Code checkbox to ensure that the debugger does not try parsing source code that is not a part of the project.
- Clear the Enable Edit and Continue checkbox. Since Creatio restarts automatically after the configuration compilation, the setting is not supported.
- Select the Suppress JIT optimization on module load checkbox to ensure the debugger stops at breakpoints correctly.
Write C# code in a configuration project
The Terrasoft.Configuration.sln configuration project is a Visual Studio solution delivered together with Creatio and located in the [Path to Creatio]\Terrasoft.WebApp\Terrasoft.Configuration directory.
The configuration project has the following advantages for development:
- The configuration project is a fully configured solution for developing complex back-end functionality.
- You can use the entire scope of the IDE functionality: debugging, refactoring, autocomplete, etc.
The configuration project has the following limitations:
- Performance is relatively low since the entire configuration part of Creatio (
Terrasoft.Configuration.dll) is recompiled. - File system development mode of C# code is possible only by interacting with the on-site Creatio database.
To begin file system development mode using a configuration project, open [Path to Creatio]\Terrasoft.WebApp\Terrasoft.Configuration\Terrasoft.Configuration.sln in Visual Studio.
View the configuration project structure in the table below.
Directory | Description |
|---|---|
Lib | Stores the downloaded third-party class libraries bound to packages. |
Autogenerated\Src | Stores the files that contain the autogenerated source code for pre-installed package schemas. The files are non-editable. |
Pkg | Stores the downloaded packages required for file system development mode. |
bin | Stores the downloaded compiled configuration and third-party libraries. |
Write C# code in a custom project
The custom project is an individual class library project that is preconfigured for interaction with Creatio.
To debug and test the development results in a custom project, you can use a local database connected via the WorkspaceConsole utility or Creatio in the cloud connected via the special Executor utility.
Development in a custom project has the following advantages:
- Speed of change testing, compilation and execution is high.
- Visual Studio functionality is fully supported.
- Any tools within the continuous integration pipeline are supported, for example, unit testing.
- Project setup is simple and does not require the configuration source code.
- Both Creatio on-site and cloud databases are supported. Creatio in the cloud supports PostgreSQL only.
Development in a custom project has the following limitations:
- Only the development and debugging of individual classes or small back-end functionality blocks are supported.
- Required Creatio class libraries must be added to the project dependencies individually.
Write JavaScript code
To develop front-end functionality using external IDEs, follow these steps:
- Open the Configuration section. Instructions: Open the Configuration section.
- Enable the file system development mode. Read more >>>
- Create, obtain, or update a package from the SVN repository.
- Create the Client module schema type. Instructions: Configuration elements of the Client module type.
- Download the schema from the database to the file system.
- Implement the schema source code using an external IDE. To do this, open the file that contains the schema source code in the preferred IDE (or any text editor) and add the needed source code.
- Save the changes.
- Debug the source code.
- Refresh the browser page that has Creatio open every time you make changes to the schema source code. This can slow down the development significantly. To mitigate this, we developed functionality that reloads the browser page automatically after the source code is changed.
Set up the automatic display of JavaScript code changes
When Creatio starts, it creates an object that tracks changes to the *.js file that contains the source code of the developed module in the file system. If changes are made, a message is sent to the client Creatio instance notifying it of the changes. An object in the client application listens to the message, defines the objects that the changed module uses, destroys connections, registers new paths to modules, and attempts to reload the changed module. As a result, the browser requests the initialized modules from new paths, and the modules load changes from the file system.
The automatic display of JavaScript code changes has the following advantages:
- It will save you time spent on the interpretation and load of other modules. The individual development page lets you omit loading a number of auxiliary modules, for example, left and right panel, notification panel, etc.
- This reduces the number of server requests.
- It will help you detect redundant module connections. This approach to the development of individual modules lets you find unnecessary dependencies early and eliminate them.
The automatic display of changes to the JavaScript code has the following limitations:
- Code syntax errors cause issues. If the module source code has a syntax error, Creatio does not refresh the page automatically. You have to force a refresh, for example, by pressing F5. Once the error is fixed, the page becomes operable again.
- Module coupling is strong. Not all Creatio modules can be downloaded separately.
To enable the automatic display of JavaScript code changes:
-
Install the JavaScriptOnlineLoader package.
-
Enable file system development mode. Read more >>>
-
Add the
JavaScriptOnlineLoaderdirectory that contains the needed package to the[Path to Creatio]\Terrasoft.WebApp\Terrasoft.Configuration\Pkgdirectory.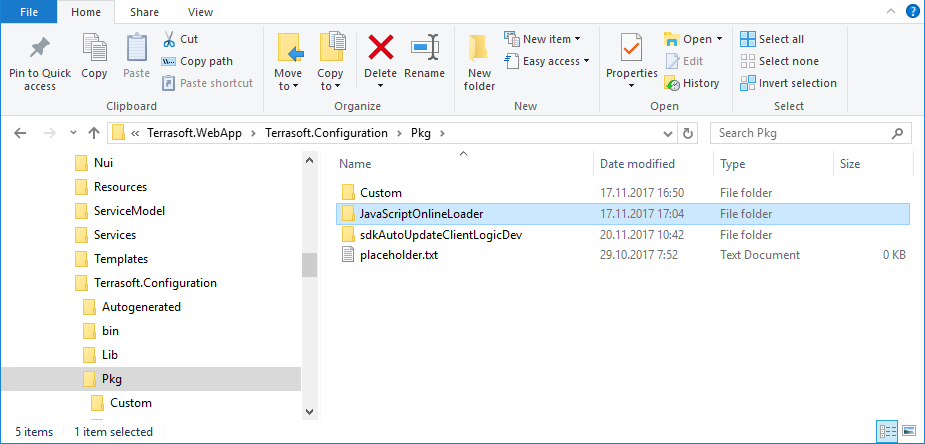 Important
The package is available on GitHub. You can also download the package archive via the following link: Download package.
-
Click Actions → File system development mode group → Update packages from file system.
As a result, Creatio will display the package in the package workspace.
-
-
Open the page of the developed module in the browser. To do this, open the
ViewModule.aspxpage with the following parameter added:?vm=DevViewModule#CardModuleV2/<Module name>For example, the user-made package includes a
KnowledgeBasePageV2schema that replaces the schema of the Knowledge base section edit page.URL of the KnowledgeBasePageV2 page that contains the functionality that displays changes automaticallyhttp://localhost/creatio/0/Nui/ViewModule.aspx?vm=DevViewModule#CardModuleV2/KnowledgeBasePageV2where
http://localhost/creatiois the URL of Creatio on-site.Follow the URL to open the
ViewModule.aspxpage that contains the loaded module. -
Change the source code of the developed schema. You can change the source code of the developed schema in any text editor, for example, Notepad++. After you save the changes, Creatio refreshes the browser page automatically.