Manage Marketplace listings
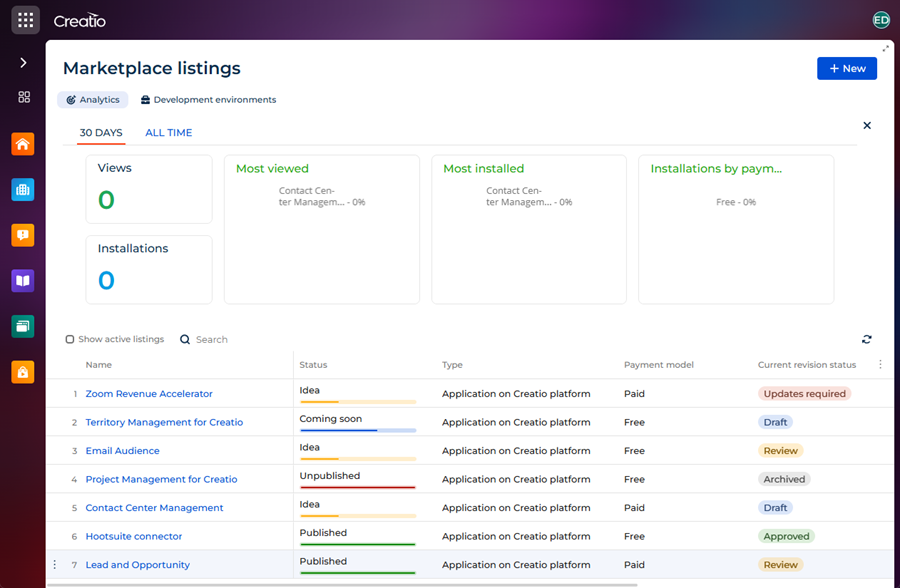
Creatio partners use Creatio Marketplace Console to create and manage Marketplace listings for their solutions. The console is available in the Success Portal and includes the following sections:
- Public profiles — manage partner profile information displayed on Creatio Marketplace.
- Marketplace listings — manage listings and their revisions.
- Cases — communicate with Creatio Marketplace support.
A Marketplace listing represents a solution on Creatio Marketplace. The listing contains information that helps users understand the value of the solution, such as the description, key features, screenshots, pricing, compatibility details, and installation instructions.
Each listing is managed using revisions. A revision is a specific version of the listing content and the Marketplace solution file. Developers update the listing by creating new revisions. Only one revision can be published at a time.
View the Marketplace listings section in the figure below.
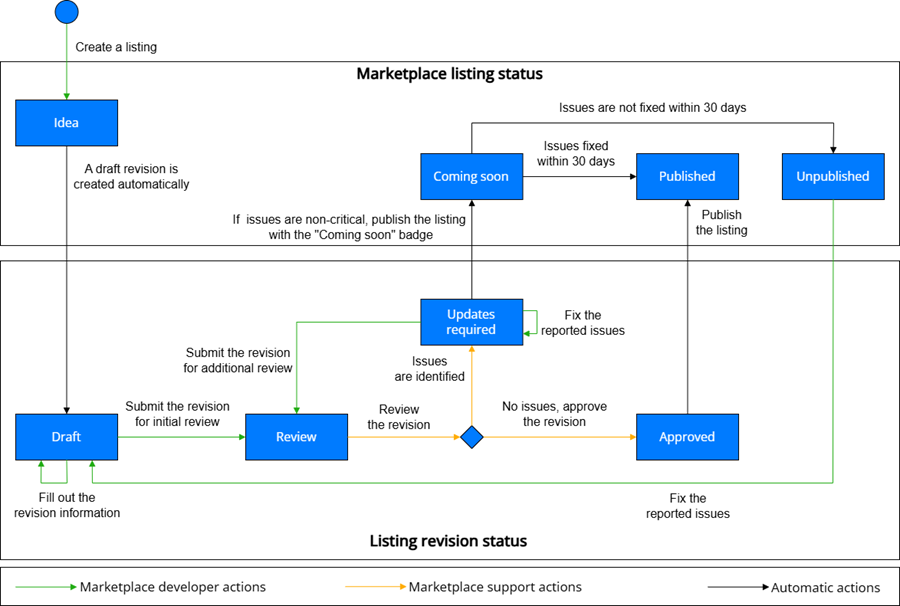
Listing and revision lifecycles
Creatio Marketplace Console uses related lifecycle models: one for the Marketplace listing and one for its revisions.
The listing lifecycle describes the publication state of the listing on Creatio Marketplace. Listing statuses determine whether the listing is visible to Marketplace users.
The table below describes each listing status and explains how it is set.
Status | Description |
|---|---|
Idea | The initial status of the Marketplace listing. The listing is created in Marketplace Console and is not visible on Creatio Marketplace. Set automatically when a new listing is created in Creatio Marketplace Console. |
Coming soon | The listing becomes visible on Creatio Marketplace with the "Coming soon" badge after the initial review, provided that no critical issues are identified. Additional updates are still required before full publication. Set by Creatio Marketplace support. |
Published | The listing is available on Creatio Marketplace. Set by Creatio Marketplace support. |
Unpublished | The listing is removed from Creatio Marketplace and is no longer visible to users. Set by Creatio Marketplace support. |
While listing statuses describe the publication state of the listing itself, the revision lifecycle describes how changes to the listing are managed. Revision statuses describe the current state of that version.
The table below describes each revision status and explains how it is set.
Status | Description |
|---|---|
Draft | The initial status of the revision. New or updated listing information is added but is not yet available on Creatio Marketplace. Set automatically when a new listing is created in Creatio Marketplace Console or when a new revision is created to update a published listing. |
Review | The developer sends the revision for review. Creatio Marketplace support reviews the revision and verifies compatibility of the uploaded solution files and listing resources according to the requirements. Set by the Marketplace developer. |
Updates required | Creatio Marketplace support identified issues during the review process that must be fixed before the revision can be approved. The issues may relate to the Marketplace listing resources or the Marketplace solution requirements. Set by Creatio Marketplace support. |
Approved | The revision passed review and can be published on Creatio Marketplace. Set by Creatio Marketplace support. |
Archived | A previously published revision that was replaced by a newer approved revision or archived when the listing is removed from publication. Archived revisions remain available in the revision history. The status is set automatically once a new revision is approved. |
Publish a Marketplace listing (initial publication)
Before creating a Marketplace listing in Creatio Marketplace Console, make sure your public profile is filled out. Instructions: Steps to publish a public profile. The public profile contains partner information displayed on the listing page on Creatio Marketplace.
The first publication of a Marketplace listing follows the lifecycle shown in the figure below. The figure shows only the statuses involved in this process.
1. Create a revision
- Log in to the Success Portal.
- Open the Marketplace listings section.
- Click New.
2. Fill out the revision information
A revision includes several tabs with required information about the Marketplace listing. Complete all required properties before submitting the revision for review.
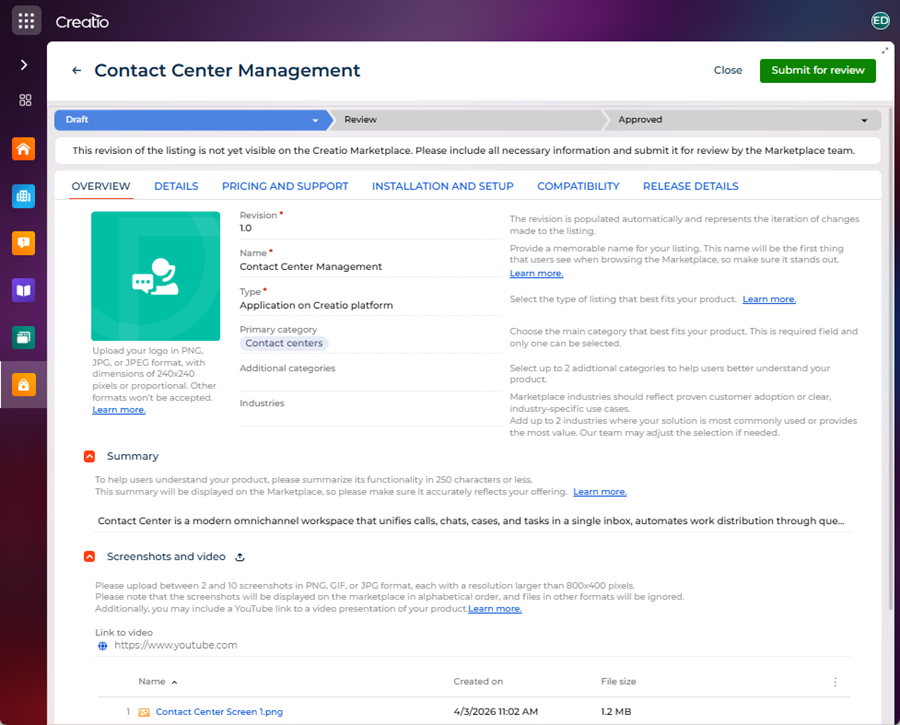
Overview tab
The Overview tab contains the following properties.
Property | Description |
|---|---|
Logo | The unique logo of the revision. The logo is displayed on Creatio Marketplace after the listing is published. Click |
Revision | The revision number of the Marketplace listing. The value is generated automatically and cannot be edited. |
Name | Enter a unique revision name that describes the solution functionality. The name template depends on the value selected in the Type field, therefore we recommend selecting the Type value first. Make sure the value meets the Requirements for Marketplace listing resources. |
Type | Select the Marketplace listing type. Learn more: Marketplace listing types. |
Primary category | Select the main category of the Marketplace solution. |
Additional categories | Select up to 2 additional categories to help users find the Marketplace solution. |
Industries | Select up to 2 industries where the solution is most commonly used or delivers the most value. The value should reflect proven customer adoption or clear industry-specific use cases. |
Summary | Enter a brief description of the revision. Describe the primary functionality of the solution and the problems it solves. Make sure the value meets the Requirements for Marketplace listing resources. |
Screenshots and video | Media files that demonstrate the Marketplace solution functionality and help present the solution to users. To specify the value:
|
After you complete the properties on the Overview tab, click Save.
As a result:
- The listing is created with the "Idea" status.
- A revision is generated automatically with the "Draft" status.
View the Overview tab of the Contact Center Management listing revision in the figure below.
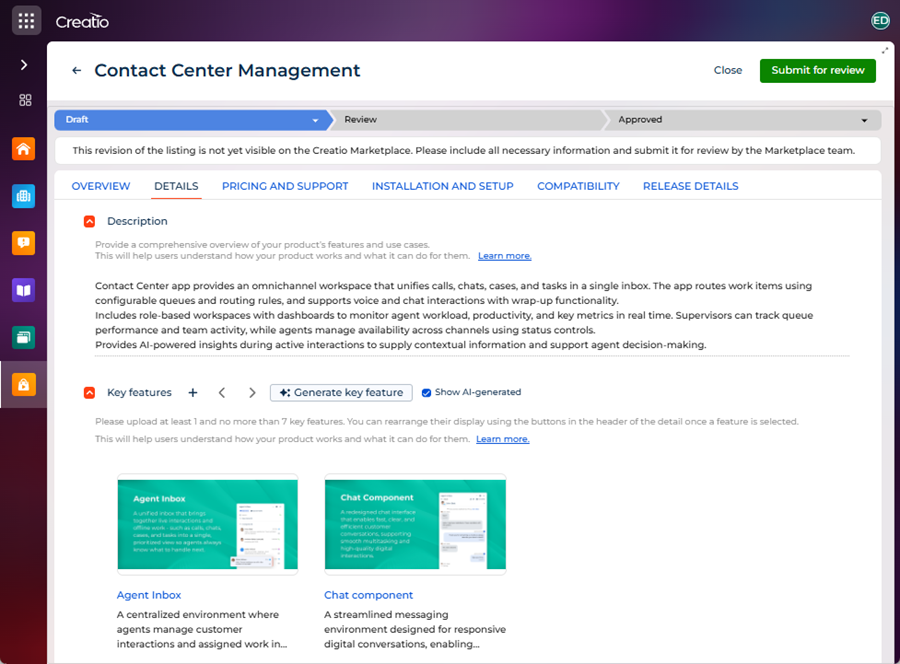
Details tab
The Details tab contains the following properties.
Property | Description |
|---|---|
Description | Enter a detailed description of the revision that covers the benefits of the Marketplace solution. Make sure the value meets the Requirements for Marketplace listing resources. |
Key features | A detailed description of the revision key features. Specify the essential features and benefits of the Marketplace solution. To specify the value:
|
 and
and  buttons.
View the Details tab of the Contact Center Management listing revision in the figure below.
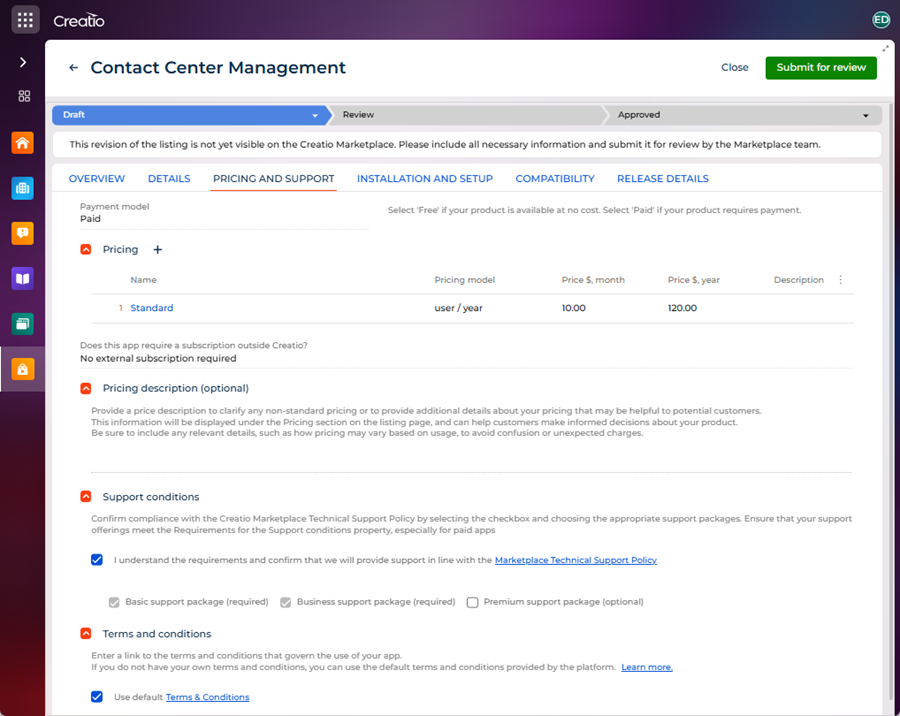
Pricing and support tab
The Pricing and support tab contains the following properties.
Property | Description | |
|---|---|---|
Payment model | Select the payment model of the revision. | |
Pricing | Specify the pricing details of the Marketplace listing. Specify this property if the Payment model field is set to "Paid." If the solution has optional items or features sold separately, such as add-ons or API limit increases, specify them as well. Make sure the values meet the Requirements for Marketplace listing resources. To specify the value:
| |
Does this app require a subscription outside Creatio? | Select whether the revision requires additional payments beyond Creatio pricing.
| |
Pricing description (optional) | Enter developer comments on the pricing model of the revision. You can provide additional licensing details. Explicitly indicate if users must purchase another Marketplace listing or multiple license types of the current Marketplace listing. Make sure the value meets the Requirements for pricing of paid listings. | |
Support conditions | Specify the technical support terms and conditions for the Marketplace listing. Specify this property if the Payment model field is set to "Free" or if the Does this app require a subscription outside Creatio? field is set to "External subscription is included in pricing (ISV / Reselling)." If the Payment model field is set to "Free," the value is generated automatically. Make sure the value meets the Requirements for Marketplace listing resources.
| |
Terms and conditions | List the responsibilities of users and the Marketplace solution developer. This helps define how users can use the Marketplace solution and ensures compliance with international and national legislation. Terms and conditions that clearly define developer responsibilities also improve the credibility of the Marketplace solution for potential users.
| |
View the Pricing and support tab of the Contact Center Management listing revision in the figure below.
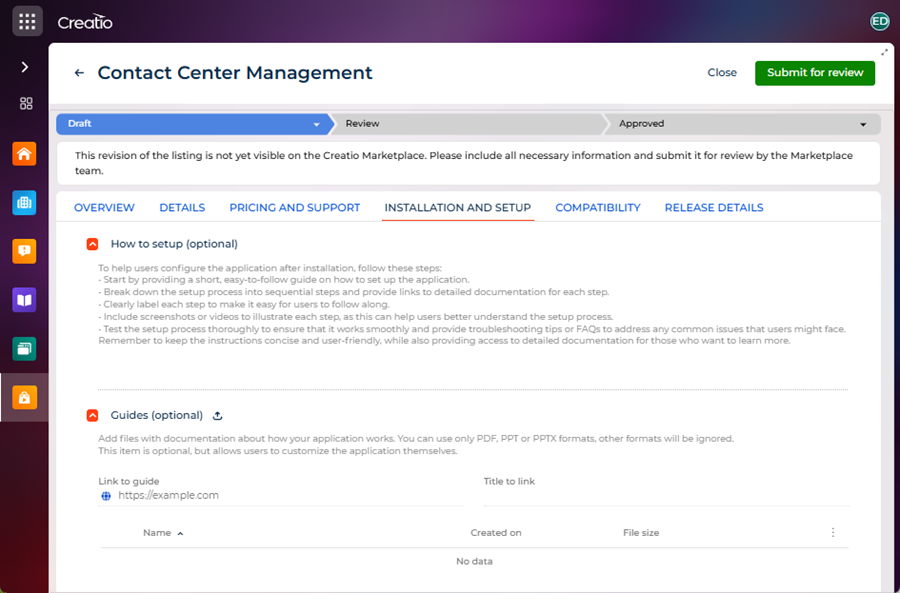
Installation and setup tab
The Installation and setup tab contains the following properties.
Property | Description |
|---|---|
How to set up (optional) | Provide a step-by-step guide that explains how to set up the Marketplace solution from scratch. |
Guides (optional) | Upload files or enter a link to materials that explain how to install and use the Marketplace solution. For example, a setup guide, user guide, or a step-by-step YouTube video that demonstrates how to install and use the solution effectively. Make sure the value meets the Requirements for Marketplace listing resources. To specify the value:
|
View the Installation and setup tab of the Contact Center Management listing revision the figure below.
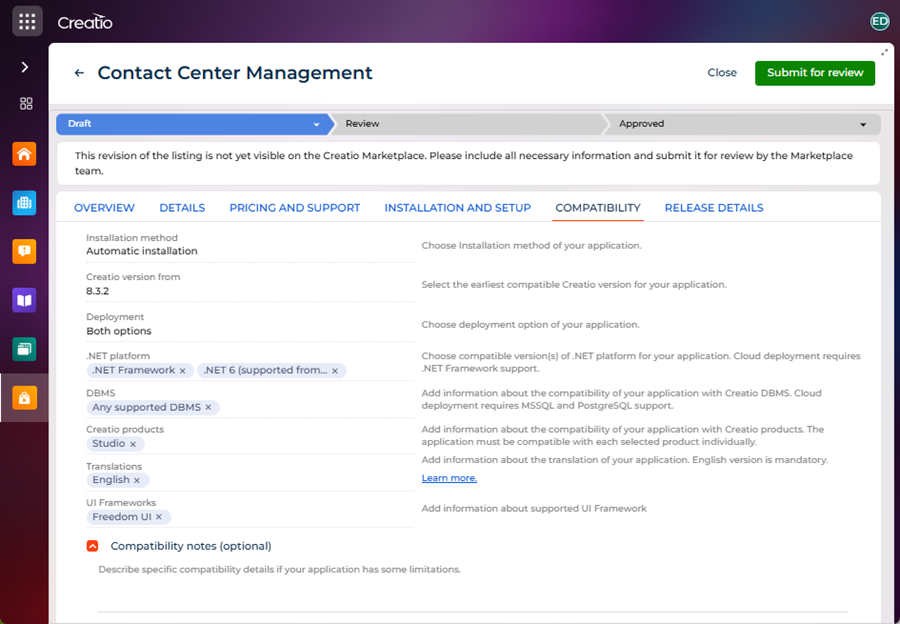
Compatibility tab
The Compatibility tab contains the following properties.
Property | Description |
|---|---|
Installation method | Select the installation method of the Marketplace solution.
|
Creatio version from | Select the earliest version of Creatio products that is compatible with the Marketplace solution. To specify the value:
|
Deployment | Select the deployment option supported by the Marketplace solution:
|
.NET platform | Select the framework that is compatible with the Marketplace solution. Make sure the value meets the Requirements for compatibility. |
DBMS | Select the DBMS that is compatible with the Marketplace solution. Multiple values can be selected. Make sure the value meets the Requirements for compatibility. |
Creatio products | Select the base Creatio products that are compatible with the Marketplace solution. Multiple values can be selected. Make sure the value meets the Requirements for compatibility. |
Translations | Select the languages available in the Marketplace solution. Multiple values can be selected. Make sure that your value meets the Requirements for Marketplace solution. |
UI Frameworks | Select the UI framework that is compatible with the Marketplace solution. Multiple values can be selected. Make sure the value meets the Requirements for compatibility. |
Compatibility notes (optional) | Enter additional compatibility requirements for the Marketplace solution. Learn more: Requirements for compatibility. |
View the Compatibility tab of the Contact Center Management listing revision in the figure below.
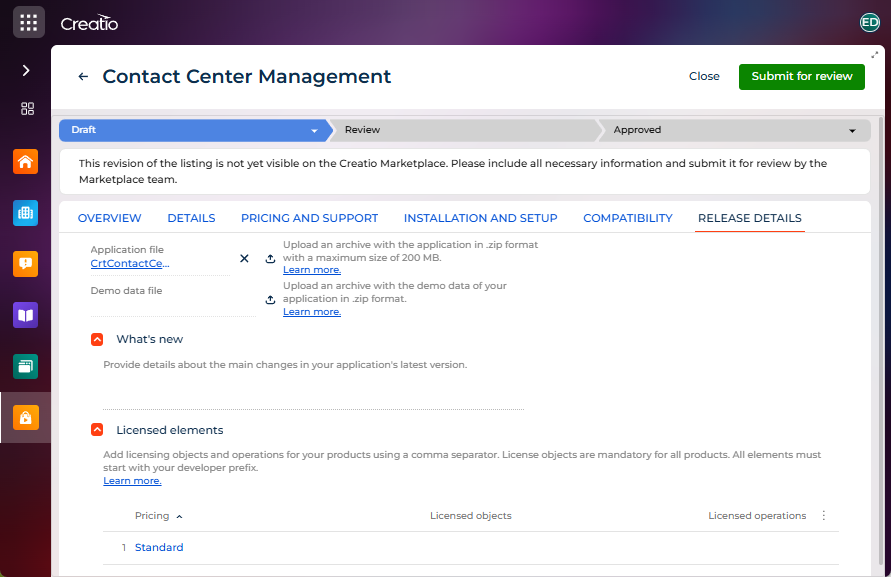
Release details tab
The Release details tab contains the following properties.
Property | Description | |
|---|---|---|
Application file | The *.zip file that contains the Marketplace solution functionality. Click | |
Demo data file | The *.zip file that contains demo data for the Marketplace solution. Click We recommend creating a demo version to demonstrate how the Marketplace solution works in Creatio. Learn more: Demo version of the Marketplace solution. | |
What's new | Enter brief notes about updates to the Marketplace solution. If you modify an existing Marketplace solution, describe the changes made and the new capabilities introduced. Make sure the value meets the Requirements for compatibility. | |
Licensed elements | Specify the details of the Marketplace listing licensed elements. Specify this property if the Payment model field on the Pricing and support tab is set to "Paid." Make sure the values meet the Requirements for Marketplace listing resources. To specify the value:
| |
 in the Licensed objects column to enter the names of custom objects added to the Marketplace solution. Licensed objects are key custom objects, for example, section. Learn more:
 View the Release details tab of the Contact Center Management listing revision in the figure below.
3. Submit the revision for initial review
After you complete all required properties of the revision, submit the revision for initial review. To do this:
- Log in to the Success Portal.
- Open the Marketplace listings section.
- Open the page of the listing you want to publish.
- Open the Revisions tab.
- Open the revision that has the "Draft" status.
- Click Submit for review.
As a result:
- The revision status changes from "Draft" to "Review."
- The revision is sent to Creatio Marketplace support for review.
- A case is created automatically in the Cases section. Use the created case to communicate with Creatio Marketplace support during the review process.
View the Email Audience listing revision that is sent for review in the figure below.
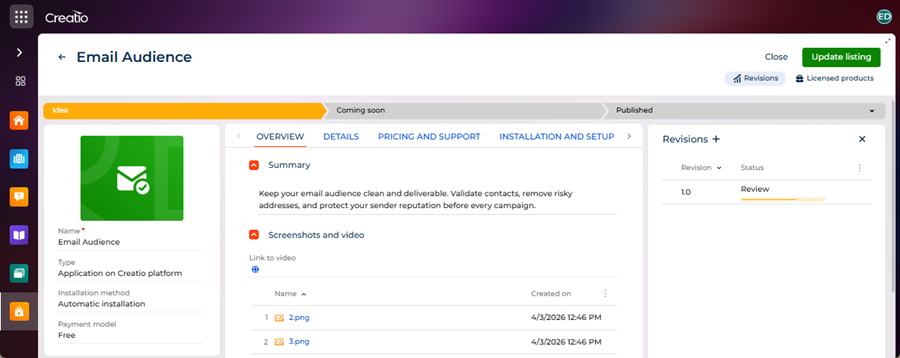
During the review process, Creatio Marketplace support verifies that the revision complies with the Requirements for Marketplace listing resources and the Requirements for Marketplace solution.
If the revision is reviewed successfully:
-
The revision status changes from "Review" to "Approved."
-
The listing status changes from "Idea" to "Published."
View the Revisions tab of the Hootsuite connector listing revision that is reviewed successfully in the figure below.

-
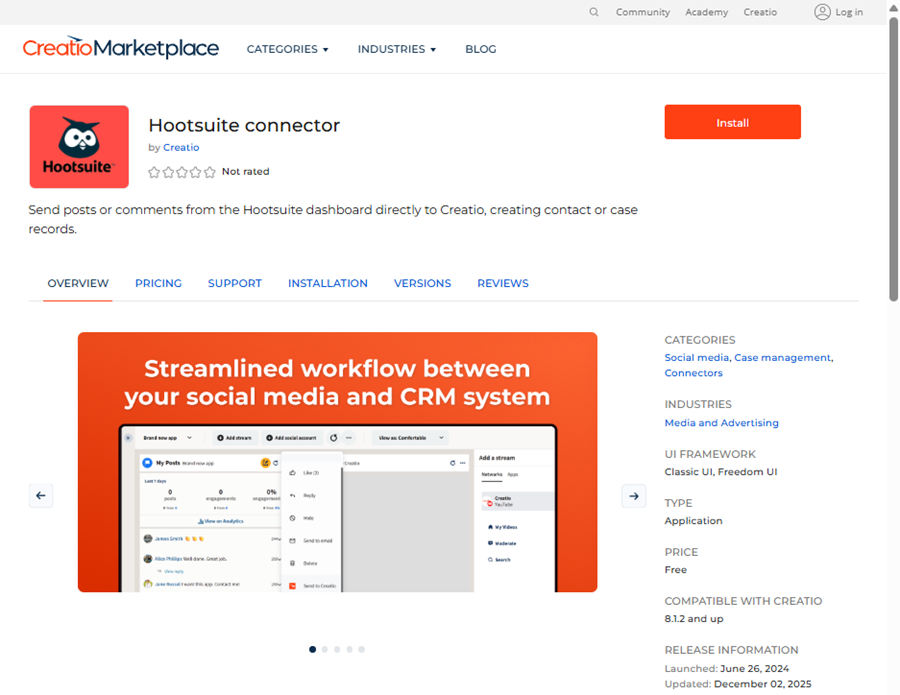
The listing is published on Creatio Marketplace automatically.
View the Hootsuite connector listing published on Creatio Marketplace in the figure below.
-
The Marketplace developer is notified once the listing is published.
-
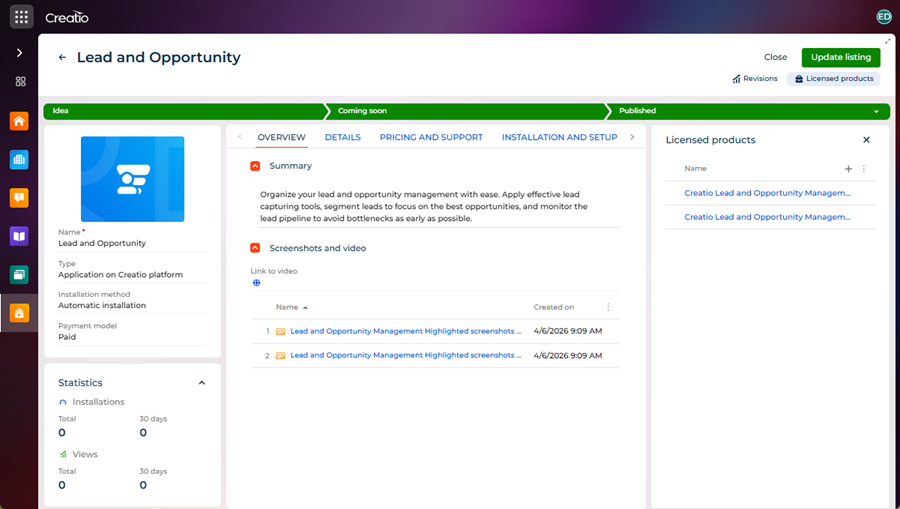
A list of licensed products for paid listings becomes available on the Licensed products tab. The licensed product name matches the official license name used in commercial proposals, client contracts, and other legal documents.
View the Licensed products tab of the Lead and Opportunity listing in the figure below.
If issues are identified:
- Detailed comments and recommendations are added to a separate case.
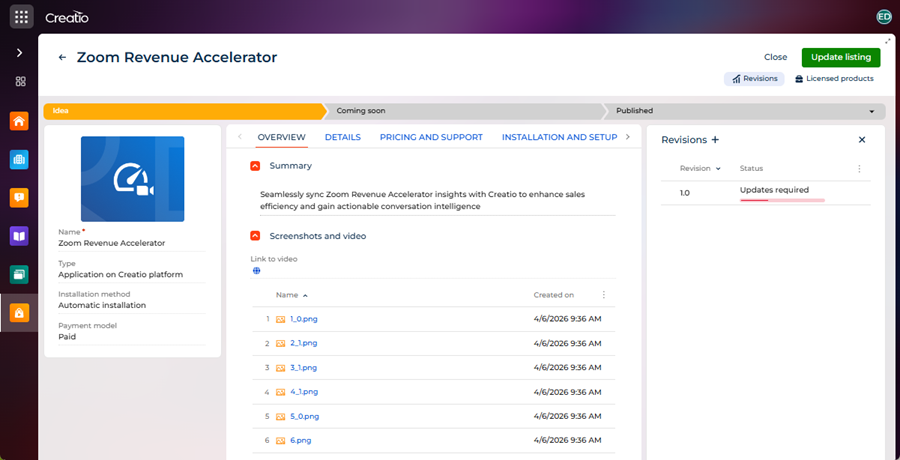
- The revision status changes from "Review" to "Updates required."
View the Revisions tab of the Zoom Revenue Accelerator listing revision that requires updates in the figure below.
Fix the reported issues and resubmit the revision for review.
After the initial review, Creatio Marketplace support may allow publishing the listing on Creatio Marketplace with the "Coming soon" badge while the review continues in additional iterations.
View the Yellow.ai listing with the "Coming soon" badge in the figure below.
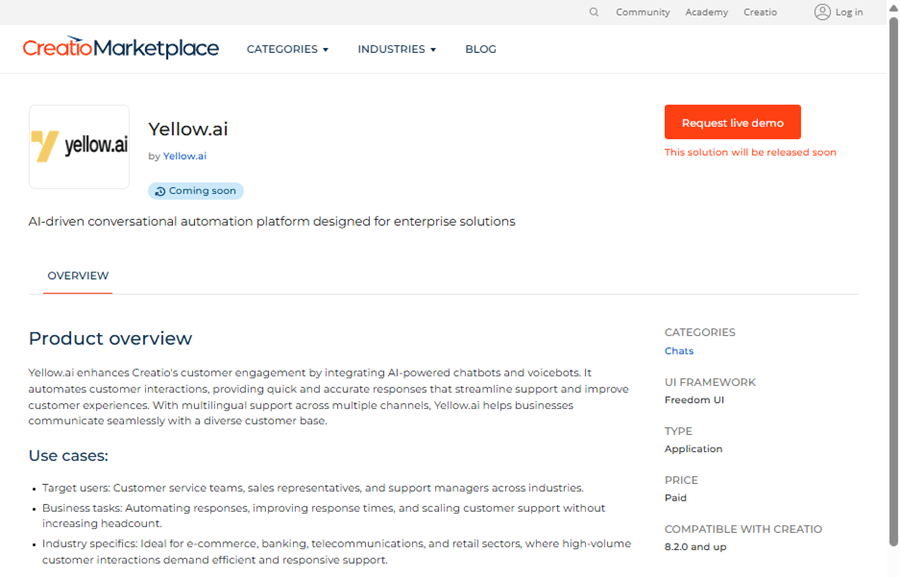
You can publish a listing with the "Coming soon" badge if the following prerequisites are met:
- The initial review confirmed that the revision does not contain critical blockers.
- The Key features expanded list on the Details tab contains valid information and accurately reflects the solution functionality.
- The Application file field on the Release details tab contains a valid file that works correctly with the Creatio product(s) specified in the Creatio products field on the Compatibility tab.
If providing the application file is not possible, confirm the solution functionality by providing access to a working demo, for example:
- a video demonstration
- access to a pre-production environment
- a screen sharing session
While the listing is published with the "Coming soon" badge:
- Only the "Request a live demo" installation option is displayed on the listing page on Creatio Marketplace.
- The listing remains published for 30 days.
If the required updates are submitted and approved within this period, the listing status changes from "Coming soon" to "Published," and the listing is published on Creatio Marketplace automatically. Otherwise, the listing status changes from "Coming soon" to "Unpublished" unless a different deadline is agreed with Creatio Marketplace support, and the listing is removed from publication on Creatio Marketplace automatically.
Update a published Marketplace listing
A Marketplace listing can have multiple revisions. Use revisions to update listing content without affecting the currently published version.
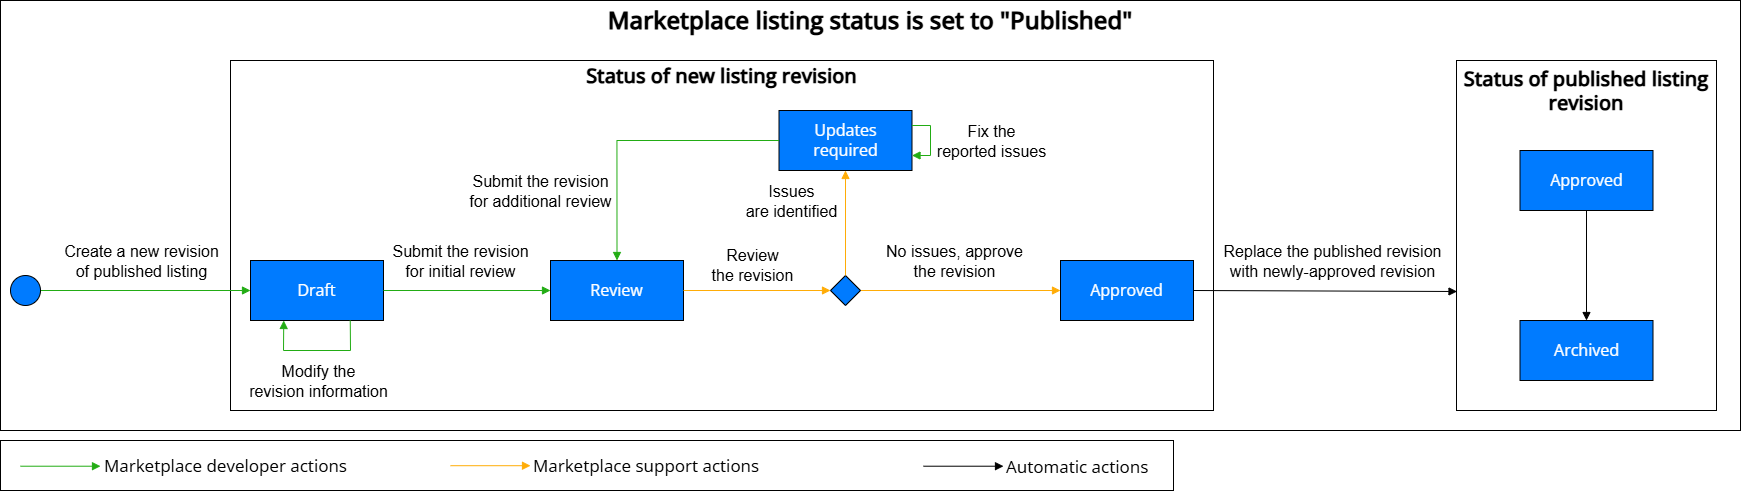
The update of a published Marketplace listing follows the lifecycle shown in the figure below. The figure shows only the statuses involved in this process.
To update a published Marketplace listing:
- Log in to the Success Portal.
- Open the Marketplace listings section.
- Open the page of the listing you want to update.
- Click the Update listing button. This creates the revision with the "Draft" status automatically. The created revision includes all information from the current listing and is ready for modifying.
- Modify the revision information across the revision tabs.
- Click Submit for review.
As a result:
-
The revision status changes from "Draft" to "Review."
View the Revisions tab of the Lead and Opportunity listing that has multiple revisions in the figure below.

-
The revision is sent to Creatio Marketplace support for review.
-
A case is created automatically in the Cases section. Use the created case to communicate with Creatio Marketplace support during the review process.
During the review process, Creatio Marketplace support verifies that the revision complies with the Requirements for Marketplace listing resources and the Requirements for Marketplace solution.
If the revision is reviewed successfully:
-
The listing status remains "Published."
-
The new revision status changes from "Review" to "Approved."
-
The published revision status changes from "Approved" to "Archived."
View the Revisions tab of the Lead and Opportunity listing whose second revision is approved in the figure below.

-
The published revision is replaced with the newly-approved revision on Creatio Marketplace automatically.
-
The Marketplace developer is notified once the listing is updated.
-
A list of licensed products for paid listings becomes available on the Licensed products tab. The licensed product name matches the official license name used in commercial proposals, client contracts, and other legal documents.
If issues are identified:
- Detailed comments and recommendations are added to a separate case.
- The new revision status changes from "Review" to "Updates required."
- The published revision status remains "Approved."
Fix the reported issues and resubmit the revision for review.
Remove a listing from publication
The removal of a Marketplace listing from publication follows the lifecycle shown in the figure below. The figure shows only the statuses involved in this process.
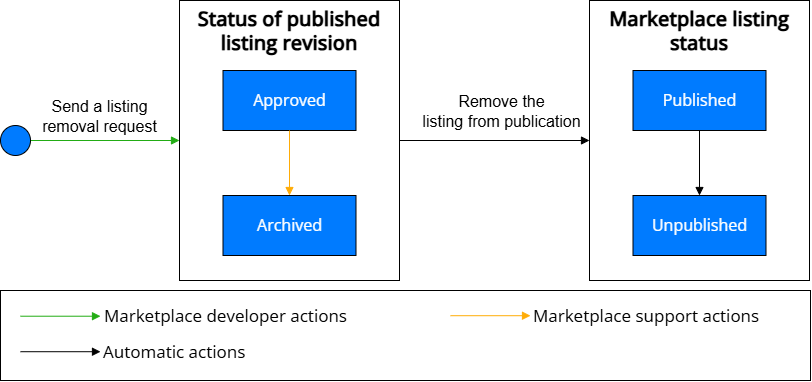
To remove a listing from publication, send a listing removal request to Creatio Marketplace support.
As a result, after Creatio Marketplace support reviews the request:
- The revision status changes from "Approved" to "Archived."
- The listing status changes from "Published" to "Unpublished."
- The listing is removed from publication on Creatio Marketplace automatically.
A listing can be removed from publication automatically in the following cases:
- The partnership has ended.
- The partner decides to stop further development and support.
- The solution is not functioning properly and is no longer supported.
View the Revisions tab of the unpublished Project Management for Creatio listing in the figure below.
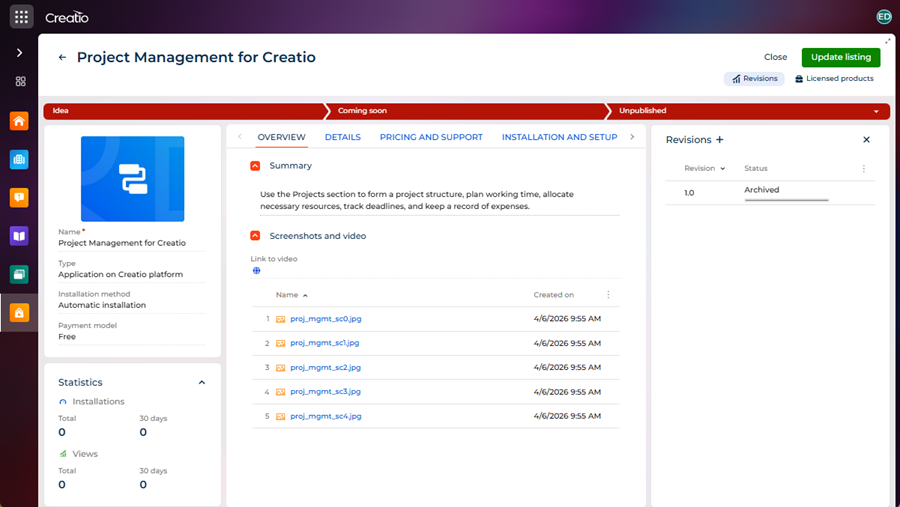
Once removed from publication, the listing is no longer visible to users on Creatio Marketplace.
See also
Steps to publish a public profile
Requirements for Marketplace listing resources
Requirements for Marketplace solution
Demo version of the Marketplace solution
Resources
Official Creatio Marketplace website
Official Success Portal website
Creatio Marketplace Technical Support Policy