Plagiarism-proof the source code of a Marketplace app
Creatio stores the open-source code of a Marketplace app in a read-only package. The code is not plagiarism-proof. Users that have the corresponding access permissions can view the code. Plagiarism-proof your front-end and back-end code separately.
Plagiarism-proof the C# code
Use the project package to protect the C# source code of the Marketplace app from plagiarism. Learn more: Project package.
You are permitted to plagiarism-proof only C# source code developed by you.
The ways to protect the C# code of a Marketplace app from plagiarism are as follows:
- Develop a new Marketplace app as a project package.
- Convert an existing Marketplace app to a project package.
Develop your Marketplace app on the configuration level that contains preinstalled Creatio packages, similar to the development of other apps. Compile the C# source code of the packages into the Terrasoft.Configuration.dll as part of the publishing. The code can interact with the core. Learn more: Creatio customization levels. View the elaborate diagram of Creatio customization levels on the figure below.
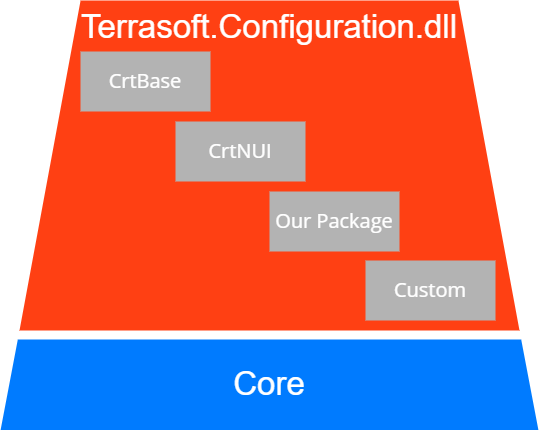
CrtBase,CrtNUIare base Creatio packages.OurPackageis the project package that contains the Marketplace app.Customis a special Creatio package.
Project packages offer the following advantages for Marketplace apps:
- Exclude the C# code of the custom Marketplace app from
Terrasoft.Configuration.dll. - Install the Marketplace app as a separate *.dll.
View the diagram of Creatio customization levels that contain the Marketplace app's project package in the figure below.

Develop the Marketplace app as a project package
We recommend developing new Marketplace apps as project packages.
General procedure to develop the Marketplace app as a project package is as follows:
- Set up Creatio for file system development. Read more >>>
- Create a user-made package. Read more >>>
- Code the custom functionality. Read more >>>
- Build the project package. Read more >>>
1. Set up Creatio for file system development
Instructions: Set up Creatio to work with the file system.
2. Create a user-made package
Use one of the following tools to create a user-made package:
- Creatio IDE. Instructions: Create a user-made package.
- Clio utility. Learn more: official vendor documentation (GitHub).
To create a user-made package using the Clio utility:
-
If needed, install Clio. Learn more: official vendor documentation (GitHub).
Command that installs Cliodotnet tool install clio -g -
Go to the Creatio
Pkgdirectory.Command that opens the Pkg directorycd C:\inetpub\wwwroot\creatio\Terrasoft.WebApp\Terrasoft.Configuration\Pkg; -
Create a new package.
Command that creates a new packageclio init OurPackage; -
Set up the package dependencies. To do this, modify the
descriptor.jsonfile.See the example that sets up the dependencies (the
DependsOnproperty) of theOurPackagepackage on theCrtCorepackage and adds the package description (theDescriptorproperty) below.Example that sets up the package dependencies and adds the package description{
"Descriptor": {
"UId": "45cc06b2-6448-4d9e-9f51-bee31a6dbc25",
"PackageVersion": "7.8.0",
"Name": "OurPackage",
"ModifiedOnUtc": "/Date(1633420586000)/",
"Maintainer": "Customer",
"Description": "Payment calculator",
"DependsOn": [
{
"UId": "2fabaf6c-0f92-4530-aef8-40345c021da2",
"PackageVersion": "7.8.0",
"Name": "CrtCore"
}
]
}
}
As a result, Creatio will create the OurPackage user-made package that depends on the CrtCore package.
3. Code the custom functionality
You can code the custom functionality in any external IDE. This example uses Microsoft Visual Studio Code.
To code the custom functionality:
-
Open the
OurPackage.slnproject.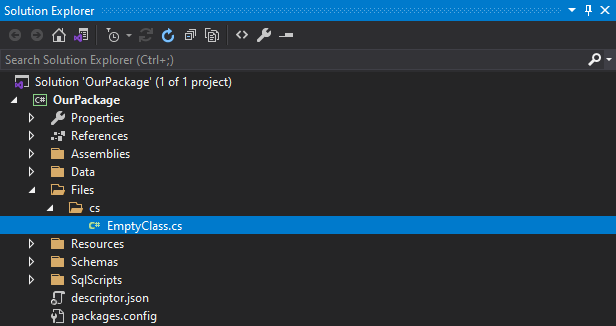
-
Download the relevant version of CreatioSDK NuGet package from the repository available on the official vendor website.
-
Install the CreatioSDK NuGet package.
-
Implement the custom functionality in the
Files\csapp directory.You can create the app in the IDE while developing the C# code. To do this, press
Ctrl+Shift+Bin Visual Studio. -
Build the app.
If the IDE builds the app successfully, the *.dll, *.pdb, and other auxiliary files will be placed in the
Files\Binapp directory.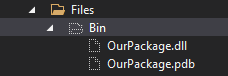
-
Upload the
OurPackagepackage from the[Path to app]\Terrasoft.WebApp\Terrasoft.Configuration\Pkgdirectory to the database.-
Open the Configuration section. Instructions: Open the Configuration section.
-
Click Actions → File system development mode group → Update packages from file system.
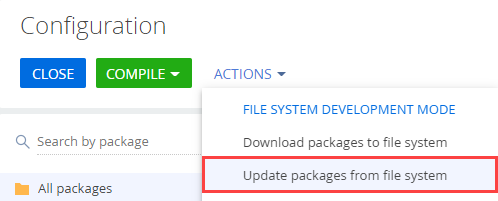
This uploads the
OurPackagepackage to Creatio IDE.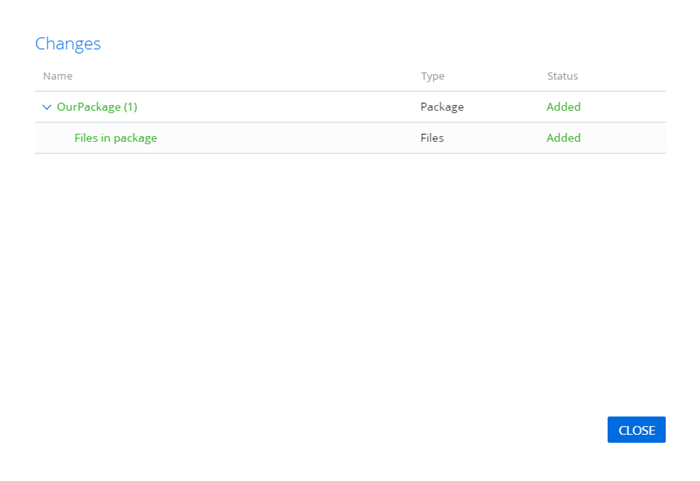
-
-
Restart Creatio.
Command that restarts Creatioclio restart
4. Build the project package
Build the project package to prepare the Marketplace app for publishing on the Creatio Marketplace online platform.
If you want to exclude the C# source code that belongs to you from the project package, make sure to delete the code before exporting the package.
To build the assembly package:
-
Delete the C# source code that belongs to you from the project package (if necessary). Do this if you want to exclude the C# source code from the project package.
-
Create the
PackagePublish.targetfile to automate the project package building. -
Add the following code to the
PackagePublish.targetfile.PackagePublish.target file<?xml version="1.0" encoding="utf-8" ?>
<Project xmlns="http://schemas.microsoft.com/developer/msbuild/2003">
<PropertyGroup>
<DestinationFolder>C:\PkgRelease\$(AssemblyName)</DestinationFolder>
</PropertyGroup>
<ItemGroup>
<PkgAssemblies Include="Assemblies\**"/>
</ItemGroup>
<ItemGroup>
<PkgData Include="Data\**"/>
</ItemGroup>
<ItemGroup>
<PkgFiles Include="Files\Bin\**"/>
</ItemGroup>
<ItemGroup>
<PkgProperties Include="Properties\**"/>
</ItemGroup>
<ItemGroup>
<PkgResources Include="Resources\**"/>
</ItemGroup>
<ItemGroup>
<PkgSchemas Include="Schemas\**"/>
</ItemGroup>
<ItemGroup>
<PkgSqlScripts Include="SqlScripts\**"/>
</ItemGroup>
<ItemGroup>
<PkgDescriptor Include="descriptor.json"/>
</ItemGroup>
<Target Name="CopyFiles">
<Copy
SourceFiles="@(PkgAssemblies)"
DestinationFiles="@(PkgAssemblies->'$(DestinationFolder)\Assemblies\%(RecursiveDir)%(Filename)%(Extension)')"
/>
<Copy
SourceFiles="@(PkgData)"
DestinationFiles="@(PkgData->'$(DestinationFolder)\Data\%(RecursiveDir)%(Filename)%(Extension)')"
/>
<Copy
SourceFiles="@(PkgFiles)"
DestinationFiles="@(PkgFiles->'$(DestinationFolder)\Files\Bin\%(RecursiveDir)%(Filename)%(Extension)')"
/>
<Copy
SourceFiles="@(PkgProperties)"
DestinationFiles="@(PkgProperties->'$(DestinationFolder)\Properties\%(RecursiveDir)%(Filename)%(Extension)')"
/>
<Copy
SourceFiles="@(PkgResources)"
DestinationFiles="@(PkgResources->'$(DestinationFolder)\Resources\%(RecursiveDir)%(Filename)%(Extension)')"
/>
<Copy
SourceFiles="@(PkgSchemas)"
DestinationFiles="@(PkgSchemas->'$(DestinationFolder)\Schemas\%(RecursiveDir)%(Filename)%(Extension)')"
/>
<Copy
SourceFiles="@(PkgSqlScripts)"
DestinationFiles="@(PkgSqlScripts->'$(DestinationFolder)\SqlScripts\%(RecursiveDir)%(Filename)%(Extension)')"
/>
<Copy
SourceFiles="@(PkgDescriptor)"
DestinationFiles="@(PkgDescriptor->'$(DestinationFolder)\%(RecursiveDir)%(Filename)%(Extension)')"
/>
</Target>
<Target Name="CreateRelease" AfterTargets="CopyFiles">
<Exec Command="clio generate-pkg-zip $(DestinationFolder) -d C:\PkgRelease\$(AssemblyName).gz" />
</Target>
</Project> -
Add the following string to the
OurPackage.csprojfile.OurPackage.csproj file<Import Project="PackagePublish.target" /> -
Open the command line.
-
Run the following command.
msbuild /t:CreateRelease
As a result, Creatio will download the project package to the C:\PkgRelease directory that contains the OurPackage subdirectory and the OurPackage.gz *.gz archive. The archive contains the Marketplace app ready to be published on the Creatio Marketplace online platform.
Convert the Marketplace app package to a project package
You might need to modify your Marketplace app significantly to prepare it for the conversion to a project package.
Use the clio convert command to convert the existing Marketplace app to a project package. Instructions: official vendor documentation (GitHub).
Some files and schemas are not suitable for conversion. For example, the "User task" type schemas. The "User task" type schema remains a partial class regardless of the Partial flag status. Place the element to Terrasoft.Configuration.dll library. By default, the utility saves the code of the "User task" type schema to the AutoGenerated directory of the project package, not Terrasoft.Configuration.dll, as part of the conversion.
To convert the existing Marketplace app to a project package, run one of the following commands:
clio convert .\OurPackage_Conf\ -c false.clio convert .\OurPackage_Conf\.
The outcome of each command is identical since the utility sets the -c (ConvertSourceCode) key to false by default.
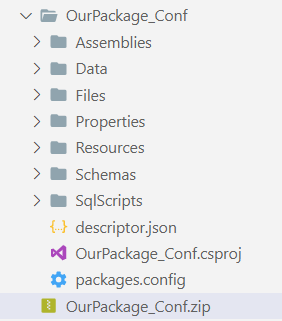
After the conversion, the C# package will contain the following data:
- The project package, which contains the converted Marketplace app.
- The *.zip archive that contains the original Marketplace app.
View the structure of the C# project after the conversion on the figure below.
As a result, the existing Marketplace app will be converted to a project package ready to be installed into Creatio.
Generate the project package as part of the CI/CD pipeline. We recommend storing the unprotected source code of your Marketplace app in the repository.
Plagiarism-proof the JavaScript code
The ways to plagiarism-proof the JavaScript code of a Marketplace app are as follows:
- minification
- obfuscation
Do not modify the structure of the client module schema. Creatio Designers expect a particular schema structure.
The best way to plagiarism-proof the JavaScript code is to implement the protected logic using mixins. We do not recommend obfuscating client module schemas that Creatio Designers utilize.
You can obfuscate the JavaScript code using a large number of open source solutions. This example uses JavaScript Obfuscator. Learn more: official vendor documentation (GitHub).
To plagiarism-proof the JavaScript code using JavaScript Obfuscator:
-
Install JavaScript Obfuscator. Instructions: official vendor documentation (GitHub).
Command that installs JavaScript Obfuscatornpm install javascript-obfuscator -g -
Prepare the JavaScript code for obfuscation.
-
Create a mixin.
For this example, create the
MRKT_DemoMixinmixin. Learn more: Mixins (mixins). -
Implement the JavaScript code to obfuscate in the mixin.
MRKT_DemoMixindefine("MRKT_DemoMixin", [], function () {
Ext.define("Terrasoft.configuration.mixins.MRKT_DemoMixin", {
alternateClassName: "Terrasoft.MRKT_DemoMixin",
secretMethod: function () {
console.log("MRKT_DemoMixin");
},
});
}); -
Add the
MRKT_DemoMixinmixin to themixinsproperty of the client module schema.For this example, add the
MRKT_DemoMixinmixin to theContactPageV2client module schema.ContactPageV2define("ContactPageV2", ["MRKT_DemoMixin"], function() {
return {
entitySchemaName: "Contact",
mixins: {
"MRKT_DemoMixin": "Terrasoft.MRKT_DemoMixin"
},
attributes: {},
modules: /**SCHEMA_MODULES*/{}/**SCHEMA_MODULES*/,
details: /**SCHEMA_DETAILS*/{}/**SCHEMA_DETAILS*/,
businessRules: /**SCHEMA_BUSINESS_RULES*/{}/**SCHEMA_BUSINESS_RULES*/,
methods: {
onEntityInitialized: function() {
this.callParent(arguments);
/* Consume MRKT_DemoMixin. */
this.secretMethod();
},
},
dataModels: /**SCHEMA_DATA_MODELS*/{}/**SCHEMA_DATA_MODELS*/,
diff: /**SCHEMA_DIFF*/[]/**SCHEMA_DIFF*/
};
});
-
-
Back up the unprotected JavaScript code. You might need to edit it later.
-
Obfuscate the JavaScript code.
Command that obfuscates the JavaScript codejavascript-obfuscator MRKT_DemoMixin.js --output MRKT_DemoMixin.obfuscated.jsLearn more: official vendor documentation (GitHub).
As a result, JavaScript Obfuscator will generate an obfuscated file. View the example of the obfuscated file below.
function a0_0x2c69() {
    var _0x272852 = ['Terrasoft.MRKT_DemoMixin', 'Ok\x20-\x20MRKT_DemoMixin', '636527SjITzq', '47544MWcgAk', '1503XwngZr', '1735980OhnVnL', '7cyzbFA', '1795796hIfdLG', '655476qGUaEY', '22085740BJZJXi', '3038716Shuabr', 'MRKT_DemoMixin', '5iENPSJ'];
    a0_0x2c69 = function() {
        return _0x272852;
    };
    return a0_0x2c69();
}
var a0_0x31e3ab = a0_0x3f9a;

function a0_0x3f9a(_0x104961, _0x4f9883) {
    var _0x2c694d = a0_0x2c69();
    return a0_0x3f9a = function(_0x3f9a09, _0x1d247d) {
        _0x3f9a09 = _0x3f9a09 - 0xa7;
        var _0x481962 = _0x2c694d[_0x3f9a09];
        return _0x481962;
    }, a0_0x3f9a(_0x104961, _0x4f9883);
}(function(_0x479332, _0x464f89) {
    var _0x279ddd = a0_0x3f9a,
        _0x3c692e = _0x479332();
    while (!![]) {
        try {
            var _0xae3ae0 = -parseInt(_0x279ddd(0xac)) / 0x1 + parseInt(_0x279ddd(0xa7)) / 0x2 + parseInt(_0x279ddd(0xaf)) / 0x3 + -parseInt(_0x279ddd(0xb1)) / 0x4 * (-parseInt(_0x279ddd(0xa9)) / 0x5) + -parseInt(_0x279ddd(0xb2)) / 0x6 * (-parseInt(_0x279ddd(0xb0)) / 0x7) + -parseInt(_0x279ddd(0xad)) / 0x8 * (-parseInt(_0x279ddd(0xae)) / 0x9) + -parseInt(_0x279ddd(0xb3)) / 0xa;
            if (_0xae3ae0 === _0x464f89) break;
            else _0x3c692e['push'](_0x3c692e['shift']());
        } catch (_0x44cb38) {
            _0x3c692e['push'](_0x3c692e['shift']());
        }
    }
}(a0_0x2c69, 0xc4309), define(a0_0x31e3ab(0xa8), [], function() {
    var _0x3dbe12 = a0_0x31e3ab;
    Ext['define']('Terrasoft.configuration.mixins.MRKT_DemoMixin', {
        'alternateClassName': _0x3dbe12(0xaa),
        'secretMethod': function() {
            var _0x3b8302 = _0x3dbe12;
            return _0x3b8302(0xab);
        }
    });
}));
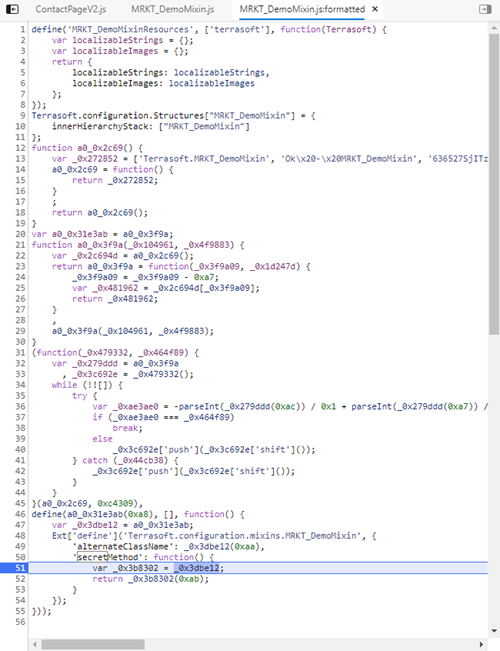
To view the JavaScript code in the browser page:
- Clear the browser cache.
- Refresh the page.
- Open the developer tools. Instructions: Integrated debugging tools.
View the example of the JavaScript code in the browser page in the figure below.
Obfuscate the JavaScript code as part of the CI/CD pipeline. We recommend storing the unprotected JavaScript source code of your Marketplace app in the repository.
See also
Resources
Official Clio utility documentation (GitHub)