Set up automatic case registration from email
Add support mailboxes to Creatio to accelerate communication with your customers:
- Creatio will register new cases automatically based on the incoming emails.
- Customers will receive case notifications.
- All case emails will be saved to the case history.
Add a support mailbox
Before you begin, set up one or more mailboxes to use for case registration. Instructions: Configure a shared mailbox.
-
Click the
 button to open the System Designer.
 -
Go to the "System setup" block → " Lookups."
-
Open the List of mailboxes for case registration lookup.
-
Click New.
-
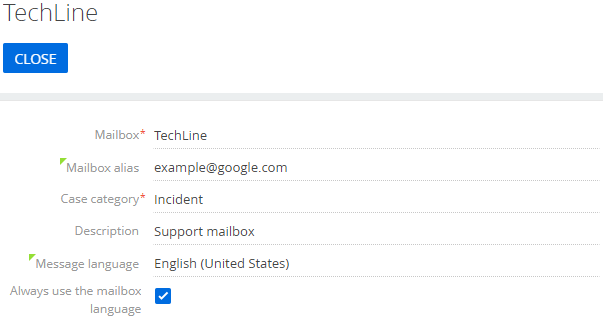
Select the support mailbox added during the email integration setup in the Mailbox field. The field is required.
-
Specify the name of the mailbox you use to receive emails in the Mailbox alias field. Fill out the field only if you receive emails in the mailbox that differs from the mailbox you set up originally.
-
Specify the relevant category in the Case category field. For example, "Incident." The field is required.
-
Enter the mailbox description in the Description field.
-
Select the language Creatio will use for the email if the mailbox language selection rule is triggered in the Message language field. Learn more: Set up the language of the support mailbox.
-
Select the Always use the mailbox language checkbox to send emails in the specified language regardless of other rules (Fig. 1).
-
Repeat steps 4–11 if you are using more than one support mailbox.
As a result, Creatio will process all emails received by the mailboxes in the case registration system.
You can also set up a shared support mailbox for communicating with customers and sending case notifications. Learn more: Configure a shared mailbox.
Send localized notifications
Creatio enables you to send email notifications in the client's preferred language. To do this:
- Specify preferred language on the contact page.
- Localize email notifications templates. Instructions: Set up template localization
- Set up the mailbox language.
In Creatio, you can set up the language for:
- the case notification mailbox
- the email notification template
- the notifications sent to customers who do not have the preferred language specified
Creatio determines the email language based on the following rules:
- If you do not select the Always use the mailbox language checkbox during the email setup, Creatio uses the following variables to determine the language, from highest to lowest priority:
- The preferred language of the recipient contact.
- The email language specified during the mailbox setup.
- The value of the "Default language for messages" ("DefaultMessageLanguage" code) system setting.
- If you select the Always use the mailbox language checkbox, Creatio sends emails in the mailbox language regardless of other rules.
See also
Set up the Microsoft Exchange and Microsoft 365 services