Set up a product selection business process
Automate product selection using custom business logic. For example, create a business process for product selection and sales and set it up to run from the consultation panel, an application case, or any other necessary location. Use a pre-configured "Product selection | ProductSelectionProcessPage" page to do this. In this case, Creatio will process the selection results based on the custom business logic regardless of the value of the "Process for registration selected product" ("SelectedProductRegistrationProcess" code) system setting. Therefore, when setting up a business process or case, set up the business logic for placing an application or opportunity as well.
Create a business process for selling bank cards to contacts. The process includes selecting a product and submitting an application. It must be launched from the consultation panel.
To implement this example, a pre-configured process for submitting an application is required. Select the "Process for registration selected product - Application (Example)", whose purpose is to help you to familiarize yourself with the product selection functionality.
Step 1. Create a business process for consultation and bank card sales
-
Create a new business process from the process library. Learn more in the online course: Model your first process.
-
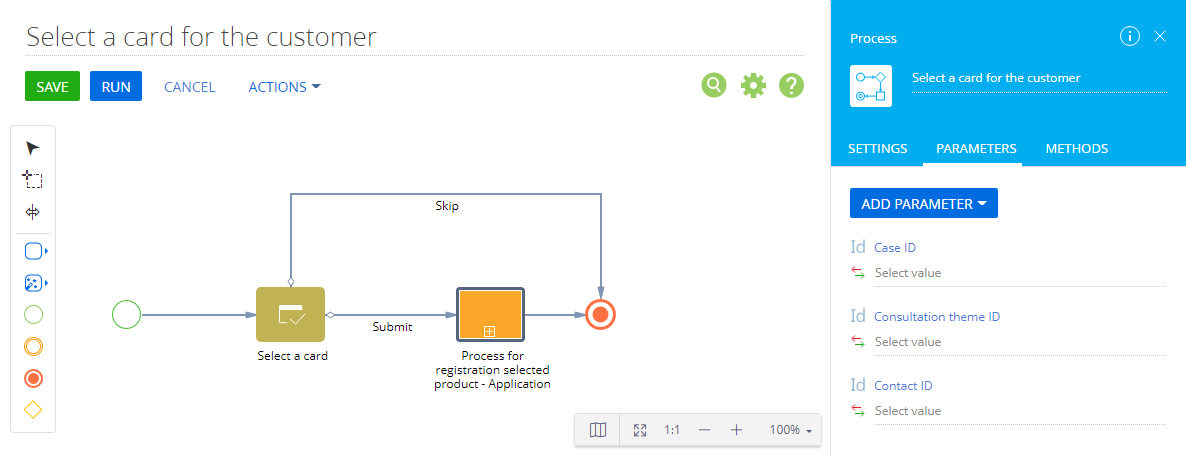
Add parameters to the process to which to pass the unique identifiers of the consultation subject, contact, and application created as part of the consultation. To do this:
- Click
 at the top right corner of the workspace.
 - Open the Parameters tab in the process setup area.
- Click the Add parameter and select "Unique identifier."
- Fill out the parameter data:
- Title – the parameter title to use in the business process.
- Code – the unique code of the parameter that will help you to find it in the configuration settings.
- Data type – the unique identifier. Creatio populates this value automatically.
- Direction – bidirectional. This enables you to both pass data to the parameter and pass data from the parameter to the subsequent elements or other processes.
- Value – leave empty. Creatio populates this field automatically for each process instance upon launch.
- Repeat steps c through d for all parameters to add to the business process. Learn more: Process parameters.
- Click
-
Select the Pre-configured page element in the User actions group and add it to the diagram. In this step, the customer assistant will see the product selection page. Set up the element properties (Fig. 2):
Fig. 2 The Pre-configured page element setup area 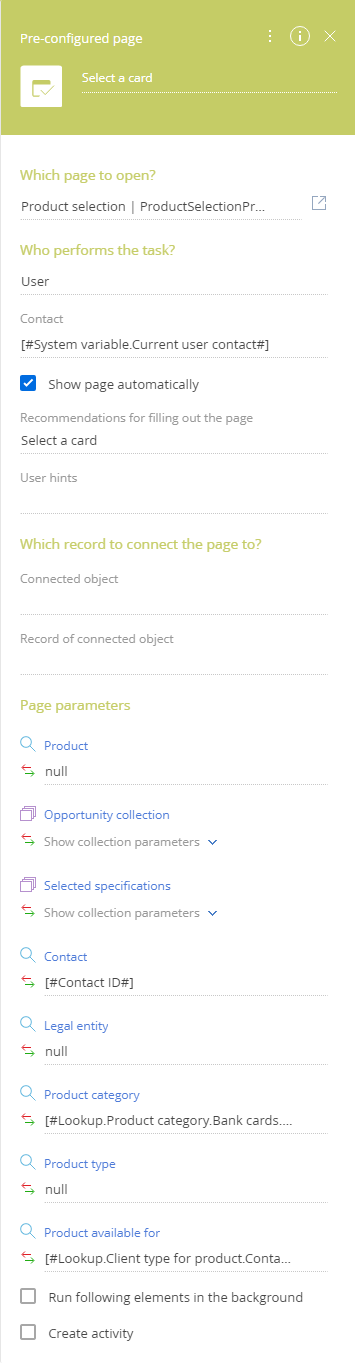
- Which page to open? – select "Product selection | ProductSelectionProcessPage" in the pre-configured page list. The page is available in Creatio version 7.18.1 and later.
- Who performs the task? – select "User" to make the pre-configured page open for a specific employee rather than a group or role.
- Contact – select "Current user contact" to open the page for the employee who runs the business process.
- Show page automatically – select the checkbox to display the page to the current user as soon as the user reaches this process step. Creatio does not display the page automatically if the process runs for other users or in the background mode.
- Specify the consultation data in the Page parameters block. These parameters affect how the process will display the pre-configured page to the user.
- Specify the value of the Contact parameter if you have recommendation prediction configured in Creatio and you want the pre-configured page to display Next Best Offers first. The value is passed from the process parameter. To do this, click
 → Process parameter and select the existing process parameter with the contact ID. Otherwise, skip this step.
 - Specify the value of the Product category parameter to open the pre-configured page for the user on a specific catalog level. To do this, click → Lookup value, then select the value of the corresponding catalog level in the Product categories lookup. For example, "Bank cards."
- Specify the value of the Product available for parameter to display the pre-configured page with the selected filter. To do this, click → Lookup value, then select the required value in the Client type for product lookup. For example, Contacts.
- Specify the value of the Contact parameter if you have recommendation prediction configured in Creatio and you want the pre-configured page to display Next Best Offers first. The value is passed from the process parameter. To do this, click
-
Add the Sub-process (Call activity) element on the diagram from the System actions group. In this step, Creatio will submit the application for the selected product. This step is required since Creatio will trigger the process specified in the "Process for registration selected product" ("SelectedProductRegistrationProcess" code) system setting only if the product selection page is opened from the action menu of the Products section. Otherwise, include the process for submitting an application in the configured business logic. Set up the element properties (Fig. 3):
Fig. 3 The Sub-process (Call activity) element setup area 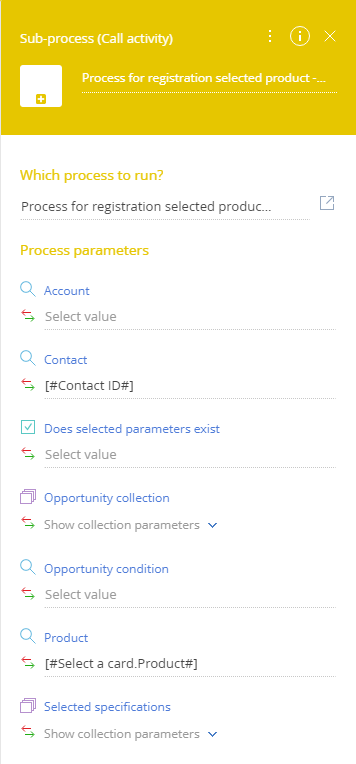
- Which process to run? – specify a previously configured process for submitting an application to run in case of a successful product selection. For example, "Process for registration selected product - Application (Example)."
- In the Process parameters block, fill out the list of product parameters and their values to pass to the application.
- Specify the value of the Product parameter by passing it from the Select a card element. This will pass the selected product to the application. To do this, click → Process parameter and select the Select a card element and its Product parameter.
- Specify the value of the Contact parameter by passing it from the process parameter. This will pass the data of the consultation’s contact to the application. To do this, click → Process parameter and select the existing process parameter with the contact ID.
- Specify the value of the Product parameter by passing it from the Select a card element. This will pass the selected product to the application. To do this, click
-
Connect the Pre-configured page and Sub-process (Call activity) elements on the diagram using a conditional flow. Set the "Application" result of the Pre-configured page element as the flow’s condition.
-
Connect the Pre-configured page element and the termination event on the diagram using a conditional flow. Set the "Skip" result of the Pre-configured page element as the flow’s condition.
As a result, you will be able to use the process for selling bank products to the customers, from consultation to application.
Step 2. Set up the process launch from the consultation panel
To run the process from the consultation panel, bind it to a specific consultation subject. For example, the "Bank cards" theme of the "Sell" theme block. Learn more about how to set up the consultation blocks and themes: Set up the consultation panel.