Filters
You can filter records in the lists, calendars, analytic widgets, and galleries in Creatio. The following tools can be used to search and filter records in sections:
- Quick filters
- Advanced filters
Quick filters
Creatio sections can have quick filters (Fig. 1). You can use a quick filter to filter data by the most frequently used conditions of date/time, by lookup, or by a created, custom condition.
No-code creator that has sufficient permissions can set up quick filters for any section. Learn more: Set up quick filter components.

For example, the Calendar section of the Productivity app contains a quick filter as it is needed to analyze employee activity during a specified period of time.
Creatio saves the filter settings when the page is updated when you switch sections or log out and log back in to Creatio. To remove a quick filter by time period or lookup, click the  button in its right part. To remove a custom quick filter, clear or select its checkbox depending on the filter settings.
Quick filter by time period
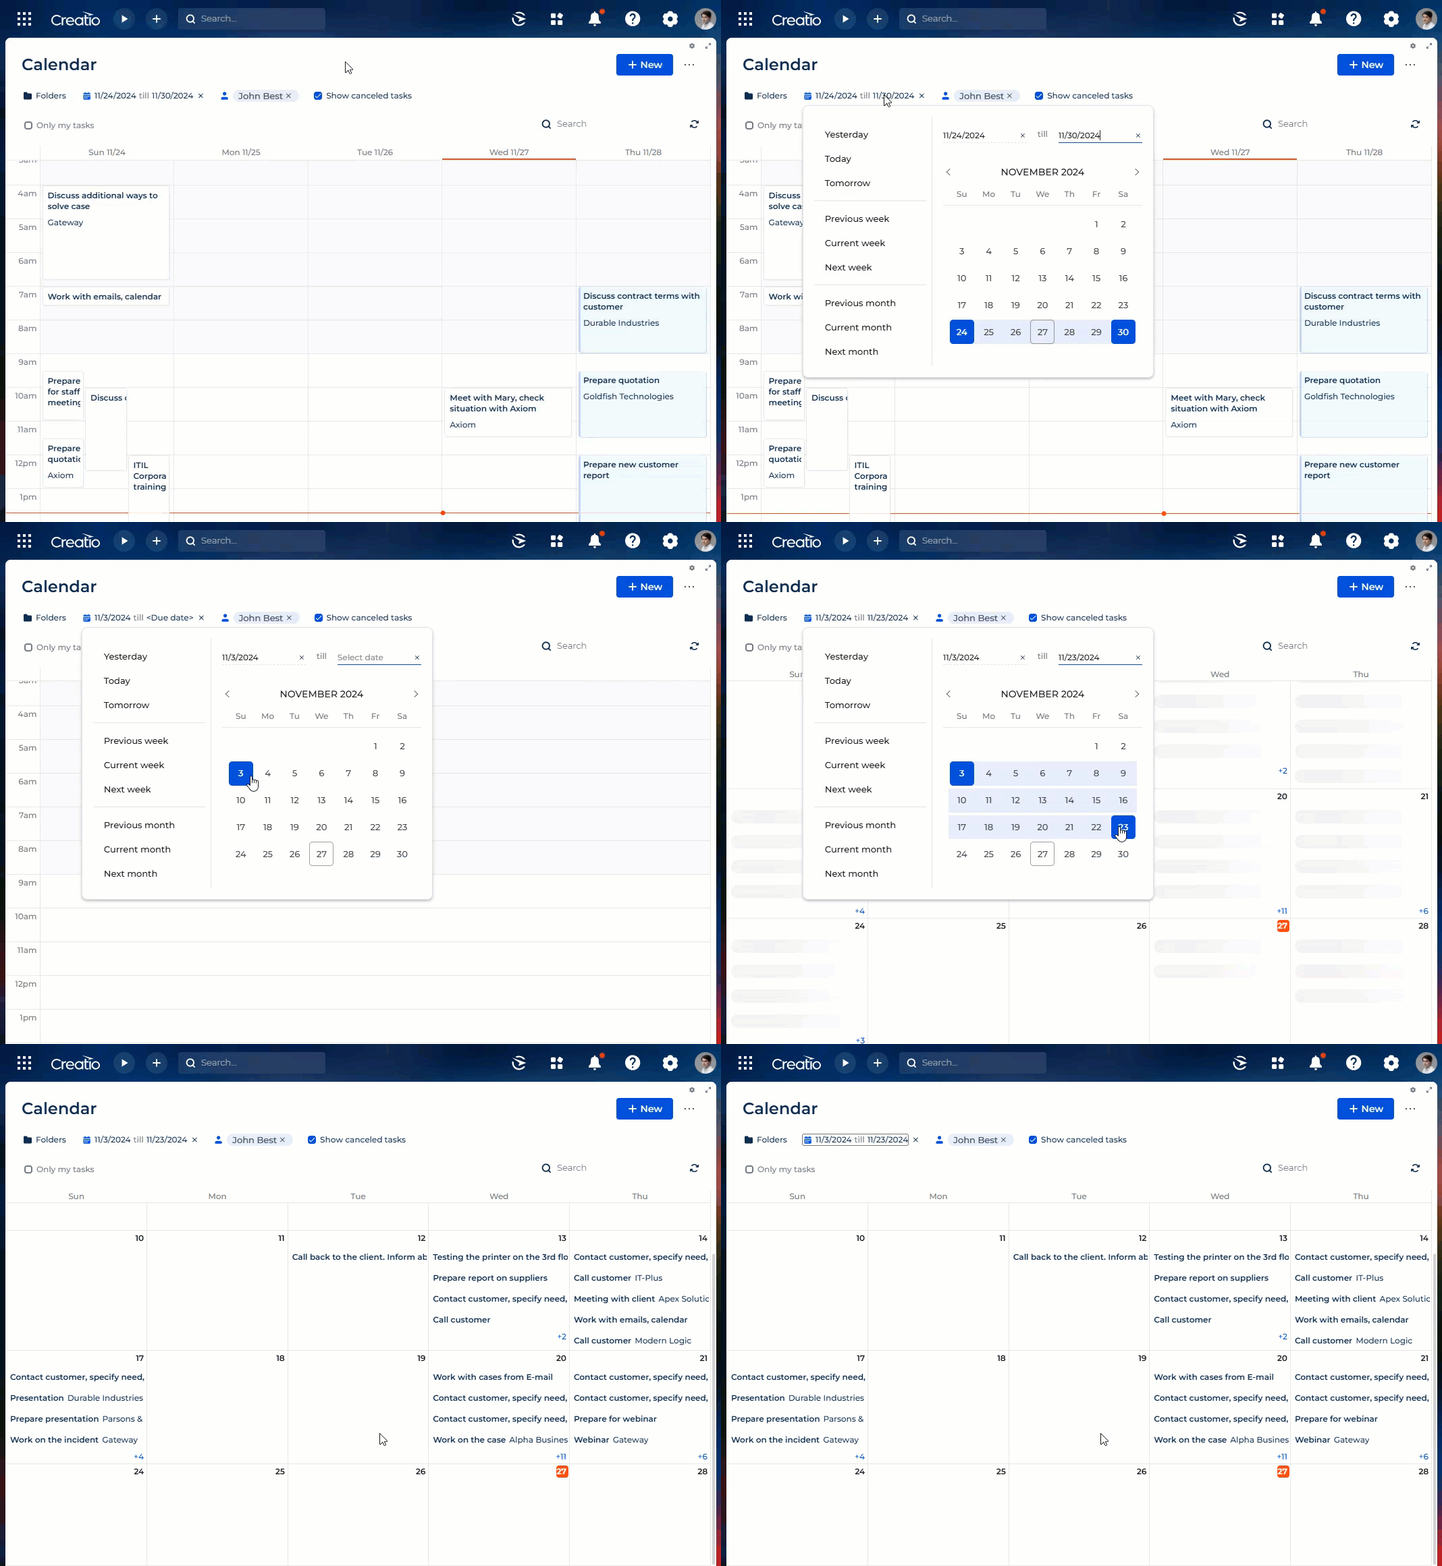
You can filter records by one date or date range, for example, to display the activities for the current or previous week.
The filter includes the presets by day, week, month, and quarter. You can also set a custom period by specifying its start and end dates using the built-in calendar.
Previous, current, and next week, month, and quarter are actual calendar weeks, months, and quarters. For example, if the previous month was December, then when you select the "Previous month" period in the Activities section, the activities will be displayed for the period of time between 1st and 31st of December.
To set up a custom filter period, select the start and end date of the period using the built-in calendar. You can open the calendar by clicking the start or end date of the period (Fig. 2).
Since Creatio 8.3.3, the filter also supports fiscal periods that align with your organization's fiscal calendar.
To enable fiscal periods for a quick filter, no-code developer needs to select the Show fiscal periods checkbox in the Freedom UI Designer setup area of the quick filter. Learn more: Set up Quick filter components.
Creatio derives fiscal boundaries from the "Start date of the fiscal year" (FiscalYearStartDate code) system setting. Creatio uses only the month; the day is always 1. If the setting is empty, Creatio uses calendar boundaries instead.
After you enable fiscal periods, the quick filter displays a Fiscal toggle panel with the following periods (Fig. 3):
- "Previous week", "Current week", and "Next week" filter by fiscal weeks.
- "Q1", "Q2", "Q3", and "Q4" filter by fiscal quarters.
- "First half year" and "Second half year" filter by fiscal half-years.
- "Previous year", "Current year", and "Next year" filter by fiscal years.
Creatio applies fiscal boundaries consistently across lists, dashboards, widgets, and details.

Quick filter by lookup
Apply a filter by lookup to display records by one or more lookup values. For example, in the Calendar section of the Productivity app, the filter displays records by activity participants.
To view data by one or more values, click the filter and select the needed values in the dropdown menu (Fig. 4).

Custom quick filter
You can use a filter in the form of a checkbox that applies or cancels a preconfigured condition. For example, the Calendar section of the Productivity app has a filter that displays cancelled activities. To manage this filter, select or clear the checkbox (Fig. 5).

Advanced filters
The Filters panel lets you build complex record filters directly on a Freedom UI page. You can combine multiple conditions, group them with logical operators, and filter by columns of connected objects — without leaving the page.
If Filters are not available on your page, a no-code creator can add them. Learn more: Set up Filters components.
To filter records in folders and analytic widgets, follow the instructions: Filters (Creatio 8.3 documentation).
Click Filters on the page to open the filter panel (Fig. 6). If no conditions are set yet, Creatio displays an empty state and prompts you to add the first condition.
Each condition consists of a column, an operator, and a value. The panel shows each condition in a collapsed view so you can read it as a short phrase. Click a condition to expand it and change its settings.
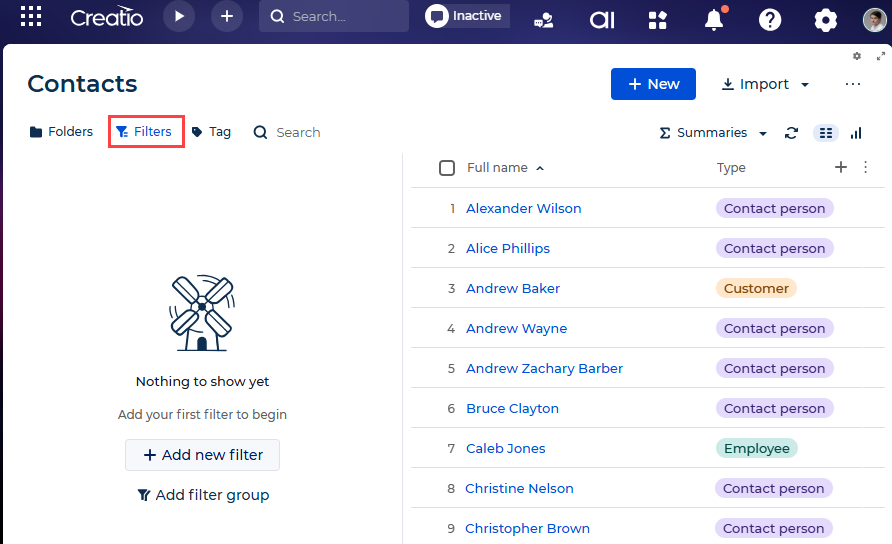
Click Apply to filter the records. Click Clear all to remove all conditions from the panel. Creatio saves the filter state for the current page and restores it the next time you open the panel.
When you filter contacts, the menu that opens when you click Add filter can also include pre-defined filters. These are ready-made conditions that installed Creatio apps, for example, Marketing Campaigns or Segmentation, add to the Pre-defined filters group of the menu. Learn more: Pre-defined filters.
Filter by object column
You can filter records by any column of the current section. For example, filter contacts by "Job Title" or accounts by "Category."
Filter accounts by their category in the Accounts section.
-
Click Filters to open the filter panel.
-
Click Add filter.
-
Select the "Category" column.
Fig. 7 Select a column for the filter condition 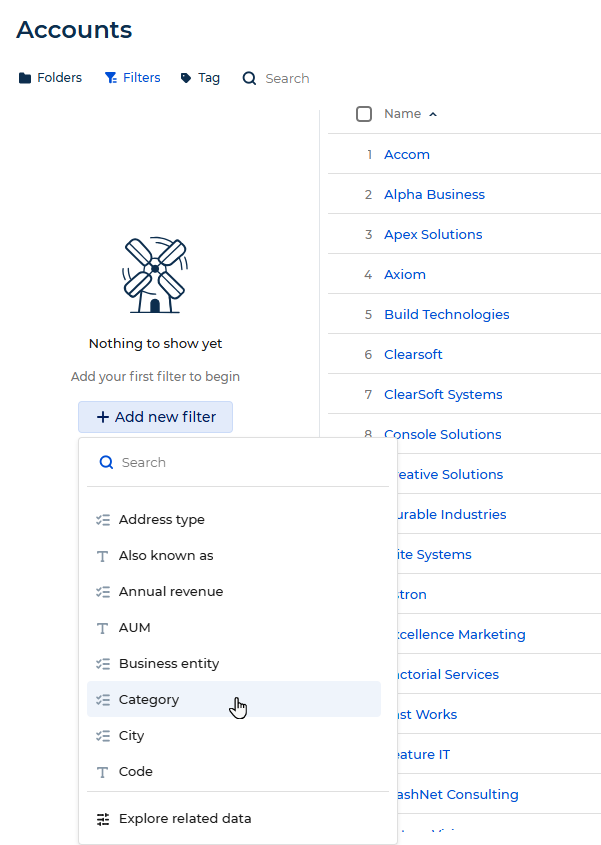
-
Select the "is" operator.
-
Select "A" from the dropdown list.
-
Click Apply.
Fig. 8 Filter by account category applied 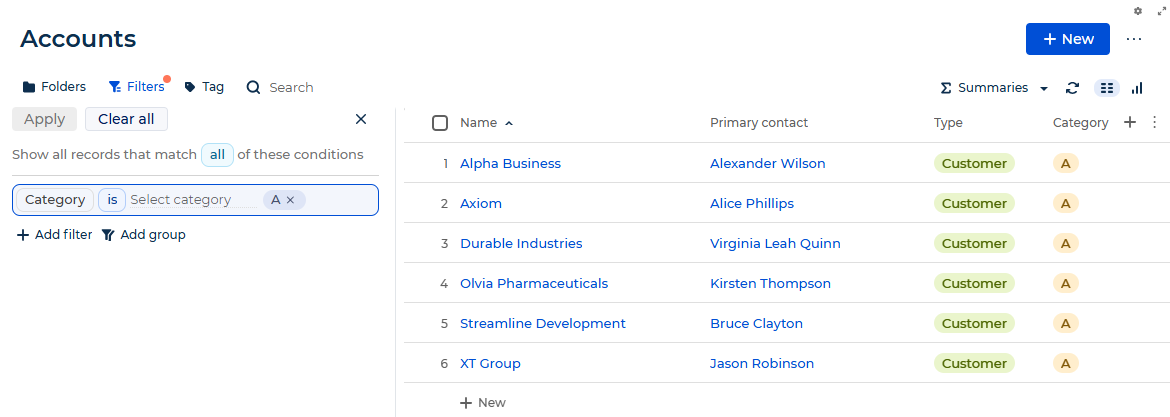
As a result, Creatio displays only accounts whose category is "A."
Filter by date
For date and date/time columns, you can filter by an exact value or a relative period. Exact values let you specify a precise date, date and time, or time. Relative periods — such as previous month, current quarter, or next week — update automatically so the filter stays valid over time without manual updates.
To set the filter value, select the "is" operator, then choose a value type from the menu. To set a date and time range, use the "between" operator instead.
The following value types are available:
Exact date, date and time, or time
Select Exact date, Exact date & time, or Exact time to filter by a specific value. Use the "between" operator to set a range with a start and end value.
Display all tasks created during the event preparation period — from 9:00 AM on May 10 to 5:30 PM on June 10.
-
Click Filters to open the filter panel.
-
Click Add filter.
-
Select the "Created on" column.
-
Select the "between" operator.
-
Enter "5/10/2026 9:00 AM" as the start value.
-
Enter "6/10/2026 5:30 PM" as the end value.
-
Click Apply.
Fig. 9 Filter by date range 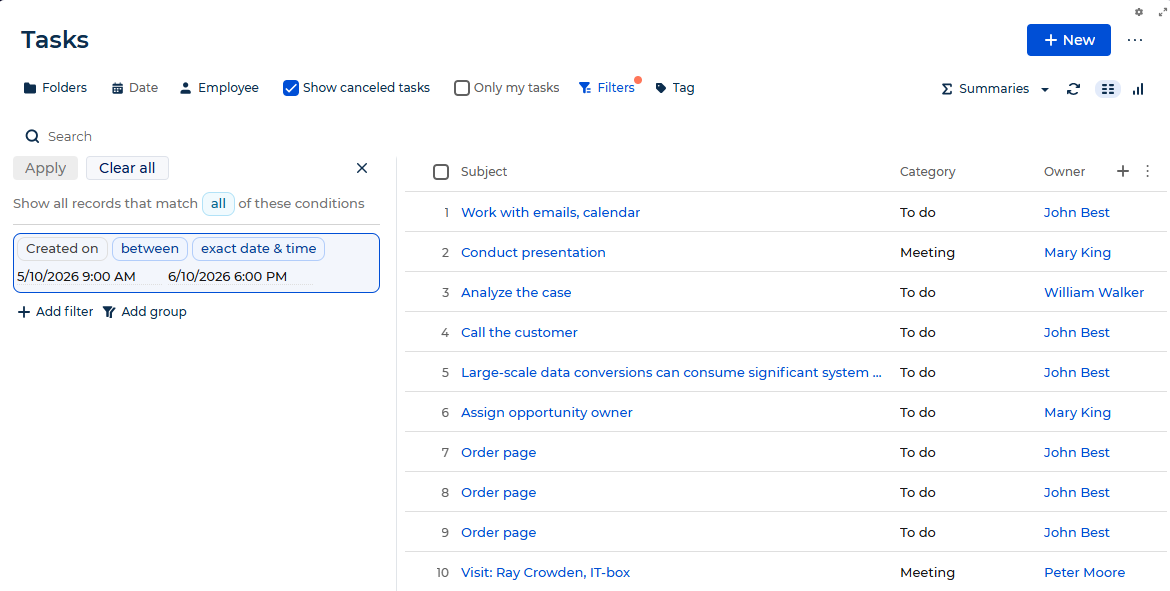
As a result, Creatio displays only tasks created within the specified date and time range.
Hour
Select Hour to filter by the previous, current, or next hour. You can also filter by a specific number of previous or next hours by selecting Previous hours... or Following hours... and entering the needed number. Only integer numbers are accepted.
The previous, current, or next hour is a full clock hour — from the 1st to the 60th minute. For example, if the current time is 2:34, the next hour is the period from 3:00 to 3:59, not from 2:34 to 3:33.
Day
Select Day to filter by yesterday, today, or tomorrow. You can also filter by a specific number of previous or next days by selecting Previous days... or Following days... and entering the needed number. To filter by a specific day of the week, select Day of the week... To filter by a specific day of the month, select Day of the month...
Display all tasks created yesterday.
- Click Filters to open the filter panel.
- Click Add filter.
- Select the "Created on" column.
- Select the "is" operator.
- Select "Day" → "Yesterday".
- Click Apply.
As a result, Creatio displays only tasks created yesterday.
Week
Select Week to filter by the previous, current, or next week. A week is a calendar period from Monday to Sunday — not a 7-day period starting from the current day. For example, if today is Wednesday, the next week is the period from next Monday to Sunday.
Month
Select Month to filter by the previous, current, or next month. To filter by a specific month, select Month... and choose the needed month. A month is a full calendar month. For example, selecting "Previous month" in December shows records for December 1–31.
Quarter
Select Quarter to filter by the previous, current, or next quarter. A quarter is a 3-month calendar period: Q1 is January–March, Q2 is April–June, Q3 is July–September, and Q4 is October–December.
Half-year
Select Half-year to filter by the previous, current, or next half-year. The first half-year is January–June, the second is July–December.
Year
Select Year to filter by the previous, current, or next year. You can also filter by a specific year. A year is a full calendar year — not a 12-month period from the current date.
Every year
Select Every year to filter by recurring annual dates, matching records by day and month only regardless of year. The following options are available:
- Today — displays a list of records whose date matches the current date not counting the year. For example, the contact's birthday is today.
- Every year, exactly in... — displays a list of records whose date will come after a specified number of days not counting the year. For example, the contact's birthday is exactly in 5 days.
- Every year, within... next days — displays a list of records whose date falls on one of the next days not counting the year. For example, the contact's birthday is within 5 days or less.
- Every year, within... previous days — displays a list of records whose date falls on one of the previous days not counting the year. For example, the contact's birthday was 5 days ago or less.
Display all contacts whose birthday is within the next 7 days.
-
Click Filters to open the filter panel.
-
Click Add filter.
-
Select the "Birth date" column.
-
Select the "is" operator.
-
Select "Every year" → "Every year, within... next days" and enter "7."
Fig. 10 Filter by annual events 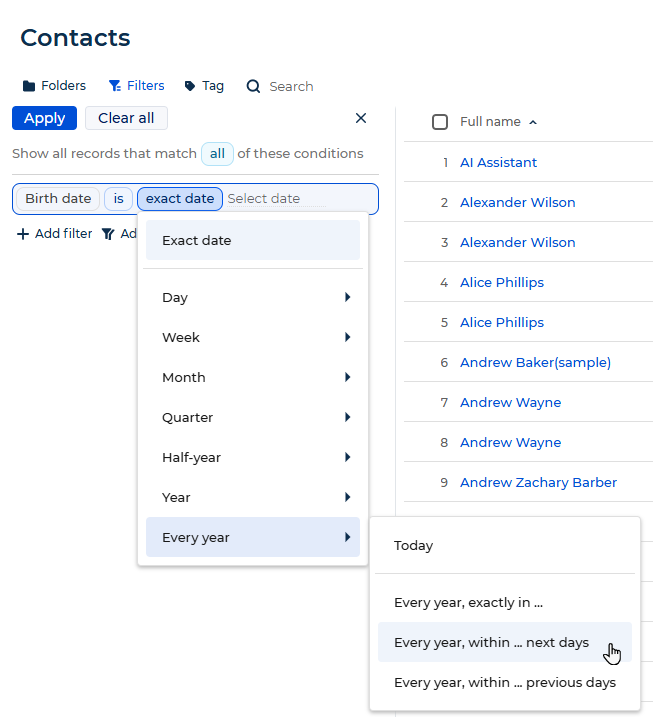
-
Click Apply.
As a result, Creatio displays only contacts whose birthday falls within the next 7 days, regardless of year.
Filter by connected object column
You can filter records by columns of connected objects. For example, filter contacts by the type of their related account, or filter tasks by the category of the account connected to the task.
Filter activities in the Tasks section by a certain type of connected company.
- Click Filters to open the filter panel.
- Click Add filter.
- Select Explore related data to open the list of connected objects.
- Open the "Related objects" tab.
- Select the "Account" path, then select the "Type" column → Select.
- Select the "is" operator.
- Select "Customer" from the dropdown list.
- Click Apply.
As a result, Creatio displays only tasks connected to accounts of the "Customer" type.
When the filter is set up for "Account type is not Customer", activities will be displayed for the accounts that are not customers. This also applies to empty values, so accounts whose "Type" field is unfilled will also be displayed.
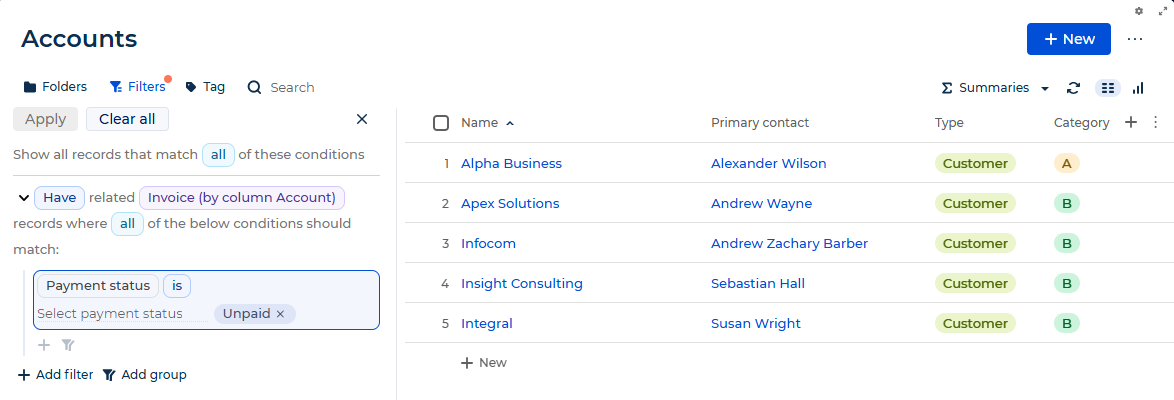
You can view the full attribute path of any condition to verify which object column it uses. Click  in a condition to view the selected attribute path and column.
Filter by reverse relation
You can filter records by objects that reference them — for example, show only accounts that have at least one related invoice with a specific payment status.
Find all accounts that have unpaid invoices.
-
Click Filters to open the filter panel.
-
Click Add filter.
-
Select Explore related data to open the list of connected objects.
-
Open the "Related objects" tab.
-
Select the "Invoice (by column Account)" path, then select "At least one record" → Select.
-
Click the + button inside the filter block to add a sub-condition. Select the "Payment status" column, set the operator to "is", and select "Unpaid."
-
Click Apply.
Fig. 12 Filter by reverse relation 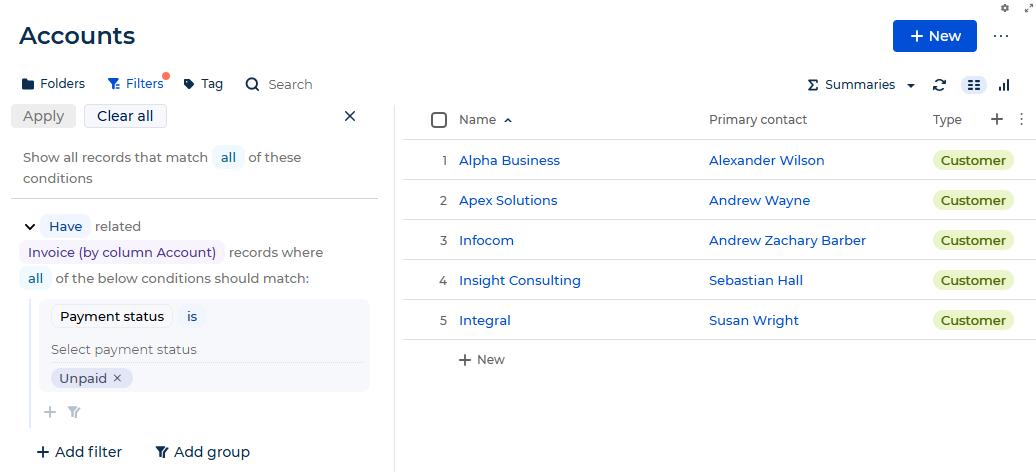
As a result, Creatio displays only accounts that have at least one invoice with the "Unpaid" payment status.
Filter by number of records
Use aggregate filters to filter records based on the number of connected records — for example, show only contacts who have more than 5 related calls.
Find contacts who have more than 5 related calls — to identify the most actively engaged contacts in the sales pipeline.
-
Click Filters to open the filter panel.
-
Click Add filter.
-
Select Explore related data to open the list of connected objects.
-
Open the "Related objects" tab.
-
Select the "Activity (by column Contact)" path, then select "Number of records" → Select.
-
Select the "Number of records" condition, set the operator to "more than", and enter "5."
-
Click the + button inside the filter block to add a sub-condition. Select the "Category" column, set the operator to "is", and select "Call."
-
Click Apply.
Fig. 13 Aggregate filter by connected object 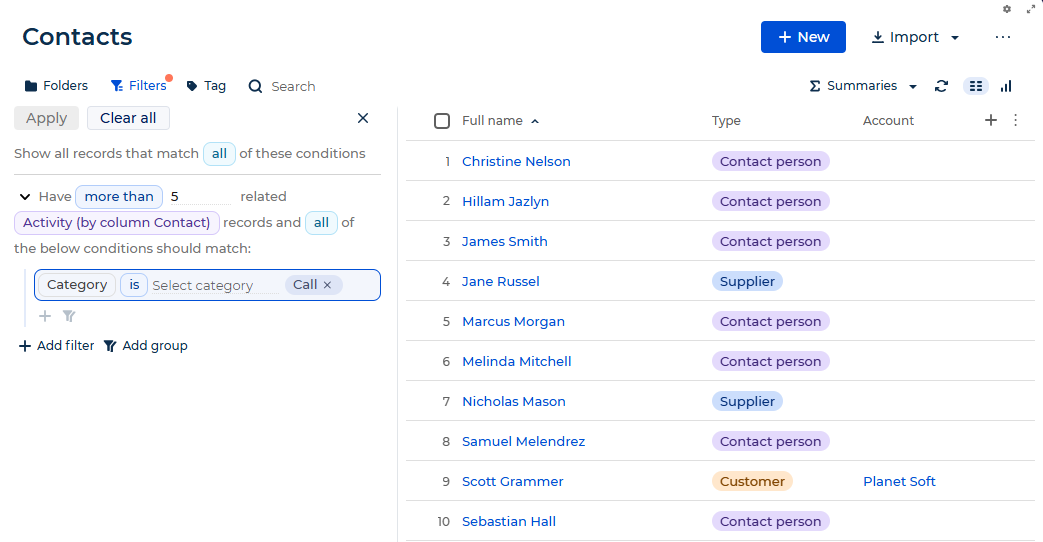
As a result, Creatio displays only contacts who have more than 5 related calls. Use this list to focus follow-up efforts on the most actively engaged contacts.
Filter by aggregation value
You can filter records based on a calculated value across connected records — for example, show only accounts whose total contract amount exceeds a certain threshold.
Find all accounts whose total contract amount is more than 10,000.
-
Click Filters to open the filter panel.
-
Click Add filter.
-
Select Explore related data to open the list of connected objects.
-
Open the "Related objects" tab.
-
Select the "Contract (by column Account)" path, then expand "Amount" and select "Sum of values" → Select.
-
Select the "more than" operator and enter "10000."
-
Optionally, click the + button inside the filter block to add a sub-condition and narrow the results further. For example, select the "Status" column, set the operator to "is", and select "Signed" to count only signed contracts.
-
Click Apply.
Fig. 14 Filter by aggregation value 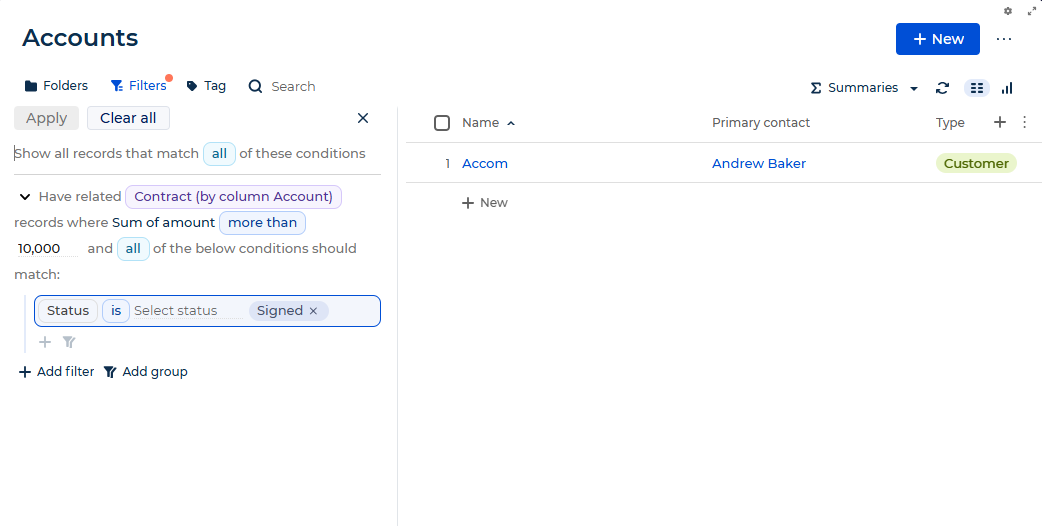
As a result, Creatio displays only accounts whose total contract amount exceeds 10,000.
Filter by complex hierarchy
You can filter records using a multi-level hierarchy of connected objects — for example, find contacts who are owners of accounts that have at least one opportunity with a budget over a certain threshold.
Find contacts who are owners of accounts that have at least one opportunity with a budget over $150,000.
-
Click Filters to open the filter panel.
-
Click Add filter.
-
Select Explore related data to open the list of connected objects.
-
Open the "Related objects" tab.
-
Select the "Account (where Contact is Owner)" path, then select "At least one record" → Select.
-
Click the + button inside the filter block to add a sub-condition.
-
Select Explore related data, open the "Related objects" tab, and select the "Opportunity (by column Account)" path, then expand "Budget" and select "Minimum value" → Select.
-
Select the "more than" operator and enter "150000."
-
Click Apply.
Fig. 15 Filter by complex hierarchy 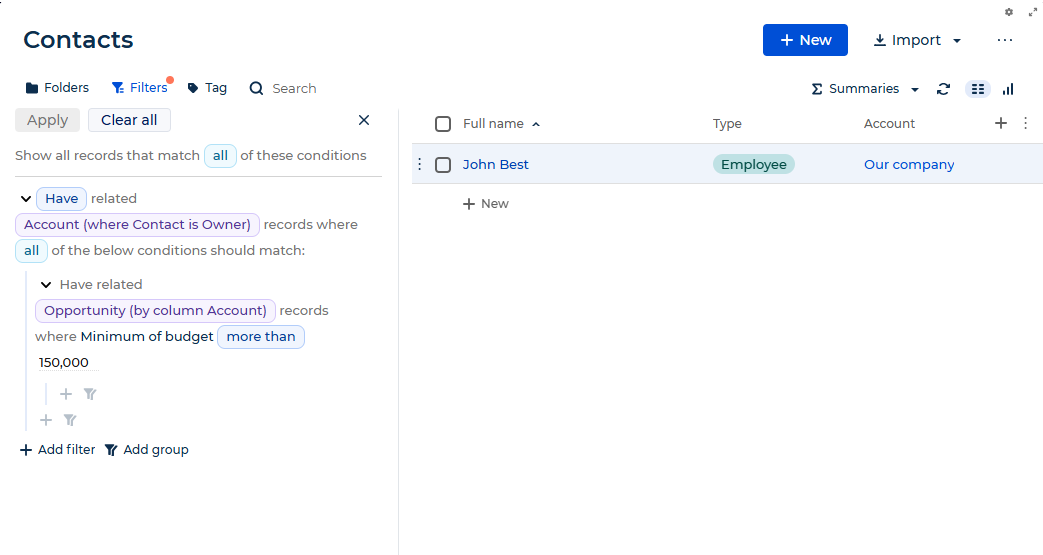
As a result, Creatio displays only contacts who are owners of accounts that have at least one opportunity with a budget over $150,000.
Group conditions with logical operators
You can combine conditions using "all" (every condition must match) or "any" (at least one must match) logical operators. To build a more complex filter, click Add group to add a nested condition group with its own logical operator.
Find contacts to invite to a car sales campaign: customers who meet the legal driving age requirement in their country — at least 18 in the United Kingdom or at least 21 in the United States.
-
Click Filters to open the filter panel.
-
Click Add filter and add the condition: "Type" "is" "Customer."
-
Click Add group. This creates Group 1 at the root level. Set its operator to "any".
-
Inside Group 1, click
 . This creates Group 1.1. Set its operator to "all".
 -
Inside Group 1.1, add the condition: "Age" "at least" "18."
-
Inside Group 1.1, add the condition: "Country" "is" "United Kingdom."
-
Inside Group 1, click
. This creates Group 1.2. Set its operator to "all". -
Inside Group 1.2, add the condition: "Age" "at least" "21."
-
Inside Group 1.2, add the condition: "Country" "is" "United States."
-
Make sure the root group operator is set to "any".
-
Click Apply.
Fig. 16 Audience segmentation filter for a car sales campaign 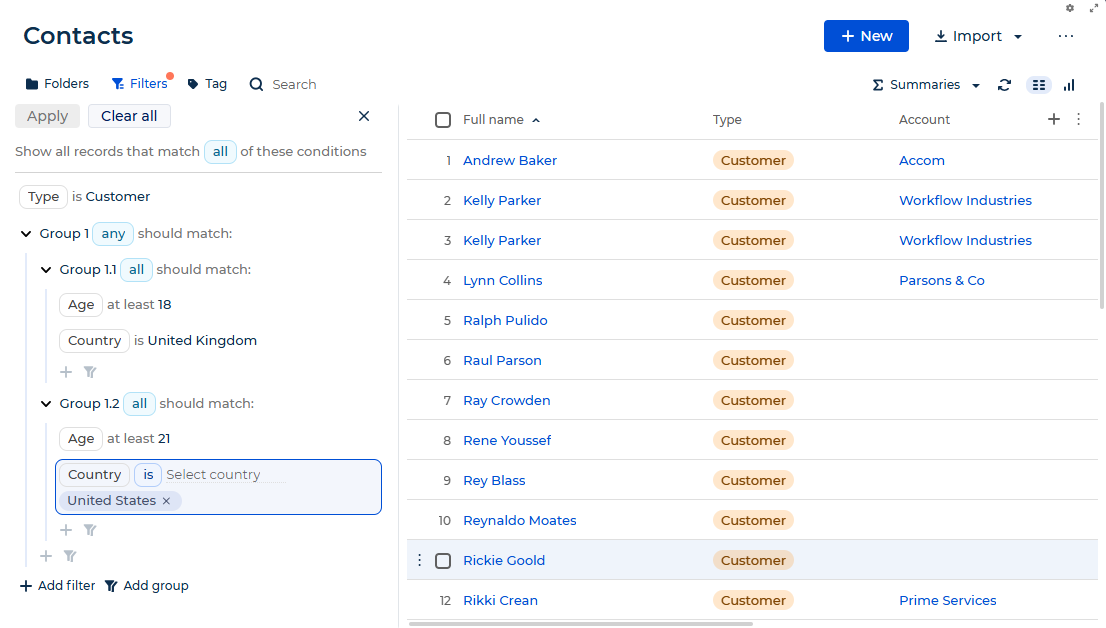
As a result, Creatio displays only contacts of the "Customer" type who are of legal driving age in their country.