Conduct med rep visits
Pharma Creatio manages med rep’s "to-do" list during the visits and records results of each activity. While in the field, med reps use mobile devices to perform visit actions (presentation, SKU monitoring, order placement, etc.) and report on their results. We recommend that med reps use tablets for the best experience when working in the field. Visit pages are most informative when viewed in horizontal layout.
Only the users that are included to the "Sales representatives" role can use the Pharma features in the mobile app.
Medical rep action results are recorded in Creatio on the Actions - Visit detail of the visit activity page.
Use the Field sales rules lookup to customize the list of visit actions.
All actions during a visit can be performed in both online and offline modes of the mobile app. When working offline, you do not need to maintain a constant Internet connection. It is required to periodically synchronize the mobile application with the main application to save the changes made when using the mobile device on Creatio server. You can select the preferable mode in the "Mobile application operation mode" system setting ("MobileApplicationMode" code).
To synchronize the mobile application with the main application:
-
Make sure that the mobile device has established an Internet connection.
-
Open the Settings section of the mobile application.
-
Click the Synchronization button.
As a result, the data from the primary application will be displayed in the mobile app and the primary application will display the records that were created using the mobile app.
Online mode does not require regular manual synchronization.
To perform an action during a visit:
-
Open the visit page.
-
On the Visit actions detail, set the switcher next to the needed action to the "Completed" position.
The switcher of a completed action is highlighted in blue (Fig. 1).As a result, the visit action will be considered completed. You can finish the visit once all required actions are completed (you can skip optional visit actions). A field employee cannot complete a required action unless all preceding required actions on the agenda have been completed. Once the last required action is completed, the visit is considered finished. The action that is not required can be skipped.
Fig. 1 Completing visit actions in the mobile app 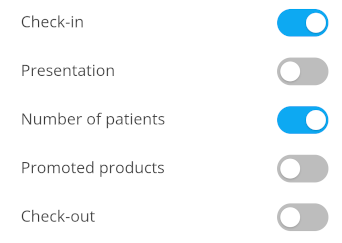
You can finish the visit once all required actions are completed. To perform the next required action, the previous required action must be completed. As a result, once the last required action is completed, the visit is considered finished. The action that is not required can be skipped.
Show a presentation
If the visit agenda requires conducting a presentation, the "Presentation" action becomes available to the employee. To do this, set the switcher next to the needed action to the "Completed" position.
As a result, a presentation file will open in your mobile app, so you can use it during the presentation.
Specify the number of patients
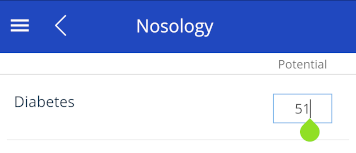
Filling out the number of patients whose diagnoses require treatment with the promoted products, is an important visit action, which affects the categorization of the corresponding physician. Set the switcher next to the needed action to the "Completed" position to complete the "Number of patients" action before filling in the actual number.
A window will open with the list of medical conditions (nosology) that the physician treats and a Potential field next to each condition. Specify the number of patients that you learned from the physician in the Potential field of the corresponding nosology (Fig. 2).
Specify promoted products
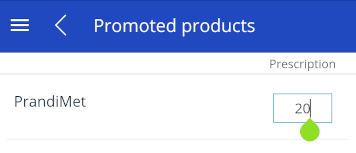
Information about the number of prescriptions of the promoted products is used to calculate the physician’s loyalty and the corresponding categorization. The "Promoted products" action is required. To specify the number of prescriptions, mark the corresponding action as "Completed."
As a result, the app will display the list of promoted products. Enter the number of prescriptions for each product in the Prescriptions field (Fig. 3).
Monitor SKU
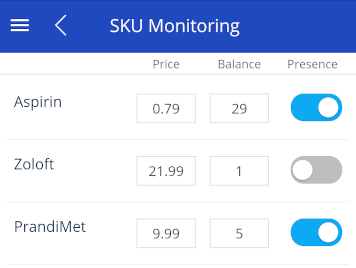
During a visit, tap the SKU Monitoring action. To do this, set the switcher next to the needed action to the "Completed" position.
After you complete this action, a page will open, where you can enter how much of each of the promoted products is left in stock (Fig. 4).
You can use your mobile device’s camera to take a photo of the product facings and attach it to the visit. To do this:
-
On the section page, click the Edit button (Fig. 5).
Fig. 5 Opening a visit for editing 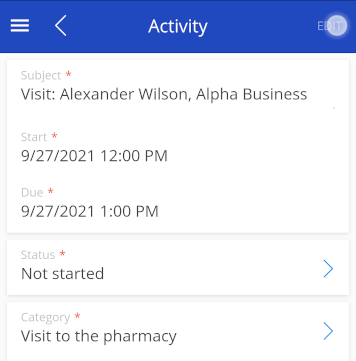
-
On the Attachments detail, click the
 button.
 -
Select the photo you made earlier and attach it to the activity. You can also use the Take picture action. The mobile device will switch to its camera mode. The picture taken will be automatically added to the Files detail.