Manage a list
Creatio can display data in app sections and on some pages as lists. A list is an index of records. Each record contains a set of fields (columns). The list can display any of the object columns as well as aggregated columns and data of linked objects.
Out of the box, Creatio displays list data as a simple table. Each record corresponds to a single row. Rows are numbered to streamline navigation and data management. You can select multiple records and manage the selected records in bulk.
The list displays phone numbers, emails, and URLs as links. If Creatio is integrated with a phone service, click the number to initiate a call from the communication panel. Otherwise, clicking the field runs the application that handles phone calls. Click an email to open the new email window of the default email client. Click an URL to open the web page in a new tab. You can display some other values in the list as links to enable users to open Creatio records quickly. For example, you can display the value of the Owner field as a link to enable users to open the page of the record owner from the list.
You can connect list to another list to filter records, for example, display customers in specific countries. You can also select one or more records in the connected list to filter records by that record, for example, display customers in a specific country.
Set up list columns
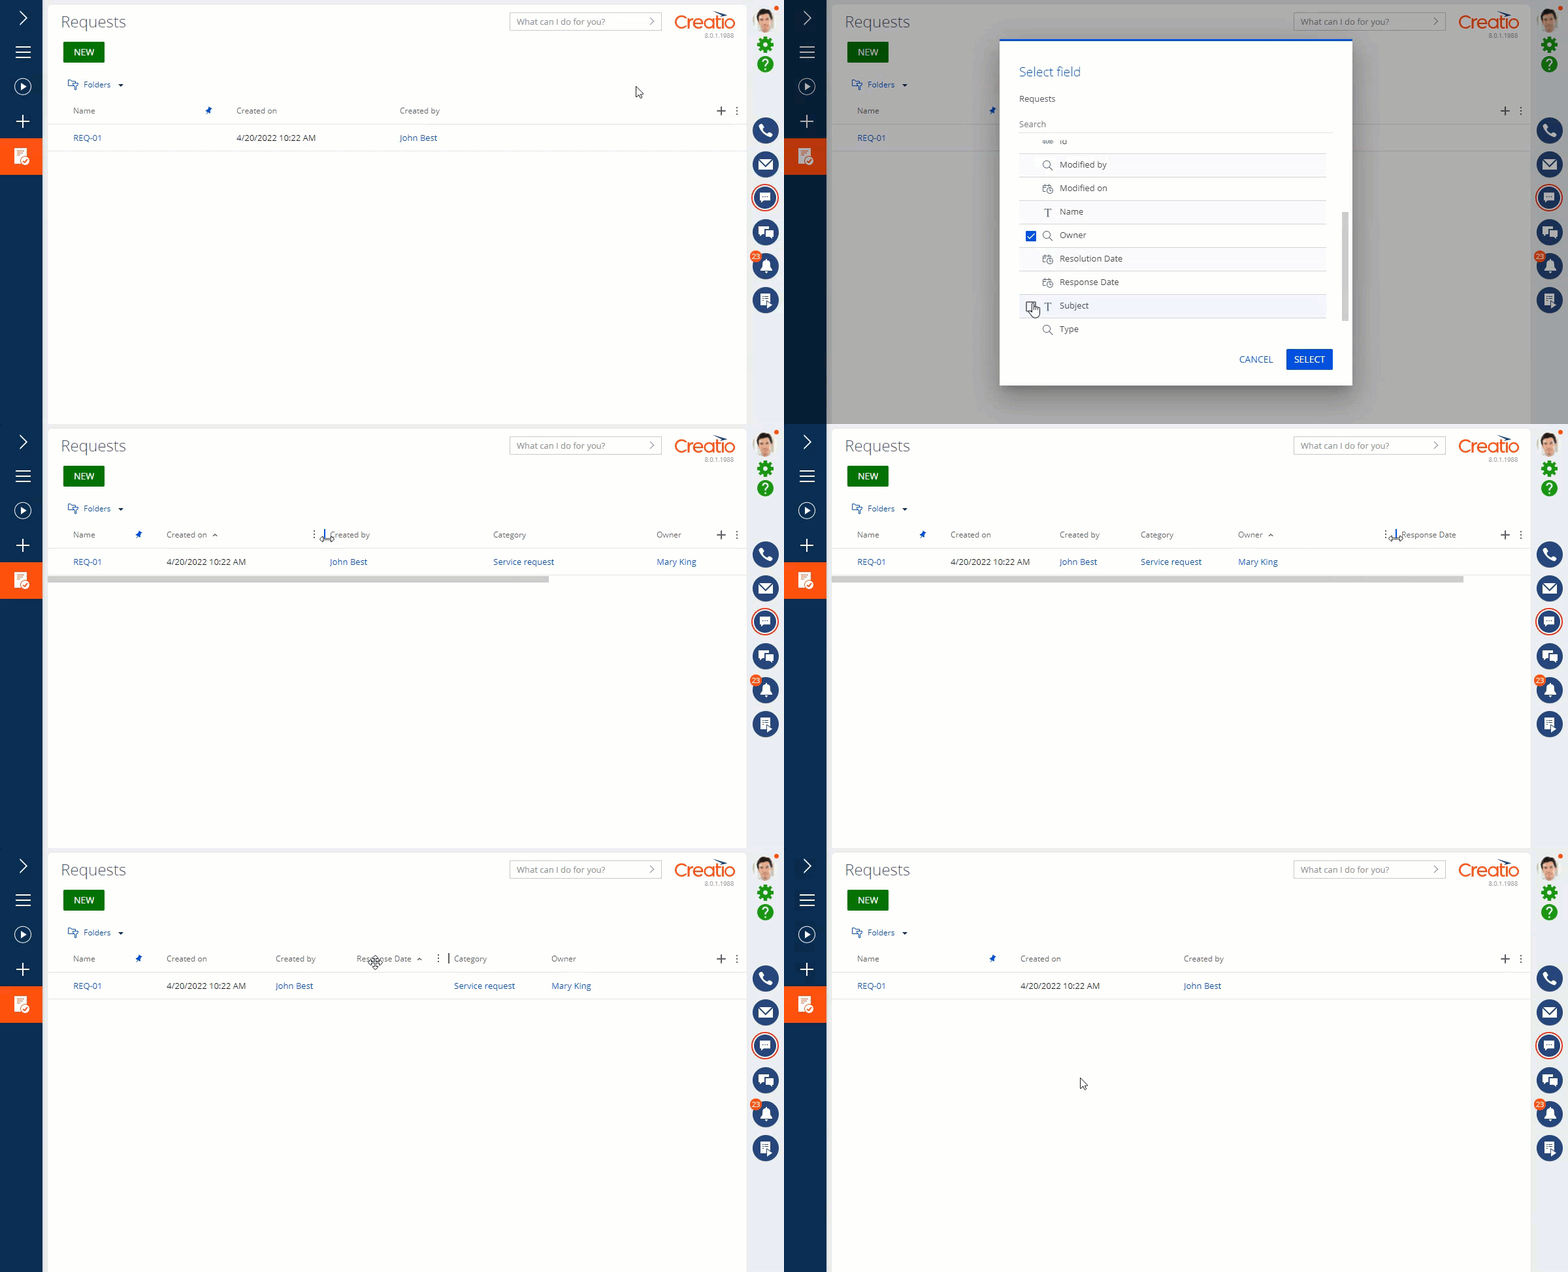
You can customize the appearance of list columns and their sorting parameters (Fig. 1). System administrators and users that have permissions to the "List setup for all users" ("CanCreateDefaultGridSettings" code) system operation can customize list columns for all users, including external users. Learn more about customizing the columns in the table below. For data security reasons, external users cannot add system columns, for example, "Created on," "Modified by." If you want to display them to external users, the system administrator can set up the list.

| Action | Steps to take |
|---|---|
| Add a column | Click You can add columns that contain aggregate functions and display the number of records. This includes columns that display the value of the first record linked via a reverse connection, with or without filter and sorting conditions. For example, this is useful if you need to display the results of the last contact activity. |
| Hide a column | Click  to the right of its title → Hide. to the right of its title → Hide. |
| Freeze a column | Click  to the right of its title → Freeze. to the right of its title → Freeze. |
| Unfreeze a column | Click  to the right of its title. to the right of its title. |
| Resize a column | Drag  to the right of the column title left to reduce the size or right to increase it. to the right of the column title left to reduce the size or right to increase it. |
| Move a column | Drag its title cell to the new place. |
| Sort the list records | Select a column by which to sort the data and click  next to its title. Click again to change the sorting order: next to its title. Click again to change the sorting order:  for ascending order or for ascending order or  for descending order. for descending order. |
| Disable sorting | Click  or or  to the right of the column title until the color changes to gray to the right of the column title until the color changes to gray  . . |
| Reset to default settings | Click  in the top right → Reset to default list settings. in the top right → Reset to default list settings. |
| Save your list settings as default settings for all users | Click in the top right → Save list settings for all users. The settings are saved for external users as well. If a user has custom list settings applied, Creatio does not override them. However, it applies the saved settings when a user resets to default column settings. The action is available for system administrators and users that have permissions to the "List setup for all users" ("CanCreateDefaultGridSettings" code) system operation. |
Add an aggregated column
You can set up aggregation for numeric, date, datetime columns of the connected objects and filter the aggregated values. Numeric columns support minimum, maximum, sum, average functions. Date and datetime columns support minimum and maximum functions. For example, you can get the summary information about the "Account" object by the connected "Activity" object.
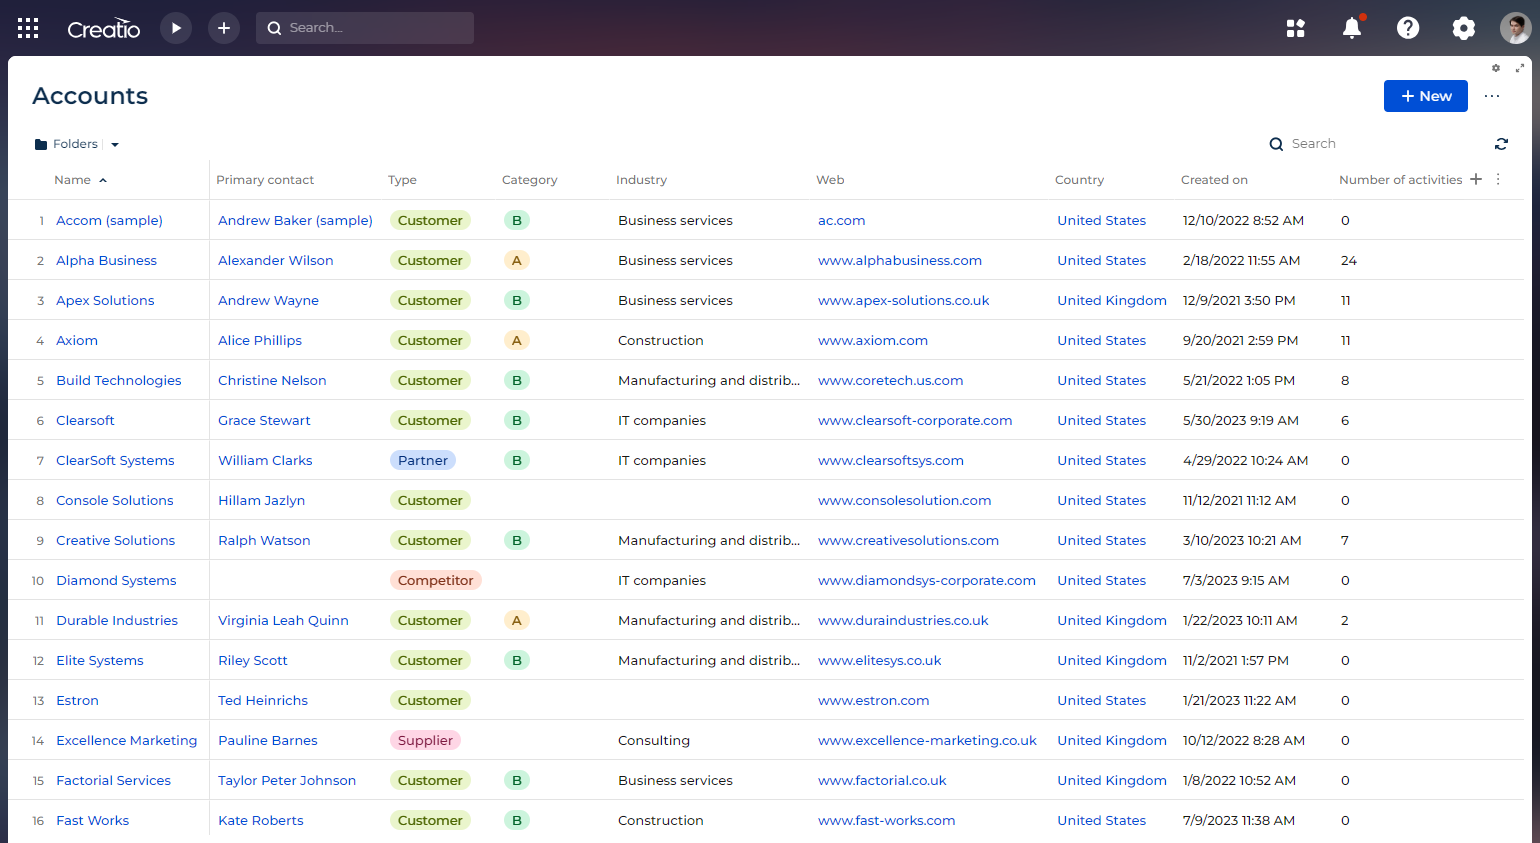
Display the number of current contact’s activities connected to each account in the list of the Accounts section.
-
Open the Accounts section.
-
Click
 in the top right. This opens a window.
 -
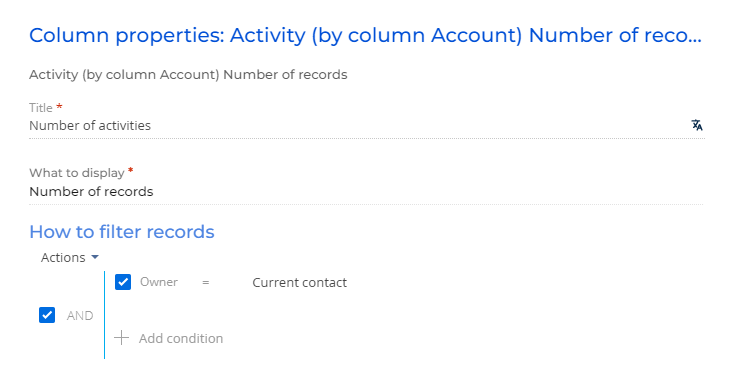
Click Related objects → Activity (by column Account) → Number of records → Select. This opens a window (Fig. 2).
-
Enter the column caption, for example, "Number of activities." You can click the
 button to the right to localize the caption to other languages you use in the app.
 -
Specify the data aggregation filter. For example, to display the number of activities whose owner is the current contact, apply filtering by "Owner: Current contact."
Fig. 2 Set up an aggregate column 
-
Click Save.
As a result, the accounts list will display the number of activities of the current user for each account (Fig. 3).

Edit data directly in the list
The component can let you edit records directly in the list without opening their form pages. To edit a list cell:
- Double-click an editable cell. The editability status is represented by the
 or
or  icon on selected cells.
 - Enter the new cell value. This brings up the control panel at the bottom.
- Click the Save all or Discard button on the control panel to save or cancel changes, respectively.
If Creatio is unable to validate the edited data, the  icon appears to the right of the cell. Hold the pointer over the icon to view the error description. The same icon appears at the beginning of the row.
Cells of the following columns and records are non-editable:
- System columns, for example, Created on.
- Aggregate columns.
- Columns of linked objects.
- Columns you lack permissions to edit. Creatio checks column permissions when you try to save changes.
- Records you lack permissions to edit. Creatio checks record permissions when you try to save changes.
Keyboard shortcuts
Keys | Action |
|---|---|
Arrow keys | Move between individual list cells. Works in both editable and non-editable lists. |
Ctrl + C | Copy the content of the selected cell. Works in both editable and non-editable lists. |
Enter | Edit the selected cell. Apply changes to the selected cell and select the cell below. |
Arbitrary characters | Replace the cell value with the characters. |
Tab | Apply changes to the selected cell and select the cell to the right. |
Delete | Clear the selected cell. |
Shift + Delete | Delete the record that contains the selected cell. |
Spacebar | Switch the checkbox value. |
Ctrl + S | Save changes. |
Shift + Enter | Add a record below the selected cell. |
Ctrl + LMB | Select multiple records one by one. |