Manage Portal Creatio in the main application
This article covers how administrators in the main Creatio application can manage portal users and portal access permissions.
Portal administrators can perform some of these operations as well. Learn more: Manage a portal organization account.
You can create individual portal users or portal organizations – groups of portal users connected to one account. Organizations allow you to manage your customers’ employees who work with the portal. You can appoint portal administrators from users in the organization. Administrators can create and delete users, assign permissions and invite new users to the portal.
Creatio lets you configure which data and functionality are available for portal users. Assign portal user permissions in several ways:
-
For the "All portal users" parent role. All portal users in this role will obtain the same access permissions.
-
For each user separately. Each user will obtain separate access permissions.
-
For a portal organization. Users will inherit the permissions of their organization.
-
For user groups. You can create subordinate organizational roles in the "All portal users" role, and configure access permissions for them. Add several functional roles with different access permissions. to compartmentalize the users’ access within a single organization.
Since Creatio version 8.0.9 "Portal user" user type and "All portal users" root role were renamed to "External user" and "All external users," respectively.
Listed below are a few common business cases of portal setup.
- A portal for users without organizations. This is the simplest structure. Add individual portal users to Creatio. Configure permissions for an individual user, for all users (by configuring permissions for a parent role), for user groups (if you created subordinate organizational roles). Setup procedure:
- Create users:
- Add portal users manually.
- Allow portal users to register on their own.
- Set up the email invitations.
- Set up the portal users’ access permissions.
- Create users:
- A portal with organizations and the same access permissions for all users. This structure connects portal users to an account, i. e., groups them in an organization. You can configure access permissions for each organization individually. Users inherit the permissions from their organization, therefore, you do not need to configure permissions for each user separately. Setup procedure:
- Set up the organizational structure:
- Create organizations and users in Creatio.
- Appoint portal administrators.
- Create portal users on the portal as the portal administrator.
- Set up email invitations.
- Set up the portal users’ access permissions:
- Set up permissions in Creatio.
- Configure access permissions on the portal as the portal administrator.
- Set up the organizational structure:
- A portal with organizations and different access permissions in a single organization. You can create separate roles within a portal organization and configure their permissions. For example, create functional roles for the main and regional office managers and connect users in an organization to one of these functional roles. Users inherit permissions from their functional role, therefore, you do not need to configure permissions for each user separately. Setup procedure:
- Set up the organizational structure:
- Create organizations and users in Creatio.
- Appoint portal administrators.
- Create portal users on the portal as the portal administrator.
- Set up email invitations.
- Set up the portal users’ access permissions:
- Set up permissions in Creatio.
- Configure access permissions on the portal as the portal administrator.
- Set up the organizational structure:
Manage portal users
All users who have access to the portal must be in the "All portal users" organizational role. Create a portal user account for each portal user. Each portal user account must be linked to a contact.
Add portal users
System administrators or users who have permission to the "Manage portal users" ("CanAdministratePortalUsers" code) system operation can create portal users in the primary application. The latter is a good option when an employee who is not supposed to have access to other employee accounts is in charge of creating portal users.
You can add the following types of portal users:
-
Individual portal users without an organization. In this case, you need to register each user separately.
-
Portal organization users. You can add portal organization users in bulk.
noteAlso, you can import portal users via LDAP integration or from Excel. Learn more: Set up LDAP synchronization, Import from Excel.
Deactivate users to restrict them from accessing the portal.
Add an individual portal user
You need administrator privileges to be able to add portal users.
To add a portal user account:
-
Click
 → "Organizational roles" → "All portal users."
 -
Go to Users tab → Users detail →
 → Add new.
 -
Fill out the new user page (Fig. 1). Learn more: Add users.
Fig. 1 Creating a new user 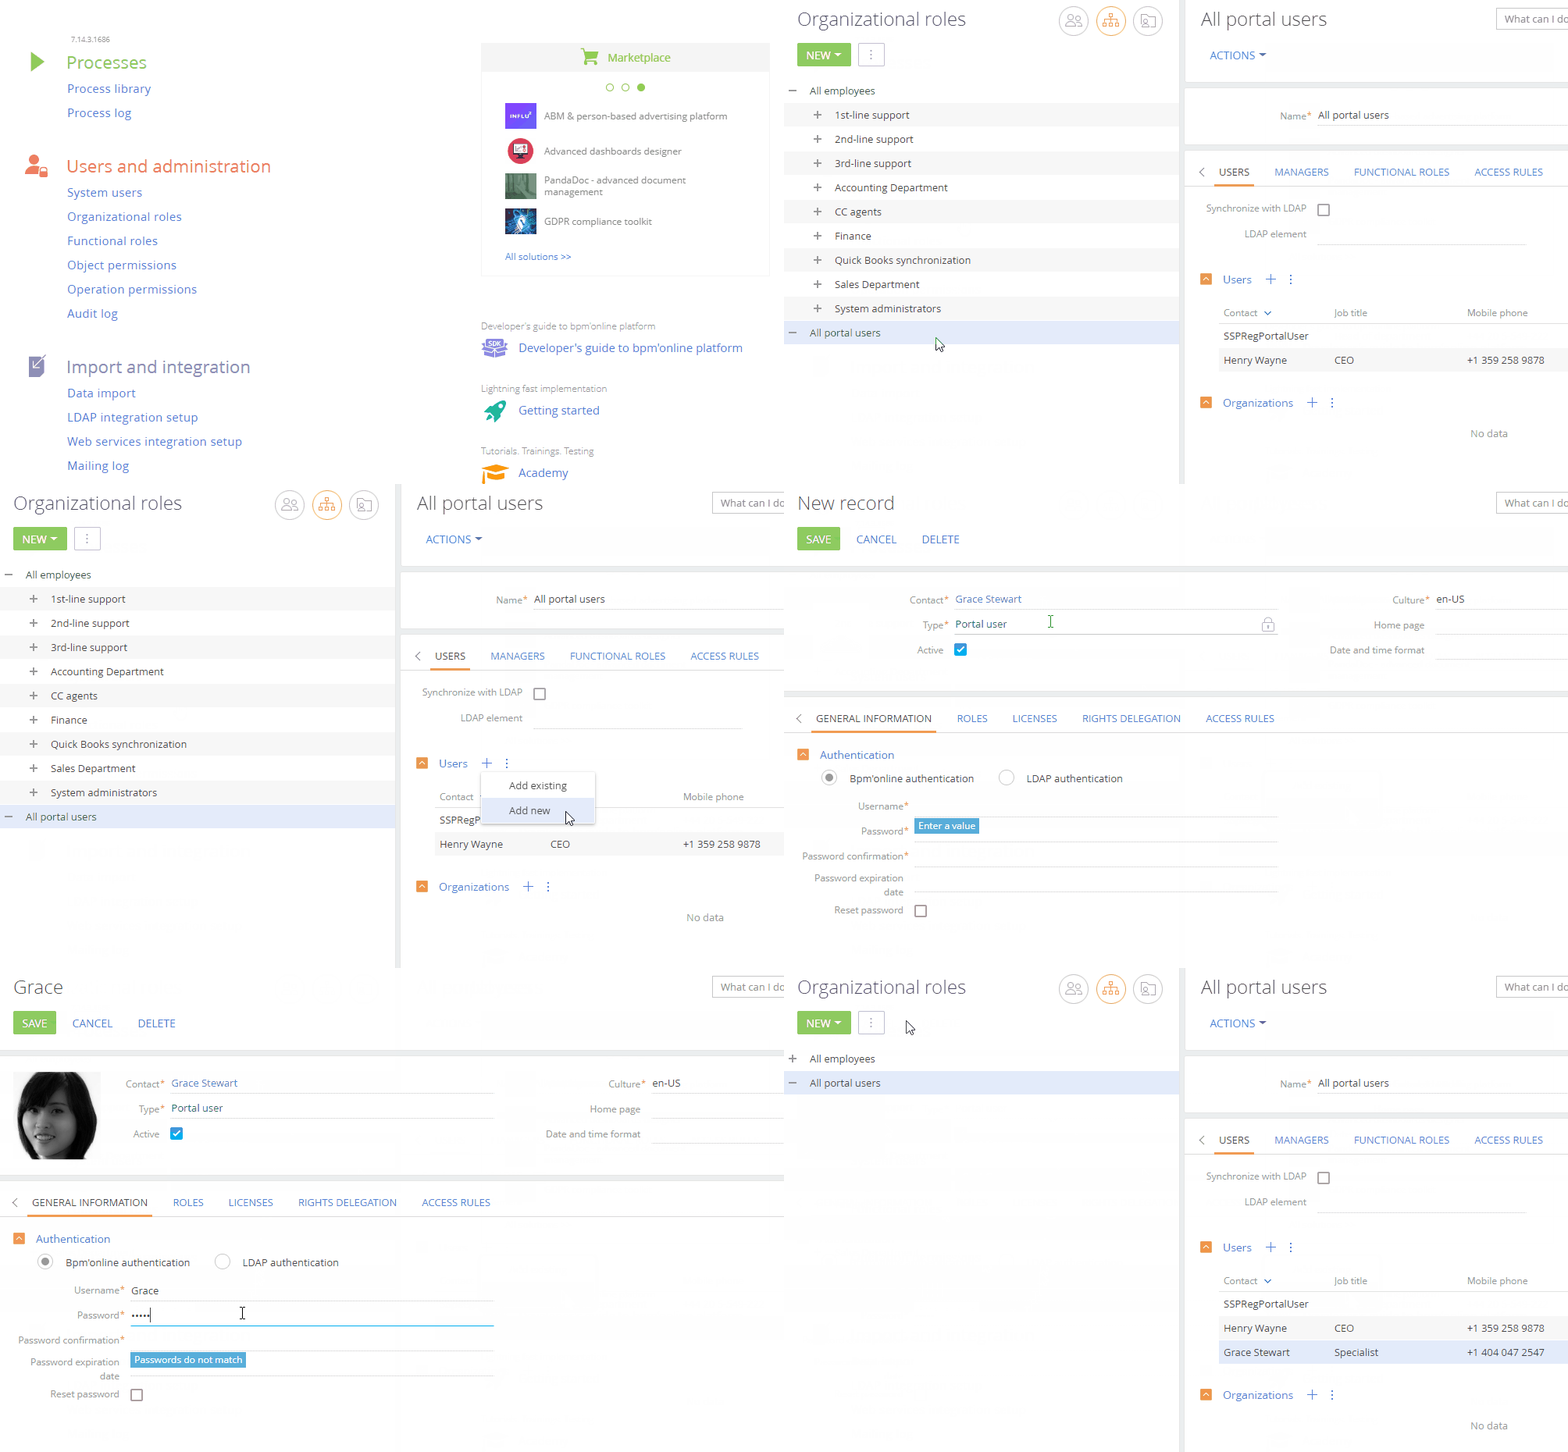
If a contact record for the new portal user does not exist yet, you can add it during this step. Click  in the Contact field, then click New in the lookup window that pops up. Fill out the contact page that opens. After you save the contact page, you will return to the new user page. Creatio will populate the Contact field with the newly created contact.
Add a portal user as part of a portal organization
To link portal users to an organization, add the organization record first.
All users in an organization automatically inherit any permissions assigned to that organization. This lets you set up access permissions once – for an organization – and assign these permissions by adding new users to the organization.
Depending on the user permissions, there are several ways to create an organization and add users to it.
-
Users with system administrator permissions can create organizations from the organizational role page.
-
Users with permissions to the "Manage portal users" ("CanAdministratePortalUsers" code) system operation can create organizations from the account page.
Creatio will add a new user account with updated access permissions. The previous user account is deactivated to prevent duplication.
Add users to an organization from the organizational role page
Use this option in the following situations:
- If you do not have permission to access the [System users] section.
- If a portal user changed their employer, you can move the corresponding contact to the relevant organization.
-
Click
 → "Organizational roles" → "All portal users."
 -
Go to the Organizations detail →
 → select an account for the new organization in the Account field (Fig. 2). Use the search bar in the account lookup window to find the relevant account by its name.note
If an account record for the new portal organization does not exist yet, you can add it during this step when filling out the Account field on the organization page.
If necessary, modify the organization’s name in the Name field.
Fig. 2 Adding a portal organization from the organizational role page 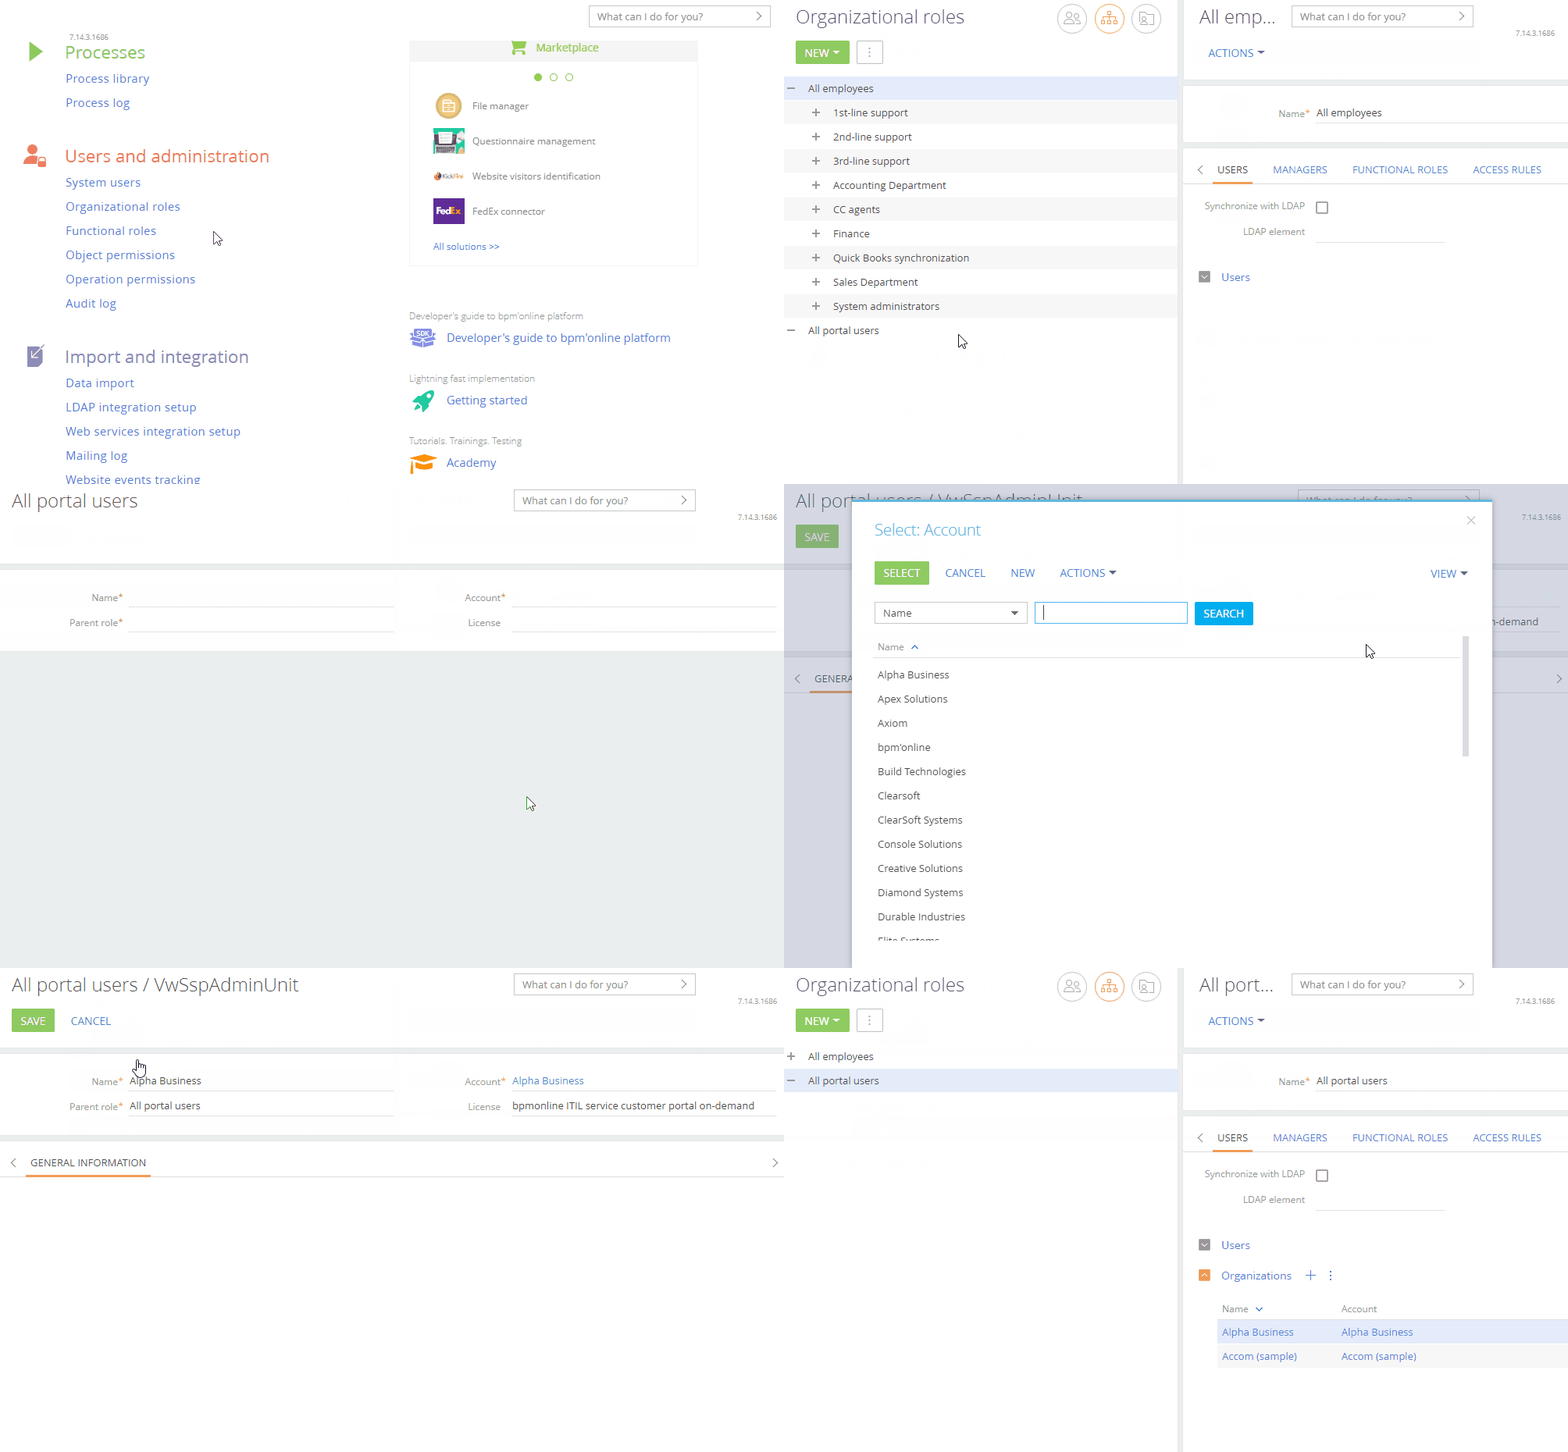
-
Save the page. Go to the Organizations detail and click the needed organization. The organization page will open.
-
If the contact record already exists, go to the Portal users detail →
 → Add existing contacts to add a new contact. Select the contacts in the pop-up window (Fig. 3).
Click and select Add new contacts to add a new contact. Enter the emails of the new users. Use spaces or commas to delimit the emails. Creatio automatically validates any entered email. Click Create portal users.
Creatio will locate the contacts with matching email addresses or create a new contact for each address that does not match any existing contacts. For any new contacts, the Full name field will contain the email local part, i. e. the text before "@."
-
Creatio will prompt you to send email invitations to the new portal users. You can close the prompt and send the invitations later.
Fig. 3 Adding users to a portal organization from the organizational role page 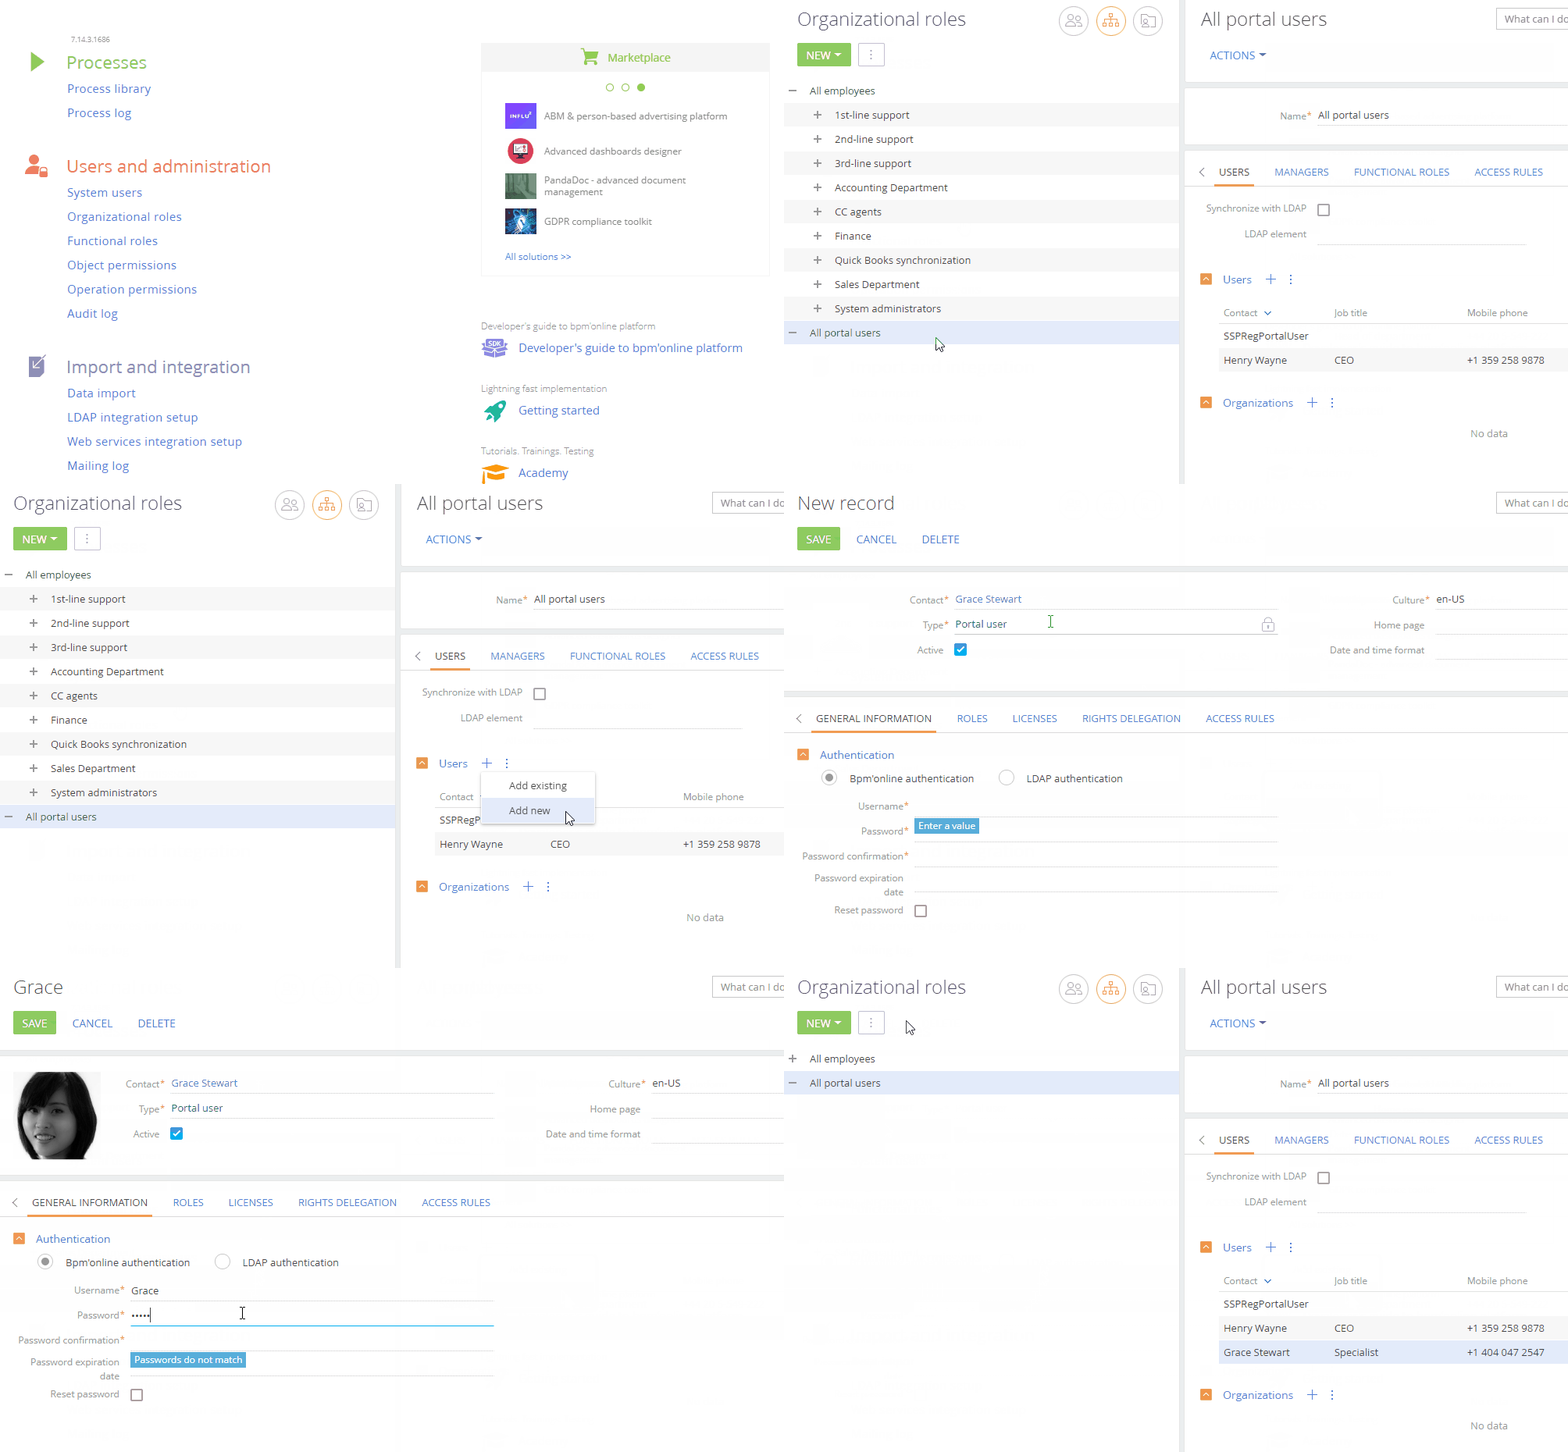
As a result, the users will be added to the organization and automatically inherit any permissions assigned to that organization. If you move an existing user to a new organization, the previous user account is deactivated to prevent duplication.
To manage the portal users’ parameters (login, password, roles, and licenses), double-click the corresponding string on the Portal users detail.
Managing the portal users’ parameters requires permission to the Manage portal users ("CanAdministratePortalUsers" code) system operation. Learn more: Set up system operation permissions.
Add users to a portal organization from the account page
Use this option if you do not have permission to access the System users section.
-
Open the account page → click the Contacts and structure tab → go to the Portal users detail.
-
Click Create organization. The button will be available only if the account is not already linked to a portal organization.
noteIf you try to add portal users by clicking
 before you create a portal organization, you will be prompted to create a portal organization.
 -
Select "All portal users" in the Parent role field (Fig. 4).
Fig. 4 Adding a portal organization from the account page 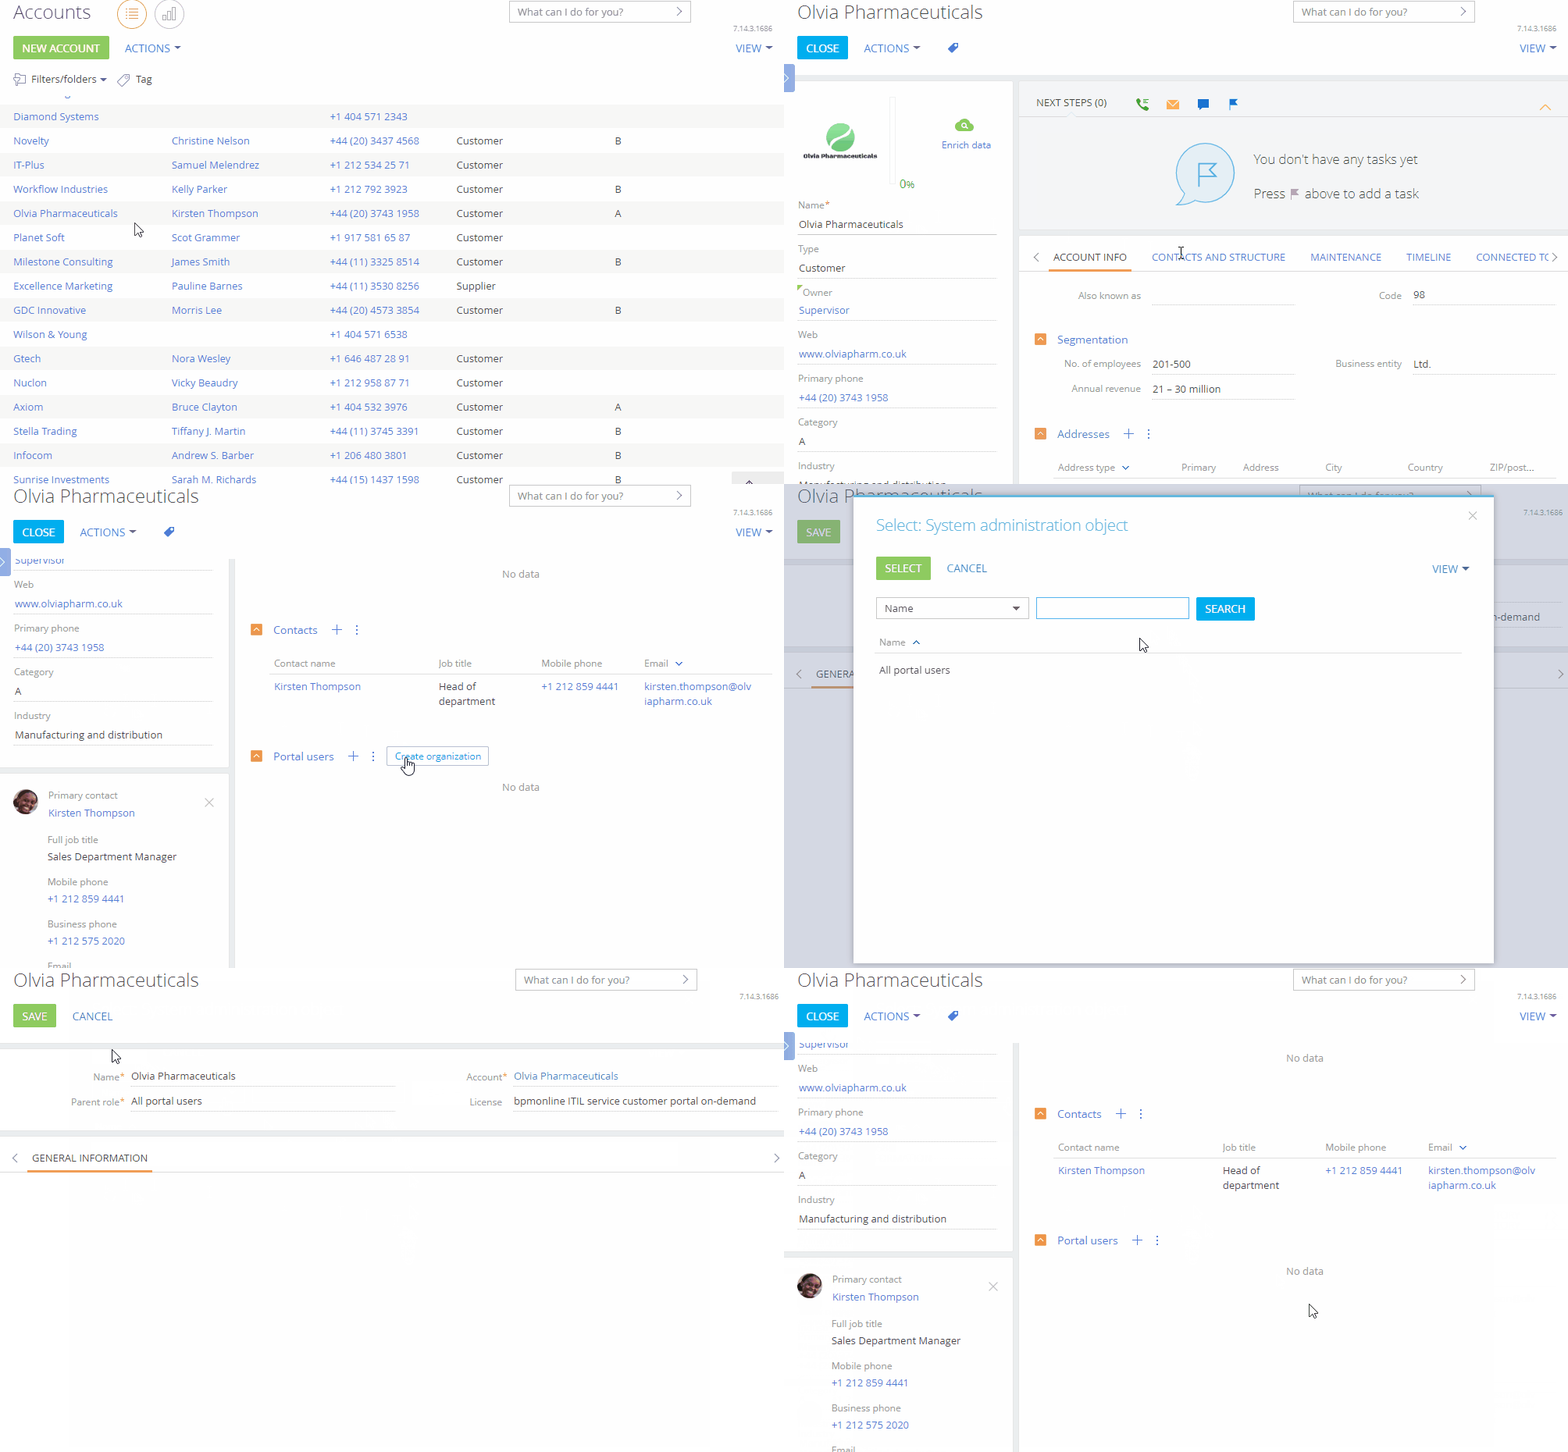
-
Save the changes. As a result, a new organization will be added and become available on the "All portal users" role page.
-
If the contact record already exists, go to the Portal users detail →
 → Add existing contacts to add a new contact. Select the contacts in the pop-up window (Fig. 5).
Click
 and select Add new contacts to add a new contact. Enter the portal user emails and click Add users.
 -
Creatio will prompt you to send email invitations to the new portal users. You can close the prompt and send the invitations later.
Fig. 5 Adding users to a portal organization from thePortal usersdetail 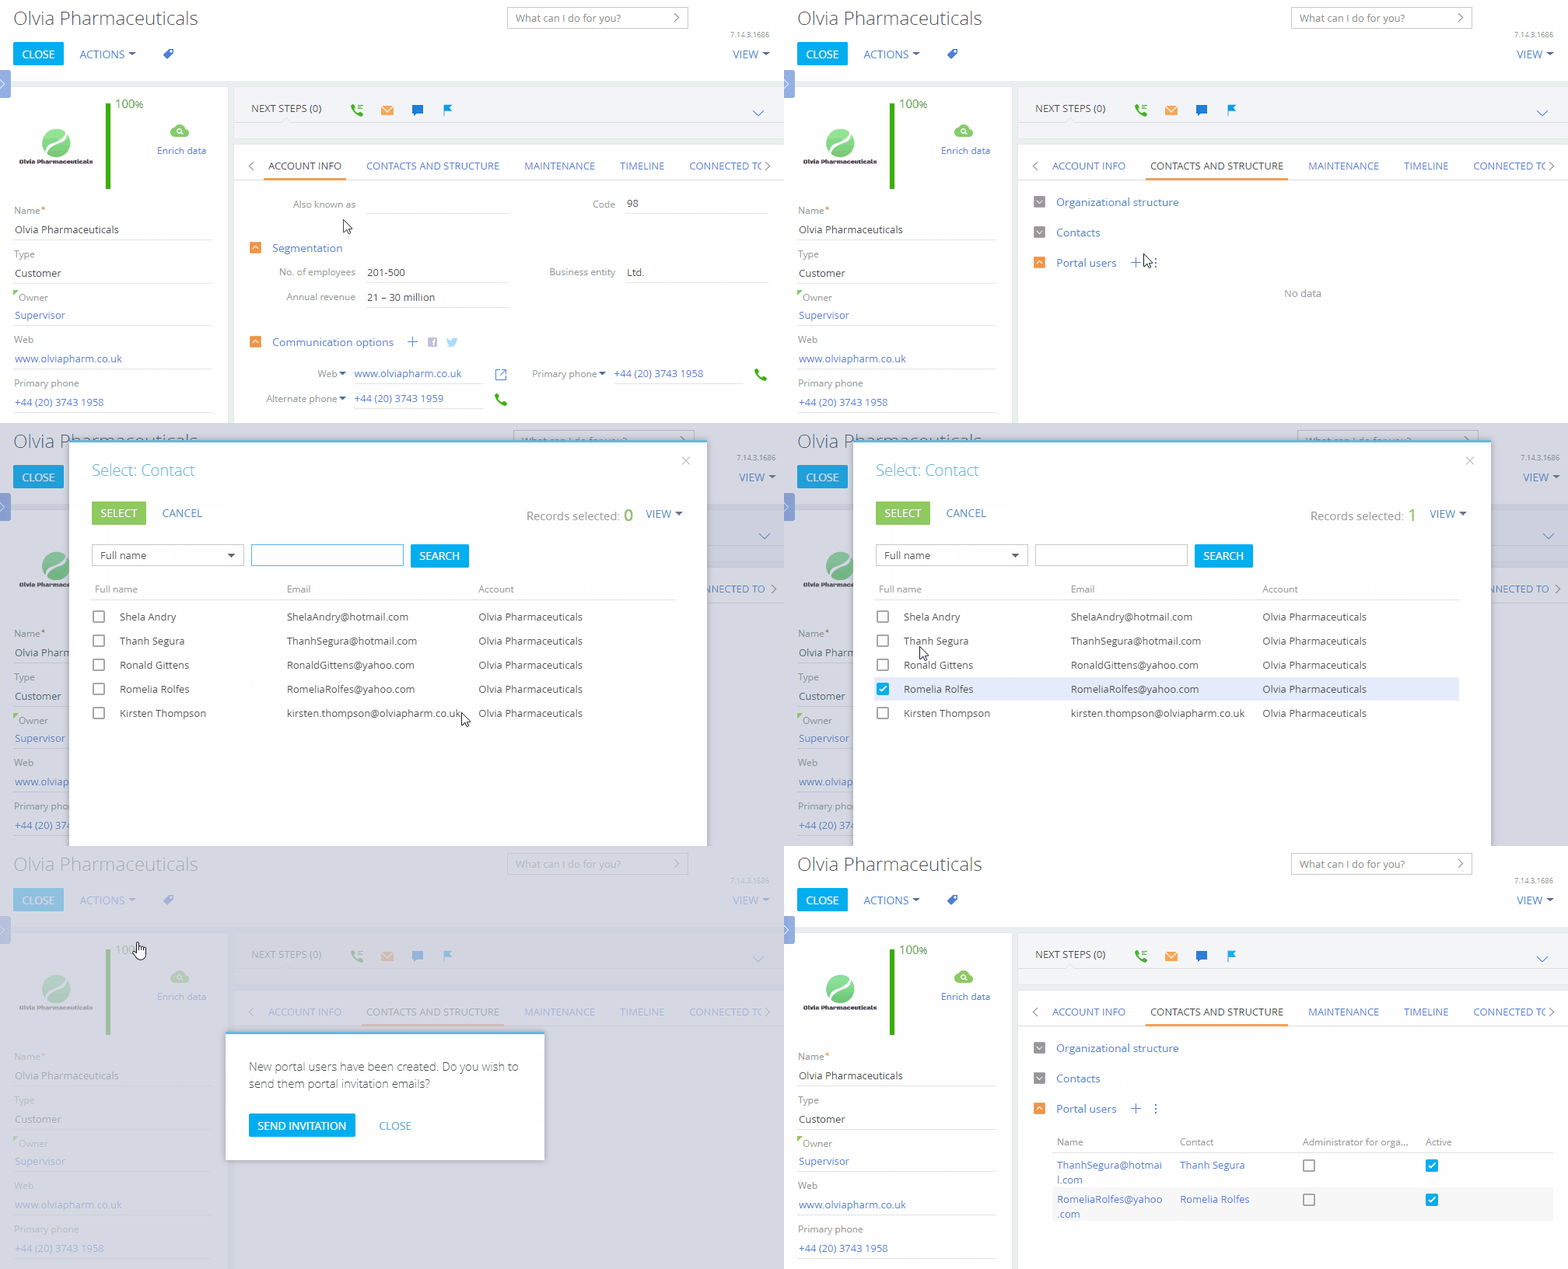 note
noteAlso, you can add portal users to an organization from the Contacts detail. Select several contacts in the detail’s list, click
 and select Add portal users.
As a result, the users will be added to the organization and automatically inherit any permissions assigned to that organization.
To manage the portal users’ parameters (login, password, roles, and licenses), double-click the corresponding string on the Portal users detail.
Portal administrators can also add new portal users within their organization.
Deactivate users
System administrators can deactivate portal user accounts to restrict the portal users from accessing the portal.
Deactivate a portal user from the user page
-
Click
 →"System users." Open the user page.
 -
Clear the Active checkbox and save the changes (Fig. 6).
Fig. 6 Deactivate an individual portal user 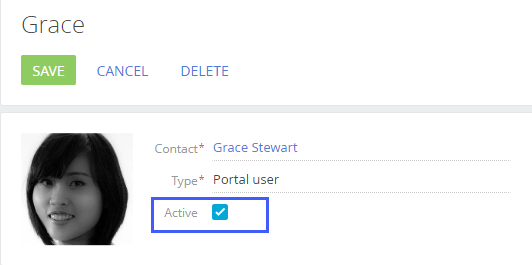
Deactivate a portal user from the organization page
-
Click
 → "Organizational roles" → "All portal users."
 -
Go to the Organizations detail and click the needed organization. Locate the relevant user.
-
Clear the Active checkbox and save the changes (Fig. 7).
Fig. 7 Deactivate a portal user in an organization 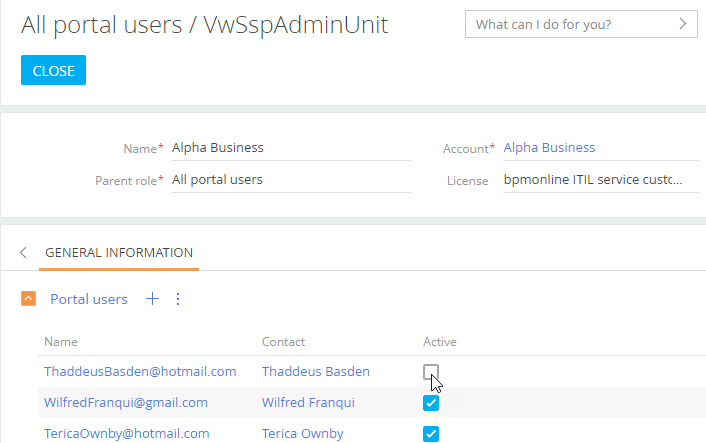
As a result, the user will be suspended and will not be able to access the portal. You can reactivate the user at any time.
Send portal invitations
Send the new user an email invitation to allow them to log in to the portal. The invitations are sent to the email specified on the portal user’s contact page. You can customize the invitation by modifying the corresponding email template.
Sending invitations requires an integrated mailbox. Learn more: Set up base integrations.
Portal users who are administrators of portal organizations can also send invitations. Learn more: Send invitations to portal users.
To enable messaging, perform initial setup:
-
Set up a mailbox for sending portal user invitations and password recovery emails. Specify the mailbox address in the "SSP registration mail box" ("SSPRegistrationMailbox" code) system setting.
-
If necessary, set up preferred languages for the portal user contacts and localized templates. Otherwise, the users will receive notifications in the default language. If the Culture field on the user page contains language other than the default, and notification templates are available in that language, the user will receive localized notifications.
-
Customize the email text. To do this, set up the portal registration template.
Open → "Lookups" → Message templates lookup → "Template - Portal user registration" localized template (Fig. 8). Edit this template to customize the email text and layout, as well as add localized versions.
Fig. 8 The portal user registration template 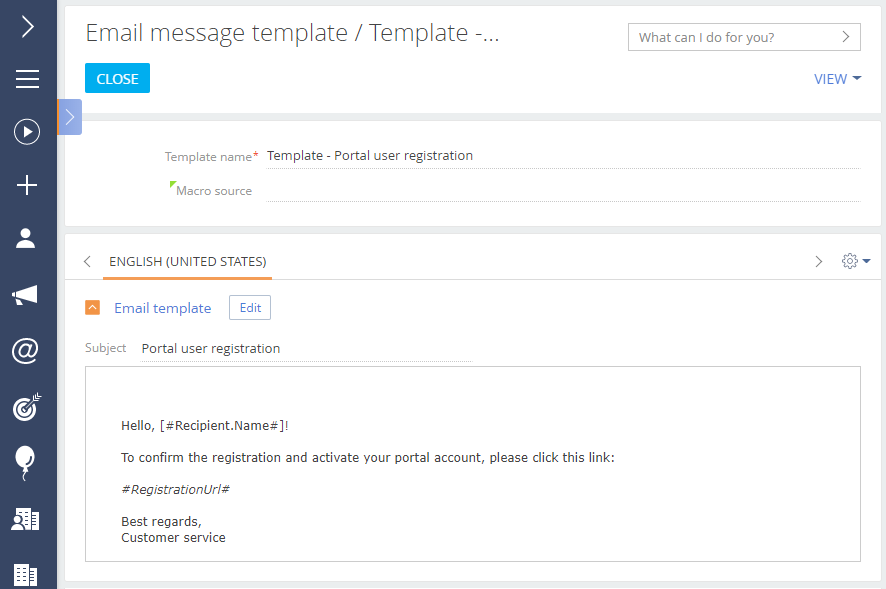
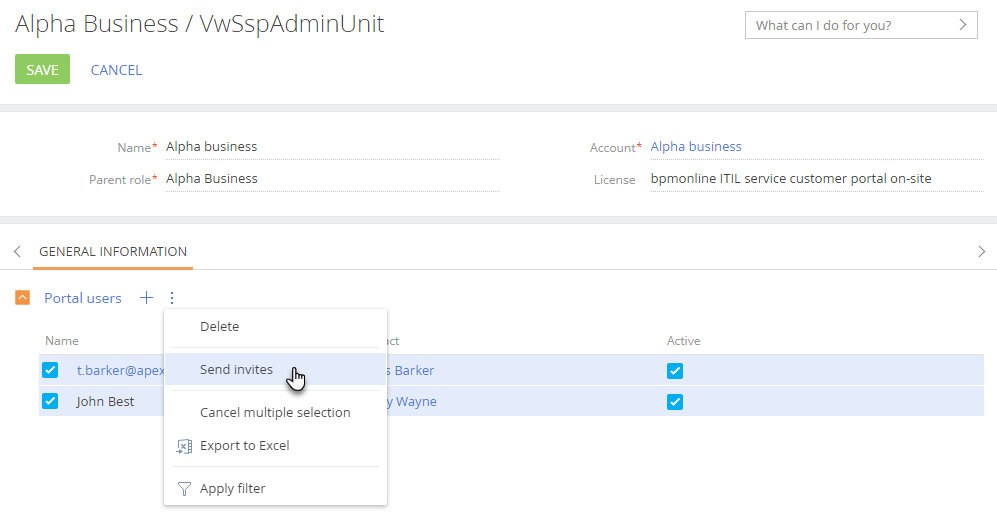
Send the invitation right after adding a new portal user by clicking Send invites.
To send or resend invitations to arbitrary users at any moment:
- Select the needed users in the Portal users detail.
- Click
 and select Send invites (Fig. 9):
If a user clicks the portal link in the invitation email and does not specify any password, Creatio will generate the password automatically. The link in the invitation email works only once. A portal administrator should send another portal invite to any users who did not specify their password on the first login.
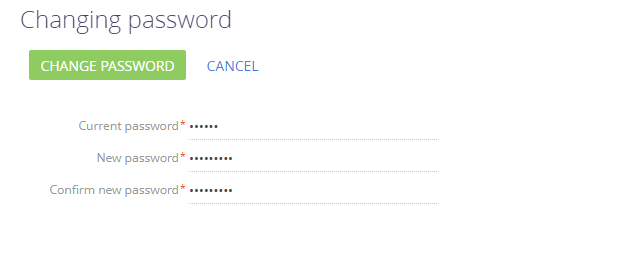
After the user clicks the link in the portal invitation email, they are redirected to the password setup page (Fig. 10).
Set up the user self-registration on the portal
The self-registration for portal users helps to save time and automates several system administrators and portal administrator functions. The setup procedure consists of several steps.
Required steps:
-
Make sure that there is a Creatio portal system user with the least permissions.
-
Set up portal user licensing at self-registration.
-
Set up notifications about portal user registration and password recovery.
Optional steps:
- Edit the registration and password recovery email templates.
Create a portal system user
Creatio requires a user account with the most limited access permissions to ensure the correct self-registration of portal users, password recovery, and case feedback collection. By default, this is the SysPortalConnection user. Make sure that you do not delete this user, and do not modify this user’s access permissions and licensing. Otherwise, the portal user self-registration might become unavailable.
If you face any issues with self-registration, check the system user settings:
-
Click
 → "System users." Locate a portal system user record.
 -
Open the system user page SysPortalConnection → find a portal license in the Licenses tab.
-
Make sure the system user is connected to an existing contact (the Contact field).
noteThe portal license name consists of the portal configuration and the Creatio deployment method, e.g., "Creatio self-service portal cloud" or "Creatio customer portal on-site".
To change the portal user account:
-
Add a user in the Users and roles management section. Click
 → System users → New → Portal user. Please do not specify "Supervisor" or an employee user who works in the main Creatio application.
 -
Assign a portal license on the Licenses tab.
-
Configure the minimal access permissions for the new user in the Object permissions section.
-
Specify the new user in the Creatio settings:
-
For on-site Creatio: specify the user in the web.config file. Learn more: Set up portal user licensing at self-registration.
-
For cloud Creatio: contact Creatio support and provide the user credentials.
-
Set up portal user licensing at self-registration
To let the portal users obtain a portal license automatically during registration:
-
Click
 →"System users."
 -
Open the portal system user page. By default, the portal system user is SysPortalConnection.
-
On the Licenses tab, select a checkbox next to the portal license (Fig. 11).
Fig. 11 Assign a portal license to the system user 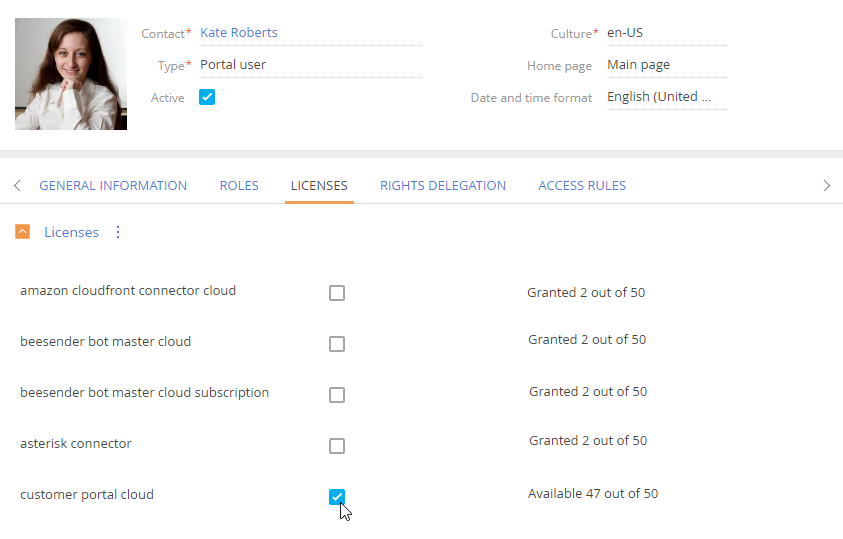
In the license manager, verify that there are unassigned portal licenses left to issue to the self-registered portal users. Creatio will assign the licenses automatically. Learn more: Creatio licensing.
The name of the portal license consists of the portal configuration and the Creatio deployment method, e.g., "Creatio self-service portal cloud" or "Creatio customer portal on-site".
For on-site Creatio, you also need to edit the Web.config file located in the root directory of the Creatio application:
-
In the SspUserRegistrationLicPackage parameter, specify the name of the product whose licenses to assign upon the portal user creation. For example:
<add key="SspUserRegistrationLicPackage" value ="Creatio Customer Portal On-Site" /> -
Make sure that the UserManagementSauName and UserManagementSauPassword parameters contain the system user login and password. New portal users will receive the permissions of the user specified in the configuration file.
Set up notifications for portal users
Configure a portal notification mailbox to send invitations or confirmation emails to portal users. To do this, you need to synchronize a mailbox with Creatio. Learn more: Set up base integrations.
To set up notifications for portal users:
Click  → "System settings."
-
Open the "SSP registration mail box" ("SSPRegistrationMailbox" code) system setting.
-
In the Default value field, specify a mailbox from which to send notifications to the portal users.
You can customize the templates for email notifications that the portal users receive after registration or when recovering their passwords. You can set up a localized email template in the Email templates lookup. By default, Creatio uses the following templates for email notifications:
-
"SSP invite template (US)" - an invitation to the portal.
-
"Template - Portal user registration" - portal user registration confirmation.
-
"Link for password recovery" - password recovery link.
Learn more: Set up an email template.
Creatio uses the following system settings to determine which template will be sent to a user:
-
"SSP invite template" ("PortalInvitationEmailTemplate" code).
-
"Confirmation email template for portal user registration" ("PortalRegistrationEmailTemplate" code).
-
"Password reset email template for portal user" ("PortalRecoveryPasswordEmailTemplate" code).
Click  → System Designer → "System settings" to edit these system settings.
Set up password recovery
If a user is unable to log in to the portal, they are to request the administrator to send another invite or use the password recovery functionality (Fig. 12).
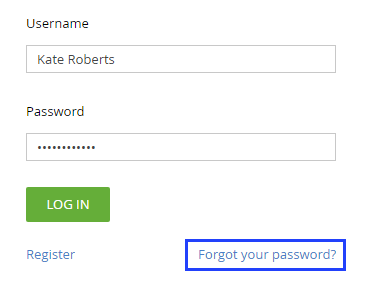
After clicking Forgot password on the login page, the user will receive an email with a password recovery link.
To customize the password recovery email template:
-
Click
 → Lookups → Message templates → "Link for password recovery" template.
 -
Edit the template.
The "Link for password recovery" template must contain the #RecoveryLinkUrl# macro, which will be replaced with the portal user account password recovery link.
noteSpecify the password recovery template in the following system setting: "Password reset email template for portal user" ("PortalRecoveryPasswordEmailTemplate" code). If you delete an existing template, we recommend specifying a new password recovery template in this system setting.
Assign a portal administrator
You can grant portal administrator privileges to portal users in an organization.
These portal administrators will have several additional permissions within their organization:
-
Manage the organization profile. The organization profile page displays the organization’s name and phone number, as well as the list of portal users.
-
Add users.
-
Send invites.
-
Set up permissions.
-
View and edit the service information.
Learn more: Manage a portal organization account.
To promote a portal user to the portal administrator:
-
Click
 → "Organizational roles" → "All portal users" in the primary application.
 -
Go to the Organizations detail and click the needed organization. Th is will open the portal organization page.
-
Select the Administrator for organization on the portal checkbox for the users who must be made administrators (Fig. 13).
Fig. 13 Promote portal users to portal administrators 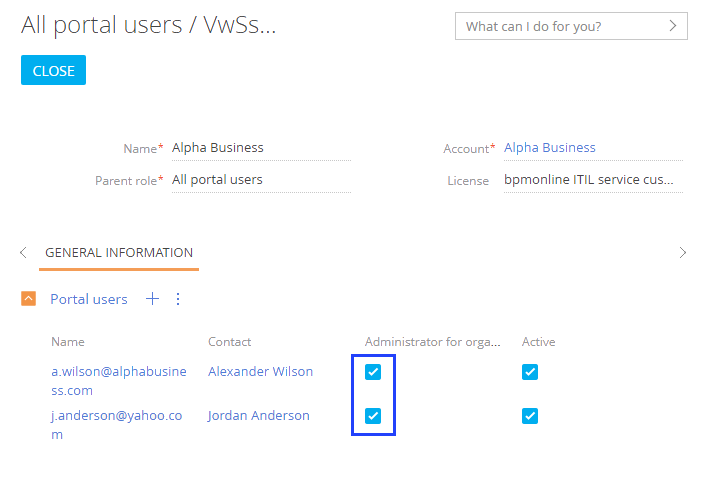
Portal administrators can promote other users as well.
If you do not appoint a portal administrator for an organization, regular system administrators will need to add, invite and deactivate portal users of that organization. Learn more: Add users.
Manage portal access permissions
This article covers access permissions setup for Creatio version 8.0.9 and earlier. Since Creatio version 8.0.10 set access permissions for external users in the Object permissions section. You do not need to use the "List of objects available for external users" and "List of schema fields for external access" lookups. Instructions: Object operation permissions.
Since portal functionality lets external users access Creatio data, managing access permissions for portal users is paramount. You can choose which of your business data is available on the portal, and make sure that any sensitive and confidential information is safe and out of external users’ reach.
Creatio grants access permissions on the portal according to the "least access" principle. This means the portal users are prohibited to perform any action to which they do not have explicit permission.
In general, managing access permissions for portal users is the same as managing access permissions for regular users, with the same array of administrative tools and mechanics. Learn more: Assign a user role.
Portal access management has certain specifics:
-
Portal users are a separate type of Creatio users that belong to the "All portal users" organizational role.
-
In addition to the regular object permissions, the data available for portal users is limited by the List of objects available for portal users lookup. The portal UI will display only the objects included in the lookup.
Note that the list of sections available for portal users also depends on the portal configuration. For example, the Portal cases section is not available in the "Customer portal" configuration. Learn more: Creatio portal overview.
Whenever a portal user attempts to access specific data, Creatio checks permissions in the following order:
-
Availability on the portal. This means an object with the requested data is listed in the List of objects available to portal users lookup. If not, the user will not be able to view it regardless of other permissions.
-
Object operation access. Does the user have permission to create, read, update, and delete the object data? If not, the user will not be able to perform this action (e.g. read or edit data) regardless of other permissions.
-
Record access. Does the user have permission to access the object record that contains the needed data? If certain records are restricted, the user will not be able to perform the corresponding actions (e. g. read or edit particular support cases, knowledge base articles, etc.) regardless of other permissions.
-
Column access. Does the user have permission to access the column that contains the needed data? If certain columns are restricted, the user will not be able to perform the corresponding actions (e. g. read or edit case assignee, knowledge base author, etc.), regardless of other permissions.
Each step represents a separate object permission level you can configure.
The "All portal users" role has a set of default permissions that allow the users to work with the base portal sections. If you add new sections and other functions to the portal, make sure to update the portal user access permissions.
If you do not add a section of the main application to the workplace of a portal user, they will not be able to open the section or its record page by clicking a direct link.
Grant access to create, read, update, and delete operations for object data using object operation permissions. For example, allow the portal users to create new articles in the Knowledge base section by configuring the corresponding operation permissions for the "Knowledge base" object.
Learn more: Manage object operation permissions.
Record permissions let you configure the portal user access to separate records: support cases, knowledge base articles, requests, etc. For example, portal users must be able to see their own cases, as well as cases created by their colleagues within the same organization.
Note that unless you grant explicit record permissions, portal users will be able to access only the records that they created. You can set access to records in several ways:
-
Set up default permissions that apply to each new record, based on its author.
-
Share the record with the portal users through "Actions" on a record page.
-
Use business processes to allocate permissions.
Learn more: Manage record access.
Column permissions manage access to specific record fields (e. g., the "Satisfaction level" field in a case record). Configuring column permissions will determine:
-
Whether the corresponding field will be displayed on the record page.
-
Whether the corresponding column will be displayed in the section list.
Learn more: Set up the column permissions.
You can grant these permissions to each portal user separately or to a portal user role, such as "All portal users".
Default portal user access permissions
By default, all portal users have the following access permissions:
-
Permission to read articles in the Portal Knowledge base section. When regular Creatio users add new knowledge base articles, the portal users are automatically granted permission to read these articles.
-
Permission to view the portal main page.
-
Permission to change the password on the user profile page.
-
Permission to access the folder area in the portal sections.
-
Permission to post, edit and delete comments in the feed. Permission to like other users’ comments.
-
Permission to add, edit and delete records in the Portal Cases section on the self-service portal in Service Creatio products. The users can only see their own records.
Just like with regular users, you can manage object permissions and system operation permissions for portal users.
-
Object permissions let you manage access to sections, details, and lookups, as well as their separate records and columns.
-
System operation permissions let you manage portal user access to specific functions, such as Excel export.
Service object permissions
The self-service portal in Service Creatio products can grant users and organizations permissions to read cases, service agreements, and configuration items automatically.
Cases
If the " Grant case permissions for portal user organization " system setting ("GrantCasePermissionsForPortalOrganization" code) is enabled, both the owner and their portal organization’s all users are granted permission to view. This lets the portal users track the status of incidents created by their coworkers.
Service agreements and configuration items
Enable the " Enable rights on service agreements and conf items for portal users " system setting ("EnableRightsOnServiceObjects" code) to grant portal users and organizations permission to view the required service agreements and configuration items automatically.
Note that before this, you need to set up record permissions for the "Service agreement" object so that portal users only have access to the service agreements that are relevant to them. Learn more: Record permissions.
The permission to view a service agreement is granted to:
- The user whose contact is specified in the Service objects detail of the current record.
- All users who are part of the portal organization specified in the Service objects detail of the current record.
The permission to view a configuration item is granted to:
- The user whose contact is specified n the Users detail of the current record
- All users who are part of the portal organization specified in the Users detail of the current record.
Set up the portal’s organizational structure
Similar to regular Creatio users, you can group portal users by assigning them various organizational and functional roles. If you assign permissions to a role, they will apply to all users of that role.
By default, all portal users in Creatio belong to a single "All portal users" role. The access permissions that you assign to this role will apply to all portal users.
You can group and segment your portal users by adding subordinate roles to the "All portal users" role. These roles will inherit all access permissions automatically from their parent role. Also, you can grant additional permissions to each of the subordinate roles. For example, portal users from different locations may have different access permissions.
Portal organizations are special types of portal user roles. They are used for managing employees of your customers. You can link such portal organizations to existing Creatio accounts.
Use the organizational structure roles to manage portal user permissions and grant access to objects, records, or columns quickly to multiple users as per your business needs.
Add a portal user role
You can add organizational roles for portal users in the same way as for regular users. Learn more: Organizational roles.
Only system administrators can access organizational and functional role sections in Creatio. To allow a regular user to create and configure portal organizations, as well as manage portal users, make sure you grant them permissions for the "Manage portal users" ("CanAdministratePortalUsers" code) system operation.
For example, you can create a "London" organizational role to manage permissions separately for London-based portal users (Fig. 14) after you make sure that portal user roles are subordinate to the "All portal users" parent role.
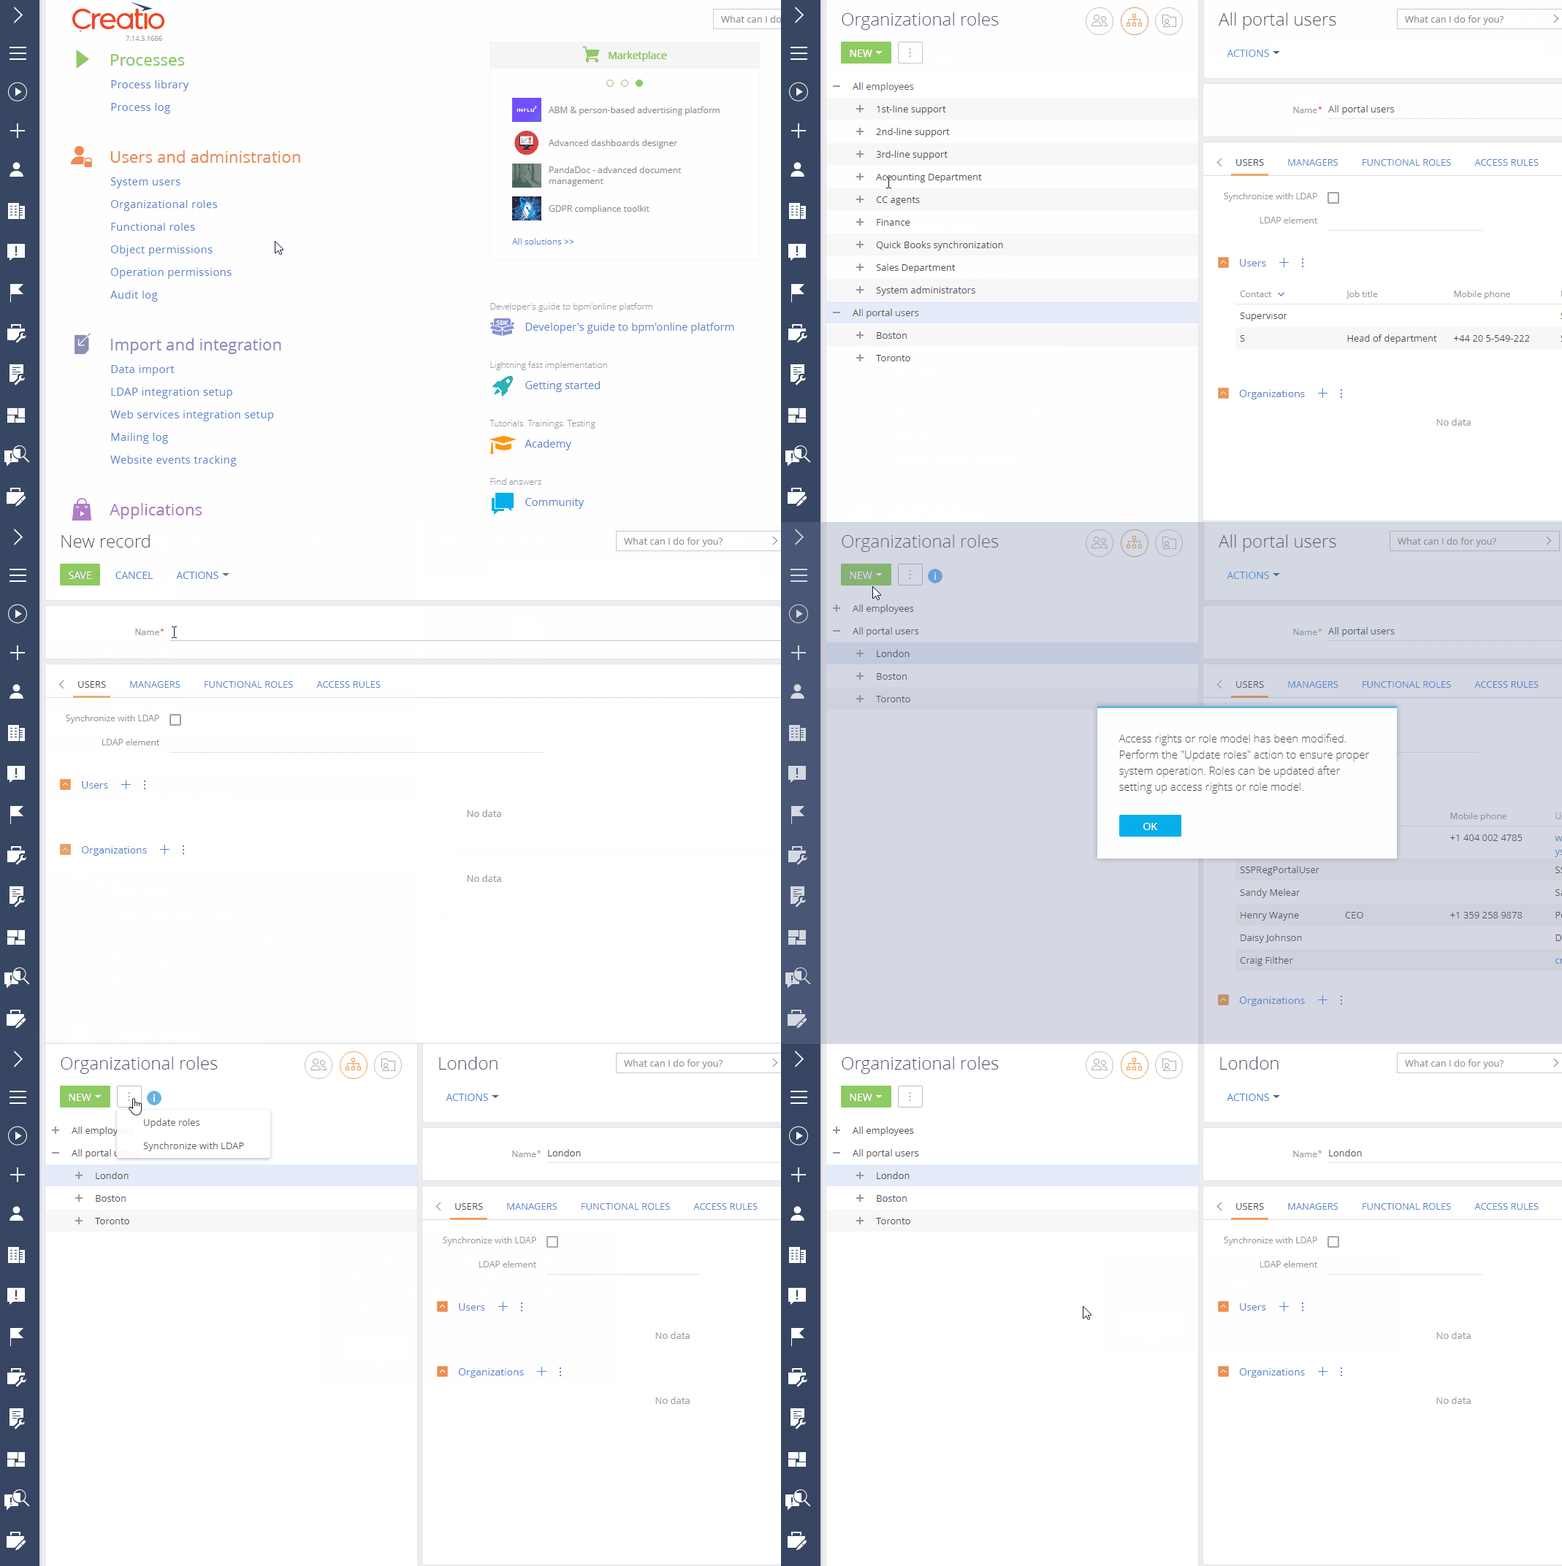
As a result, the users of the "London" organizational role will inherit the permissions configured for the "All portal users" role. You will be able to assign additional permissions specific to all portal users with the "London" role.
Assign a role for a portal user
You can assign portal users to organizational roles similarly to assigning regular users to corresponding roles. Learn more: Assign a user role.
For example, you can assign portal users to the "Toronto" organizational role (Fig. 15). Note that you can only assign portal users to the roles that are subordinate to the "All portal users" role.
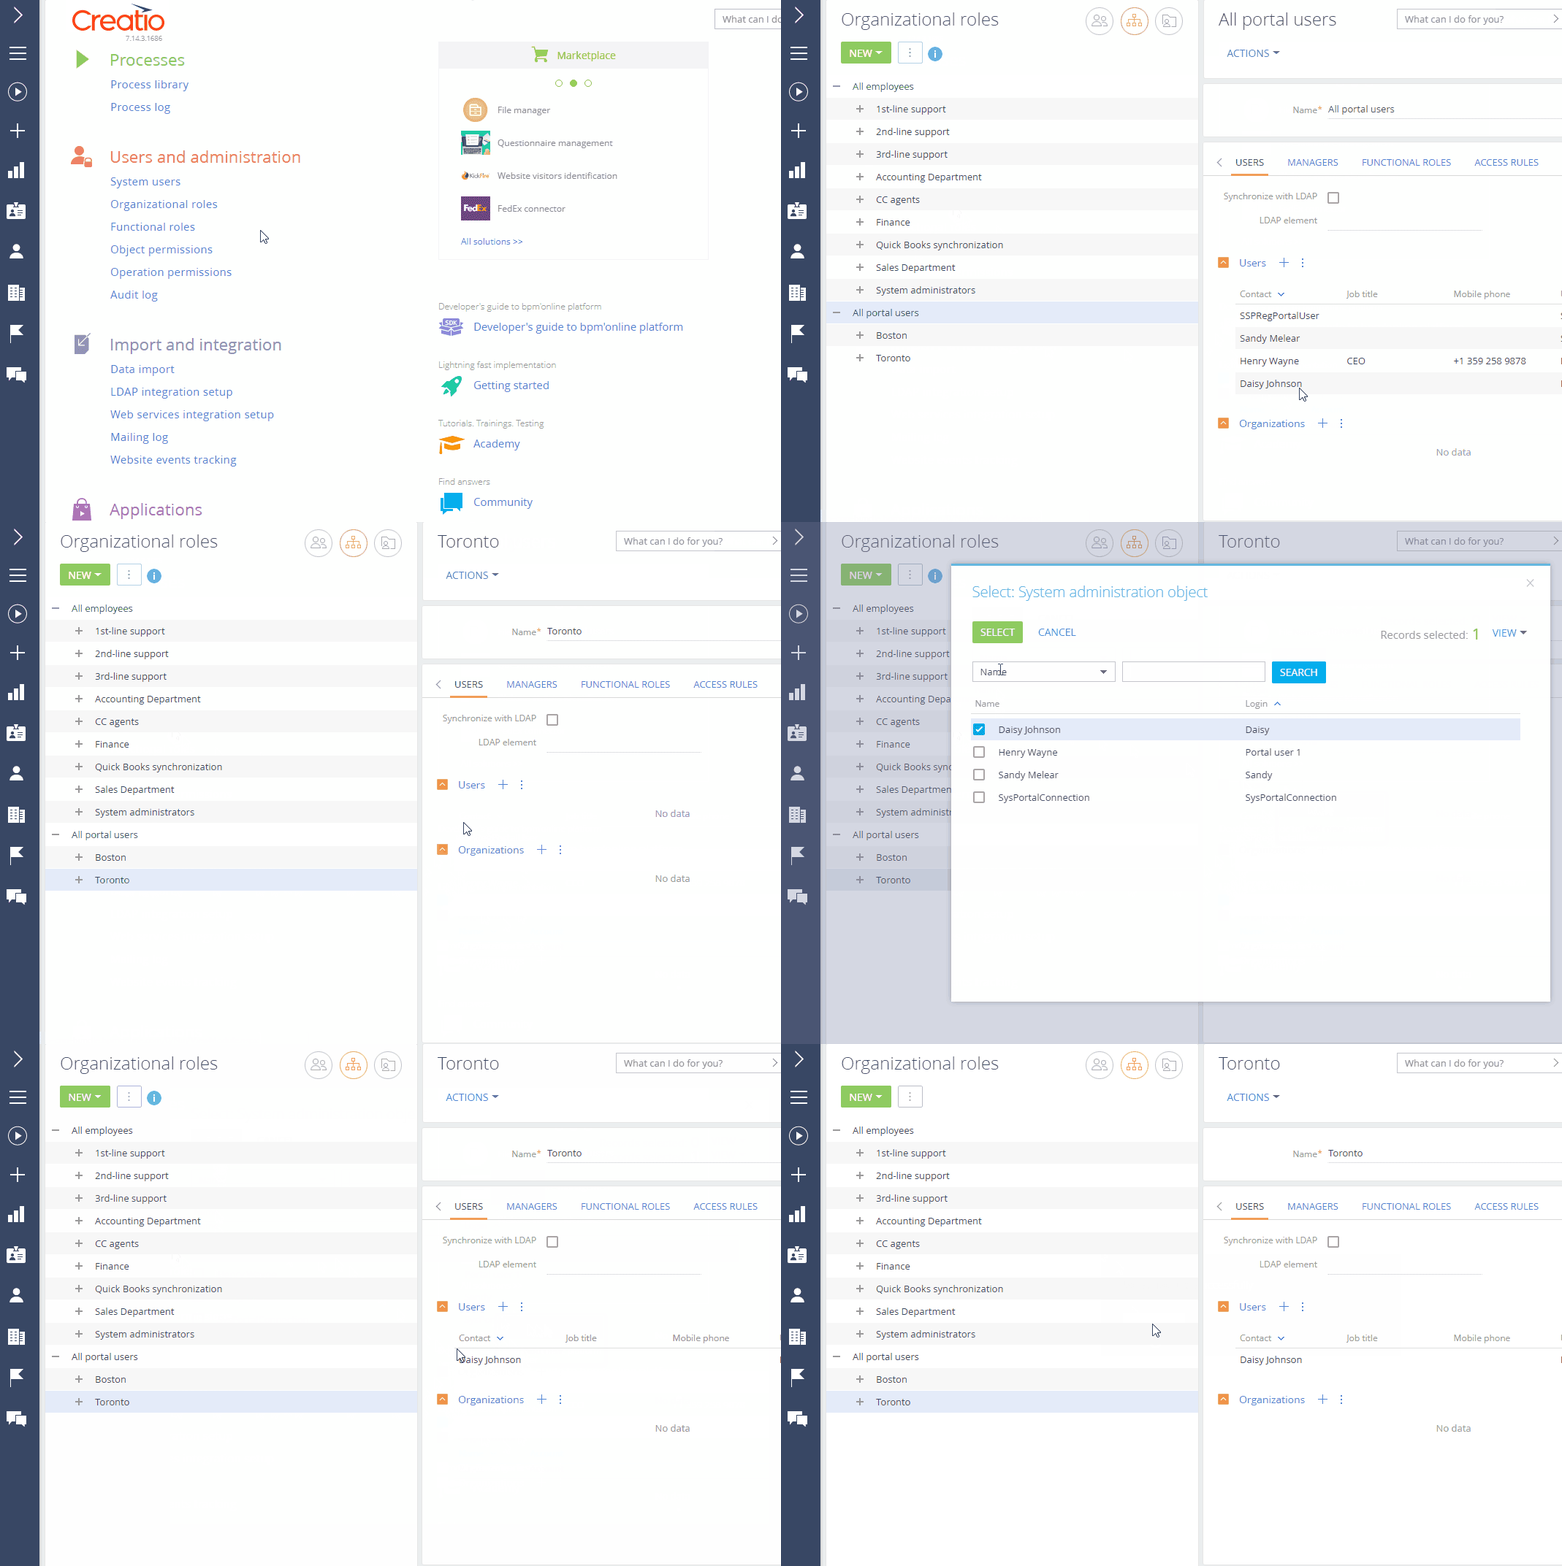
As a result, the user of the "Toronto" organizational role will inherit the permissions configured for the "Toronto" role, as well as any permissions configured for its parent "All portal users" role.
Set up access permissions for portal users
Assign object permissions to grant permissions to the portal section data. Learn more: Manage object operation permissions.
Although you can grant permissions to specific portal users, assigning permissions to portal user roles is more optimal.
-
Assign common permissions to the "All portal users" role.
-
Add subordinate organizational roles to the "All portal users" role to differentiate permissions between various portal user groups.
-
Link roles to customer accounts to manage employees of your customers.
You can manage object access permissions on three levels:
-
Object operation permissions – ability to view, add, edit and delete data in an object.
-
Record permissions – ability to view, edit, and delete specific records in objects.
-
Column permissions – ability to view, edit and delete data in specific columns.
ImportantBefore you start setting up access permissions for portal users, make sure that the corresponding objects are listed in the List of objects available for portal users lookup. If they are not, none of the object data will be available for the portal users.
Set up object operation permissions on the portal
You can manage general access permissions to a section, detail, or lookup on the portal by setting up object operation permissions for the portal user roles. Setting up permissions for portal users is similar to that of regular users. Learn more: Manage object operation permissions.
For example, grant different permissions for the Knowledge base article section to portal users from Boston and Toronto (Fig. 16).
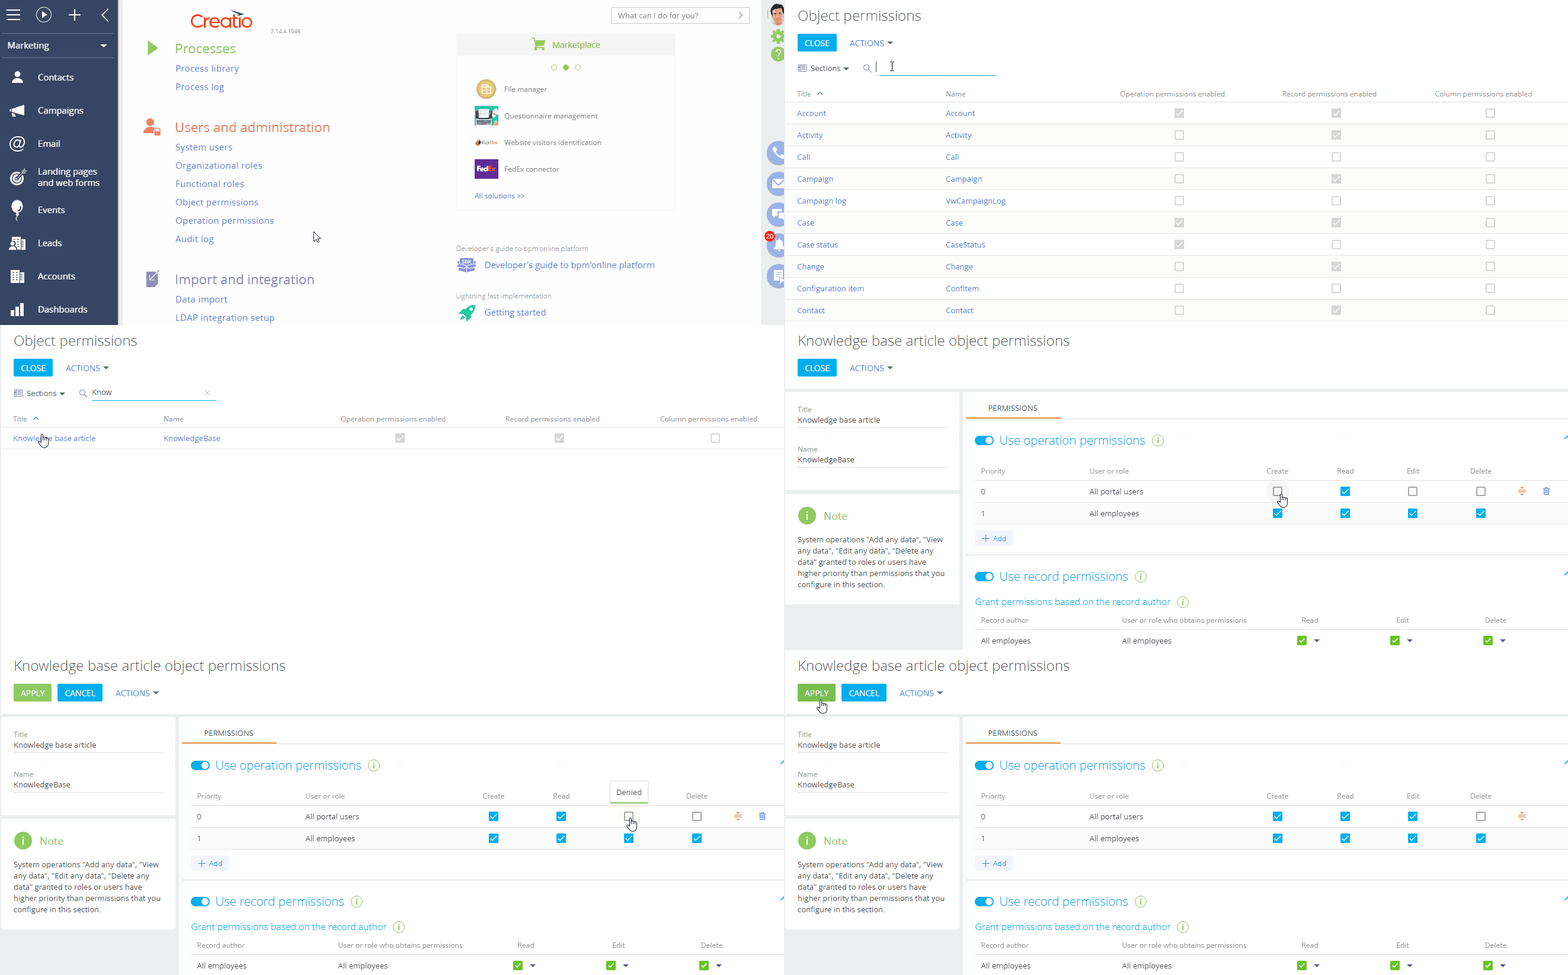
As a result, portal users with the "Boston" role will be able to create new articles in the Knowledge base section, view and edit existing articles, but will not be able to delete them. Portal users with the "Toronto" role will be able to view the knowledge base articles, but will not be able to modify or delete them.
Set up record permissions on the portal
You can manage access to specific records in the portal sections, details, and lookups for portal users. If you enable record permissions in an object, all object records will become unavailable for portal users, unless there are explicit permissions set up for each record.
Creatio can grant permissions to each record in an object automatically, based on the record author. Setting up permissions for portal users is similar to that of regular users. Learn more: Manage record access.
For example, assign permissions for knowledge base articles created by portal users in Boston (Fig. 17).
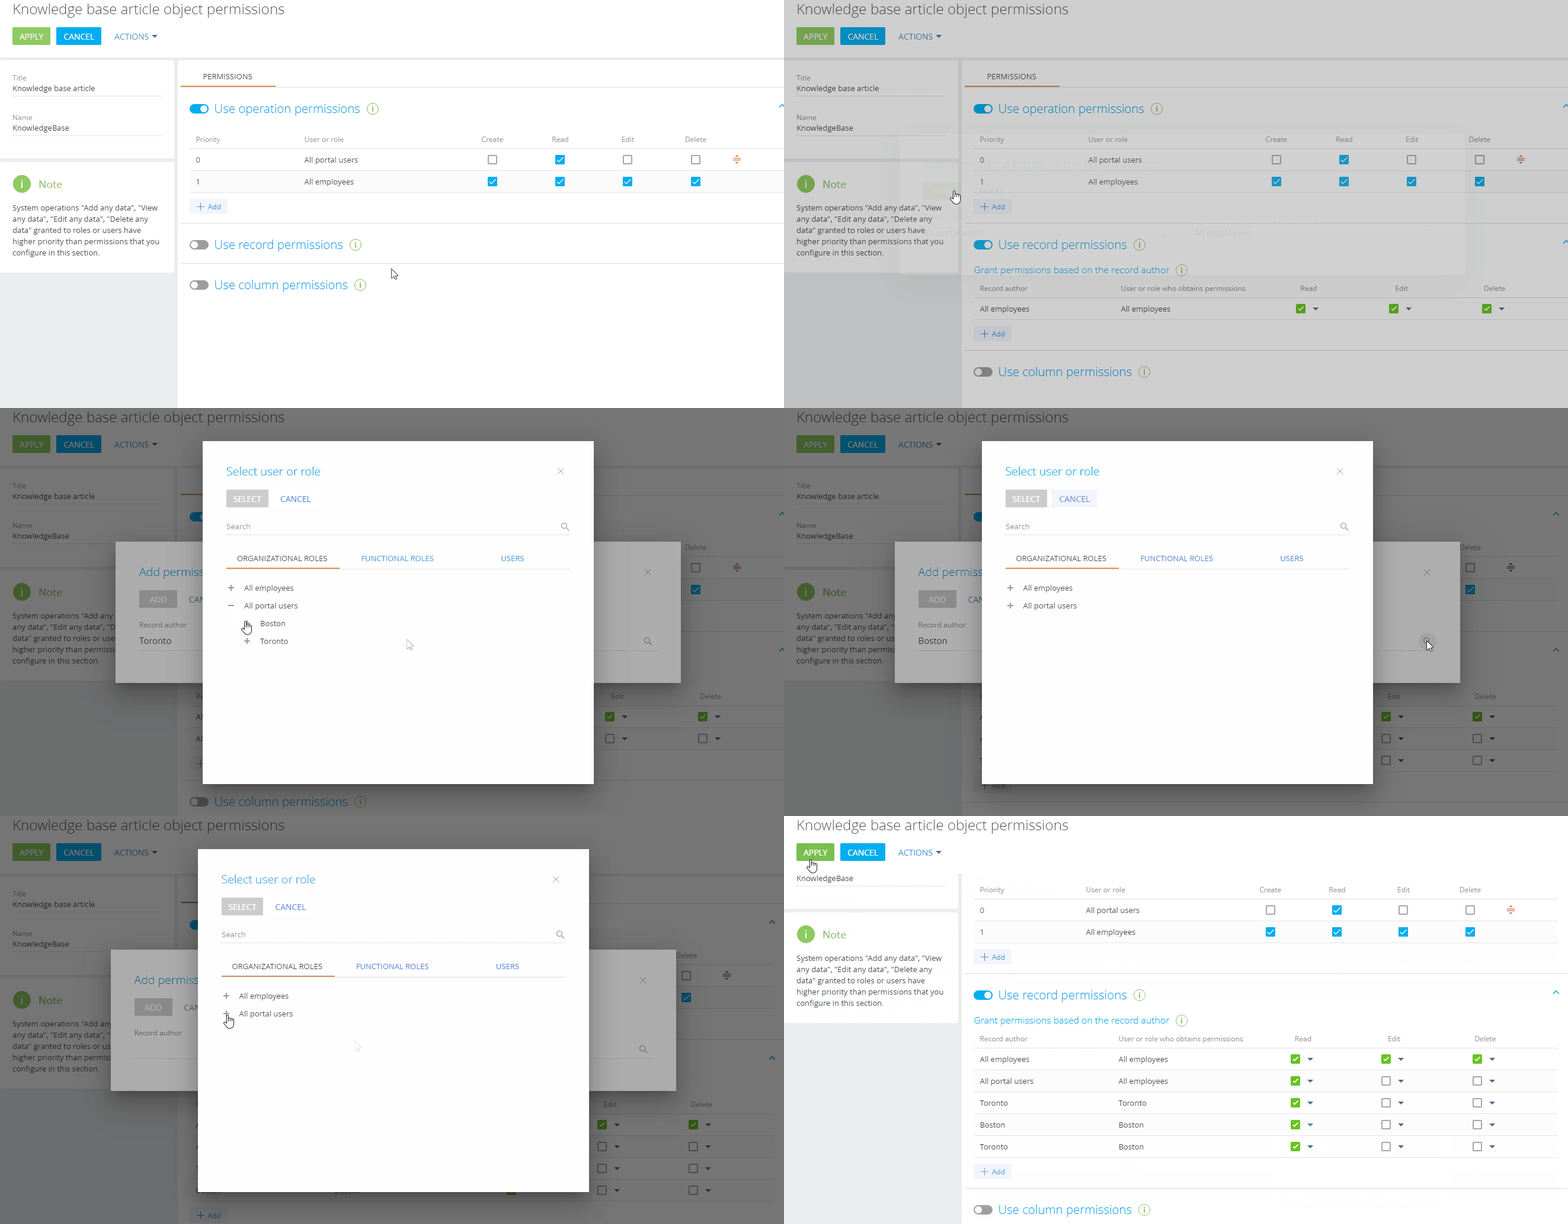
As a result, the users in Toronto will be able to see the knowledge base articles created by portal users from Boston.
Before you set up record permissions in an object, make sure that portal users have access to corresponding object operations.
Set up column permissions on the portal
You can manage access to specific columns in sections, details, and lookups for portal users by setting up column permissions for the needed user or role. Setting up permissions for portal users is similar to that of regular users. Learn more: Set up column permissions.
For example, hide the Modified on column to deny portal users and roles permission to view the date when the knowledge base articles were last updated (Fig. 18).
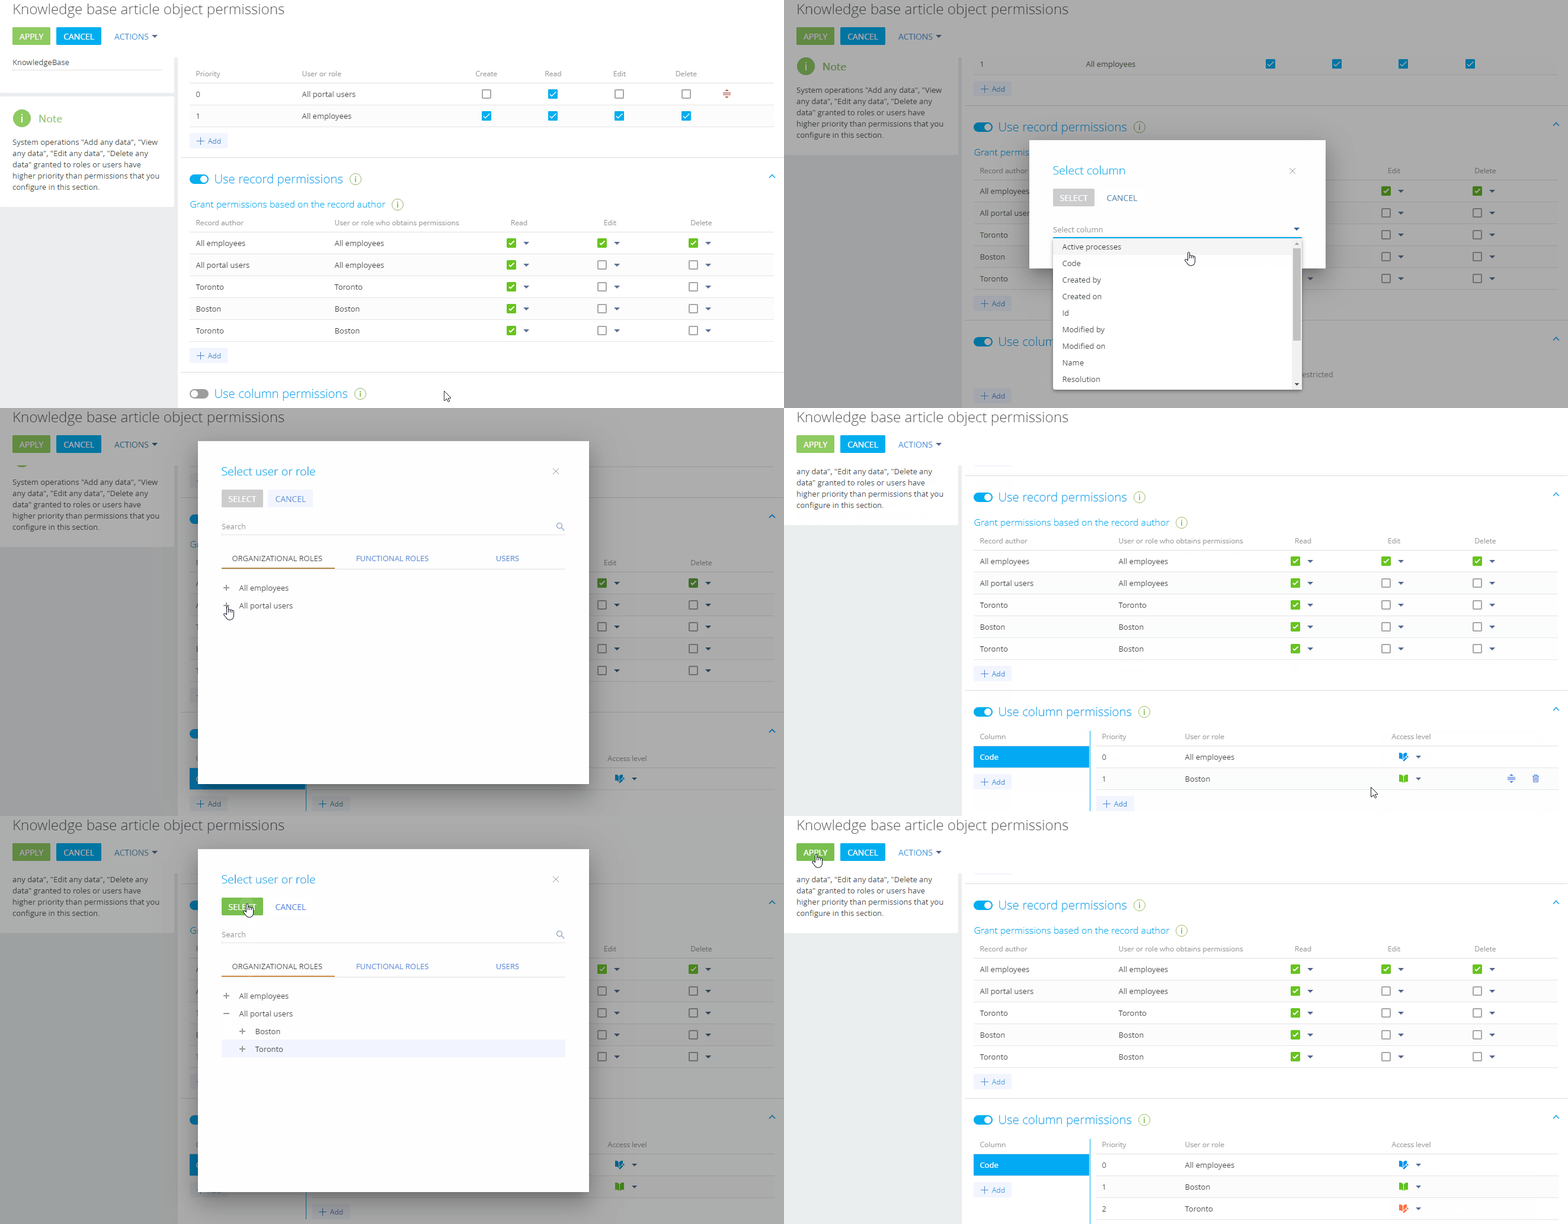
As a result, the users in Toronto will not be able to see the "Modified on" column on the knowledge base article pages.
Before you set up column permissions in an object, make sure that portal users have access to corresponding object operations and records.