You can enhance the performance of large-scale Creatio projects (up to several thousand users) through horizontal scaling, i. e., by increasing the number of servers with deployed Creatio applications and setting up workload distribution between them.
The load balancer may be either hardware or software. To work in fault-tolerant mode, use an HTTP/HTTPS traffic balancer that supports the WebSocket protocol. Creatio has been tested on the HAProxy software load balancer. There are cases of successful implementation of other balancers, e. g., Citrix, Cisco, NginX, FortiGate, Microsoft ARR.
This guide covers horizontal scaling of Creatio using a free open-source load balancer (HAProxy), designed for distributing the load between several application servers.
General deployment procedure
Creatio .NET Framework
To deploy Creatio using the horizontal scaling of .NET Framework application servers:
-
Deploy the required number of Creatio application instances in a web farm.
-
Specify identical SQL and Redis databases in the ConnectionStrings.config file for all instances.
-
Add the following key in the <appSettings> block of the application’s Web.config file:
The “value” number must be identical for all Creatio instances of the web farm.
- Generate a unique machineKey value for one of Creatio instances. Learn more in a separate article: Modify Web.config. Copy the resulting value and specify it in the Web.config files of each Creatio instance. You can locate the files in the root Creatio folder and the Terrasoft.WebApp folder.
-
Turn on clustering for all schedulers in the <quartzConfig> block of every node's external configuration file (Web.config):
-
If the instanceId settings collide, specify unique values for each scheduler node.
The ways to specify unique instanceId values are as follows:
-
Add the following string to all schedulers in the <quartzConfig> block of every node’s external configuration file (Web.config):
As a result, the scheduler will generate the unique node name based on the <node name>+timestamp template.
- Add unique quartz.scheduler.instanceId values manually.
-
-
Set the “value” attribute of the quartz.jobStore.clustered setting to “true.”
- Grant access permissions to created application directories for the IUSR user and the user who launches the Application pool in IIS.
- Set up a load balancer (e. g., HAProxy) to distribute the workload between the deployed application servers.
-
If necessary, set up load balancing for database and session servers.
Creatio .NET Core
To deploy Creatio using the horizontal scaling of .NET Core application servers:
- Deploy the required number of Creatio application instances.
- Specify identical SQL and Redis databases in the ConnectionStrings.config file for all instances.
- Go to the root directory of any Creatio instance and locate the Terrasoft.WebHost.dll file.
-
Run the following command:
As a result, configuration files of the current application instance will be updated.
-
Enable clustering for all schedulers in the <quartzConfig> block of every node's external configuration file (Terrasoft.WebHost.dll):
-
If the instanceId settings collide, specify unique values for each scheduler node.
The ways to specify unique instanceId values are as follows:
-
Add the following string to all schedulers in the <quartzConfig> block of every node’s external configuration file (Terrasoft.WebHost.dll):
As a result, the scheduler will generate the unique node name based on the <node name>+timestamp template.
- Add unique quartz.scheduler.instanceId values manually.
-
-
Set the “value” attribute of the quartz.jobStore.clustered setting to “true.”
- If necessary, set up load balancing for the database and session servers.
- Copy all configuration files of the current application instance to the root folders of other application instances.
- Set up a load balancer (e. g., HAProxy) to distribute the workload between the deployed application servers.
Install the HAProxy balancer
The HAProxy load balancer supports a range of free open-source OS. This guide covers one of the simpler methods of deploying HAProxy on the Debian OS via the haproxy.debian.net service.
- Open the installation service page by clicking https://haproxy.debian.net/.
-
Select the OS and its version, as well as the HAProxy version.
As a result, the service will generate a set of HAProxy installation commands to run in the Debian OS.
Fig. 1 HAProxy installation commands generated by the haproxy.debian.net service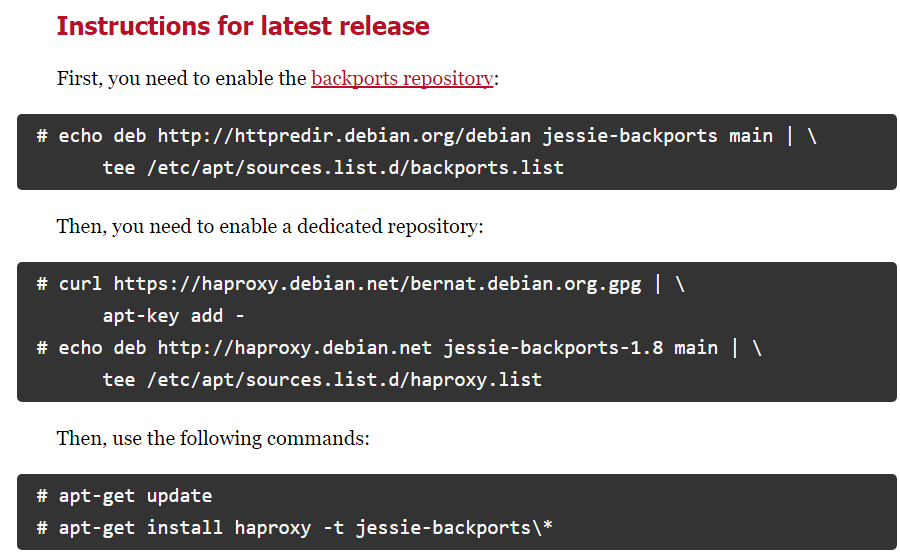
- Run the generated commands one after another.
Set up the HAProxy balancer
To set up HAProxy, modify the haproxy.cfg file. Follow this path to locate the file:
Primary setup (required)
Add the sections required for HAProxy operation: frontend and backend.
The frontend section
Add the following settings to the frontend section: bind and default_backend.
- Specify the address and the port that will receive requests distributed by HAProxy in the bind setting.
- Specify the name that will match the name of the backend section in the default_backend option.
As a result, the setting will look as follows:
The backend section
Add the following required settings to the backend section:
- Specify the type of balancing, e. g., roundrobin, in the balance parameter. Learn more about the different types of balancing in the HAProxy documentation.
- Use the server parameter to specify all servers (or nodes) that distribute the load.
Add a unique “server” parameter that contains the server address, port address, and weight for each server (i. e. the deployed Creatio instance). The server weight enables the balancer to distribute the load based on the physical capabilities of the servers. The higher weight you specify for the server, the more requests it will receive. For example, if you need to distribute the load between 2 Creatio application servers, add 2 “server” parameters to backend:
As a result, the setting will look as follows:
The new settings will be applied as soon as you restart HAProxy. Use the following command to restart HAProxy:
Check the server status
The HAProxy balancer works with the following server statuses:
| Status | Description |
|---|---|
| UP | The server is operational. |
| UP - transitionally DOWN | The server is considered operational at the moment, but the last health check has failed. As a result, the server is currently switching to the DOWN status. |
| DOWN - transitionally UP | The server is not considered operational at the moment, but the last health check has succeeded. As a result, the server is currently switching to the UP status. |
| DOWN | The server is not operational. |
Health checks initiate changes in a server’s operational status. The simplest health check requires adding the “check” keyword to the server setup string. Running the health check requires the server’s IP and TCP port. Health check example:
Set up web stats (optional)
To turn on web stats, add a new listen section that contains the following parameters: bind, mode http, stats enable, stats uri. The section will look as follows:
As a result, you will be able to view the web stats of Creatio load balancing in the browser.
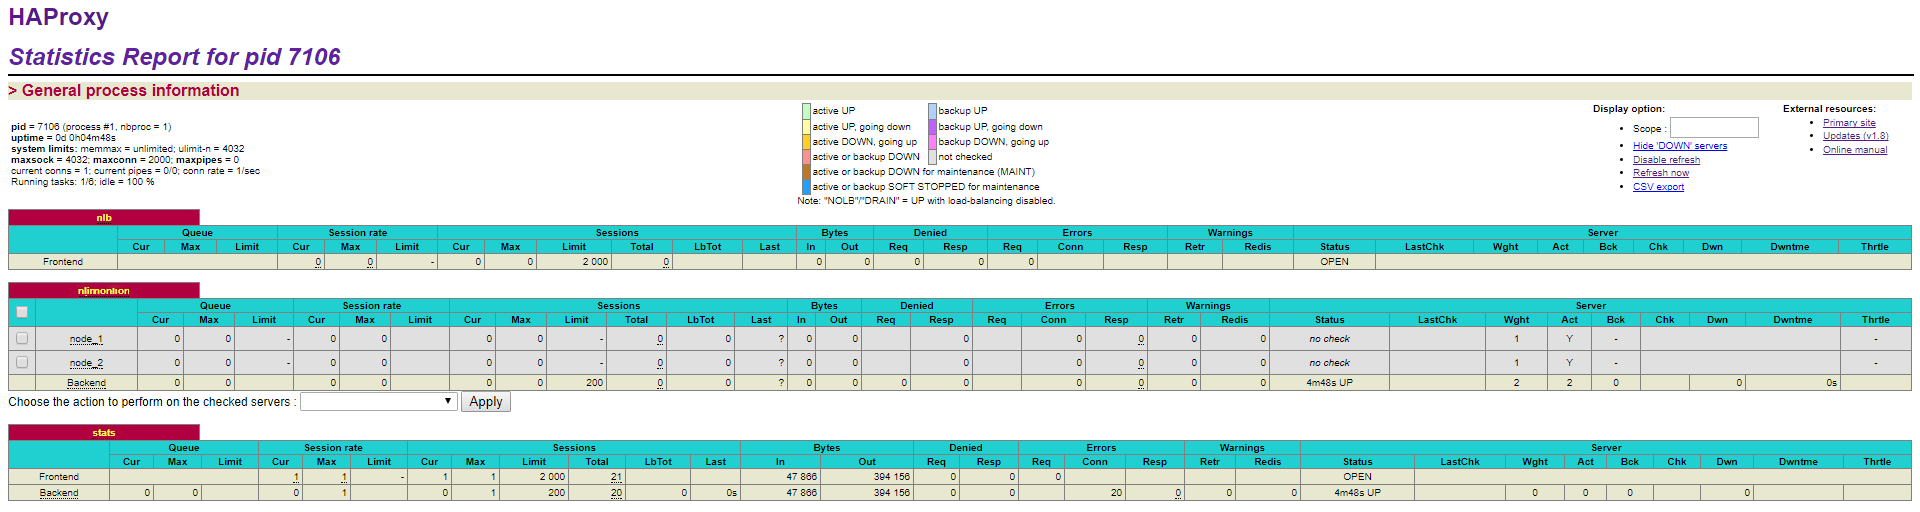
To view the stats, follow the path: balancer address:9000/haproxy_stats.
Set up the IP addresses in the audit log for .NET Core (optional)
With a web farm, user requests reach the servers through a load balancer and/or a proxy server. As such, by default, the audit log displays the IP address of the proxy that forwarded the request last, not the actual IP address of the user.
You can configure the audit log so that it displays the actual IP address of the user. To do this:
- Configure the balancer so that each request it forwards to one of the Creatio application instances has a header with “ForwardedForHeaderName” name and the user’s IP address value.
-
Modify the configuration files of Creatio application instances accordingly.
- Go to Creatio root directory and open appsettings.json.
-
Edit the “ForwardedHeaders” section so that it reads:
Where:
“Enable” turns on the Forwarded headers processing function in the web application.
“ForwardedForHeaderName” is the name of the header that contains the IP address.
“KnownProxiesIP” is the trusted IP address list. Creatio processes the “ForwardedHeader” value only if it receives a request from these IP addresses. They сфт belong to the load balancer, reverse proxy, etc. If you leave this value empty, Creatio processes the “ForwardedHeader” value received from any IP address.
Example“ForwardLimit” is the limit of IP addresses in the “X-Forwarded-For” processed header. The parameter adds more protection from incorrectly setup proxy servers and malicious requests received from third-party network channels. Proxy servers write their IP addresses to the end of the “X-Forwarded-For” header when forwarding requests. For example, the “X-Forwarded-For” header can have the following IP address chain: ip1, ip2, ip3, ip4. In this case:
- ip1 is the client (browser) address.
- ip2 and ip3 are proxy server addresses.
- ip4 is the balancer address.
If you set “ForwardLimit” to 4, the web server receives all 4 addresses. If you set it to 3, the web server receives only the last 3 IP addresses, i. e., ip2, ip3, and ip4.
The default value is 3. If you have the “KnownProxiesIP” parameter set up, you can set the “ForwardLimit” parameter to null.
- Repeat steps a-b for all Creatio application instances in your web farm.