Bulk emails of the Email section are sent once to a set number of recipients and enable you to actively engage your customers. Use bulk emails to notify your customers about news, promo offers and discounts that might be of interest to them.
Fill out the bulk email data
- Go to the Email section.
- Click New and select Bulk email.
Fill out the fields on the page of the new record (Fig. 1):
Fig. 1 Adding a bulk email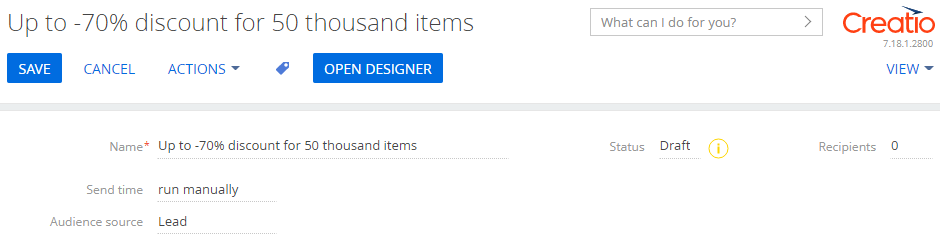
- Name – specify the name of the new bulk email. The name will be displayed in the Email section list only, the recipients will not see it.
- Send time – specify how and when the bulk email will be sent. This field has two options:
- Run manually – the bulk email will be sent when you click the Start sending button;
- At the specified time – the bulk email will be sent automatically at a specified time. If you select this option, additional required fields will appear to the right. Use these fields to specify the date and time when your bulk email should start being sent.
- Audience source – the contacts linked to this object will be imported to the bulk email's audience. “Contact,” “Lead,” “Event participant” objects are available by default. You can also add new objects yourself. Learn more: Set up objects that form email audience.
- Set up the email template in the content designer. Learn more: Create an email template.
- Specify the email information on the Parameters tab.
Email type – specify the type of your email, e. g., “Focus email” or “Newsletter.”
The email type is used for implementing subscriptions to different types of content.
- System email – select this checkbox if the current email is not a marketing email. In this case, Creatio will ignore the Do not use email checkbox on the Communication channels detail of the recipients’ contact records and will send emails to all contacts from the email audience.
Add bulk email audience
Use the Audience tab to set up the list of recipients for a bulk email. You can add contacts as well as other object records to the audience, e. g., leads or campaign participants. You can add multiple recipients to the email.
To add email audience:
- Navigate to the Audience tab of the email page, click
 and select the type of object to form the audience, e. g., lead, contact, or campaign participant. If the Audience tab of an email already has participants, you can only select the object whose records the current participants are based on.
 - Select records for adding to the email audience manually, from a filter, or from a folder on the newly-opened page.
- To add records manually, select them in the list.
- To add records from a folder, select Show folders in the Filters/folders menu. In the folder tree, select the needed folder. Learn more about how to work with folders: Folders. Additionally, you can set up a standard filter for the folder records.
- To select records using a filter, select Switch to advanced mode in the Filters/folders menu. Set up filters. For example, if you are adding an audience from the leads, you can select only qualified leads with a specific need type. Note that you can only save the configured filter for objects where folders are available. Learn more about how to work with filters: Filters.
- Click Import.
- To add all records that meet the filter conditions to the email audience, select the Import by filter option in the menu that appears.
- To add the records selected manually, click Import selected in the menu that appears.
This will add all the recipients to the email audience.
- If you import the selected records or records from a folder, all the participants will be added to the Audience tab simultaneously.
- If you import the filtered records, they will add to the Audience tab one by one. You can see the import status on the email page.

You can check the exact number of the added records in a notification on the communication panel.
If the import fails, you will see an error message in the communication panel.
The Audience tab displays the contact name and the email of the recipient, as well as the Extended entity column. If you hover over the column value, a mini page appears. It displays the details of a record (e. g. a lead or an event) used to import the recipient. If you click the link in the Extended entity column, you will open the page of the record used to import the recipient.
Check duplicates in the email audience
When adding an email audience, Creatio does not verify the audience duplicates. We recommend checking the audience manually before sending emails. To do this:
- Navigate to the Audience tab, click
 and select Manage audience.
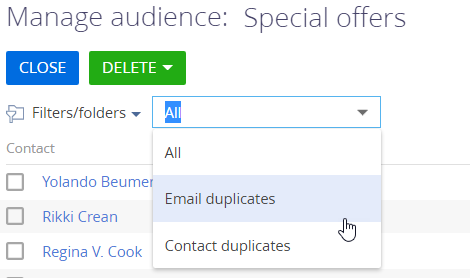
 - Set the filter (Fig. 5):
- “Email duplicates” – the filter displays the email participants with similar email addresses, as well as those without email addresses specified.
- “Contact duplicates” – the filter displays email participants with similar contact full names.
- “All” – the filter displays all email participants.
- Select any duplicate records and click Delete. In the menu that appears, click Delete selected records.
- Click Close to leave the audience managing page.
Delete bulk email audience
You can select email participants by selecting separate or all records. You can only delete the audience for emails that have not been started.
To delete several recipients:
- Navigate to the Audience tab, click
 and select the Select multiple records option.
 - Select the email participants that you want to delete.
- In the
 button's menu, click Delete selected records.
To delete all records, click Remove audience in the ![]() button's menu. After you delete the audience, blocking of the object selection for the import of email participants will be removed. When you add an email audience next time, you will be able to select any object and not only the object that has already been used for the email.
button's menu. After you delete the audience, blocking of the object selection for the import of email participants will be removed. When you add an email audience next time, you will be able to select any object and not only the object that has already been used for the email.
How to set up bulk email click tracking
Add the UTM tracking codes to the email to receive information about the number of clicks from the email. For instance, you can track the number of leads received from the email.
- Go to the Parameters tab on the email page.
- Select the Use UTM tracking codes checkbox in the Email-to-website click tracking block. Specify the UTM tracking codes of the email: “utm_source,” “utm_campaign,” and “utm_medium.”
- Specify the list of domains for which the tracking codes will be applied when generating the click link in the “List of domains” field. You can specify multiple domains using commas (,).
- Save the changes.